Sign In
Upload
Manuals
Brands
GE Manuals
Medical Equipment
Giraffe OmniBed
GE Giraffe OmniBed Manuals
Manuals and User Guides for GE Giraffe OmniBed. We have
1
GE Giraffe OmniBed manual available for free PDF download: Service Manual
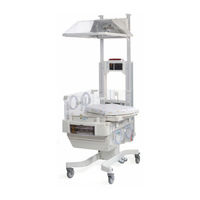
GE Giraffe OmniBed Service Manual (270 pages)
Brand:
GE
| Category:
Medical Equipment
| Size: 20.05 MB
Table of Contents
Table of Contents
3
About this Manual
15
Scope and Intended Users
15
Conventions
15
References
16
Symbol Definitions
16
User Responsibility
18
Important
18
Technical Competence
19
Warnings
19
Cautions
20
Chapter 1: Functional Description
29
Control Board
29
Figure 1-1 Block Diagram
30
Relay Board
31
Display Driver Board / el Display
32
LED Board
33
Power Supply
33
Peripheral Components
33
Rail and Heater Door Switches
34
Datalink Option
34
Servo Controlled Oxygen Option
35
Humidifier
37
Figure 1-2 Humidifier
37
Chapter 2: Service Checkout
39
Setup
39
Mechanical Checks
39
Controller Checks
40
Humidity Check
42
Servo Controlled Oxygen Check
42
Leak Check
42
Pre-Use Checkout
42
Supply Valve Leak Test
43
Scale Check
44
Mechanical Check
44
Weight Checks
44
Center Weight Check
44
Off Center Weight Check
45
Other Accessory Checks
45
Cable Connections and Mechanical Controls
46
Figure 2-1 Connections and Controls
46
Chapter 3: Calibration and Maintenance
49
Service Maintenance Schedule
49
Figure 3-1 Control Board Test Points
50
Special Tools
51
System Calibration
51
Line Voltage Calibration
52
Humidifier Calibration
53
Servo Controlled Oxygen Calibration
54
Scale Calibration
54
Leakage Current
55
Ground Resistance Check
55
Chapter 4: Troubleshooting
57
Startup Sequence
57
Service Screen
58
Figure 4-1 First Service Screen
58
Figure 4-2 Second Service Screen
59
Figure 4-3 Status Menu
59
Figure 4-4 Switch Diagnostic Diagram
60
Figure 4-5 Pedal Screen
60
Figure 4-6 Service Screen
61
Alarm Messages
62
Air Probe Failure" Alarm
62
Air Temp >38C" or "Air Temp >40C" Alarm
62
Baby Hot" or "Baby Cold" Alarm
62
Baby Mode Disabled" Alarm
63
Baby Probe 1 Failure" or "Baby Probe 2 Failure" Alarm
63
Bad Membrane Switch" Alarm
63
Bed Heater Failure" Alarm
64
Bed Up/Down Pedal Failure" Alarm
64
Bed Up/Down Pedal Switches Disabled" Alarm
64
Canopy Pedal Disabled" Alarm
65
Canopy Pedal Failure" Alarm
65
Canopy Pedal Pressed" Alarm
65
Down Pedal Pressed" Alarm
65
Fan Always in High Speed" Alarm
66
Fan Failure" Alarm
66
Heater Doors Not Closed" Alarm
67
Heater Doors Not Opened" Alarm
67
Humidifier Failure" Alarm
68
In Transition - Heat Off" Alarm
69
Motor Drive Failure" Alarm
69
Power Failure (LED Indicator)
70
Radiant Heater Failure" Alarm
70
Temperature out of Calibration" Alarm
70
Up Pedal Pressed" Alarm
71
Error Codes
71
System Failure 0
71
System Failure 1
72
System Failure 2
72
System Failure 3
72
System Failure 5
72
System Failure 6
73
System Failure 7
73
System Failure 8
73
System Failure 11
73
System Failure 12
74
System Failure 13
74
System Failure 14
74
System Failure 15
74
System Failure 16
76
System Failure 17
76
System Failure 18
76
System Failure 19
77
System Failure 20
77
System Failure 22
77
System Failure 23
78
System Failure 25
78
System Failure 26
78
System Failure 27
79
System Failure 28
79
System Failure 29
79
System Failure 30
79
System Failure 33
80
System Failure 34
80
System Failure 35
80
System Failure 36
80
System Failure 37
81
System Failure 38
81
System Failure 50
81
System Failure 51
81
System Failure 52
82
System Failure 53
82
System Failure 55
82
System Failure 60
82
System Failure 98
82
System Failure 99
82
Troubleshooting Symptoms
83
Additional Troubleshooting Tips
86
Raising and Lowering the Canopy or Elevating Base
86
Incubator Heaters and Bed Safety Thermostat
87
Radiant Heater
87
Power Supplies
87
Switches/Thermostat
88
Humidifier Heater/Safety Thermostat
89
Compartment Air Probe and Patient Probes
89
Heat Sink Sensor Thermistor
90
E-Base Motor and Canopy Motor
90
Rail Lift Belt Failure
91
Troubleshooting the 50 Pin Ribbon Cable
92
Troubleshooting the Toroidal Transformer
92
Interpreting Serial Numbers
92
Servo Controlled Oxygen
93
Servo Controlled Oxygen Service Screen
93
Figure 4-7 Servo Controlled Oxygen Service Screen
93
Servo Controlled Oxygen Alarm Messages
94
Servo Controlled Oxygen Troubleshooting Tips
97
Check Supply Valves and Endcap Safety Valve
97
Check Calibration Valve/Calibration Fan
97
Check Cooling Fan
98
Sensor Housing Temperature Sensor Temperature to Resistance Curve
98
Chapter 5: Repair Procedures
99
Canopy Removal for Replacement
99
Figure 5-1 Heater Housing Cover and Soffit
100
Figure 5-2 Original Seal Parts
101
Figure 5-3 Nuts
101
Figure 5-4 Access Holes
102
Figure 5-5 Canopy, Bracket, and Heater Housing
102
Figure 5-6 Two People Needed for this Step
103
Servicing the Canopy Seals
104
Figure 5-7 Canopy Seals and Extrusions
104
Figure 5-8 Wedging a Blunt Object to Keep Seal Open
105
Servicing Original Canopy Seals
105
Figure 5-9 Enhanced Seal Parts
106
Figure 5-10 West Side Seal Parts
107
Figure 5-11 Using North Seal to Help Position Washers
107
Figure 5-12 Seal Cross-Section
108
Figure 5-13 North Seal Parts
109
Figure 5-14 Beveled Side of North Spacer Toward Canopy
109
Figure 5-15 Hole Fill Assembly (2X) for Canopies with Six Holes Across North End
110
Figure 5-16 South Seal Parts
111
Figure 5-17 South Corner Parts
112
Figure 5-18 North Corner Parts
112
Figure 5-19 Installing Rail Spacers
113
Figure 5-21 Soffit
115
Figure 5-22 Trimming the Soffit
115
Figure 5-23 Untrimmed and Trimmed Soffit
116
Servicing Enhanced Canopy Seals
117
Porthole Door Replacement
118
Right Rail Assembly Repair Procedures
118
Removing the Right Upright (Motor Side)
118
Figure 5-24 Disconnecting Heater Door Cable
119
Figure 5-25 Upright Decorative Strips, End Caps, and Wire Covers
120
Figure 5-26 Removing the Lift Motor
121
Figure 5-27 Display Module Disassembly
121
Removing the Left Upright
122
Right Rail Internal Repairs
124
Removing the Inner Rail Assembly
124
Figure 5-28 Right Upright Disassembly
124
Replacing Rollers and Tension Springs
125
Figure 5-29 Rollers and Tensioning Spring
125
Separating the Lift Rail from the Belt Channel
126
Replacing the Rail Drive Belt
126
Figure 5-30 Replacing the Drive Belt
126
Replacing the Rail Buoyancy Springs
127
Figure 5-31 Replacing the Rail Buoyancy Springs
127
Replacing the Slip Clutch or Motor Roll Pin
128
Reassembling the Right Upright
128
Left Rail Internal Repairs
130
Removing the Inner Rail Assembly
130
Figure 5-32 Left Inner Rail
130
Replacing the Rail Buoyancy Springs
131
Figure 5-33 Left Rail Springs and Spools
131
Replacing Rollers, Tension Springs, and Cable Carrier Links
132
Reassembling the Left Upright
132
Figure 5-34 Re-Attaching the Upright
132
Replacement of the Left Upright Heater Wire Harness/Cable Carrier Assembly
134
Removing and Disassembling the Rail
134
Removing the Old Harness Assembly from the Left Rail
134
Figure 5-35 Cable Guard Latch
135
Figure 5-36 3-Pin MAT-N-LOK Connector and Bushing
135
Reinstalling the New Harness on the Left Rail
136
Figure 5-37 Cable Tie
136
Removing the Old Harness from the Cable Carrier Channel
137
Installing the New Harness on the Cable Carrier Channel
137
Figure 5-38 Connector Drawing
137
Figure 5-39 Opened Cable Guard Latches
137
Figure 5-40 Correct and Incorrect Cable Tie Usage
138
Figure 5-41 Lift Rail and Cable Carrier Channel Together
138
Reassembly
139
Radiant Heater Assembly Repair Procedures
139
Removing the Canopy/Heater Assembly
139
Figure 5-42 Canopy Alignment
140
Realigning the Canopy
141
Replacing the Radiant Heater
142
Figure 5-43 Radiant Heater Disassembly
142
Heater Door Spool Assembly
144
Figure 5-44 Heater Door Cable Adjustment
144
Heater Door Cable Adjustment
145
Spring Tube Assembly Replacement
146
Figure 5-45 Securing String to the Spring Tube
146
Figure 5-46 Removal of the Lower M5 Nut
147
Figure 5-47 Dog Point of the Set Screw
148
Compartment Air Probe Repairs
149
Figure 5-48 Compartment Air Probe Disassembly
149
Removing the Upper End Cap Spring
150
Figure 5-49 Top Rail End Cap
150
Lower Unit Repairs
151
Removing the Chassis Cover with the Storage Drawer in Place
151
Incubator Fan, Fan Motor, and Optical Fan Sensor
152
Figure 5-50 Bed Disassembly
152
Figure 5-51 Heat Sink and Fan
153
Figure 5-52 Fan Motor
153
Incubator Heater Replacement
154
Figure 5-53 Elevating Base
154
To Remove the Incubator Heater Closest to the Foot of the Bed
155
To Remove the Incubator Heater Closest to the Head of the Bed
155
Elevating Base
156
Chassis Replacement
157
Figure 5-54 Chassis Bottom Cover
157
Bed Up/Down Pedal Switch
158
Canopy Pedal Switch
158
Canopy Membrane Switch Replacement
158
Bed Tilt Brake Pad Replacement
160
Figure 5-55 Replacing the Tilt Brake Pad
160
Caster Replacement
161
Humidifier Assembly Repairs
161
Tips for Repairing an Old Style Unit
162
Disassembly
162
Figure 5-56 Humidifier Parts
163
Reassembly
164
Controller and Display Module Procedures
165
Display Module
165
Figure 5-57 Display Module
165
Probe Panel
166
Figure 5-58 Probe Panel
166
Battery
167
Controller Components
168
Figure 5-59 Electronics Enclosure
168
Control Board
169
Power Supply
169
Relay Board
169
Solid State Relays
169
Canopy Lift Motor, ISO Transformer, Circuit Breakers, Power Switches, and Power Outlets
170
Toroidal Transformer
170
Servo Controlled Oxygen Service Procedures
171
Installing Oxygen Sensors
171
Replacing the Vent Screen
171
Figure 5-60 Installing Sensors
171
Sensor Housing Repairs
172
Sensor Housing Repairs: Boards, Calibration Fan Assembly, and Sensor Plug Assembly
172
Figure 5-61 Sensor Housing
172
Sensor Housing Repairs: Calibration Valve
173
Valve Housing Repairs
174
Valve Housing Repairs: Regulator Assembly
174
Figure 5-62 Valve Housing
174
Valve Housing Repairs: Supply Valves
175
Endcap Safety Valve
175
Figure 5-63 Endcap Safety Valve
175
Servo Oxygen Board Repairs
176
Chapter 6: Illustrated Parts
177
Exploded Views
177
Probe Housing, Display Module, and Electrical Enclosure
178
Figure 6-1 Probe Panel Assembly
179
Figure 6-2 Display Module
181
Figure 6-3 Electrical Enclosure
183
Figure 6-4 Humidifier Transformer and RS232 Option
185
Bed and Side Panels
186
Figure 6-5 Bed
187
Figure 6-6 Side Panel (East/West)
189
Figure 6-7 Rear (North) and Front (South) Wall
191
Radiant Heater and Canopy
192
Figure 6-8 Radiant Heater
193
Figure 6-9 Canopy
195
Figure 6-10 Original Canopy Seal Parts
196
Figure 6-11 Enhanced Canopy Seal Parts
197
Figure 6-12 Heater Doors
199
Chassis
200
Figure 6-13 Upper Chassis
201
Figure 6-14 Lower Chassis
203
Humidifier
204
Figure 6-15 Humidifier Assembly
205
Elevating Base
206
Figure 6-16 Base and Elevating Column
207
Uprights and Lift Rail Components
208
Figure 6-17 Right (East) Upright Parts, Motor Side (Complete East Rail Assembly: 6600-0290-850)
209
Figure 6-18 Belt Channel - 1 (Lift Motor Side)
211
Figure 6-19 Belt Channel - 2 (Lift Motor Side)
213
Figure 6-20 Lift Rail (both Sides)
215
Figure 6-21 Rail End Caps
217
Figure 6-22 Left (West) Upright (Complete West Rail Assembly: 6600-0290-851)
219
Compartment Air Probe
220
Figure 6-23 Compartment Air Probe
221
Servo Control Oxygen
222
Figure 6-24 Servo Control Oxygen Sensor Housing Assembly (Servo O2 Upgrade Kit 6600-0678-800)
223
Figure 6-25 Servo Control Oxygen Valve Housing
225
Figure 6-26 Expansion Chamber/Heatsink Vent
226
Figure 6-27 Servo Control Oxygen Cooling Fan
227
Figure 6-28 Servo Control Oxygen PC Board
228
Figure 6-29 Manifold Endcap Safety Valve
229
Storage Drawer
230
Figure 6-30 Storage Drawer
230
Figure 6-31 Instrument Shelf (6600-0865-700)
231
Figure 6-32 Monitor Shelf (6600-0824-800)
232
Figure 6-33 E-Cylinder Holder (6600-0836-800)
233
Figure 6-34 Tubing Management Arm (6600-0837-800)
234
Figure 6-35 Dovetail Mount DIN Rail (6600-0659-803)
235
Figure 6-36 Silo Support Assembly (6600-0853-800)
236
Figure 6-37 Rotating I.V. Pole Assembly (6600-0851-800)
237
Figure 6-38 Dovetail Extension (6600-0852-800)
238
Accessories
239
Labels
240
PCB Layouts
245
Figure 6-39 Control Board (6600-0212-850)
245
Figure 6-40 Display Driver Board (6600-0213-850)
246
Figure 6-41 Relay Board (6600-0214-850) Revision Level 10 or Higher
247
Figure 6-42 Relay Board (6600-0214-850) Revision Level 9 or Lower
248
Wiring Diagrams
249
Figure 6-43 Wiring Diagram: Control Board
249
Figure 6-44 Wiring Diagram: Elevating Base and Canopy Lift Rails
250
Figure 6-45 Wiring Diagram: Electrical Enclosure
251
Figure 6-46 Wiring Diagram: Graphics Display
252
Figure 6-47 Wiring Diagram: Incubator Relay Board Rev 10 or Higher
253
Figure 6-48 Wiring Diagram: Incubator Relay Board 9 or Lower
254
Figure 6-49 Wiring Diagram: Radiant Heater Relay Board 10 or Higher
255
Figure 6-50 Wiring Diagram: Radiant Heater Relay Board 9 or Lower
256
Figure 6-51 Wiring Diagram: Servo Humidifier Relay Board 10 or Higher
257
Figure 6-52 Wiring Diagram: Servo Humidifier Relay Board 9 or Lower
258
Figure 6-53 Wiring Diagram: Servo Control Oxygen
259
Appendix A: Compartment and Skin Probe Characteristics
261
Appendix B: Specifications
263
Power Requirements
263
Accessory Outlets
263
Standards
263
Operating Environment
264
Storage Conditions
264
User Control Settings
264
Alarms
264
Performance
265
System
265
Humidity
265
Servo Control Oxygen
265
Weight Scale
266
Mechanical Specifications
266
Accessories
266
Appendix C: RS-232 Serial Data
267
Connector
267
Data Stream
267
Nurse Call
268
Advertisement
Advertisement
Related Products
GE Giraffe Blue Spot PT Lite
GE GA000940
GE GB000040
GE GB000050
GE GA000955
GE GA000810
GE GA000815
GE GA000100
GE GEH-ECG 1200
GE PD MiniTrap G-25
GE Categories
Refrigerator
Ranges
Microwave Oven
Air Conditioner
Dishwasher
More GE Manuals
Login
Sign In
OR
Sign in with Facebook
Sign in with Google
Upload manual
Upload from disk
Upload from URL