Sign In
Upload
Manuals
Brands
Carrier Manuals
Air Conditioner
WeatherMaker 48TCD/E16 Series
Carrier WeatherMaker 48TCD/E16 Series Manuals
Manuals and User Guides for Carrier WeatherMaker 48TCD/E16 Series. We have
1
Carrier WeatherMaker 48TCD/E16 Series manual available for free PDF download: Installation Instructions Manual
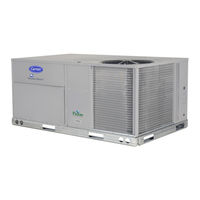
Carrier WeatherMaker 48TCD/E16 Series Installation Instructions Manual (60 pages)
Single Package Rooftop with Gas Heat/Electric Cooling
Brand:
Carrier
| Category:
Air Conditioner
| Size: 10.17 MB
Table of Contents
Table of Contents
1
Safety Considerations
2
General
3
Rated Indoor Airflow (Cfm)
3
Pre-Installation
3
Installation
16
Step 1 - Plan for Unit Location
16
Roof Mount
16
Step 2 - Plan for Sequence of Unit Installation
17
Curb-Mounted Installation
17
Pad-Mounted Installation
17
Frame-Mounted Installation
17
Step 3 - Inspect Unit
17
Step 4 - Provide Unit Support
17
Roof Curb Mount
17
For Sizes 07-14 Only
17
Slab Mount (Horizontal Units Only)
21
Alternate Unit Support
21
Slab Mount)
21
Step 5 - Field Fabricate Ductwork
21
Step 6 - Rig and Place Unit
21
Positioning on Curb
22
Step 7 - Convert to Horizontal and Connect
23
Ductwork (When Required)
23
Sizes
23
Size 16
24
All Units
24
Step 8 - Install Outside Air Hood
24
Economizer and Two-Position Damper Hood
24
Package Removal (Factory Option Sizes 07-14)
24
Two-Position Damper Hood Removal (Factory Option Size 16)
25
Economizer and Two-Position Damper Hood
25
Setup (Size 16)
25
Step 9 - Install Flue Hood
26
Step 10 - Install Gas Piping
26
Factory-Option Thru-Base Connections (Gas Connections) (Sizes 07-14)
27
Factory-Option Thru-Base Gas Connections (Size 16)
28
All Units
29
Step 11 - Install External Condensate Trap and
30
Line
30
Step 12 - Make Electrical Connections
30
Field Power Supply (Sizes 07-14)
30
Field Power Supply (Size 16)
31
All Units
32
Units with Factory-Installed Non-Fused Disconnect
32
Units Without Factory-Installed Non-Fused Disconnect
33
All Units
33
Convenience Outlets
34
All Units
35
Factory-Option Thru-Base Connections (Electrical Connections) (Size 07-14)
35
Factory-Option Thru-Base Connections (Electrical Connections) (Size 16)
36
Humidi-Mizer® Control Connections
38
Economi$Er® X (Factory-Installed Option)
41
Product Description
41
System Components
41
Specifications
41
Inputs
42
Outputs
42
Environmental
42
Economizer Module Wiring Details
42
S-Bus Sensor Wiring
43
Interface Overview
44
User Interface
44
Keypad
44
Menu Structure
44
Setup and Configuration
44
Time-Out and Screensaver
44
Enthalpy Settings
52
Two-Speed Fan Operation
52
Checkout
53
Troubleshooting
53
Premierlink™ Control
54
RTU Open Control System
54
Smoke Detectors
54
Completing Installation of Return-Air Smoke Sensor
54
Additional Application Data
54
Step 14 - Install Accessories
55
Step 15 - Check Belt Tension
55
Belt Force - Deflection Method
55
Belt Tension Method
56
Step 13 - Adjust Factory-Installed Options
55
Smoke Detectors
55
Economi$Er IV Occupancy Switch
55
Pre-Start and Start-Up
56
Troubleshooting the Ultra Tech™ Compressor
56
Modulation Control Input Specifications
56
Start-Up Checklist
59
Advertisement
Advertisement
Related Products
Carrier 48TC D/E17 Series
Carrier 48TC D/E20 Series
Carrier 48TC D/E24 Series
Carrier 48TC D/E28 Series
Carrier WeatherMaker 48TCD/E08 Series
Carrier WeatherMaker 48TCD/E09 Series
Carrier WeatherMaker 48TCD/E12 Series
Carrier WeatherMaker 48TCD/E14 Series
Carrier WeatherMaker 48TC*D08
Carrier WeatherMaker 48TC*D16
Carrier Categories
Air Conditioner
Heat Pump
Furnace
Thermostat
Chiller
More Carrier Manuals
Login
Sign In
OR
Sign in with Facebook
Sign in with Google
Upload manual
Upload from disk
Upload from URL