Panasonic KV-S1057C Operating Manual
Document scanner
Hide thumbs
Also See for KV-S1057C:
- Troubleshooting manual (6 pages) ,
- Service manual (255 pages) ,
- Quick start manual (5 pages)
Table of Contents
Advertisement
These instructions contain information on operating the scanner. Before reading these instructions, please read
the Quick Installation Guide enclosed with this unit.
Keep all documentation in a safe place for future reference.
Current model availability depends on your country/area. Please contact your dealer.
Operating Manual
Document Scanner
KV-S1057C
Model No.
KV-S1027C
KV-SL1066
KV-SL1056
KV-SL1055
KV-SL1036
KV-SL1035
Advertisement
Table of Contents

Related Manuals for Panasonic KV-S1057C


Summary of Contents for Panasonic KV-S1057C
- Page 1 Operating Manual Document Scanner KV-S1057C Model No. KV-S1027C KV-SL1066 KV-SL1056 KV-SL1055 KV-SL1036 KV-SL1035 These instructions contain information on operating the scanner. Before reading these instructions, please read the Quick Installation Guide enclosed with this unit. Keep all documentation in a safe place for future reference.
-
Page 2: Feature Highlights
Introduction Introduction Thank you for purchasing a Panasonic Document Scanner. Feature Highlights List of Available Features and Equipment S1057C S1027C SL1066 SL1056 SL1055 SL1036 SL1035 Scanning speed Simplex (pages/min.) Scanning speed Duplex (images/min.) Background color switch function Double feed detection... -
Page 3: Double Feed Detection Function
OK button or Start/Stop button . This scanner also has a function that starts scanning when you place documents on the feed tray (Touch Free Scanning). KV-S1057C and KV-S1027C KV-SL1066, KV-SL1056, KV-SL1055, KV-SL1036 and KV-SL1035 Card Scanning •... - Page 4 • The screen shots used in this manual may differ from the screens displayed on your computer. • The illustrations in this manual are based on the KV-S1057C. Trademarks • Microsoft, Windows, Windows Vista, and Internet Explorer are either registered trademarks or trademarks of Microsoft Corporation in the United States and/or other countries.
-
Page 5: About The Documentation
For details about viewing the help files, see "To view the help" (page 22). Software / Manual CD-ROM Contents — Device Driver — Drivers TWAIN — ISIS Panasonic proprietary application Applications Image Capture Plus for configuring advanced scanning settings — User Utility Utilities Scan Button Setting Tool —... -
Page 6: System Requirements
Introduction System Requirements Computer PC/AT or compatible machine with a CD-ROM drive ® Intel Core™ i5 2.5 GHz or higher ® Memory 4 GB or higher Interface USB 2.0 / USB 3.0 Note • For details about the system requirements, refer to [Read me first] in the Software / Manual CD-ROM. •... -
Page 7: Table Of Contents
Cleaning the Conveyor and Scanning Glasses ..............53 Cleaning the Double Feed Detectors and Starting Sensors ...........54 Cleaning the Rollers .......................55 Replacing the Rollers .....................60 Appendix ....................66 Troubleshooting ......................66 Error Messages (KV-S1057C and KV-S1027C only) .............69 Uninstalling the Software ....................70 Repacking Instructions ....................71 Specifications ........................72 Operating Manual... - Page 8 Table of Contents Index......................74 Operating Manual...
-
Page 9: Before You Start
Before You Start Before You Start Installation Precautions • Do not place the unit in direct sunlight, in a cold Illegal Duplication draft, or near heating apparatus. • Do not place the unit near apparatus which It is unlawful to make duplication of certain generate electronic or magnetic noise. -
Page 10: Roller Cleaning Paper
• For details about the roller cleaning paper, refer to the Material Safety Data Sheet (MSDS). Please ask your Panasonic sales company about obtaining the Material Safety Data Sheet. • To purchase the roller cleaning paper (KV-SS03), please contact your dealer, or call our Supplies and Accessories department at 1-800-726-2797 (U.S.A. -
Page 11: Check The Accessories
Before You Start Check the Accessories Check that all accessories are included before installing the unit. In the event that an item is missing, please contact your dealer. Accessories Name Notes USB cable — Software / Drivers, Applications, Utilities, Documents Manual CD-ROM When the unit is shipped, this is stored in the Mixed batch card guide... -
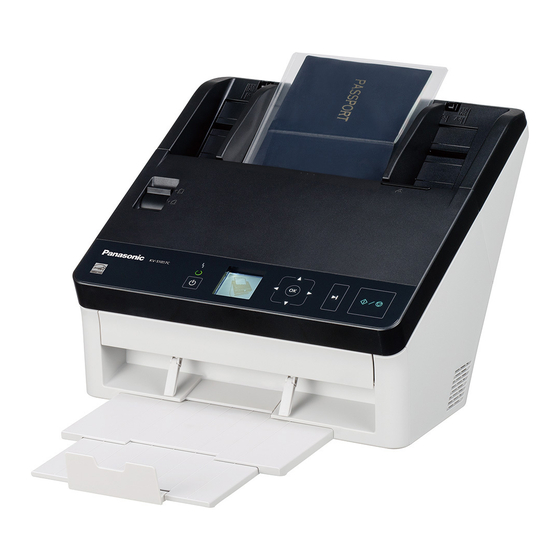
Page 12: Location Of Controls
Location of Controls Main Unit Front Document guides Mixed batch card guide Manual feed selector Switches the scanning method between continuous scanning (Auto) and manual scanning (Manual). Operation panel For details, refer to "Operation Panel and LED Indicators" (page 14). Exit tray Exit extension tray 1 Exit extension tray 2... -
Page 13: Rear
Location of Controls Rear Security slot Use a commercially available security cable. USB connector USB cable Connect the USB cable to the scanner and the other end of the USB cable to the computer. Power cord AC inlet Operating Manual... -
Page 14: Operation Panel And Led Indicators
Location of Controls Operation Panel and LED Indicators nKV-S1057C and KV-S1027C nKV-SL1066, KV-SL1056, KV-SL1055, KV-SL1036 and KV-SL1035 A LED (Red) Lights when an error occurs. B LED (Green) Shows the scanner’s status. C Power button Press the power button for more than one second to turn the unit off. D Cursor button E Skip button If you press this button after a double feed is detected and scanning has been paused, the document... - Page 15 If you press this button after a double feed is detected and scanning has been paused, the document (or documents) detected as a double feed will be ejected from the scanner without being scanned. Scanning will stop. n KV-S1057C and KV-S1027C only G LCD H OK button If you are using the scanner with Image Capture Plus, you can perform a push scan using the LCD.
-
Page 16: About Led
(except the power button) on the scanner’s operation panel to return to ready mode. The time until the scanner enters sleep mode can be changed in User Utility. For details about the error, refer to "Error Messages (KV-S1057C and KV-S1027C only)" (page 69) or check in User Utility. Operating Manual... -
Page 17: Installation
Installation Required Space Around the Scanner In order to ensure proper operation, install the unit maintaining the proper distances from surrounding objects, as shown in the following illustration. 400 mm (16 in.) 238 mm (9.4 in.) 272 mm (10.7 in.) 750 mm (30 in.) 300 mm... -
Page 18: Installing The Software
Installation Installing the Software Notice • Make sure to connect the unit to your computer after installing the software. Connecting the unit to your computer and turning on the unit’s power before installing the software may influence the software installation. If you connect the unit to your computer and turn on the unit’s power before installing the software by mistake, install the software after disconnecting the unit from your computer. - Page 19 Installation If you selected [Custom] for the installation type in step 4, select the item that you want to install. Note • If you select TWAIN or ISIS, Image Capture Plus will also be installed. Follow the instructions on the screen and complete the installation. •...
-
Page 20: Installing The Unit
Installation Installing the Unit Remove all packing tape and cushioning. Pull out the feed extension tray in the direction of the arrow shown in the illustration below. Set the exit tray. Raise the exit stopper. Operating Manual... - Page 21 Installation Pull out the exit tray (A) and the exit extension trays (B, C). Notice • Do not forcefully pull out the exit stopper, the exit tray, or the exit extension trays. Doing so may damage them. Plug in the power cord and connect the USB cable. Press the power button to turn ON the unit’s power.
-
Page 22: Viewing Operating Manual And Help Installed
6.0 or later for Windows. ® For Image Capture Plus Select [All Programs] ® [Panasonic] ® [Image Capture Plus] ® [Image Capture Plus Help]. For User Utility or Scan Button Setting Tool Select [All Programs] ® [Panasonic] ® [Scanner Tools]. -
Page 23: Operation
Operation Preparing Documents Notice • Make sure to remove paper clips and staples from documents before scanning. Failing to do so can damage the unit, document, or both. • It is recommended to confirm that documents and cards are suitable for scanning (paper size, thickness, type, etc.) before scanning them. -
Page 24: Recommended Paper Types
Operation Paper capacity for the feed tray: Number of Paper length (L) Combined thickness Paper weight sheets 64 g/m² (17 lb.) High-quality woodfree paper 54 mm £ L £ 297 mm 10 mm 75 g/m² (20 lb.) (2.1 in. £ L £ 11.7 in.) (0.4 in.) High-quality woodfree paper 80 g/m²... -
Page 25: Compatible Card Types
Operation Compatible Card Types The compatible card types for this unit are as follows. ISO format card: 85.6 ´ 54 mm (3.4 ´ 2.1 in.) Size: Thickness: 0.76 mm (0.03 in.) • Embossed cards are also compatible. When scanning embossed cards, it is recommended to place them in landscape orientation with the side to be scanned facing up. -
Page 26: Compatible Bound Documents (Manual Scanning Only)
Operation Compatible Bound Documents (Manual Scanning Only) Bound documents can be scanned by setting the manual feed selector to manual scanning (Manual). You can use an optional carrier sheet (KV-SS076) to scan passports using manual scanning. Passport size: The passport sizes compatible with this unit are as follows. Width: 140 mm (5.5 in.) or less Length:... - Page 27 Operation Put the passport in a carrier sheet. • Open the passport (A) to the page you want to scan, and then put the thinner part (the opened half with less pages) in the carrier sheet (B) first, as shown in the illustration. •...
- Page 28 Operation Insert the carrier sheet (A) until it stops as shown in the illustration. Note • When manual scanning (Manual) is selected, make sure to insert the documents until they come into contact with the paper feed roller. Start scanning. Note •...
-
Page 29: Incompatible Documents
Operation Incompatible Documents The following types of documents may not scan properly: • Torn or frayed documents • Curled, wrinkled or folded documents • Carbon paper • Perforated or punched paper • Non-rectangular or irregularly shaped paper • Coated paper •... -
Page 30: Notes About Documents For Scanning
Operation Notes about Documents for Scanning • Depending on the paper type, scanning results may be poor when you scan incompatible documents, or even documents that should be compatible. If scanned images are skewed, paper jams occur, or double feeding occurs, try scanning again after doing the following: –... -
Page 31: Switching The Background Color Of Scanned Images
Operation Switching the Background Color of Scanned Images Using the software, you can switch the background color of scanned images between white and black. For details, refer to the Image Capture Plus, TWAIN, or ISIS help. Operating Manual... -
Page 32: Continuous Scanning (Auto) And Manual Scanning (Manual)
Operation Continuous Scanning (Auto) and Manual Scanning (Manual) You can select either continuous scanning (Auto) or manual scanning (Manual) by using the manual feed selector. Bound documents can be scanned by setting the manual feed selector to manual scanning (Manual). Continuous scanning (Auto) This setting is for feeding documents one page at a time automatically. -
Page 33: Mixed Batch Card Guide
Operation Mixed Batch Card Guide No adjustment to the document guide is required when using the mixed batch card guide. The mixed batch card guide prevents a card from skewing when scanning paper documents and a card simultaneously. Installing the mixed batch card guide The mixed batch card guide is stored inside the feed tray. - Page 34 Operation Attach the feed tray (A) to the unit. Attach the mixed batch card guide (A) to the unit. Operating Manual...
-
Page 35: Removing The Mixed Batch Card Guide
Operation Removing the mixed batch card guide Remove the mixed batch card guide as shown in the following illustration. Remove the mixed batch card guide (A) from the unit. Remove the feed tray (A) from the unit. • Remove the left side of the feed tray (B) first as shown in the illustration. Operating Manual... - Page 36 Operation Attach the mixed batch card guide (B) to the feed tray (A). Attach the feed tray (A) to the unit. Operating Manual...
-
Page 37: Using The Mixed Batch Card Guide
Operation Using the Mixed Batch Card Guide Set paper documents on the feed tray, and a card on the mixed batch card guide respectively. • The card set on the mixed batch card guide is fed after completing the paper document scanning. •... -
Page 38: Scanning Documents
Operation Scanning Documents Adjust the document guides (A) slightly larger than the actual size of the documents. Operating Manual... - Page 39 Operation Fan the documents. • Documents that have been stapled together or stacked together (as in a file folder) will need to be separated. Fan the stack of documents to separate all the edges. Hold both ends and bend the documents as shown in the illustration. To flatten the documents, hold firmly and pull them apart as shown in the illustration.
- Page 40 Operation Place the documents on the feed tray with the side to be scanned facing down. • Set the leading edge of documents as shown in the illustration (A). • Insert the documents slowly until they stop. Note • The height of the documents should not exceed the limit mark ( ) on the document guide.
- Page 41 Operation Hold the exit stopper and adjust the exit extension trays (A, B) to match the size of the scanned documents. Note • When the documents are curled or a paper jam occurs, fold up the exit guides (C) and then resume scanning.
-
Page 42: Performing A Push Scan
• Press and hold the OK button for more than 2 seconds to open the application setting screen. (KV-S1057C and KV-S1027C only) • Press and hold the Start/Stop button for more than 2 seconds to open the application setting screen. - Page 43 Push scan using the LCD If you are using a KV-S1057C or KV-S1027C with Image Capture Plus, you can perform a push scan using the LCD. Registered jobs are displayed on the LCD. Use the cursor button (A) to select a job.
- Page 44 Operation Push scan using the 7-segment LED If you are using a KV-SL1066, KV-SL1056, KV-SL1055, KV-SL1036 or KV-SL1035 with Image Capture Plus, you can perform a push scan using the 7-segment LED. A registered job number is displayed on the 7-segment LED.
-
Page 45: Checking Events
Operation Checking events Check the following if an application does not start up after being set. Display the Scan properties screen. • If you are using Windows 8 / Windows 7: [Control Panel] ® [View devices and printers], right-click the scanner icon, and display the [Scan properties] screen. -
Page 46: Using Control Sheets
Operation Using Control Sheets Placing a control sheet in the middle of documents lets you change the scanning conditions for pages scanned after the control sheet. Also, you can change the folder used to save the scan data of documents scanned after the control sheet. -
Page 47: About Printing Control Sheets
Operation About Printing Control Sheets • Print the control sheet at the specified size; do not enlarge or reduce the size. • When printing the control sheet, make sure that the pattern is 25 mm (1 in.) from the top of the page and centered horizontally. -
Page 48: Clearing Paper Jams
Clearing Paper Jams Clearing Paper Jams Torn paper, thin paper or paper that is creased on the top edge may cause paper jams. If a paper jam occurs, remove the jammed sheet according to the following procedure. Remove all documents from the feed tray. Press the ADF door release (A), and open the ADF door (B). - Page 49 Clearing Paper Jams • If the document is jammed in the exit area, pull it forward as shown in the illustration. Close the ADF door. • Push both sides of the ADF door down slowly until it clicks into place. Notice •...
-
Page 50: Care And Maintenance
Care and Maintenance Cleaning the Outside of the Scanner Notice • Before moving the unit, be sure to unplug the power cord and USB cable. • Do not use commercially available cleaners, detergent, thinner, or benzine. (Doing so may cause deformation, discoloration or damage.) •... -
Page 51: Cleaning The Inside Of The Scanner
Care and Maintenance Cleaning the Inside of the Scanner Note • Clean the inside of the scanner when approximately 6,000 sheets have been scanned. The time for cleaning may differ depending on documents you scan. To maintain proper scanning, clean the scanner parts frequently. - Page 52 Care and Maintenance Clean the conveyor, scanning glasses, double feed detectors, starting sensors and rollers. • Clean the parts in the following order: conveyor and scanning glasses, double feed detectors and starting sensors, rollers. • For details about cleaning, refer to the following: –...
-
Page 53: Cleaning The Conveyor And Scanning Glasses
Care and Maintenance Cleaning the Conveyor and Scanning Glasses With a soft and dry cloth, wipe off any dirt on the conveyor (A) and scanning glasses (B). Operating Manual... -
Page 54: Cleaning The Double Feed Detectors And Starting Sensors
Care and Maintenance Cleaning the Double Feed Detectors and Starting Sensors Remove dust from the double feed detectors (A) and starting sensors (B) with a cotton swab. Operating Manual... -
Page 55: Cleaning The Rollers
Care and Maintenance Cleaning the Rollers Use the roller cleaning paper (KV-SS03) (page 10) to wipe dirt off from the surfaces of all rollers. Notice • Be careful not to damage any parts of the unit. Open the double feed prevention roller cover (A). Remove the double feed prevention roller. - Page 56 Care and Maintenance Use the roller cleaning paper to clean the surface of the double feed prevention roller. • Wipe the entire surface of both rollers. Install the double feed prevention roller. • Align the shaft that is shaped as indicated by A with the notch in the roller mount (B), and then insert the shaft in the notch.
- Page 57 Care and Maintenance Close the double feed prevention roller cover (A) firmly. Notice • Be sure to close the double feed prevention roller cover until it clicks into place. Open the paper feed roller cover (A). Operating Manual...
- Page 58 Care and Maintenance Use the roller cleaning paper to clean the paper feed roller. • Wipe the rollers from one end to the other (in the direction of the arrow) all the way around them, as shown in the illustration. Close the paper feed roller cover firmly.
- Page 59 Care and Maintenance Use the roller cleaning paper to clean the surface of the conveyor rollers (A) and exit rollers (B). • Wipe the rollers from one end to the other (in the direction of the arrow) all the way around them, as shown in the illustration.
-
Page 60: Replacing The Rollers
Care and Maintenance Replacing the Rollers As a rough guideline, we recommend to replace the paper feed roller and double feed prevention roller module after scanning 250,000 sheets of paper. ("250,000 sheets" is based on scanning high-quality woodfree paper. Depending on the type of paper and other factors, the actual lifetime for the rollers will differ.) In User Utility, you can check the number of sheets that have been scanned. - Page 61 Care and Maintenance Remove the double feed prevention roller. • While pushing the latch (A) to the right side as the direction indicated by the arrow, remove the double feed prevention roller (B) in the direction of the arrow. Then, pull out the left shaft (when facing it) from the notch in the roller mount.
- Page 62 Care and Maintenance Close the double feed prevention roller cover (A) firmly. Notice • Be sure to close the double feed prevention roller cover until it clicks into place. Open the paper feed roller cover (A). Operating Manual...
- Page 63 Care and Maintenance Lift up the gear (A) on the left side of the paper feed roller, and then remove the paper feed roller. Remove the rubber rollers from the paper feed roller shaft. • Push the tab (A) to remove the rubber roller (B) from the paper feed roller shaft. Remove the other rubber roller (C) in the same way.
- Page 64 Care and Maintenance Take out the new paper feed roller in the optional roller exchange kit. Install the two new rubber rollers onto the paper feed roller shaft. • After confirming the tabs (A) of both rubber rollers are facing outwards, insert the rubber rollers onto the paper feed roller shaft until they click into place.
- Page 65 Care and Maintenance Close the paper feed roller cover (A) firmly. Notice • Make sure to close both sides of the paper feed roller cover until they click into place. • After installing the paper feed roller, confirm that the paper feed roller can rotate in the feeding direction.
-
Page 66: Appendix
Appendix Troubleshooting If a problem occurs while the scanner is being used, check the following items and check the scanner status in User Utility. If the unit still malfunctions, turn it OFF, unplug the power cord and call for service. Symptom Possible Cause Remedy... - Page 67 Appendix Symptom Possible Cause Remedy The paper feed roller or double feed Replace the paper feed roller or prevention roller have become worn double feed prevention roller. down. (page 60) Clean the double feed detectors. The double feed detectors are dirty. (page 54) Right and left sides of the document Flatten the document (page 24) and...
- Page 68 Appendix Symptom Possible Cause Remedy The image for a scanned The document to be scanned was Load the document correctly. document is blank. loaded upside down. (page 38) Vertical streaks appear on the Clean the scanning glasses. The scanning glasses are dirty. scanned document.
-
Page 69: Error Messages (Kv-S1057C And Kv-S1027C Only)
Appendix Error Messages (KV-S1057C and KV-S1027C only) Error codes corresponding to the scanner status are displayed on the LCD. Also, when the scanner is connected to a computer, simple messages are displayed on the LCD. For details about the error codes and messages, check in User Utility. -
Page 70: Uninstalling The Software
In Windows XP, select [Add or Remove Programs]. Uninstall the following software programs. Program Name Publisher Image Capture Plus Panasonic System Networks Co., Ltd. Scan Button Setting Tool Panasonic System Networks Co., Ltd. IDR Engine Panasonic System Networks Co., Ltd. -
Page 71: Repacking Instructions
Appendix Repacking Instructions It is highly recommended that you keep the original carton and ALL packing materials. If you need to transport or ship the scanner, please follow these instructions. Note • Improper repacking of the scanner may result in a service charge to repair the scanner. •... -
Page 72: Specifications
The scanning speed differs depending on the host computer, the operating system, the application, the measuring method, the quantity of data in the image, and the paper type. The scanning speed depends on a measuring method of Panasonic. For details, see "Compatible Paper Types". - Page 73 8 W or less 8 W or less 8 W or less Power consumption 3.0 W or less (For KV-S1057C and KV-S1027C) (For AC100 – Sleep 2.9 W or less (For KV-SL1066, KV-SL1056, KV-SL1055, KV-SL1036 and 125 V models) KV-SL1035) Power OFF 0.5 W or less...
- Page 74 Index Index OK button Operating Environment Operation panel 12, 14 Numerics 7-segment LED 2, 15, 44 Paper feed roller Power button AC inlet Power cord 11, 13 Accessories Push Scan 3, 42 ADF door ADF door release Quick Installation Guide 5, 11 Background color switch function 2, 3, 31...
- Page 75 © Panasonic System Networks Co., Ltd. 2014 PNQX6995ZA DD0914HS0...