Culligan Aqua-Cleer Series Installation, Operation & Service Instructions With Part List
Advanced drinking
water systems
Hide thumbs
Also See for Aqua-Cleer Series:
- Owner's manual (65 pages) ,
- Maintenance instruction (2 pages) ,
- Owner's manual (59 pages)

Related Manuals for Culligan Aqua-Cleer Series


Summary of Contents for Culligan Aqua-Cleer Series
- Page 1 Cat. No. 01020219 Rev. C 05/28/09 DCO # 010836 Installation, Operation & Service Instructions with Parts List Culligan Aqua-Cleer ® ® Advanced Drinking Water Systems Models from 2008 © 2008 Culligan International Company...
- Page 2 Your local independently operated Culligan dealer employs trained service and maintenance personnel who are experienced in the installation, function and repair of Culligan equipment. This publication is written specifically for the purpose of training and guiding these individuals and is intended for their use.
-
Page 3: Table Of Contents
Installation, Operation & Service Instructions with Parts List Culligan Aqua-Cleer ® ® Advanced Drinking Water Systems Models from 2008 Table of Contents Page Specifications ........2 Suggested Installation Equipment . -
Page 4: Specifications
......Perchlorate Cartridge* 1000 gallons Dispensing Faucet ... . Culligan Aqua-Cleer Faucet: Rotary Operation, Stainless Steel and Resin Flow Passages, with Built-in Siphon Break . -
Page 5: Suggested Installation Equipment
Suggested Installation Equipment Sink Cutting Tools Porcelain Cutter Kit, 1-1/4 inch diameter, PN 00591625 Greenlee Hole Punch, 1-1/4 inch diameter Plumbers Putty Heavy Duty Drill with speed control to 400 rpm Tools Screwdriver, blade and Phillips (#1) 1/8 inch diameter pilot drill for #10 screws Center Punch Razor Blade Knife Accessories/Hardware... -
Page 6: Product Information
If the Aqua-Cleer system will not be installed immediately, refrigerate the RO membrane element at 35°/40°F (2°/5°C). DO NOT ALLOW TO FREEZE. Warranty A limited warranty is extended to the original end user from Culligan. This warranty is printed on the back cover of the Owner’s Guide. Application Guidelines The Aqua-Cleer system is designed for use on potable water supplies meeting the guidelines outlined in Table 1. -
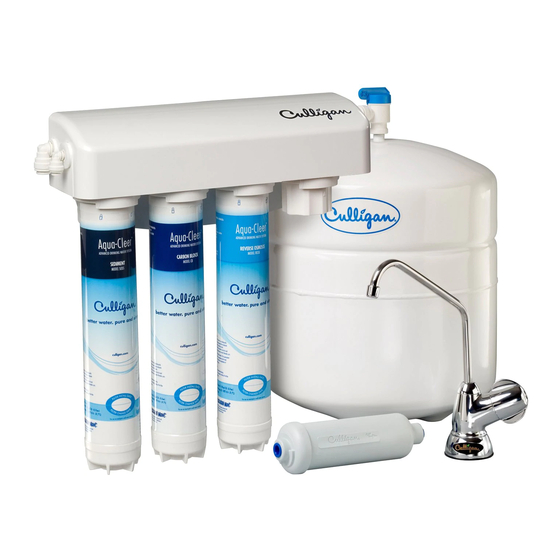
Page 7: Component Description
Component Description 3/8” Outlet 1/4” Inlet Figure 2 Item Description Manifold Assembly SED 1 Sediment Filter SED 2 Sediment Filter SED 3 Sediment Filter Carbon Block Filter Granular Activated Carbon Filter 30 GPD Reverse Osmosis Membrane 50 GPD Reverse Osmosis Membrane Nanofiltration Reverse Osmosis Membrane Arsenic Filter Perchlorate Filter**... - Page 8 The manufacturer recommends discarding all the product water for at least one hour of operation before drinking or use in food preparations. Culligan highly recommends discarding the product water for a full 24 hours to flush the preservative and to properly hydrate the membrane for maximum performance.
-
Page 9: Part Numbers
• Aqua-Cleer Sentry Monitor ™ This optional monitor (figure 1) accessory checks the TDS level of the drinking water each time the dispenser faucet is used. A green LED indicator mounted in the faucet signals if the TDS level is below the setpoint, an red signal appears if it is above. -
Page 10: In-Plant Preparation
To help assure a reliable connection, it is important to use high quality tubing with Inlet Outlet a consistent outside diameter. Culligan recommends that the tubing listed in the “Suggested Installation Insert Equipment” section of this manual (page 3) be used with the Aqua-Cleer system. - Page 11 Connect the inlet of the single head cartridge assembly to a source of clean, filtered water. Connect the outlet of the service housing to a suitable drain. Slowly turn on the water and flush the filter for 5 minutes at a rate of 1-2 gpm (4-7 L/min).
- Page 12 Note: Changing the air pressure will alter the amount of water stored in the tank. Increasing the pressure will decrease capacity while decreasing pressure will increase capacity. * Cartridge not for sale in California or Iowa. Culligan Aqua-Cleer Drinking Water Systems ®...
- Page 13 Check Air Pressure Using a tire gauge with 1 psi increments, check the air pressure in the empty storage tank. The air pressure should be between 5 and 15 psi, for the 2, 3 and 9 gallon storage tanks. Depending on the influent water pressure the air pressure may need to be adjusted.
-
Page 14: Installation
Note: Install the drain line so that it runs downward with no loops or low spots. Otherwise the unit will overflow at the air gap siphon break built into the faucet, or make irritating gurgling sounds. The concentrate line that leads to the faucet should be installed in a straight vertical path to avoid making a gurgling noise. Culligan Aqua-Cleer Drinking Water Systems ®... - Page 15 10 Performance Check 11 Clean up Work Area. 12 Review Operation with Customer. Select Component Installation Locations Dispenser Faucet - The Culligan faucet is designed to be mounted on the rear lip of the sink. It may be installed in ® •...
-
Page 16: Faucet Installation
If possible, consult with the customer as to how the installation site is used. Faucet Installation The Aqua-Cleer drinking water faucet was designed by Culligan to compliment the RO drinking water system. Properly installed, it will help to maximize your customer’s product satisfaction. To simplify its access and installation, we suggest you install the faucet on the rear lip of the sink. - Page 17 One proven tool is the Relton porcelain cutter kit, PN 00-5916-25, when used with a slow speed drill (300-400 rpm). • Drill a pilot hole through the porcelain and base material with the carbide tip drill. • Build a putty dam around the drill area. Add enough water to lubricate cutters and reduce cutting noise. •...
-
Page 18: Tubing Connections
Center the base over the hole with the Culligan logo facing forward and tighten the screws in a clockwise rotation. You may need to use your finger to guide the toggles as you tighten the screws. Once the screws are tightened and seated the base installation is now complete. - Page 19 Changing Handle Orientation The handle can be rotated 180°. Listed below is the procedure to change the handle orientation (refer to figure 11): Remove the handle cap and unscrew the handle screw. Remove the handle. Unscrew the handle cartridge nut. Remove the handle cartridge and rotate it 180°...
- Page 20 Do not connect the RO outlet to the plumbing below the disposal. Double basin sink with disposal, single trap • The fitting which joins the drains from the disposal and second sink should be directional. If not, then Culligan recommends that it be replaced. •...
- Page 21 Install Filter System Assembly The mounting bracket contains three mounting slots. The holes are sized to accept #10 round head wood screws (not supplied). Some types of surfaces such as particle board or drywall, may require the use of plastic screw anchors or toggle bolts to provide adequate support for the unit.
- Page 22 Review Operation With Customer Review the operation of the Culligan drinking water system with the customer. Explain that the unit will require routine maintenance of the prefilters, reverse osmosis membrane filter, and the polishing filter. Advise the customer how often these items will need to be serviced based on your past experience.
-
Page 23: Performance And Technical Information
RO membrane filter to the standard temperature of 77°F (25°C). This allows the performance of the unit to be accurately gauged against Culligan’s published standards. Temperature does not affect the concentrate flow rate. - Page 24 Rinse the cell cup twice with water to be tested, then fill to the top. • Press the button on the front of the meter and read the dial for the dissolved solids content of the product water in parts per million (ppm). Figure 17 Culligan Aqua-Cleer Drinking Water Systems ® ®...
- Page 25 Measuring Flow Rates To measure flow rates, it is necessary to use a graduated cylinder (100 ml suggested), and a watch or stopwatch with a second hand. Measure and record the product and concentrate flow rates as follows: • Collect the water sample directly from the manifold for exactly one minute or exactly two minutes. •...
- Page 26 Values are listed for 5, 10 & 15 psi air pressure settings. Note: Before using the table adjust the influent water pressure to product pressure. Influent Water Pressure x 0.67 = Product Pressure Culligan Aqua-Cleer Drinking Water Systems ®...
- Page 27 Table 2 @ 5 PSI Precharge Product Water Pressure Culligan Model Total 43.2% 56.0% 64.0% 69.6% 73.6% 76.7% Gallons 01005095 (2 Gallon) 01004776 (3 Gallon) 01004765 (9 Gallon) 10.3 10.7 @ 10 PSI Precharge Product Water Pressure Culligan Model Total 28.8%...
- Page 28 °F °C °F °C 0.33 0.56 0.83 0.34 0.59 0.87 0.37 0.63 0.90 0.40 0.65 0.94 0.43 0.69 0.96 0.46 0.72 1.00 0.50 0.76 1.03 10.0 0.52 0.79 1.06 Graph 3 Graph 2 Culligan Aqua-Cleer Drinking Water Systems ® ®...
- Page 29 Installation of permeate pump (Figure 20) Tank To Bottom Of RO Cartridge You can also use the Culligan Permeate Pump (01-0161-83) to increase the Figure 19 pressure inside the storage tank. Installing this non-electric pump in the RO system will increase the pressure inside the tank up to 90% of the incoming water pressure.
- Page 30 9 Gallon Tank Pressure vs. Drawdown Both @ 10psi Pre-Charge 65 psi Tank Pressure 50 psi Tank Pressure 0.53 1.06 1.59 2.11 2.64 3.17 3.70 4.23 4.76 5.28 5.81 6.34 Gallons Graph 6 Culligan Aqua-Cleer Drinking Water Systems ® ®...
-
Page 31: Service And Maintenance
Service & Maintenance Service Schedule To keep the Aqua-Cleer system operating properly, it is necessary to change the filters and sanitize the system periodically. ® Typically, this should be done on an annual basis. Service frequency may vary depending on local water conditions. High sediment, chlorine, turbidity, or hardness levels may require more frequent service. - Page 32 8. Instruct the customer (or leave instructions) to discard the first large glass of water removed from the faucet (or drain the tank once if membrane was replaced) before using the water. A waiting time isn’t necessary. 9. Thoroughly check for leaks - again. Culligan Aqua-Cleer Drinking Water Systems ®...
- Page 33 Aqua-Cleer Estimated Flow Rates - Table 4 ® Temperature °F 2.23 2.03 1.84 1.68 1.52 1.38 1.26 1.14 1.04 0.94 0.86 Feed PCF Product Flow Rate in milliliters per minute 20.0 14.1 15.6 17.1 18.8 20.7 22.8 25.1 27.6 30.4 33.4 36.8 25.0...
-
Page 34: Troubleshooting
Clean, sanitize, and flush storage tank. Polishing filter exhausted. Replace polishing filter Plugged capillary tube. Replace capillary tube; replace prefilter, if necessary. Storage tank bladder is ruptured. Replace storage tank and check precharge pressure. Culligan Aqua-Cleer Drinking Water Systems ® ®... - Page 35 Problem Possible Cause Remedy External leakage. Tubing not fully seated in fitting Check all fittings for tightness. Tubing abraded in seal area. Recut tubing and redo connection. Overflow at faucet Concentrate tubing plugged. Clean concentrate tubing of debris. air gap (gurgling Air gap plugged.
-
Page 36: Parts List
Parts List Aqua-Cleer Drinking Water System 23, 24, and 25 3/8” Outlet 1/4” Inlet 5 and 6 2 and 3 Culligan Aqua-Cleer Drinking Water Systems ® ®... - Page 37 Item Part No. Description Qty. Screw #10.9 X 1.00” Phil. Pan P0-4021-96 Head, 50 PK P1-0202-57 Manifold Assm., 6 PK P1-0043-22 O-Ring Large ASV, 10 PK P1-00094-13 O-Ring 1/4”, 25 PK P1-0043-21 O-Ring Medium ASV, 10 PK P1-0044-33 Collar, 1/4”, 25 PK P1-0043-20 O-Ring Small ASV, 10 PK P1-0047-13...
- Page 38 Handle Cap Spout Spout O-Ring (2 req’d) Spout Clip Spout Nut Air Gap O-Ring (2 req’d) Air Gap Base Gasket Butterfly Nut Washer Spring 01018619 Service Replacement Kit * Included in service replacement kit Culligan Aqua-Cleer Drinking Water Systems ® ®...
-
Page 39: Aqua-Cleer System Performance Worksheet
Worksheet Aqua-Cleer System Performance Worksheet ® Quality Feed Water TDS: TDS __________ FEED Product Water TDS: TDS __________ PROD [(TDS - TDS ) ÷ TDS ] x 100 = __________% Removal FEED PROD FEED Quantity Produced Product Water Flow: F ___________ PROD Product Water Temperature: T__________... - Page 40 Page left intentionally blank. Culligan Aqua-Cleer Technical Manual ® ®...
-
Page 41: Mounting Bracket Template
Opening Template - Full Scale text Chapter... - Page 42 This page contains materials and DCO information. IT DOES NOT PRINT AS PART OF THE DOCUMENT! Materials & Description: Aqua-Cleer Tech Manual 01020219 Size: 11” x 17” Booklet folded down to 8 1/2” x 11” Color: Black, 2 Sided Stock: 20# White Other: Collate...