Advertisement
Quick Links
Advertisement

Summary of Contents for Silhouette Mint
- Page 1 using your custom stamp maker...
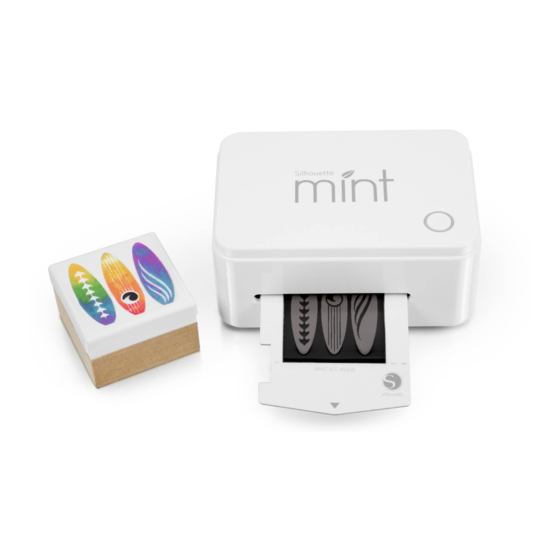
- Page 2 Check Included Items Silhouette Mint AC adapter Mint Studio software Mint ink (black, red, blue, yellow) USB Cable 2 Mint stamp kits (30x30mm, 15x60mm) stamp base, mount & lid stamp sheet 2 stamp labels 2 Silhouette Mint: using your custom stamp maker...
- Page 3 Install the Mint Studio Software PC Installation 1. Insert the included Mint Studio CD into the CD drive of your computer. 2. Proceed through the installation process by following the on-screen prompts. If the installation window does not automatically appear, browse to the CD drive in My Computer and double-click the setup.exe program to run it.
- Page 4 Connect the Silhouette Mint Once the Mint Studio software is installed, connect the Silhouette Mint to the power supply. Then connect the Mint to your computer with the included USB cable as shown in the diagram. Turn the machine on by pressing the power button. If your PC displays a “New Hardware Found”...
- Page 5 Opening the Mint Studio Software Locate the Mint Studio icon on the desktop (or in the Start Menu on your PC; in the Applications folder on a Mac®). Double-click the icon to run the application. Once Mint Studio has loaded, select ‘Design’ and you will see your available workspace displayed for your selected stamp size.
- Page 6 6 Silhouette Mint: using your custom stamp maker...
-
Page 7: Opening Images
Opening Images To open images from outside of Mint Studio choose File > Open. You can then navigate to your desired image on your computer. To open images from the Library, go to the Library (see page 12) and double-click on a design you’d like to place onto your stamp. This will have the image placed onto your workspace. - Page 8 Send to Mint Once you are ready to create your stamp, go to the Send to Mint icon on the toolbar at the top of the screen. The Send to Mint panel will appear on the right-hand side of the screen.
- Page 9 This will ready the Mint machine to receive your stamp. You may then insert a stamp sheet into the Mint (A). Your stamp sheet will begin to feed through the Mint machine as soon as you insert the stamp sheet (B).
- Page 10 Slide the stamp mount into the stamp base until it clicks into place (C). Remove the protective liner from the stamp mount and carefully position your printed stamp onto the mount (D). 10 Silhouette Mint: using your custom stamp maker...
- Page 11 Place the stamp base (which now has a stamp affixed) onto a flat, level work surface, with the affixed stamp facing upwards. Apply Mint ink on top of the lines you want to ink (A). Wait for about five to ten minutes (depending on the stamp design) to give the ink a chance to permeate and absorb into the stamp.
- Page 12 Click the My Library button to view the Silhouette designs you have on your computer. Mint Studio includes 50 free designs to help you get started. Connect your Mint to your computer and power it on to get your 50 free designs.
- Page 13 At the top of the My Library window you will find a search box. Click in the text box and type a keyword to search your library of images. Search results will display in the right panel of My Library. Silhouette Mint: using your custom stamp maker 13...
- Page 14 Downloading New Shapes Connecting to the Silhouette Design Store The Silhouette Design Store contains thousands of designs to cut with your Silhouette ranging from simple cutouts to intricate patterns and designs. Most shapes are only 99¢. Generally, a free shape is posted every week as well.
- Page 15 Browsing for new designs The Silhouette Design Store works like any other web page and can be navigated by clicking on various links to browse new releases, popular designs, etc. The home page contains popular and new designs that you may be interested in.
-
Page 16: Creating An Account
Creating an account Several different account types exist. Once you’re more familiar with the Silhouette Design Store, you may wish to purchase a subscription and download dozens of designs each month. In order to create a free account and buy designs one at a time, choose the “Sign up FREE”... - Page 17 Using your trial subscription card If your Silhouette came with a trial subscription card, you may use it to purchase designs from the Silhouette Design Store. To do this, click the ‘My Account’ link at the top of any page within the Store.
- Page 18 Thank you for purchasing the Silhouette Mint. Before using it, be sure to read the Safety Precautions contained in this User’s Guide. Keep this manual handy in a safe place for future reference when required. Warning This symbol indicates information that, if ignored or applied incorrectly, creates the possibility of death or serious personal injury.
- Page 19 Take care never to allow the plastic bag this product comes in to be ingested or placed over anyone’s head. Doing so creates the risk of suffocation. Particular care is required in households where small children are present. Silhouette Mint: using your custom stamp maker 19...
- Page 20 High-temperature Precautions The print head and the metal parts around it can become very hot. Do not touch them. Doing so creates the risk of burn injury. 20 Silhouette Mint: using your custom stamp maker...