Table of Contents
Advertisement
Advertisement
Table of Contents

Related Manuals for Heatrae Sadia 7 Litre 1kW


Summary of Contents for Heatrae Sadia 7 Litre 1kW
- Page 1 STREAMLINE UNDERSINK Fitting Instructions and User Guide...
-
Page 2: Table Of Contents
CONTENTS SECTION PAGE 1.0 INTRODUCTION 2.0 TECHNICAL SPECIFICATIONS 3.0 INSTALLATION 4.0 COMMISSIONING 5.0 EXPLANATION TO USER 6.0 MAINTENANCE 7.0 FAULT FINDING 8.0 SPARE PARTS 9.0 GUARANTEE 10.0 ENVIRONMENTAL INFORMATION 11.0 COMMISSIONING RECORD 12.0 SERVICE RECORD 13.0 SPARES STOCKISTS... -
Page 3: Introduction
1.0 INTRODUCTION Thank you for purchasing a Heatrae Sadia Streamline Undersink Vented Water Heater. The Streamline is manufactured in the UK to the highest standards and has been designed to meet all the latest relevant safety specifications. 1.1 IMPORTANT POINTS The Streamline must be installed and commissioned by a competent person. -
Page 4: Technical Specifications
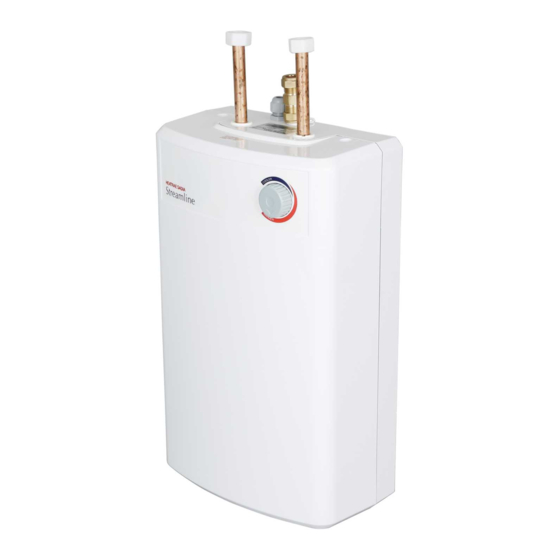
Enclosure rated IPX4 Operating Pressure 0 MPa (0 bar) ABLE 01: PERFORMANCE DATA MODEL HEAT UP (MINUTES) HEAT LOSS (kWhr/24hr) 7 Litre 1kW 7 Litre 3kW 10 Litre 1kW 10 Litre 3kW FIGURE 01: IMPORTANT FEATURES CABLE GLAND OUTLET INLET... - Page 5 FIGURE 02: DIMENSIONS (IN mm) THIRD FIXING 32.5 HOLE DIMENSION A 7 LITRE 10 LITRE...
-
Page 6: Installation
WARNING: THE STREAMLINE IS AN OPEN OUTLET WATER HEATER. THE OUTLET OF THE STREAMLINE ACTS AS A VENT AND MUST ONLY BE CONNECTED TO HEATRAE SADIA VENTED TAPS. THESE FITTINGS MUST NEVER BE BLOCKED, RESTRICTED OR MODIFIED, IN ANY WAY. - Page 7 3.3 FIXING 1. Mark the position of the Streamline, and the position of the fixing bracket (see figure 2, p5). 2. Fix the wall bracket using the two larger fixing plugs and screws provided. 3. Remove the cover of the Streamline by removing the two screws from the top face and rotating the cover about the bottom edge.
- Page 8 3.5 PLUMBING 1. Plumb the Streamline to the cold water main via a VENTED tap using 15mm diameter copper or plastic pipe. Water pressure should be no lower than 0.034MPa (0.34bar) and no higher than 1.0MPa (10bar). 2. Make connections to the adaptor pipes. The inlet is on the right, the outlet is on the left (see figure 5 below).
- Page 9 3.6 ELECTRICAL WARNING: THIS APPLIANCE MUST BE EARTHED. IT IS SUITABLE FOR A.C. SUPPLY ONLY. ELECTRICAL INSTALLATION MUST BE CARRIED OUT BY A COMPETENT ELECTRICIAN AND BE IN ACCORDANCE WITH THE LATEST I.E.E. WIRING REGULATIONS. ENSURE THE ELECTRICAL SUPPLY IS SWITCHED OFF BEFORE MAKING ANY CONNECTIONS TO THE STREAMLINE.
-
Page 10: Commissioning
4.0 COMMISSIONING DO NOT SWITCH ON THE ELECTRICAL SUPPLY UNTIL THE STREAMLINE HAS BEEN FILLED WITH WATER AND CHECKED FOR LEAKS. 1. Check all water and electrical connections are tight. 2. Check that the thermostat and cutout capillaries are located correctly in the element pockets. -
Page 11: Explanation To User
5.0 EXPLANATION TO USER Following Installation and Commissioning of the water heater the operation should be fully explained to the user. 5.1 HOT WATER 1. Indicate the location of the water heater and identify the outlets to which it is connected. 2. -
Page 12: Maintenance
Maintenance should be carried out by a competent person and any replacement parts used should be Heatrae Sadia ‘Streamline’ spare parts. Little maintenance is required, however in hard water areas the Streamline may require periodic descaling to ensure efficient operation. - Page 13 6.2 DESCALE THE STREAMLINE 1. Drain the Streamline (see section 6.1, p12). 2. Undo the locknut (rotate the locknut anticlockwise until it is clear of the inner container) 3. Remove the Element Plate assembly (EPA) and gasket. 4. Remove scale from the element and the inner container. 5.
-
Page 14: Fault Finding
2. Remove the front cover (see section 3, p6). 3. Depress the red button (see figure 11, p.15). 4. Recommission the Streamline (see section 4, p.10). 5. If the cut out continues to operate contact the Heatrae Sadia Service Team (see p20 for contact details). -
Page 15: Spare Parts
FIGURE 11 - OVER TEMPERATURE CUT OUT RESET 8.0 SPARE PARTS The following comprehensive list of spare parts is available for your Streamline. Please refer to the Rating Label on the top face of the Streamline before ordering to ensure the correct spare part is obtained. DO NOT REPLACE WITH PARTS NOT RECOMMENDED BY HEATRAE SADIA. - Page 16 FIGURE 12: SPARE PARTS...
-
Page 17: Guarantee
The Streamline is not guaranteed against damage by frost or due to the build up of scale. Please note that if Heatrae Sadia personnel or agents are requested to descale the Streamline, this work will be chargeable. This guarantee does not affect the statutory rights of the consumer. -
Page 18: Commissioning Record
11.0 COMMISSIONING RECORD Installation Date: ____________________________________________ Model and Serial Number: __________________________________ Installer (Plumbing): ________________________________________ Contact Details: ____________________________________________ Competency Scheme & ID Number: _________________________ Installer (Electrical): ________________________________________ Contact Details: ____________________________________________ Competency Scheme & ID Number: _________________________ Comments: ________________________________________________ ________________________________________________ ________________________________________________ Mains supply pressure and flow rate Isolation valve fitted Flow reducer fitted Pipework checked for leaks... -
Page 19: Service Record
12.0 SERVICE RECORD Service Date: _______________________________________________ Engineer: __________________________________________________ Contact Details: ____________________________________________ Competency Scheme & ID Number: _________________________ Comments: ________________________________________________ ________________________________________________ ________________________________________________ Service Date: _______________________________________________ Engineer: __________________________________________________ Contact Details: ____________________________________________ Competency Scheme & ID Number: _________________________ Comments: ________________________________________________ ________________________________________________ ________________________________________________ Service Date: _______________________________________________ Engineer: __________________________________________________... -
Page 20: Spares Stockists
Almondsbury, Bristol BS32 4TF Tel: 01454 620500 Alternatively, contact your local supplying merchant or wholesale branch. Service: 0844 8711535 Service Fax: 0844 8711528 E-mail: heatraesadiaservice @heateam.co.uk Heatrae Sadia Heating Hurricane Way Norwich NR6 6EA www.heatraesadia.com 36006098 issue 04 © 2012...