Panasonic PV-GS320 Operating Instructions Manual
Digital video camcorder
Hide thumbs
Also See for PV-GS320:
- Operating instructions manual (88 pages) ,
- Brochure & specs (16 pages)
Table of Contents
Advertisement
Before connecting, operating or adjusting this product,
please read the instructions completely.
Spanish Quick Use Guide is included.
Guía para rápida consulta en español está incluida.
For USA assistance, please call: 1-800-211-PANA(7262) or, contact us via the web at: http://www.panasonic.com/contactinfo
For Canadian assistance, please call: 1-800-561-5505 or visit us at www.panasonic.ca
P
PC
Operating Instructions
Digital Video Camcorder
Model No.
Mini
PV-GS320
LSQT1091 A
Advertisement
Table of Contents

Related Manuals for Panasonic PV-GS320


Summary of Contents for Panasonic PV-GS320
-
Page 1: Operating Instructions
Spanish Quick Use Guide is included. Guía para rápida consulta en español está incluida. Mini For USA assistance, please call: 1-800-211-PANA(7262) or, contact us via the web at: http://www.panasonic.com/contactinfo For Canadian assistance, please call: 1-800-561-5505 or visit us at www.panasonic.ca LSQT1091 A... -
Page 2: Table Of Contents
Contents Before using Record mode Quick Guide ........... 10 Check before recording ......... 28 Accessories ........... 12 Recording on a tape ........29 Parts identification and handling....12 Recording check..........30 Attaching the lens cap ........14 Blank search function ........30 How to remove the Sensor tag Recording still pictures on a card (for U.S.A. - Page 3 Playback mode Menu Playing back tape .......... 42 Menu list ............63 Slow-motion playback/ Menus related to taking pictures ....65 frame-by-frame playback ......43 Menus related to playback ......65 Variable-speed search function ..... 43 Other menus..........65 Playback on TV..........44 Playing back card ..........
-
Page 4: Before Using
Before using Quick Guide Push the [PUSH] mark 1 in order to close the cassette holder. ª Charging the battery Connect the AC cable to the AC adaptor and the AC jack. Put the battery on the battery mount by aligning the mark and then securely plug it PUSH Only after the cassette holder is completely... - Page 5 Before using ª How to turn off the power Press the Photoshot button [ While pressing the button 1, set the [OFF/ ON] switch to [OFF]. ª Recording on a tape ª Playing back tape ≥Set to Tape Recording Mode. ≥Set to Tape Playback Mode.
-
Page 6: Accessories
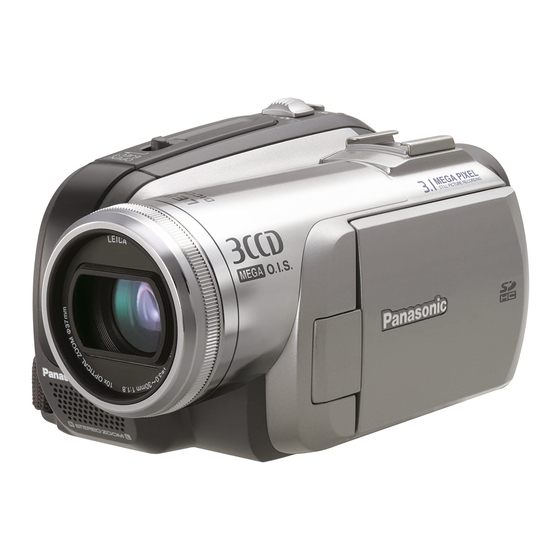
Before using Before using Parts identification and handling Accessories ª Camcorder The following are the accessories supplied with this product. PV-DAC14D K2GJ2DC00011 K2CA2CA00029 CR2025 CGR-DU06 N2QAEC000021 White balance sensor -40- Remote control sensor -27- Grip belt -14- Lens (LEICA DICOMAR) K2KZ9CB00001 VFF0304 K1HA05CD0010... - Page 7 Before using (14) (15) (16) (20) (22) (17) (21) (18) (19) (10) (11) (12) (23) (24) (25) (13) (20) LCD monitor -18- -75- Viewfinder -18- -75- Due to limitations in LCD production Due to limitations in LCD production technology, there may be some tiny bright or technology, there may be some tiny bright or dark spots on the LCD monitor screen.
-
Page 8: Attaching The Lens Cap
Before using ≥When you remove the lens cap, press the knobs firmly. How to remove the Sensor tag (for U.S.A. only) (32) Flip the grip belt. (32) Tripod receptacle This is a hole for attaching the Camcorder to optional tripod. (Please carefully read the operating instructions for how to attach the tripod to the Camcorder.) ≥You cannot open the card slot cover when the... -
Page 9: Power Supply
Charge the battery before using this product. ≥Battery charging time. ( -16- ≥We recommend using Panasonic batteries. -12-, -79- ≥If you use other batteries, we cannot guarantee the quality of this product. ≥If the DC cable is connected to the AC adaptor, then the battery will not get charged. -
Page 10: Charging Time And Recordable Time
Before using ≥Hold the battery with your hand so it does not ≥When you use this Camcorder with the LCD fall. monitor lit up with the [POWER LCD] setting. ≥Before removing the battery, be sure to set the ≥The batteries heat up after use or charging. The [OFF/ON] switch to [OFF]. -
Page 11: Setting Date And Time
Before using ª Setting date and time How to turn the power on and off with the LCD monitor/viewfinder When the Camcorder is turned on for the first When the power switch is set to [ON], the power time, [SET DATE AND TIME] will appear. can be turned on and off with the LCD monitor and the viewfinder when the unit is in Tape Recording Mode or Card Recording Mode. -
Page 12: Using The Lcd Monitor
Before using Using the LCD monitor Using the viewfinder You can record the image while viewing it on the ª Extending the viewfinder opened LCD monitor. Pull out the viewfinder and extend it by Pull the LCD monitor out in the direction of pinching the extension knob. -
Page 13: Quick Start
Before using Quick Start ª To cancel Quick Start Set [SETUP] >> [QUICK START] >> [OFF]. When Quick Start is ON the battery power is still -24- being consumed, even when the LCD Monitor ≥If the [OFF/ON] switch is set to [OFF] while the and the Viewfinder are closed. -
Page 14: Inserting/Removing A Cassette
Before using Inserting/removing a cassette condensation may be formed on the heads or the cassette tape. ( -72- Fit the AC adaptor or the battery and turn on ª When the cassette holder does not the power. come out Slide the [OPEN/EJECT] lever and open the ≥Close the cassette cover completely and then cassette cover. -
Page 15: Selecting A Mode
Before using ª Insert/remove the card into/from the card SD Card ≥The memory capacity indicated on the SD Card slot. label corresponds to the total amount of capacity to protect and manage the copyright and the capacity available as conventional memory for a Camcorder, personal computer or other equipment. -
Page 16: How To Use The Joystick
Before using How to use the joystick 2) Tape recording mode ([AUTO/MANUAL/FOCUS] switch is set to ª Basic joystick operations [MANUAL]) Operations on the menu screen and selection of files to be played back on the multi-image display Move the joystick up, down, left or right to select an item or file and then push in the center to set it. -
Page 17: Help Mode
Before using Help mode 4) Card recording mode ([AUTO/MANUAL/FOCUS] switch is set to Select an icon for an explanation of the function. [AUTO]) ≥Set to Tape/Card Recording Mode. Press the joystick to display the icon during the recording pause. Move the joystick down until icon 1 appears. -
Page 18: Switching The Language
Before using Switching the language Move the joystick right or press it to set the selection. You can switch the language on the screen display or the menu screen. Set [LANGUAGE] >> select the desired language. Move the joystick up or down in order to select the item to be set. -
Page 19: Adjusting Lcd Monitor/Viewfinder
Before using ª Adjusting LCD monitor/viewfinder Operating with remote control The menu screen transition is the same as when ª Adjusting the brightness and color the buttons on the main unit are used. Press the [MENU] button. level Set [SETUP] >> [LCD SET] or [EVF SET] >> [YES]. -
Page 20: Record Mode
≥In order to fully exhibit the performances of the ª Check points LP mode, we recommend using Panasonic ≥Remove the lens cap. ( -14- cassettes marked LP mode. (When the Camcorder is turned on with the lens ≥It is not possible to dub audio onto image... -
Page 21: Recording On A Tape
Record mode Recording on a tape ª On-screen display in the tape recording mode Remove the lens cap. ( -14- (When the Camcorder is turned on with the lens cap attached, the automatic white balance adjustment may not function properly. Please turn the Camcorder on after removing the lens cap.) When this unit is purchased, the aspect ratio is 3)¢... -
Page 22: Recording Check
Record mode ≥When connected with the USB cable or the ª Stopping blank search midway DV cable to a personal computer or other through equipment Move the joystick down to select the [∫] icon. ≥When in PC Connection Mode Recording check The last image recorded is played back for 2 to 3 seconds. -
Page 23: Zoom In/Out Function
Record mode Zoom in/out function : 2048k1512 3. 1 : 1600k1200 You can zoom in up to 10k optically. : 1280k960 ≥Set to Tape/Card Recording Mode. : 640k480 Wide-angle recording (zoom out): ≥When you purchase this unit, [ASPECT] is set Push the [W/T] lever towards [W]. -
Page 24: Recording Yourself
Record mode ª Recording yourself Digital zoom function If the zoom magnification exceeds 10 times, then You can record yourself while viewing the LCD the digital zoom function will be activated. The monitor. You can record persons in front of the digital zoom function allows you to select a Camcorder while presenting them the image. -
Page 25: Magicpix Function
Record mode MagicPix function Soft skin mode This function allows you to record color subjects This allows the skin color to be recorded in a in dark locations to stand out against the softer tone. This is more effective if you record a background. -
Page 26: Tele Macro Function
Record mode Tele macro function Fade in/fade out function By focusing only on the subject and blurring the Fade in background, the image can be impressive. This The image and audio gradually appear. Camcorder can focus on the subject at a distance Fade out of approx. -
Page 27: Wind Noise Reduction Function
Record mode ª Auto Ground-Directional Standby To select the color for fade in/fade out The color which appears in fading pictures can be (AGS) selected. This function prevents unnecessary recording Set [ADVANCED] >> [FADE COLOR] >> when you forget to pause recording and walk with [BLACK] or [WHITE]. -
Page 28: Self-Timer Recording
Record mode Self-timer recording Wide/4:3 function You can record still pictures on a card using the This allows you to record images compatible with timer. wide-screen TVs. ≥Set to Card Recording Mode. Wide Function Press the joystick to display the icon. Move Images are recorded with a 16:9 aspect ratio. -
Page 29: Optical Image Stabilizer Function
Record mode Optical image stabilizer function Recording in various situations (Scene mode) This feature reduces the jitter caused by hand movement when recording. When you record images in different situations, ≥ Set to Tape/Card Recording Mode. this mode automatically sets optimum shutter Set [ADVANCED] >>... -
Page 30: Recording In Natural Colors (White Balance)
Record mode ª Recording in natural colors To cancel the scene mode function Set [BASIC] >> [SCENE MODE] >> [OFF] or set (White balance) the [AUTO/MANUAL/FOCUS] switch to [AUTO]. The automatic white balance function may not Sports mode reproduce natural colors depending on the ≥This mode reduces Camcorder shakes for scenes or lighting conditions. -
Page 31: Manual Focus Adjustment
Record mode ª Manual focus adjustment To set the white balance manually Select [ ] in Step 3. Then, while viewing a white If auto focusing is difficult due to the conditions, subject on the entire screen, move the joystick up then manual focusing is available. -
Page 32: Manual Shutter Speed/Aperture Adjustment
Record mode ≥During normal playback, image movement may Manual shutter speed/aperture not look smooth. adjustment ≥When recording in an extremely bright place, Shutter Speed the color of the screen may change or flicker. If this happens adjust the shutter speed manually Adjust it when recording fast-moving subjects. -
Page 33: Playing Back Tape
Playback mode Playback mode ª To adjust volume Adjust the speaker volume for playback. Playing back tape Move the [s /VOLr] lever to adjust the volume. ≥Set to Tape Playback Mode. (An operation icon automatically appears on the LCD monitor.) Operate with joystick. -
Page 34: Menu List
Menu Menu ª [TAPE PLAYBACK MENU] Menu list Menu figures and illustrations are provided for easy-to-understand explanations and so they are different from the actual menu indications. ª [TAPE RECORDING MENU] 1) [BASIC] [DATE/TIME] -65- [USB FUNCTION] -55- 2) [ADVANCED] [REC SPEED] -28- [REC STDBY]... - Page 35 Menu ª ª [CARD RECORDING MENU] [CARD PLAYBACK MENU] 1) [BASIC] 1) [BASIC] [SCENE MODE] [DATE/TIME] -38- -65- [PICT.QUALITY] [PROTECT] -32- -46- [PICTURE SIZE] -31- [ASPECT] 2) [ADVANCED] -37- [CLOCK SET] [DPOF SET] -17- -46- [FORMAT CARD] -46- 2) [ADVANCED] [O.I.S.] 3) [SETUP] -38-...
-
Page 36: Menus Related To Taking Pictures
Menu Menus related to taking pictures Menus related to playback ª [DATE/TIME] ª [REC DATA] This switches between date and time indications. Set to [ON] and the settings (shutter speed, iris/ ≥The Camcorder automatically records the date gain values and white balance settings ( ), etc.) -39- and time the picture was taken on the tape/card. -
Page 37: Audio Dubbing
Others Others Indoor mode (recording under incandescent lamp) -39- Indications Outdoor mode -39- White balance adjustment mode Various functions and the Camcorder status are -39- shown on the screen. Playback indications Basic indications ¥: Recording underway Remaining battery power Playback -42- 0h00m00s00f: Time code Pause... -
Page 38: Explanation Of Terms
Others ª Explanation of terms LCD monitor/viewfinder LCD monitor ≥When the LCD monitor gets dirty, wipe it with a ª Automatic white balance dry soft cloth. White balance adjustment recognizes the color of ≥In a place with drastic temperature changes, light and adjusts so the white color will become a condensation may form on the LCD monitor. - Page 39 Others ª White balance The image recorded by the Camcorder may become bluish or reddish under the influence of light sources. To avoid such phenomena, adjust the white balance. White balance adjustment determines the white color under different light sources. By recognizing which is the white color under sunlight and which is the white color under a fluorescent lamp, the Camcorder can adjust the balance among the...
-
Page 40: Request For Service Notice (Usa Only)
Others Index ª Numerics ª P 4:3 Function ...........37 Photoshot ............31 ª A PictBridge ............50 Portrait Mode ..........38 AC Adaptor ..........15, 74 ª Q Aperture ............41 Audio Dubbing ..........49 Quick Movie Magic ........57 Auto Ground-Directional Standby (AGS) ..36 Quick Start ............. - Page 41 Panasonic Consumer Electronics Company, Division of Panasonic Corporation of North America One Panasonic Way, Secaucus, NJ 07094 Panasonic Puerto Rico, Inc. Ave. 65 de Infantería, Km. 9.5, San Gabriel Industrial Park, Carolina, Puerto Rico 00985 Panasonic Canada Inc. 5770 Ambler Drive, Mississauga, Ontario, L4W 2T3...