Table of Contents
Advertisement
Quick Links
Advertisement
Table of Contents

Related Manuals for LG MMBB0332901


Summary of Contents for LG MMBB0332901
- Page 2 Copyright©2010 LG Electronics, Inc. A l l r i g h t s reserved. LG and the LG logo are registered trademarks of LG Group and its related entities. enV ® is a trademark of Verizon Wireless. All other trademarks are the property of...
-
Page 3: Important Safety Precautions
Read these simple guidelines. Breaking the rules may be dangerous or illegal. Further detailed information is given in this user guide. Violation of the instructions may cause serious injury or death. ● Never use an unapproved battery since this could damage the phone and/or battery and could cause the battery to explode. - Page 4 Important Safety Precautions ● Do not expose the battery charger or adapter to direct sunlight or use it in places with high humidity, such as a bathroom. ● Do not use harsh chemicals (such as alcohol, benzene, thinners, etc.) or detergents to clean your phone.
- Page 5 ● Unplug the power cord and charger during lightning storms to avoid electric shock or fire. ● Only use the batteries and chargers provided by LG. The warranty will not be applied to products provided by other suppliers. ● Only authorized personnel should service the phone and its accessories.
-
Page 6: Table Of Contents
Table of Contents Important Safety Precautions .1 Welcome ....8 Technical Details ... . .9 Important Information . - Page 7 1.2 Get New Ringtones ..51 1.3 My Ringtones ....51 1.4 My Music ....52 Playing Your Music .
- Page 8 Table of Contents 2.1.5 Contacts <Name> ..109 2.1.6 Redial ....109 2.1.7 Play ....109 2.1.8 My Verizon .
- Page 9 8.7 Voice Privacy ....151 8.8 DTMF Tones ....152 8.9 Assisted Dialing ... .152 9.
-
Page 10: Welcome
NOTE The Bluetooth ® word mark and logos are owned by the Bluetooth SIG, Inc. and any use of such marks by LG Electronics is under license. Other trademarks and trade names are those of their respective owners. -
Page 11: Technical Details
Important Information This user’s guide provides important information on the use and operation of your phone. Please read this guide carefully prior to using the phone to be able to use your phone to its greatest advantage and to prevent any accidental damage or misuse. - Page 12 Technical Details CDMA Designator Standard TIA/EIA-95A TSB-74 Basic Air Interface ANSI J-STD-008 TIA/EIA-IS2000 TIA/EIA/IS-634 TIA/EIA/IS/651 Network TIA/EIA/IS-41-C TIA/EIA/IS-124 TIA/EIA/IS-96-B TIA/EIA/IS-637 Service TIA/EIA/IS-657 IS-801 TIA/EIA/IS-707-A TIA/EIA/IS-856 1x EV-DO TIA/EIA/IS-878 Related TIA/EIA/IS-866 interface TIA/EIA/IS-890 between the user’s body and the back of the phone, including the antenna, whether extended or retracted.
- Page 13 FCC Notice and Cautions This device and its accessories comply with part 15 of FCC rules. Operation is subject to the following two conditions: (1) This device and its accessories may not cause harmful interference, and (2) this device and its accessories must accept any interference received, including interference that causes undesired operation.
-
Page 14: Phone Overview
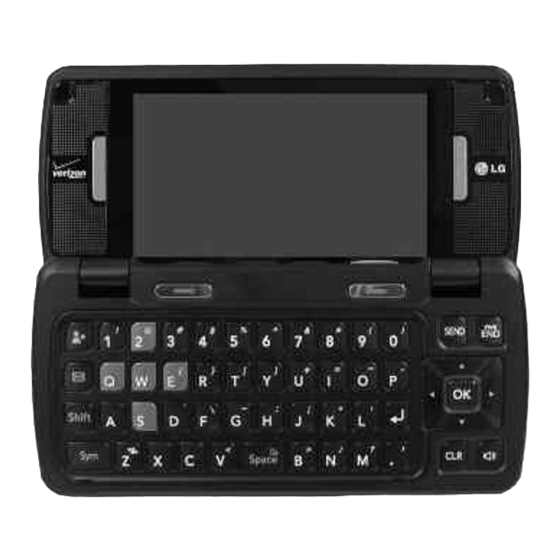
Phone Overview 1. Earpiece 2. Camera Key 3. Side Volume Keys 4. Lock/ Unlock 5. Touch Soft Keys 6. SEND Key 7. Clear Key / Voice Command Key 1. Earpiece Lets you hear the caller. 2. Camera Key Use for quick access to Camera function. - Page 15 1. Left Soft Key 2. FAVORITES 3. Microphone 4. Message Key 5. Shift Key 6. Symbol Key 7. Game Directional Keys 1. Left Soft Key Use to access the Messaging menu or the function immediately above it at the bottom left of the LCD. 2.
-
Page 16: How To Use It
Quick Glance of Touchpad and How to Use It Touch Sensitive Soft Keys 1. Make sure your hands are clean and dry. Remove moisture from the surface of your hands. Don't use the touch keys in a humid environment. 2. Touch key sensors are sensitive to your light touch. -
Page 17: Calibrating The Touch Screen
Using the Internal Keypad 1. Open the flip and press [MENU]. 2. Press the Directional Key scroll to the Settings & Tools menu and press 3. Press Touch Settings. 4. Press Calibration. 5. Close the flip to start calibration. 6. Touch the target each time it appears. -
Page 18: Touch Screen Shortcut Menu
Calibrating the Touch Screen/ Shortcut Menu Touch Screen Shortcut Menu The Touch Screen Shortcut Menu allows instant access to menus with the quick touch of your fingertip. To use the Shortcut Menu: 1. Unlock the Touch Screen by sliding the image the Unlock Key ( ) on the left side of your phone. - Page 19 Messages: Displays the recent Messages menu. Phone: Displays the touch Dialpad so you can make a call without opening the flip. Dial manually using the numeric keys or from your Recent Calls and Contacts. When you touch the Touch and hold this key to access your voice mail box Touch this key to voice dial.
-
Page 20: Text Input
Entering and Editing Information Text Input You can enter information using the exterior Touch Screen or the interior keypad. Each has special key functions to help you with text entry. Using the Touch Screen When creating a Text, Picture, Video or Voice message using the outside LCD, the Touch Screen provides you with Touch Keys specific to the type of field. - Page 21 When entering text, besides "typing" the text with Touch Keys, you also have the option to write with your fingertip. The Touch Screen interprets your movements into characters. 1. Touch a text field, then touch the manual writing icon right side of the display. 2.
-
Page 22: Entering And Editing Information
Entering and Editing Information The following tables may help in understanding how the Touch Screen interprets movements into characters. Diaeresis... -
Page 23: From The Internal Qwerty Keypad
From the Internal Qwerty Keypad When creating a Text, Picture or Video message using the inside LCD, use the Qwerty keypad. Use to send a New TXT Message. FAVORITES You can add up to 10 contacts or groups as Favorites to easily make calls, send messages, and view messages. -
Page 24: Menu Tree On The Internal Screen
Menu Tree on the Internal Screen Media Center Media Center 1. Music & Tones 1. V CAST Music |Rhapsody 2. Get New Ringtones 3. My Ringtones 4. My Music 5. My Sounds 6. Sync Music 2. Picture & Video 1. V CAST Videos 2. -
Page 25: Recent Calls
5. Groups 6. Speed Dials 7. In Case of Emergency 8. My Name Card Recent Calls Recent Calls 1. Missed 2. Received 3. Dialed 4. All 5. View Timers VZ Navigator VZ Navigator 1. VZ Navigator My Music My Music 1. - Page 26 Menu Tree on the Internal Screen 2. Backlight 1. Internal Backlight 2. External Backlight 3. Keypad Backlight 3. Wallpaper 1. Internal Wallpaper 2. External Wallpaper 4. Charging Screen 1. Internal Screen 2. External Screen 5. Display Themes 6. Menu Fonts 7.
-
Page 27: Phone
NOTICE Please use only an approved charging accessory to charge your LG phone. Improper handling of the charging port, as well as the use of an incompatible charger, may cause damage to your phone and void the warranty. -
Page 28: Charging With Usb
NOTE Low-powered USB ports are not supported, such as the USB port on your keyboard or bus- powered USB hub. LG USB Driver is downloadable from the following site: http://www.lgmobilephones.com > Click SUPPORT > Select a Carrier(Verizon) > Select a Model >... -
Page 29: Battery Temperature Protection
Battery Temperature Protection Though extremely rare, if the battery becomes overheated, the phone will automatically turn off. When you turn the phone back on, a message pops up alerting you that the phone was powered off for your safety. Battery Charge Level You can find the battery charge level at the top right of the LCD screen. -
Page 30: Signal Strength
Getting Started with Your Phone Signal Strength Call quality depends on the signal strength in your area. You can tell how much signal strength you have by the number of bars next to the signal strength icon: the more bars, the stronger the signal. -
Page 31: Redialing Calls
3. Press the external touch to place the call. 4. Press the external touchkey to end the call. NOTE To activate the speakerphone during a call, simply open the flip. NOTE If the external Touch Screen backlight dims while on a call, touch any side key to turn the backlight back on. -
Page 32: Menu Access
Menu Tree on the External Touch Screen Menu Access The MENU Touch Key provides access to eight phone menus. To access the main menus from the external screen, unlock first by pressing the unlock key ( ) on the left side of your phone or sliding the image the bottom of the screen to open the main menus. -
Page 33: Shortcut Menu On The External Touch Screen
Shortcut Menu on the External Touch Screen Touch Screen Shortcut Menu The Shortcut Menu allows quick, direct access to several frequently used device features from the external Touch Screen. Up to 15 shortcuts can be set. To access the Shortcut Menu, unlock the external Screen, then touch the Shortcut Menu icon . -
Page 34: Features
Quick Access to Convenient Features Vibrate Mode Sets the phone to vibrate instead of ring ( is displayed). To set Vibrate Mode, press and hold the internal keypad or touch and hold (touch to display the keypad) from the external Touch Screen Dialpad. -
Page 35: Voice Commands
Voice Commands Voice Commands allow you to do things by verbal command (e.g., make calls, check Voicemail, etc.). For more information, see page 111. 1. Access the Voice Commands feature: With the flip open, press ● With the flip closed and the ●... -
Page 36: Memory
Contacts in Your Phone’s Memory Storing Basics Using the Internal Keypad 1. Open the flip and enter a number (max. 48 digits), then press the Left Soft Key [Save]. 2. Use the Directional Key scroll to Add New Contact/ Update Existing, then press 3. -
Page 37: Speed Dial
4. Change the entry as you want, then press to save your changes. Using the External Touch Screen 1. Unlock the Touch Screen by sliding the image unlock or press the Unlock Key ( ) on the left side of your phone. 2. -
Page 38: Storing A Number With Pauses
Contacts in Your Phone’s Memory 8. Touch DONE , then touch SAVE Storing a Number with Pauses Pauses allow you to enter additional series of numbers to access automated systems such as Voicemail or credit billing numbers. Pause types are: Wait (W) The phone stops dialing until you press the Left Soft Key [Release] with the flip open, or touch RELEASE... -
Page 39: Changing The Default Number
From the Contact List Screen Using the Internal Keypad 1. Open the flip, then press the Right Soft Key [Contacts]. 2. Use the Directional Key scroll to an entry, then press the Left Soft Key [Edit]. 3. Use the Directional Key scroll to the phone number field to add, then enter the number and press... -
Page 40: Deleting
Contacts in Your Phone’s Memory Deleting Deleting a Phone Number Using the Internal Keypad 1. Open the flip, then press the Right Soft Key [Contacts]. 2. Use the Directional Key scroll to an entry. 3. Press the Left Soft Key [Edit]. -
Page 41: Speed Dialing
Deleting a Speed Dial Using the External Touch Screen 1. Unlock the Touch Screen by sliding the image unlock or press the Unlock Key ( ) on the left side of your phone. 2. Touch the contact touch soft key 3. - Page 42 Contacts in Your Phone’s Memory Account Information Speed Dials Speed Dials 95-99 are preset to access certain phone account information for your convenience: 95 (#Warranty Center), 96 (#DATA), 97 (#BAL), 98 (#MIN), and 99 (#PMT). Unlike Speed Dial 1, you can delete and/or change these.
-
Page 43: Rotation
3D (Three-axis-accelerometer) Rotation 3D Rotation is a feature that allows you to have flexibility in how you view content on your screen. Simply turn your enV horizontal (or horizontal to vertical ) and get a whole new perspective. enV TOUCH senses the change in orientation and automatically adjusts to fit the screen. -
Page 44: Camera Features
Camera Features The built-in 3.2M camera feature is complete with optics for superior photo capabilities with various options, effects, and controls. The camera feature works with the flip closed or open. Camera Settings Below shows how to access the camera settings with the flip closed. Touch screen to access... - Page 45 Options in Camera Mode Flash Settings Auto / Flash On / Only This Shot/ Flash Off. Focus Settings Auto Focus: Automatically focuses. Macro: Use for really close shots. Manual: Select where you want to focus the shot. Shot Types Normal: No effect applied to picture. Panorama: Take series of pictures from left to right when you match the circles, the next shot is taken...
-
Page 46: Video Camera
Self Timer: Off/ 3 Seconds/ 5 Seconds/ 10 Seconds Auto Save: On/ Off Save Option: Internal/ External Video Camera The built-in video camera feature functions like the camera feature. To set options, effects and controls follow the steps below: Video Camera Settings Below shows how to access the video settings with the flip closed. - Page 47 NOTE To access video settings with the flip open, press the Right Soft Key [Options]. Use to adjust brightness and to adjust zoom. Resolution : 640X480 / 320X240 / 176X144 White Balance : Auto / Sunny / Cloudy /Fluorescent / Glow Color Effects : Normal/ Negative/ Aqua/ Sepia/...
-
Page 48: Picture Editing
Picture Editing With the enV ® TOUCH ‘s many picture editing features, you have endless possibilites in creating fun pictures. To edit while viewing a picture, touch Options , then touch Edit. Editing Touch Keys Pen Drawing Be creative. Draw on a photo. Choose from multiple colors, pen and eraser widths. -
Page 49: Video Editing
1. View a picture with someone's face, touch , then touch Edit. 2. Touch to enter face editing menu, then touch placement of eyes and mouth. 3. Touch , then touch select face distortion type. 4. Touch one of the face distortions , then touch increase or to decrease... - Page 50 Editing Using Video Effects Access My Videos, then touch the video clip to edit. Touch Options ● Multi Trim , edit video up to 3 times. You can add a fade effect between the clipped video pieces by touching and then Save with Fade Effect.
-
Page 51: Media Center
M M e e d d i i a a C C e e n n t t e e r r Media Center gives you customizable service right on your wireless device that lets you get Ringtones, play games, surf the web, get up-to-the- minute information and more. -
Page 52: 1.1 V Cast Music | Rhapsody
Media Center Music Only Mode Music Only mode allows you to listen exclusively to your music (as you do with MP3 players). Set Music Only mode to On if you don't want your listening enjoyment to be interrupted by calls. 1. -
Page 53: Get New Ringtones
1.2 Get New Ringtones Allows you to connect to Media Center and download various ringtones. Using the Internal Keypad 1. Open the flip and press [MENU]. 2. Press [Media Center]. 3. Press Music & Tones. 4. Press Get New Ringtones. 5. -
Page 54: My Music
Media Center Using the External Touch Screen 1. Unlock the Touch Screen by sliding the image unlock or press the Unlock Key ( ) on the left side of your phone and touch to access the menu. 2. Touch the Media Center icon 3. -
Page 55: Playing Your Music
Using the External Touch Screen 1. Unlock the Touch Screen by sliding the image up to unlock or press the Unlock Key ( ) on the left side of your phone and touch to access the menu. 2. Touch the Media Center icon 3. - Page 56 Play All Allows you to play all songs. All Songs Allows you to view all of your songs alphabetically. Scroll to a song and press Playlists Allows you to view and play your songs by playlist. Playlists can be created on either your phone or PC then transferred between them, but Playlists can only be managed (add and delete songs) from where they were created.
-
Page 57: Touch Screen Music Controls
Exit From the Music Player Press the internal key or the external Player. Touch Screen Music Controls Back key Shuffle Repeat Album Name Song Name Rewind/Skip Back to Previous Song • The enV ® TOUCH Music Player has various EQ settings available(CONCERT HALL, CLASSICAL, BASS BOOSTER, VOCAL BOOSTER, TREBLE BOOSTER, FLAT) for different playback conditions &... -
Page 58: Controlling The Music Player
Media Center Controlling the Music Player If you keep the flip open while listening to your music, use the following to control the Music Player: ● Left Soft Key [Mute/Unmute] Allows you to mute or unmute the current song. ● Right Soft Key [Options] Allows you to choose:... -
Page 59: Sync Music
1.6 Sync Music Allows you to synchronize your music between your PC and your phone. Transfer music files from your PC into your phone's memory or microSD memory card (sold separately) and vice versa. Transfer music you purchased from the online V CAST Music | Rhapsody Music Store to your PC. -
Page 60: Picture & Video
Media Center Sync your music from your PC to your wireless device This option allows you to transfer music files from your PC. In order to use this option, you must install V CAST Music with Rhapsody on your PC. 1. - Page 61 Using the Internal Keypad 1. Open the flip and press [MENU]. 2. Press [Media Center]. 3. Press Picture & Video. 4. Press V CAST Videos. 5. Press the Directional Key view video clip categories and press to select a category. 6.
- Page 62 Media Center 7. Once video is downloaded a message will appear on your phone. 8. Select Yes and press video. 9. The video clip will be automatically saved in My Videos. NOTE Not all videos are downloadable. Only videos that have the option to save can be downloaded.
-
Page 63: Get New Pictures
2.2 Get New Pictures Allows you to connect to Media Center and download a variety of images for My Pictures. Using the Internal Keypad 1. Open the flip and press [MENU]. 2. Press [Media Center]. 3. Press Picture & Video. 4. - Page 64 Media Center Manage My Pics Allows you to mark pictures and apply options (erase, move, lock/unlock). Edit Menu to edit the image. Slide Show Displays your pictures as a slide show beginning with the selected picture. Rename Renames the image. Set Favorite Sets the image as favorite.
-
Page 65: My Videos
Rename Renames the image. Print Via Bluetooth/ Preference File Info Name/ Date/ Time/ Resolution/ Size/ Type Options for Wallpaper Images: Wallpaper(Internal Wallpaper/ External Wallpaper)/ Take Picture/ Get New Pictures Options for Images with DRM: Set As/ Take Picture/ Get New Pictures/ Slide Show/ Rename/ File Info 2.4 My Videos... - Page 66 Media Center between Fit, Normal and Full. ● Down Directional Key ● Right Directional Key ● Left Directional Key NOTE While playing a video, press the Right Soft Key [Options] to select Send / Record Video / VCAST Videos / Set As / Rename / File Info Using the External Touch Screen 1.
-
Page 67: Take Picture
2.5 Take Picture Take pictures straight from your phone. Camera Key Camera Lens TIPS ● To take a clear picture, set the proper brightness level and zoom before taking the picture. ● Avoid jolting the camera. ● Wipe the camera lens with a soft cloth. SHORTCUTS The Side Camera Key ( ) is a shortcut key to... -
Page 68: Record Video
Media Center Using the External Touch Screen 1. Unlock the Touch Screen by sliding the image up to unlock or press the Unlock Key ( ) on the left side of your phone and touch to access the menu. 2. Touch the Media Center icon 3. -
Page 69: Online Album
Color Effects Normal/ Negative/ Aqua/ Sepia/ Black&White Save Option Internal/ External Go To Camera Switches to the Camera function 7. Press [Record] to begin recording, and again to stop. 8. Press the Left Soft Key [Save]. The recorded video is stored in My Videos. -
Page 70: Games
Media Center 3. Touch Picture & Video. 4. Touch Online Album. 5. Login to access your Online Album. 3. Games Allows you to play games as well as download new games and applications from the Media Center server. Using the Internal Keypad 1. - Page 71 City ID City ID is an enhanced Caller ID feature on select Verizon Wireless handsets that automatically displays the city and state of every wireless call received. City ID reads the area code and local exchange of an incoming call and displays the location associated with that number.
- Page 72 Media Center NOTES • To use VZ Navigator , you must turn Location On (see page 142). • Download and subscription required for use only in National Enhanced Service Coverage Area: accuracy and completeness of information is not guaranteed; information about location of device will be used to deliver service.
- Page 73 Visual Voice Mail. 8. Once the activation steps are completed, exit the application and return after 5 minutes to begin using Visual Voice Mail. * Please note that storing a voice mail password is required to use Visual Voice Mail. This application may store voice mail messages in electronic format on this device.
- Page 74 Media Center Mobile Email Mobile Email is an application downloadable from the Browse & Download Menu. Don't miss an important email. Thanks to Mobile Email, you can get your emails on your phone, while you're on the go. Mobile Email works with many providers, including Yahoo!, AOL, Verizon.net and others.
-
Page 75: Extras
6. Extras Allows you to access to extras applications. Using the Internal Keypad 1. Open the flip and press [MENU]. 2. Press [Media Center]. 3. Press Extras. 4. Press [Get New Applications]. Using the External Touch Screen 1. Unlock the Touch Screen by sliding the image unlock or press the Unlock Key ( ) on the left side of your... -
Page 76: Messaging
MESSAGING M M E E S S S S A A G G I I N N G G The phone can store up to 690 messages. The information stored in the message is determined by phone mode and service capability. Other limits to available characters per message may exist. - Page 77 ● Editing Text 1. With the flip open, press the Right Soft Key [Options] (or with the flip closed, touch 2. Select the option(s) to customize. Insert Quick Text Allows you to insert quick text customized on the phone. Save As Draft Saves the message into the Drafts folder.
-
Page 78: Picture Message
MESSAGING 1.2 Picture Message The Basics of Sending a Message Using the Internal Keypad 1. Open the flip and press the Left Soft Key [Message]. 2. Press New Message. 3. Press Picture Message. 4. Enter the cellular phone number or email address of the recipient. - Page 79 2. Select the option(s) to customize. Preview Displays the Picture message as it would be seen by the recipient. Save As Draft Saves the message into the Drafts folder. Insert Quick Text Allows you to insert quick text customized on the phone.
-
Page 80: Video Message
MESSAGING to scroll through the slides attached to your picture message. 6. Complete the message then send or save the message. 1.3 Video Message The Basics of Sending a Message Using the Internal Keypad 1. Open the flip and press the Left Soft Key [Message]. -
Page 81: Voice Message
flip closed, touch 3. Select the option(s) to customize. Preview Displays the Video message as it would be seen by the recipient. Save As Draft Saves the message into the Drafts folder. Insert Quick Text Allows you to insert quick text customized on the phone. -
Page 82: Messages
MESSAGING 9. Touch Text, Name Card, and/or Subject to complete your message. 10.Touch SEND to send. 2. Messages When your phone receives a message, you are alerted by: ● a notification message on the screen. ● an alert tone or vibration, depending on your volume settings. -
Page 83: Drafts
2. Touch the Messaging icon 3. Touch Messages. 4. Touch a message entry. 5. Options from here: REPLY ● Touch ● Touch a message entry to view it, then you can touch REPLY ERASE , or FORWARD ● Touch Options Manage Inbox / Erase Msgs from Contact / Settings Message Icon Reference... -
Page 84: Voicemail
MESSAGING Using the External Touch Screen 1. Unlock the Touch Screen by sliding the image unlock or press the Unlock Key ( ) on the left side of your phone and touch to access the menu. 2. Touch the Messaging icon 3. -
Page 85: Visual Voice Mail
4. Options from here: ● Touch to delete information, and then touch Yes. ● Press or touch CALL listen to the message(s). ● Touch Visual Vmail to use the Visual Voicemail function. 5. Visual Voice Mail Visual Voice Mail allows the management of voice mail directly from the device rather than accessing voice mail via traditional... -
Page 86: Chat
MESSAGING your enV ® TOUCH when new email has arrived. Using the Internal Keypad 1. Open the flip and press the Left Soft Key [Message]. 2. Select Email. 3. Select an email service. Mobile Email/ Corporate Mail/ Mobile Web Email Using the External Touch Screen 1. - Page 87 Message Settings Sub-Menu Descriptions 1. Messages View Select Time to display messages chronologically in Inbox and Outbox. Select Contact to sort all messages alphabetically by Contact in one folder. 2. Entry Mode Select T9 Word , Abc , ABC or 123 to be your default input method.
-
Page 88: Erase Options
MESSAGING 13. Callback # Select On to automatically send a designated callback number with your messages. Or, select Off. 14. Signature Select Custom to create/edit a signature to automatically send with your messages. Select None for no signature. 10. Erase Options Allows you to erase all messages stored in your Inbox, Sent, or Drafts folders. -
Page 89: Contacts
C C O O N N T T A A C C T T S S The Contacts Menu allows you to store names, phone numbers and other information in your phone’s memory. SHORTCUT Pressing the Right Soft Key with the flip open is Shortcut to the Contacts List. -
Page 90: Backup Assistant
CONTACTS Message/ Set As ICE Contact/ Call/ Set As Favorite/ Manage Contacts/ Send Name Card ● Press the Left Soft Key [Edit] to edit. ● Press to call. NOTE In the contact list, press the Right Soft [Options]. Select Manage Contacts. In this menu you can manage multiple contacts at the same time. -
Page 91: Favorites
NOTE To use the Backup Assistant service, you are required to activate the service from your phone. Using the Internal Keypad 1. Open the flip and press [MENU]. 2. Press the Directional Key scroll to Contacts, and press 3. Press Backup Assistant. -
Page 92: Groups
CONTACTS 5. Groups Allows you to view your grouped Contacts, add a new group, change the name of a group, delete a group, or send a message to everyone in the selected group. Using the Internal Keypad 1. Open the flip and press [MENU]. -
Page 93: Speed Dials
6. Speed Dials Allows you to view your list of Speed Dials or designate Speed Dials for numbers entered in your Contacts. Using the Internal Keypad 1. Open the flip and press [MENU]. 2. Press the Directional Key scroll to Contacts, and press 3. - Page 94 CONTACTS Using the External Touch Screen 1. Unlock the Touch Screen by sliding the image unlock or press the Unlock Key ( ) on the left side of your phone and touch to access the menu. 2. Touch the Contacts icon 3.
-
Page 95: My Name Card
8. My Name Card Allows you to create, edit and view all of your own Contact information including name, phone numbers, and email address. Using the Internal Keypad 1. Open the flip and press [MENU]. 2. Press the Directional Key scroll to Contacts, and press You may send your name card using the Right Soft Key... -
Page 96: Recent Calls
RECENT CALLS R R E E C C E E N N T T C C A A L L L L S S The Recent Calls Menu is a list of the last phone numbers or Contact entries for calls you placed, accepted, or missed. -
Page 97: Received
2. Received Allows you to view the list of incoming calls; up to 90 entries. Using the Internal Keypad 1. Open the flip and press [MENU]. 2. Press the Directional Key scroll to the RECENT CALLS menu and press 3. Press Received. -
Page 98: Dialed
RECENT CALLS 3. Dialed Allows you to view the list of outgoing calls; up to 90 entries. Using the Internal Keypad 1. Open the flip and press [MENU]. 2. Press the Directional Key scroll to the RECENT CALLS menu and press 3. -
Page 99: All
4. All Allows you to view the list of all calls; up to 270 entries. Using the Internal Keypad 1. Open the flip and press [MENU]. 2. Press the Directional Key scroll to the RECENT CALLS menu and press 3. Press All. -
Page 100: View Timers
RECENT CALLS 5. View Timers Allows you to view the duration of selected calls. Using the Internal Keypad 1. Open the flip and press [MENU]. 2. Press the Directional Key scroll to the RECENT CALLS menu and press 3. Press View Timers. -
Page 101: Vz Navigator
V V Z Z N N a a v v i i g g a a t t o o r r The Navigator Menu allows you to get directions to locations when you're out and about. ● Voice-prompted turn-by-turn directions with auto-rerouting if you miss a turn ●... -
Page 102: Browser
Browser B B r r o o w w s s e e r r The Browser feature allows you to access news, sports and weather from your Verizon Wireless device. Access and selections within this feature are dependent upon your service provider. - Page 103 Panning Drag the screen left to right to display web content that may be outside the viewing screen. CAUTION Do not use a sharp item as your stylus because it could scratch your screen. Returning to Home Page With Flip Open: Press and hold press the Right Soft Key [Menu], then select...
- Page 104 Browser Auto Page Fitting When loading a web page, customizes zoom level and adjusts web page to screen length. Block Pop-ups Allows you to block pop-ups. Advanced Setting Passwords - Save password for sites: Allows the Browser to save login info. View Saved Passwords: Allows you to view saved web page login info.
- Page 105 Command bar icons on the External Touch Screen URL Bar/ Web Search Allows you to enter a Web address to go to or enter text to search for. Forward Back Allows you to go back to the previous page. Home Returns to Home Page.
- Page 106 Browser From the Touch Screen (Flip closed): 1. Access the Browser 2. Tap or scroll the screen. 4. Zoom in. ● Press hold button. 5. Zoom out. ● Press hold button. 6. Fit to Screen ● Press button. Gesture Zoom from the Touch Screen (Flip closed) 1.
- Page 107 Using Gesture 1. Press Camera Key( ) or SEND Key( currently viewing. The Gesture guide screen displays. 2. Touch the screen and drag your finger in the direction of the Gesture guide menu function you desire. Ex) To activate History menu, drag the screen downward. Gesture guide [History gesture]...
- Page 108 Browser 1) Add New Feed From the Touch Screen : Touch to bring up the Browser URL bar and menus. Then touch the RSS registration indicator any information necessary and touch Save to add the feed. From the Internal Keypad : Press and use the cursor to highlight and select the RSS registration indicator...
-
Page 109: Settings & Tools
S S E E T T T T I I N N G G S S & & T T O O O O L L S S 1. My Verizon Check your subscription information ranging from your payment plan to your software upgrade or other available services. -
Page 110: Call
SETTINGS & TOOLS Sensitivity Adjust the sensitivity as More Sensitive / Automatic/ Less Sensitive. Adapt Voice If the phone asks you to repeat your voice command too often, train the phone to recognize your voice patterns. Train Digits/ Train Words Prompts Mode/ Audio Playback/ Timeout For Mode, set Prompts/... -
Page 111: Go To
would automatically start a text message without asking for the message type. When using 'Send Message' command, speak clearly and say the number, group name, or name exactly as it is entered in your Contacts list. 2.1.3 Go to <Menu> The 'Go to' command allows you to access a menu within the phone (for example, 'Go to Calendar'). -
Page 112: Ez Tip Calculator
SETTINGS & TOOLS 6. Press the Right Soft Key [Options] to add parentheses, or power functions to the calculation. 7. Press to view the calculation result. Using the External Touch Screen 1. Unlock the Touch Screen by sliding the image unlock or press the Unlock Key ( ) on the left side of your phone and touch... -
Page 113: Calendar
● Touch the left and right arrow keys to increase or decrease the amount(s). Corresponding calculation fields (tip and total for each person) appear automatically. 6. Touch Reset for another calculation. 2.4 Calendar Allows you to keep your agenda convenient and easy to access. Simply store your appointments and your phone will alert you with a reminder you set. -
Page 114: Alarm Clock
SETTINGS & TOOLS Using the External Touch Screen 1. Unlock the Touch Screen by sliding the image up to unlock or press the Unlock Key ( ) on the left side of your phone and touch to access the menu. 2. -
Page 115: Document Viewer
Using the External Touch Screen 1. Unlock the Touch Screen by sliding the image up to unlock or press the Unlock Key ( ) on the left side of your phone and touch to access the menu. 2. Touch the Settings & Tools icon 3. -
Page 116: World Clock
SETTINGS & TOOLS ● Press [STOP]. ● Press the Right Soft Key [Reset]. Using the External Touch Screen 1. Unlock the Touch Screen by sliding the image up to unlock or press the Unlock Key ( ) on the left side of your phone and touch to access the menu. -
Page 117: Notepad
7. Touch to zoom in on the city and view its date and time infomation. NOTE With the Left Soft Key SET DST or touch saving time. 2.9 Notepad Allows you to add, read, edit, and erase notes. Using the Internal Keypad 1. -
Page 118: Usb Mass Storage
SETTINGS & TOOLS Using the External Touch Screen Allows you to create and manage your drawings. 1. Unlock the Touch Screen by sliding the image unlock or press the Unlock Key ( ) on the left side of your phone and touch to access the menu. -
Page 119: Bluetooth Menu
3. Bluetooth Menu The enV ® TOUCH is compatible with devices that support the Bluetooth Headset, Handsfree, Dial Up Networking, Stereo, Phonebook Access, Basic Printing, Object Push* File Transfer, Basic Imaging and Human Interface profiles**. You may create and store 20 pairings within the enV ®... - Page 120 SETTINGS & TOOLS Bluetooth ® accessory instructions for the appropriate passcode (typically “0000” - 4 zeroes). Enter the passcode and press 10. Once pairing is successful, select either Always Ask or Always Connect and press (except headset devices) 11. Once connected, you will see the device listed in the Bluetooth ®...
-
Page 121: My Phone Name
● Icon References When a Bluetooth ® Wireless Connection is Searched (neither connected nor paired). When an audio device is searched by your ® TOUCH device When a PC is searched by ® TOUCH your When a PDA is searched by ®... -
Page 122: Discovery Mode
SETTINGS & TOOLS 7. Use the pop-up keypad to edit the phone's Bluetooth ® name. and touch Done Bluetooth ® wireless connection is dependent on your Bluetooth ® stereo device. Even though you want to connect with a headset that supports both HFP and A2DP, you may only be able to connect with one. -
Page 123: Supported Profiles
SHOW Simply touch to enter Discovery Mode. 4. Touch 5. Touch Discovery Mode. 6. Touch a setting. On/ Off 3.3 Supported Profiles Allows you to see profiles that your ® TOUCH phone can support. Using the Internal Keypad 1. Open the flip and press [MENU]. -
Page 124: Sounds Settings
SETTINGS & TOOLS ● The Headset, Handsfree, and Stereo profiles supported by enV ® TOUCH provides you with the ability to use the integrated music player (and optional Bluetooth ® stereo headset) to listen to WMA, MP3, AAC, AAC+, etc. music providing you with listening enjoyment. -
Page 125: Call Sounds
4. Touch Master Volume. 5. Adjust the volume by touching more or fewer volume bars and touch to save the setting. 4.2 Call Sounds Allows you to set how the phone alerts you for types of incoming calls. Using the Internal Keypad 1. -
Page 126: Call Vibrate
SETTINGS & TOOLS 4.2.2 Call Vibrate Using the Internal Keypad 1. Open the flip and press [MENU]. 2. Press the Directional Key scroll to the Settings & Tools menu and press 3. Press Sounds Settings. 4. Press Call Sounds. 5. Press Call Vibrate. -
Page 127: Alert Sounds
4.3 Alert Sounds Allows you to select the alert type for new messages or missed calls. Using the Internal Keypad 1. Open the flip and press [MENU]. 2. Press the Directional Key scroll to the Settings & Tools menu and press 3. -
Page 128: Digit Dial Readout
SETTINGS & TOOLS Using the External Touch Screen 1. Unlock the Touch Screen by sliding the image up to unlock or press the Unlock Key ( ) on the left side of your phone and touch to access the menu. 2. -
Page 129: Power On/Off
a call. Call Connect Alerts you when the call is connected. Charge Complete Alerts you when the battery is completely charged. 6. Use the Directional Key scroll to a setting, then press On/ Off Using the External Touch Screen 1. Unlock the Touch Screen by sliding the image up to unlock or press the Unlock Key ( ) on the... -
Page 130: Display Settings
SETTINGS & TOOLS 4. Place your finger on the Touch Screen and apply gentle upward pressure to scroll the list up, then touch Power On/Off. 5. Touch Power On Sound / Power On Vibrate / Power Off Sound / Power Off Vibrate to toggle the setting between: On/ Off 5. -
Page 131: External Banner
5.1.1.2 External Banner Using the Internal Keypad 1. Open the flip and press [MENU]. 2. Press the Directional Key scroll to the Settings & Tools menu and press 3. Press Display Settings. 4. Press Banner. 5. Press Personal Banner. 6. Press External Banner. -
Page 132: Backlight
SETTINGS & TOOLS 2. Touch the Settings & Tools icon 3. Touch Display Settings. 4. Touch Banner. 5. Touch ERI Banner to toggle the setting. On/ Off 5.2 Backlight Allows you to set the duration for illuminating the backlight. Screens and Keypad are set separately. -
Page 133: Wallpaper
5.3 Wallpaper Allows you to choose the kind of background to be displayed on the phone. The possibilities are endless, but Fun Animations, in particular, provide you with flash screens for your background wallpaper and Slide Show allows you to select several images to display in slides as wallpaper. -
Page 134: Display Themes
SETTINGS & TOOLS 3. Press Display Settings. 4. Press Charging Screen . 5. Select Internal Charging Screen or External Charging Screen. 6. Scroll to a setting and press No Image/ Desk Clock/ Calendar NOTE Press the Left Soft Key to view the options before setting it. Using the External Touch Screen 1. -
Page 135: Dial Fonts
Display Settings. 4. Press Menu Fonts. 5. Use the Directional Key scroll to a setting, then press VZW Font/ LG Serif/ LG Edge/ LG Joy/ LG Script NOTE Press the Left Soft Key [View] to preview the selected menu font. -
Page 136: Internal Clock Format
SETTINGS & TOOLS 3. Touch Display Settings. 4. Touch Dial Fonts. 5. Touch a setting. Normal/ Large Only 5.8 Internal Clock Format Using the Internal Keypad 1. Open the flip and press [MENU]. 2. Press the Directional Key scroll to the Settings & Tools menu and press 3. -
Page 137: Phone Settings
NOTE The Calibration setting allows you to calibrate the Touch Screen for improved touch accuracy based on your touch. Using the External Touch Screen 1. Unlock the Touch Screen by sliding the image unlock or press the Unlock Key ( ) on the left side of your phone and touch to access the menu. -
Page 138: Set Shortcuts
SETTINGS & TOOLS Using the External Touch Screen 1. Unlock the Touch Screen by sliding the image up to unlock or press the Unlock Key ( ) on the left side of your phone and touch to access the menu. 2. -
Page 139: Voice Commands
2. Touch the Settings & Tools icon 3. Touch Phone Settings. 4. Touch Set Shortcuts. 5. Set shortcuts. Internal My Shortcuts ● Touch Shortcut 1, 2, 3, or 4, then touch the new shortcut you want to set for it. Internal Directional Keys ●... -
Page 140: Language
SETTINGS & TOOLS Adapt Voice Train Digits/ Train Words Prompt Mode Prompts/ Readout + Alerts/ Readout/ Tones Only Audio Playback Speakerphone/ Earpiece Prompt Timeout 5 seconds/ 10 seconds CLR Key Activation On/ Off Info 7.4 Language Allows you to set the bilingual (English or Spanish) feature according to your preference. -
Page 141: Current Country
Using the External Touch Screen 1. Unlock the Touch Screen by sliding the image up to unlock or press the Unlock Key ( ) on the left side of your phone and touch to access the menu. 2. Touch the Settings & Tools icon 3. -
Page 142: Security
SETTINGS & TOOLS 7.7 Security The Security menu allows you to secure the phone electronically. Using the Internal Keypad 1. Open the flip and press [MENU]. 2. Press the Directional Key scroll to the Settings & Tools menu and press 3. -
Page 143: Restrictions
unlock or press the Unlock Key ( ) on the left side of your phone and touch to access the menu. 2. Touch the Settings & Tools icon 3. Touch Phone Settings. 4. Place your finger on the Touch Screen and apply gentle upward pressure to scroll the list up, then touch Security. -
Page 144: Phone Lock
SETTINGS & TOOLS pressure to scroll the list up, then touch Security. 5. Enter the four-digit lock code. 6. Touch Restrictions. 7. Enter the four-digit PIN code. 8. Touch a Restrictions submenu, then the setting. Location Setting Lock Setting/ Unlock Setting Incoming Calls Allow All/ Contacts Only/ Block All... -
Page 145: Lock Phone Now
7. Touch a setting. Unlocked The phone is not locked (Lock mode can be used). On Power Up The phone is locked when it is turned on. 7.7.4 Lock Phone Now Using the Internal Keypad 1. Open the flip and press [MENU]. -
Page 146: Restore Phone
SETTINGS & TOOLS left side of your phone and touch to access the menu. 2. Touch the Settings & Tools icon 3. Touch Phone Settings. 4. Place your finger on the Touch Screen and apply gentle upward pressure to scroll the list up, then touch Security. -
Page 147: System Select
7.8 System Select Allows you to set up the phone management environment. Leave this setting as the default unless you want to alter system selection as instructed by your service provider. Using the Internal Keypad 1. Open the flip and press [MENU]. -
Page 148: Call Settings
SETTINGS & TOOLS Using the External Touch Screen 1. Unlock the Touch Screen by sliding the image unlock or press the Unlock Key ( ) on the left side of your phone and touch to access the menu. 2. Touch the Settings & Tools icon 3. -
Page 149: End Call Options
5. Touch setting(s) you want. Flip Open(Speakerphone)/ Any Key/ Auto with Handsfree 6. Touch DONE 8.2 End Call Options Allows you to determine how the phone will disconnect a call. Using the Internal Keypad 1. Open the flip and press [MENU]. -
Page 150: Auto Retry
SETTINGS & TOOLS Using the External Touch Screen 1. Unlock the Touch Screen by sliding the image up to unlock or press the Unlock Key ( ) on the left side of your phone and touch to access the menu. 2. - Page 151 Using the Internal Keypad 1. Open the flip and press [MENU]. 2. Press the Directional Key scroll to the Settings & Tools menu and press 3. Press Call Settings. 4. Press TTY Mode. An explanation message is displayed. 5. Press to continue.
-
Page 152: One Touch Dial
SETTINGS & TOOLS 4. Connect the TTY equipment to the power source and turn it on. 5. Make a phone connection to the desired number. 6. When connection is made, use the TTY equipment to type in and send a text message or send voice. 7. -
Page 153: Voice Privacy
Using the External Touch Screen 1. Unlock the Touch Screen by sliding the image unlock or press the Unlock Key ( ) on the left side of your phone and touch to access the menu. 2. Touch the Settings & Tools icon 3. -
Page 154: Dtmf Tones
SETTINGS & TOOLS 8.8 DTMF Tones Allows you to set the DTMF tone length. Using the Internal Keypad 1. Open the flip and press [MENU]. 2. Press the Directional Key scroll to the Settings & Tools menu and press 3. Press Call Settings. -
Page 155: Usb Auto Detection
Using the External Touch Screen 1. Unlock the Touch Screen by sliding the image up to unlock or press the Unlock Key ( ) on the left side of your phone and touch to access the menu. 2. Touch the Settings & Tools icon 3. -
Page 156: Memory
SETTINGS & TOOLS 10. Memory Allows you to check your enV internal phone memory as well as the microSD external memory. The enV ® TOUCH can access the following file types stored on the removable microSD card. My Pictures: png, jpg, bmp, gif My Sounds: mid, qcp (used for MMS, cannot be set as ringtones) My Videos: 3gp, 3g2... -
Page 157: Card Memory
5. Scroll to Memory Usage/ My Pictures/ My Videos/ My Music/ My Sounds then press Using the External Touch Screen 1. Unlock the Touch Screen by sliding the image up to unlock or press the Unlock Key ( ) on the left side of your phone and touch to access the menu. -
Page 158: Phone Info
SETTINGS & TOOLS Using the External Touch Screen 1. Unlock the Touch Screen by sliding the image up to unlock or press the Unlock Key ( ) on the left side of your phone and touch to access the menu. 2. -
Page 159: Sw/Hw Version
unlock or press the Unlock Key ( ) on the left side of your phone and touch to access the menu. 2. Touch the Settings & Tools icon 3. Place your finger on the Touch Screen and apply gentle upward pressure to scroll the list up, then touch Phone Info. -
Page 160: Software Update
SETTINGS & TOOLS Using the External Touch Screen 1. Unlock the Touch Screen by sliding the image up to unlock or press the Unlock Key ( ) on the left side of your phone and touch to access the menu. 2. - Page 161 Screen and apply gentle upward pressure to scroll the list up, then touch Phone Info. 4. Touch Software Update. The two options shown will be Status and Check New. Touch Status to see the status of a download or update and see information on the last successful update.
-
Page 162: Safety
Safety T T I I A A S S a a f f e e t t y y I I n n f f o o r r m m a a t t i i o o n n The following is the complete TIA Safety Information for wireless handheld phones. -
Page 163: Tips On Efficient Operation
Tips on Efficient Operation For your phone to operate most efficiently: Don’t touch the antenna unnecessarily when the phone is in use. Contact with the antenna affects call quality and may cause the phone to operate at a higher power level than otherwise needed. Driving Check the laws and regulations on the use of wireless phones in the... -
Page 164: Hearing Aids
Safety Hearing Aids Some digital wireless phones may interfere with some hearing aids. In the event of such interference, you may want to consult your service provider (or call the customer service line to discuss alternatives). Other Medical Devices and Health Care Facilities If you use any other personal medical device, consult the... -
Page 165: For Vehicles Equipped With An Air Bag
vehicles using liquefied petroleum gas (such as propane or butane); areas where the air contains chemicals or particles (such as grain, dust, or metal powders); and any other area where you would normally be advised to turn off your vehicle engine. For Vehicles Equipped with an Air An air bag inflates with great force. -
Page 166: Charger And Adapter Safety
Safety ● Promptly dispose of used batteries in accordance with local regulations. ● Battery usage by children should be supervised. ● Avoid dropping the phone or battery. If the phone or battery is dropped, especially on a hard surface, and the user suspects damage, take it to a service center for inspection. - Page 167 ● Please use only an approved charging accessory to charge your LG phone. Improper handling of the charging port, as well as the use of an incompatible charger, may cause damage to your phone and void the warranty.
-
Page 168: Explosion, Shock, And Fire Hazards
Only use the batteries and chargers provided by LG. The warranty will not be applied to products provided by other suppliers. Only authorized personnel should service the phone and its accessories. -
Page 169: General Notice
● Do not immerse your phone in water. If this happens, turn it off immediately and remove the battery. If the phone does not work, take it to an LG Authorized Service Center. ● Do not paint your phone. ●... -
Page 170: Loss
Safety ● When you use the phone in public places, set the ringtone to vibration so you don't disturb others. ● Do not turn your phone on or off when putting it to your ear. ● Use accessories, such as earphones and headsets, with caution. - Page 171 ● Limit the amount of time you listen. As the volume increases, less time is required before your hearing could be affected. ● Avoid using headphones after exposure to extremely loud noises, such as rock concerts, that might cause temporary hearing loss.
-
Page 172: Fda Consumer Update
Safety F F D D A A C C o o n n s s u u m m e e r r U U p p d d a a t t e e The U.S. Food and Drug Administration’s Center for Devices and Radiological Health Consumer... - Page 173 ● Design wireless phones in a way that minimizes any RF exposure to the user that is not necessary for device function; and ● Cooperate in providing users of wireless phones with the best possible information on possible effects of wireless phone use on human health.
- Page 174 Safety developed with the advice of the FDA and other federal health and safety agencies. When the phone is located at greater distances from the user, the exposure to RF is drastically lower because a person's RF exposure decreases rapidly with increasing distance from the source.
- Page 175 5. What research is needed to decide whether RF exposure from wireless phones poses a health risk? A combination of laboratory studies and epidemiological studies of people actually using wireless phones would provide some of the data that are needed. Lifetime animal exposure studies could be completed in a few years.
- Page 176 Safety from experts in government, industry, and academic organizations. CTIA-funded research is conducted through contracts with independent investigators. The initial research will include both laboratory studies and studies of wireless phone users. The CRADA will also include a broad assessment of additional research needs in the context of the latest research developments around the world.
- Page 177 Specific Absorption Rate (SAR) in the Human Body Due to Wireless Communications Devices: Experimental Techniques”, sets forth the first consistent test methodology for measuring the rate at which RF is deposited in the heads of wireless phone users. The test method uses a tissue- simulating model of the human head.
- Page 178 Safety Frequency (RF) energy, the measures described above would apply to children and teenagers using wireless phones. Reducing the time of wireless phone use and increasing the distance between the user and the RF source will reduce RF exposure. Some groups sponsored by other national governments have advised that children be discouraged from using wireless phones at all.
-
Page 179: Driver Safety Tips
interference be found to occur, the FDA will conduct testing to assess the interference and work to resolve the problem. 12. Where can I find additional information? For additional information, please refer to the following resources: FDA web page on wireless phones (http://www.fda.gov/cellphones/) Federal Communications Commission (FCC) RF Safety... - Page 180 Safety mounted device for your wireless phone or a speaker phone accessory, take advantage of these devices if available to you. 3. Make sure you place your wireless phone within easy reach and where you can reach it without removing your eyes from the road.
- Page 181 8. Use your wireless phone to call for help. Your wireless phone is one of the greatest tools you can own to protect yourself and your family in dangerous situations -- with your phone at your side, help is only three numbers away. Dial 911 or other local emergency number in the case of fire, traffic accident, road...
- Page 182 Safety C C o o n n s s u u m m e e r r I I n n f f o o r r m m a a t t i i o o n n o o n n S S A A R R (Specific Absorption Rate) This Model Phone Meets the Government’s Requirements for...
- Page 183 exposure. The tests are performed in positions and locations (e.g., at the ear and worn on the body) as required by the FCC for each model. This device was tested for typical body-worn operations with the back of the phone kept 0.79 inches (2.0 cm) between the user’s body and the back of the phone.
-
Page 184: Devices
Safety *In the United States and Canada, the SAR limit for mobile phones used by the public is 1.6 watts/kg (W/kg) averaged over one gram of tissue. The standard incorporates a substantial margin of safety to give additional protection for the public and to account for any variations in measurements. - Page 185 better/higher of the two ratings. Hearing devices may also be rated. Your hearing device manufacturer or hearing health professional may help you find this rating. Higher ratings mean that the hearing device is relatively immune to interference noise. The hearing aid and wireless phone rating values are then added together.
- Page 186 For information about hearing aids and digital wireless phones FCC Hearing Aid Compatibility and Volume Control http://www.fcc.gov/cgb/dro/hearing.html Gallaudet University, RERC http://tap.gallaudet.edu/DigWireless.KS/ DigWireless.htm HLAA (Hearing Loss Association of America) http://www.hearingloss.org/learn/cellph onetech.asp The Hearing Aid Compatibility FCC Order http://hraunfoss.fcc.gov/edocs_public/at tachmatch/FCC-03-168A1.pdf...
-
Page 187: Accessories
There are a variety of accessories available for your phone and three easy ways to purchase them: shop online anytime at www.verizonwireless.com, call us at 1866 VZ GOT IT (894 6848) or visit one of our Verizon Wireless Communication Stores. Wall/USB Charger Batteries... -
Page 188: Limited Warranty Statement
(6) The customer shall bear the cost of shipping the product to the Customer Service Department of LG. LG shall bear the cost of shipping the product back to the consumer after the completion of service under this limited warranty. - Page 189 LG may choose at its option to use functionally equivalent re- conditioned, refurbished or new units or parts or any units. In...
- Page 190 Safety THE DURATION OF THE EXPRESS WARRANTY HEREIN. LG SHALL NOT BE LIABLE FOR THE LOSS OF THE USE OF THE PRODUCT, INCONVENIENCE, LOSS OR ANY OTHER DAMAGES, DIRECT OR CONSEQUENTIAL, ARISING OUT OF THE USE OF, OR INABILITY TO...
-
Page 191: Glossary
Feature that accesses the Internet to provide the ability to access and even download a wide variety of software, information, music, video, and more right on your LG Verizon wireless phone. microSD Additional the external memory for your mobile phone. - Page 192 Safety nhanced oaming ndicator is a feature to indicate whether a mobile phone is on its home system, a partner network, or a roaming network. Many phones indicate home vs. roaming as an icon, but ERI capable phones can clearly indicate third “partner network”...
-
Page 193: Index
10 Driver Safety Tips 177 3D (Three-axis- accelerometer) Rotation Acronyms and Abbreviations 189 Add New Device 117 Adding Another Phone Number 36 Airplane Mode 135 Alarm Clock 112 Alert Sounds 125 All 97 Answer Options 146 Assisted Dialing 152 Auto Retry 148 Backlight 130 Backup Assistant 88 Banner 128... - Page 194 Keypad Volume 125 Language 138 Location 138 Making Calls 28 Master Volume 122 Media Center 49 Memory 154 Menu Access 30 Menu Fonts 132 Menu Tree on the External Touch Screen 30 Menu Tree on the Internal Screen 22 Messages 80 MESSAGING 74 Missed 94 Mobile Email 83...
- Page 195 TXT Message 74 USB Auto Detection 153 USB Mass Storage 116 V CAST Music | Rhapsody V CAST Videos 58 Vibrate Mode 32 Video Camera 44 Video Editing 47 Video Message 78 View Timers 98 Visual Voice Mail 83 Voice Commands 33, 107, Voice Message 79 Voice Privacy 151 Voicemail 82...
- Page 196 MEMO...
- Page 197 MEMO...
- Page 198 MEMO...