
Related Manuals for Motorola WIRELESSFENCE25


Summary of Contents for Motorola WIRELESSFENCE25
- Page 1 User’s Guide WIRELESS FENCE PET TRAINING SYSTEM Model: WIRELESSFENCE25 The features described in this User's Guide are subject to modifications without prior notice.
- Page 2 Please retain your original dated sales receipt for your records. For warranty service of your Motorola product, you will need to provide a copy of your dated sales receipt to confirm warranty status. Registration is not required for warranty coverage.
-
Page 3: Overview Of Pet Collar Unit
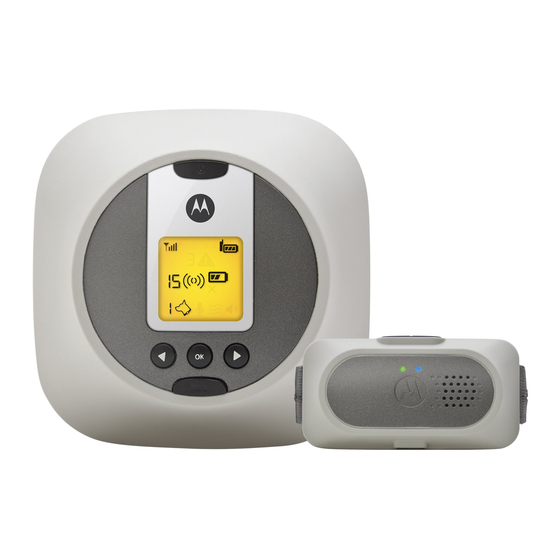
Overview of the Pet Collar Unit Pair Key Charging/Battery low LED Power Key Lights up in blue when charging. Press and hold to turn the unit On. Flashes in red when battery is low. The unit vibrates once and the Speaker indicator LED lights up in green for 3 seconds. - Page 4 Overview of the Wireless Fence Unit and Outdoor Stake Power Key Menu Key Press and hold to power on the unit. Press to access menu options. Press Press and hold to power off the unit. again to exit. When the unit is powered on, short OK Key press to turn fencing mode on or Press to select the desired option...
-
Page 5: Symbols On Wireless Fence Unit
Symbols on the Wireless Fence Unit RF signal strength of the Wireless Fence Unit against the Pet Collar Unit. Displays when you enter Menu mode. Alert indication on Collar 2 (battery low, out of range, etc). Displays when Fencing mode is activated. Battery level on the Wireless Fence Unit. -
Page 6: How System Works
How the Wireless Fence Pet Training System works The Wireless Fence Pet Training System comes with a portable Wireless Fence Unit that establishes an invisible boundary by transmitting radio signals to the Pet Collar Unit up to a distance of 150 feet line of sight. When your dog reaches the boundary zone (about 2 to 3 feet before the “real”... -
Page 7: Table Of Contents
Table of contents 1. Safety Instructions ..................9 2. Getting Started ..................11 Set up the Wireless Fence Unit..............11 Wireless Fence Unit Battery Installation ........... 12 Wireless Fence Unit Power Supply and Charging ........13 Connect the Outdoor Stake to the Wireless Fence Unit ......14 Attach the Adjustable Strap to the Pet Collar Unit ........ - Page 8 8. Cleaning and Care .................. 34 9. Frequently Asked Questions ..............35 10. Troubleshooting ..................37 11. General Information ................38...
-
Page 9: Safety Instructions
1. Safety Instructions WARNING: Not for use with dogs that pose a risk of injury to people or other animals. If in doubt that this product is right for you, please consult your veterinarian or certified behaviorist. RISK OF SKIN DAMAGE •... - Page 10 • Test this product and all its functions so that you are familiar with it prior to actual use. • Only use batteries of the same type. The Wireless Fence Unit uses an AA- sized rechargeable battery pack. • Do not use extension cords with power adapters. Only use the power adapters provided.
-
Page 11: Getting Started
2. Getting Started Set up the Wireless Fence Unit The Wireless Fence Unit works as a transmitter that detects the position of your dog and transmits signals to the Pet Collar Unit that is worn on your dog. • You can place the Wireless Fence Unit on a table top, connect it to a stake for use outdoors or mount it on a wall. -
Page 12: Wireless Fence Unit Battery Installation
Wireless Fence Unit Battery Installation IMPORTANT Installing the rechargeable battery pack and charging it fully before use is recommended. This will allow the unit to operate on battery in the event of a power outage, while traveling, or on a camping trip. The Wireless Fence Unit can be operated using an AA-sized rechargeable battery pack (supplied with the product) as an alternative source of power. -
Page 13: Wireless Fence Unit Power Supply And Charging
3. Insert the wire tab of the rechargeable battery pack into the contact slot as shown below and fit the battery pack into the compartment. 4. Close the battery compartment cover and gently tighten the screw in a clockwise direction using a small cross-head or flat end screwdriver. Wireless Fence Unit Power Supply and Charging 1. -
Page 14: Connect The Outdoor Stake To The Wireless Fence Unit
Connect the Outdoor Stake to the Wireless Fence Unit Fit the outdoor stake here. Turn clockwise 1. Fit the Outdoor Stake to the Wireless Fence Unit and turn clockwise to tighten. Attach the Adjustable Strap to the Pet Collar Unit 1. -
Page 15: Charging The Pet Collar Unit
Charging the Pet Collar Unit 1. Connect the small plug of the power adapter (5.9V DC / 1A - supplied with the product) to the Pet Collar Unit and the other end into the electrical outlet. 2. The Power LED will light up in blue to indicate charging. NOTE Only use the supplied power adapter (5.9V DC / 1A). -
Page 16: Fit The Pet Collar Unit On Your Dog's Neck
3. Put the strap over your dog’s neck, centering the Pet Collar Unit underneath its neck and making sure that the Motorola logo is upright facing you. 4. String the end of the strap through the strap buckle. 5. Pull the end of the strap until the desired level of... -
Page 17: Trim Away Excess Strap Length
The Pet Collar Unit should fit snugly on your dog’s neck so that you can only fit two fingers underneath it. It should not be able to rotate around the neck. If necessary, trim some of your dog’s hair where the Pet Collar Unit makes contact with the skin to allow for consistent performance. - Page 18 coats or undercoats, use one of the longer Collar Contacts included with your Wireless Fence Pet Training System. 1. Power off the Pet Collar Unit. 2. Using your fingers or with the help of the test light (supplied with your Wireless Fence Pet Training System), twist the Collar Contacts counter- clockwise to loosen and remove them.
-
Page 19: Using The Test Light
2.10 Using the Test Light IMPORTANT If your dog does not appear to feel the lowest level of static correction, check for proper collar fit and that there is good skin contact where the Collar Contacts touch the neck area of your dog, before increasing to higher levels. You can use the Test Light that is supplied with your Wireless Fence Pet Training System to test if the Wireless Fence Unit is sending static correction to the Pet Collar Unit. -
Page 20: Using The Pet Collar Unit
3. Using the Pet Collar Unit Powering On/Off the Pet Collar Unit To power on, press and hold POWER KEY on the Pet Collar Unit. The unit vibrates once and the Power LED lights up in green for 3 seconds. To power off, press and hold POWER KEY on the Pet Collar Unit. -
Page 21: Using The Wireless Fence Unit
4. Using the Wireless Fence Unit Powering On/Off the Wireless Fence Unit To power on or off, press and hold POWER KEY on the Wireless Fence Unit. Select a Pet Collar Unit (if you have more than 1 Pet Collar Unit) 1. -
Page 22: When To Increase Level Of Static Correction
When to Increase Level of Static Correction When you are trying to change your dog’s behavior around a heavy distraction where your dog is too excited to feel the usual level of static correction, you will need to increase the correction level 2 or 3 levels higher. If the usual level is 3, then you will need to increase it to level 5 to have your dog respond when it is really distracted or excited. -
Page 23: Setting Up An Invisible Boundary Zone
5. Setting Up an Invisible Boundary Zone What You’ll Need: 1. Pet Collar Unit 2. Test Light 3. Wireless Fence Unit (see “Turn Fencing Mode On or Off” on page 21). 4. Boundary Flags Set Transmission Range on your Wireless Fence Unit 1. -
Page 24: Place Boundary Flags
3. Hold the Pet Collar Unit with the Test Light Contacts at your dog’s neck level. The Motorola logo should be facing away from the Wireless Fence Unit and the Collar Contacts should be facing upwards. 4. Slowly walk towards the boundary zone (2 to 3 feet from the “real”... - Page 25 The Motorola logo should be facing away from the Wireless Fence Unit and the Collar Contacts should be facing upwards. 2. Slowly walk towards the boundary zone you have established in “Confirm Boundary Zone” on page 23. Note that the maximum distance between the boundary zone and the wireless fence unit is 150 feet.
-
Page 26: Training Program
6. Training Program IMPORTANT: Carefully following the entire training program of your new Wireless Fence Pet Training System is required to successfully contain your dog. The purpose of this training program is to teach your dog how to react to the system’s warning beep prior to any static correction. -
Page 27: Training Tips
• For best results, regardless of how quickly your dog is learning and respecting its new boundary, complete each phase of the training process. Training Tips • Do not punish your dog if it goes outside the boundary. The purpose of the training is to teach your dog that it is rewarding for it to stay inside the boundary and good things happen whenever it is inside the boundary. - Page 28 Steps: 1. Briskly walk towards the boundary flags. Your dog is more likely to be leading the way. 2. The warning beep from the Pet Collar Unit will indicate that your dog has entered the boundary zone. Training Program...
- Page 29 3. Immediately turn away and jog several feet back inside the boundary with your dog in tow. By doing this, you are conditioning your dog to move away from the boundary flags. 4. PRAISE your dog enthusiastically and provide a food treat. The key is to teach your dog how rewarding it is to stop before the boundary zone.
-
Page 30: Training - Days 2 - 4
Training - DAYS 2 - 4 IMPORTANT: Never leave the Pet Collar Unit on your dog for more than 12 hours. Never attach a leash or other restraint to the Pet Collar Unit – use a separate collar for leash and tags. Goal: Teach your dog to retreat from the boundary flags at the sound of the warning beep from the Pet Collar Unit, and introduce your dog to low levels of static... -
Page 31: Training - Days 5 - 7
Training - DAYS 5 - 7 IMPORTANT: Never leave the Pet Collar Unit on your dog for more than 12 hours. Never attach a leash or other restraint to the Pet Collar Unit – use a separate collar for leash and tags. Goal: Introduce tempting distractions and provide a level of static correction that is high enough so that your dog understands that there are more serious... -
Page 32: Training - Days 8 - 14
4. Repeat the distractions and approaches to the boundary for 10 – 15 minutes. 5. Play and praise for 10 minutes. Training - DAYS 8 - 14 Goal: Remove your dog’s leash and allow your dog to roam freely inside the boundary. Only proceed to this step if your dog has successfully obeyed the boundary in the presence of tempting distractions. -
Page 33: Disposal Of The Device (Environment)
7. Disposal of the Device (Environment) At the end of the product lifecycle, you should not dispose of this product with normal household waste. Take this product to a collection point for the recycling of electrical and electronic equipment. The symbol on the product, user's guide and/or box indicates this. -
Page 34: Cleaning And Care
8. Cleaning and Care IMPORTANT Power off the Pet Collar Unit before touching the Collar Contacts. Cleaning and care • Check Collar Contacts for tightness weekly. • Clean Collar Contacts with alcohol weekly. • Check your dog’s neck area for irritation and wash neck weekly. •... -
Page 35: Frequently Asked Questions
9. Frequently Asked Questions Will the Wireless Fence Pet Training System be effective on my dog? • The Wireless Fence Pet Training System is designed to be a convenient and effective training device on all healthy breeds and sizes. However, it should not be used on aggressive dogs. - Page 36 How long can I continue to deliver static correction to my dog? • The maximum duration is 60 seconds. You can press the STATIC CORRECTION KEY again after the time-out duration. What happens when there is a power failure or when there is no power supply? •...
-
Page 37: Troubleshooting
10. Troubleshooting When your dog does not seem to respond to the Static Correction • Make sure that the Pet Collar Unit is properly fitted on your dog. Loosely fitted collar will affect performance. For proper fit, the collar should be snug, yet loose enough to allow two fingers to fit between the strap and dog's neck. -
Page 38: General Information
US and Canada 1-888-331-3383 Email: support@motorolamonitors.com Consumer Products and Accessories Limited Warranty Thank you for purchasing this Motorola branded product manufactured under license by Binatone Electronics International LTD (“BINATONE”). What Does this Warranty Cover? Subject to the exclusions contained below, BINATONE warrants that this Motorola branded product (“Product”) or certified accessory (“Accessory”) - Page 39 PROVIDED UNDER THIS EXPRESS LIMITED WARRANTY IS THE EXCLUSIVE REMEDY OF THE CONSUMER, AND IS PROVIDED IN LIEU OF ALL OTHER WARRANTIES, EXPRESS OR IMPLIED. IN NO EVENT SHALL MOTOROLA OR BINATONE BE LIABLE, WHETHER IN CONTRACT OR TORT (INCLUDING...
- Page 40 (c) use of the Products or Accessories for commercial purposes or subjecting the Product or Accessory to abnormal usage or conditions; or (d) other acts which are not the fault of MOTOROLA or BINATONE, are excluded from coverage.
- Page 41 (b) broken seals or that show evidence of tampering; (c) mismatched board serial numbers; or (d) nonconforming or non-Motorola branded housings, or parts, are excluded from coverage. Communication Services. Defects, damages, or the failure of Products or Accessories due to any communication service or signal you may subscribe to or use with the Products or Accessories is excluded from coverage.
- Page 42 FCC, ACTA and Industry Canada (IC) regulations WARNING Changes or modifications to this equipment not expressly approved by the party responsible for compliance could void the user’s authority to operate the equipment. NOTE This equipment has been tested and found to comply with the limits for a Class B digital device, pursuant to Part 15 of the Federal Communications Commission (FCC) rules.
-
Page 43: Technical Specifications
Technical Specifications RF Frequency 2,400 - 2,485 MHz Modulation Chirp Spread Spectrum (CSS) Operating Temperature -20ºC to 45ºC Wireless Fence Unit 3.6V 2450mAh AA NiMH battery pack Voltage 100-240V (AC voltage, 60Hz) 5.9V DC, 1000mA (Adapter output) Collar Unit Voltage 3.7V 554mAh Li-battery pack 100-240V (AC voltage, 60Hz) 5.9V DC, 1000mA (Adapter output) - Page 44 MOTOROLA and the Stylized M Logo, are trademarks or registered trademarks of Motorola Trademark Holdings, LLC. and are used under license. All other trademarks are the property of their respective owners. © 2014 Motorola Mobility LLC. All rights reserved. US_EN Version 3.0 Printed in China...