Advertisement
Quick Links
CONNECTION INSTRUCTIONS FOR A-H2. REFER TO NUMBERED DIAGRAM ON REVERSE.
A-H2
Two-zone Hub
for A-BUS' System
Installation Manual
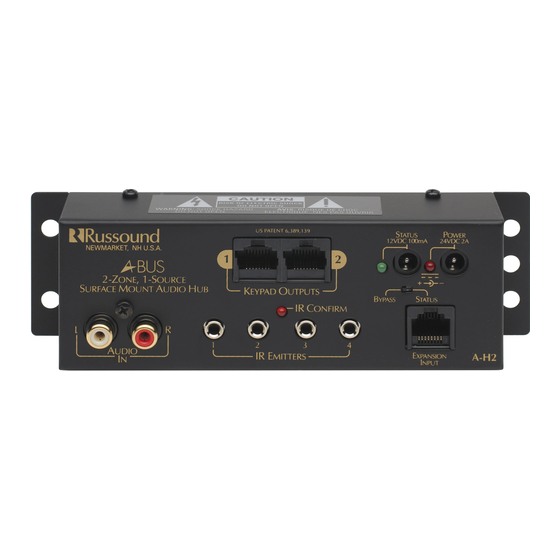
A-H2 Overview
Compact size for mounting near audio equipment
Status power input with LED indicator and selector
switch
Stereo audio input
Power input with LED indicator
Expansion input
4 common IR outputs, with confirmation LED indicator
A-H2 Specifications
Power Supply:
A-PS, 24VDC, 2.5A
Status Power:
12VDC, 100mA
Keypad Connection:
CAT-5, RJ45 connector, T568A
Expansion Connection: CAT-5, RJ45 connector, T568A
IR Emitter Connection: 1/8" male, tip (+), sleeve (-)
Dimensions:
6.5"W x 2"H x 1.25"D
(165 x 51 x 32mm)
Weight:
9.5 oz. (270g)
A-H2 Features
The Russound A-H2 is a two-zone, one-source audio
distribution hub used with A-BUS amplified keypads. The
A-H2 can also be linked to other A-BUS hubs (such as the
A-H4) and to A-BUS Ready stereo receivers in order to
increase the number of zones in a system.
NOTE: Before installation, review the manuals included
with each component in the system.
A-BUS is a registered trademark of LeisureTech Electronics Pty
Ltd Australia
Safety Instructions
1.
Read Instructions - All the safety and operating instructions should
be read before the appliance is operated.
2.
Retain Instructions - The safety and operating instructions should be
retained for future reference.
3.
Heed Warnings - All warnings on the appliance in the operating
instructions should be adhered to.
4.
Follow Instructions - All operating and user instructions should be
followed.
5.
Water and Moisture - The appliance should not be used near water;
for example, near a bathtub, washbowl, kitchen sink, laundry tub, in
a wet basement, or near a swimming pool.
6.
Wall or Ceiling Mounting
~
The appliance should be mounted to a
wall or ceiling only as recommended by the manufacturer.
7.
Heat - The appliance should be situated away from heat sources
such as radiators, heat registers, stoves, or other appliances (includ
4
ing amplifiers) that produce heat.
8.
Power Sources - The appliance should be connected to a power
supply only of the type described in the operating instructions or as
marked on the appliance.
9.
Grounding or Polarization - Precaution should be taken so that the
grounding or polarization means of an appliance is not defeated.
10. Object and Liquid Entry - Care should be taken so that objects do
not fall and liquids are not spilled into the enclosure through the
openings.
11. Damage Requiring Service - The appliance should be serviced by
qualified service personnel when:
The power supply cord or the plug has been damaged;
Objects have fallen, liqUid has been spilled into the appliance
The appliance has been exposed to rain
The appliance does not appear to operate normally
The appliance has been dropped or enclosure is damaged.
12. Servicing
~
The user should not attempt to service the appliance
beyond that described in the operating instructions. All other servic-
ing should be referred to qualified service personnel.
13. Care - From time to time you should wipe off the front panel with a
soft dry cloth.
Limited Warranty
The Russound A-H2 is fully guaranteed for two (2) years from the date of purchase
against all defects in materials and workmanship. During this period Russound will
replace any defective parts and correct any defect in workmanship without charge
for either parts or labor. For this warranty to apply, the unit must be installed and used
according to its written instructions. If service is necessary, it must be performed by
Russound. Russound assumes no responsibility for defects resulting from abuse or
servicing performed by an agency or person not specifically authorized in writing by
Russound. Damage to or destruction of components due to improper use voids the
warranty. In these cases the repair will be made at the owner's expense. Accidental dam-
age and shipping damage are not considered defects under the terms of the warranty.
To return for repairs, the unit must be shipped to Russound at the owner's expense,
along with a Return Authorization number and documentation explaining the nature
of the service required. Any product returned without prior written permission will
be
returned to sender. Russound sells products only through authorized Dealers and
Distributors to ensure that customers obtain proper support and service. Any Russound
product purchased from an unauthorized dealer orother source,.induding retailers, mail
order sellers and online sellers will not be honored or serviced under existing Russound
warranty policy. Any sale of products by an unauthorized source or other manner not
authorized by Russound shall void the warranty on the applicable product.
l.
~Russound®
Conforms
10
Ul6S00
CCflifiedto
CANlCSA
4 Expansion Input
The Expansion Input is used to connect the A-H2 with
an RJ45 patch cable to other A-BUS single-source hubs
or to an A-BUS-Ready product to increase the number
of rooms in a system. The Expansion Input connects the
Common IR, Status, and the audio source signal. Single-
source A-BUS Hubs such as A-H4, A-H4P and A-Hl all use
the same format for linking. The A-H484 multisource Hub
is different and cannot be linked to single-source hubs in
this manner.
The Link Out or A-BUS Ready subzone output of one
device must be connected to the Link In (Expansion Input
of A-H2) of the subsequent device. NEVER connect the
Link Out to another Link Out or A-BUS Ready output. This
may damage the components and void the warranty.
NOTE: Each hub in the chain requires its own A-PS power
supply.
5 Source
The A-H2 has one stereo audio input, and it can be
connected to multiple audio sources via the Tape 2 or
Zone 2 output of a stereo or home theater receiver.
Connecting to a receiver gives the A-H2 access to any
audio source connected to that receiver. Alternatively,
a single audio source can be connected directly to the
A-H2.
6 Power Supply
The A-H2 hub and amplified keypads are powered by
the A-PS 24VDCl2.5A power supply. The A-PS should be
plugged into an unswitched AC outlet (one that is live all
the time). When the A-PS is providing power, the A-H2's
POWER LED will illuminate.
7 Operation
A-K3 keypads can be operated manually or by using
the A-LRC2 remote control. A-VC2 volume controls
are operated manually using the rotary knob. If using
installed IR emitters, sources can be operated with their
own remote control by aiming it at the IR window on an
A-K3 keypad.
8 Installation
Install the A-H2 near the system's source equipment
using screws or hook and loop fastener.
The Status option provides visual indication when source
equipment is powered on and permits a system-wide 'all
off' function.
To enable Status:
Move the status jumper on all amplified keypads
to the "Enabled" position.
Move the status switch on the hub to the
"STATUS" position.
Using a Russound 846C 120Vl12VDC or
comparable power adapter, connect the coaxial plug end
to the STATUS input on the hub, and plug the adapter
into a switched AC outlet on the source component.
Status function and operation:
When the source is powered on, the Status circuit
is powered by 12VDC and turns the keypad's Status LED
to green. This indicates to the user that the source is on
and ready to receive remote control commands.
When the source is powered off (remotely or
manually), it shuts off the 12VDC Status power connected
to it, and turns off all the keypads (green LED off)
connected to the hub (A-VC2 will mute).
IMPORTANT: When the status feature is enabled, it
must be supplied with power for proper operation with
accessories such as the A-LC3 Local Source Input Module.
3 Status
2 IR Emitters
Common IR Outputs. Connect an IR emitter such as the
845.1 to each of the 4 IR connectors on the A-H2 (you
need use only one IR emitter if you've connected a single
source directly to the A-H2). The IR signal that is received
through a zone's amplified keypad is routed to the A-H2's
Common IR outputs. This allows remote operation of
sources such as CD, DVD or DSS from each zone.
1 Amplified Keypads
Connect two A-BUS amplified keypads. A CAT-5 cable is
used to connect each A-K3 or A-VC2 to a keypad output
on the A-H2 Hub. For clean installations, use RJ45 CAT-5
patch cables to connect from the hub to an RJ45 wall
plate (optional), and wire from the wall plate to the
keypad. The A-K3 has an RJ45 connector with T568A
wire configuration and the A-VC2 has a 110 punchdown
connector for the 8 individual conductors of the CAT-5
cable (use a punchdown tool with a 110 blade to insert
conductors).
Copyright
©
2008 Russound All rights reserved. All trademarks
are property of their respective owners. Russound is not respon·
sible for typographical errors or omissions. Specifications sub-
ject to change without notice.
5 Forbes Rd. Newmarket, NH 03857, U5A
Tel 603.659.5170 • Fax 603.659.5388
e·mail: tech@russound.com
28- 1134 Rev. 4 01/24/08
This product may be covered by one or more of the following
patents: US #7,181,023, #6,389,139; EP #1004222, AU #739808,
NZ #502982, Mexico #241196, Canada #CA2301062
Advertisement


