
Related Manuals for Pentair Pool Products Water UltraTemp

Summary of Contents for Pentair Pool Products Water UltraTemp
-
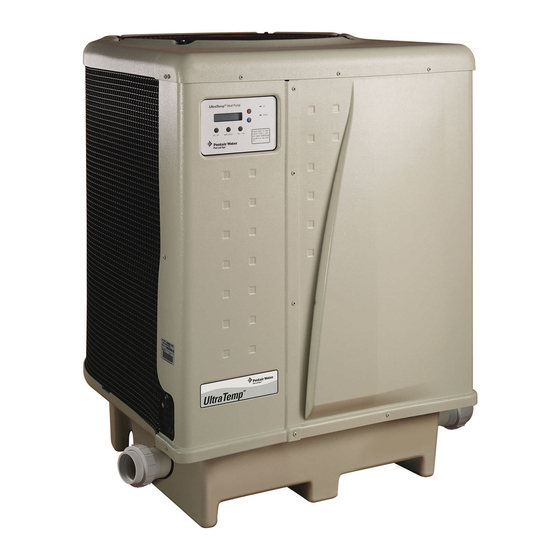
Page 1: Heat Pump
® UltraTemp Heat Pump AHRI Performance Certifi ed Installation User's Guide IMPORTANT SAFETY INSTRUCTIONS READ AND FOLLOW ALL INSTRUCTIONS SAVE THESE INSTRUCTIONS... -
Page 2: Customer Service
Customer Service If you have questions about ordering Pentair Water Pool and Spa ® ("Pentair") replacement parts, and pool products, please use the following contact information: Customer Service (8 A.M. to 4:30 P.M. — Eastern and Pacifi c Times) Phone: (800) 831-7133 Fax: (800) 284-4151 Technical Support Sanford, North Carolina (8 A.M. -
Page 3: Table Of Contents
Contents Important Warning and Safety Instructions ................iii Section 1: Introduction ......................1 Heat Pump Overview ....................1 General Features .....................2 Section 2: Installation ......................3 Installation ........................3 Materials Needed for Installation ................3 ® UltraTemp Heat Pump Dimensions ................4 Location ........................4 Clearances .......................5 Roof Run-off ......................5 Equipment Pad ......................5 Drainage and Condensation ..................6 Lawn Sprinklers .......................6... - Page 4 Contents Section 3: Operating the Heat Pump ................17 Initial Start-up Precautions ..................17 Heat Pump Control Panel Overview ................18 Control Panel Layout ....................18 Control Panel Operation ...................19 Timers and Delays ....................23 Control Panel Menu Tree Screens ................24 Control Panel Menu Screens ...................25 Operator Setup Menu Tree Screens ................27 Operator Setup Menu Screens ................28 Locking the Control Panel ..................29...
-
Page 5: Important Warning And Safety Instructions
IMPORTANT WARNING AND SAFETY INSTRUCTIONS Important Notice: This guide provides installation and operation instructions for the UltraTemp ® Heat Pump. Consult Pentair with any questions regarding this equipment. Attention Installer: This guide contains important information about the installation, operation and safe use of this product. -
Page 6: Consumer Information And Safety
IMPORTANT WARNING AND SAFETY INSTRUCTIONS Consumer Information and Safety ® The UltraTemp series of heat pumps are designed and manufactured to provide safe and reliable service when installed, operated and maintained according to the information in this manual and the installation codes referred to in later sections. Throughout the manual, safety warnings and cautions are identifi... -
Page 7: Swimming Pool Energy Saving Tips
IMPORTANT WARNING AND SAFETY INSTRUCTIONS Swimming Pool Energy Saving Tips It is important to note that a heat pump will not heat a pool as fast as a large gas or electric pool heater. If the pool water is allowed to cool signifi cantly, it may take several days to return to the desired swimming temperature. For weekend use, it is more economical to maintain the pool water temperature at or near your desired swimming temperature. -
Page 8: General Installation Information
IMPORTANT WARNING AND SAFETY INSTRUCTIONS General Installation Information 1. Installation and service must be performed by a qualifi ed installer or service agency, and must conform to all national, state, and local codes. ® 2. UltraTemp heat pumps get electrical power from an external source and provide a dual electronic thermostat control system for pool/spa combinations or preheat convenience. -
Page 9: Section 1: Introduction
Section 1 Introduction Overview Your Pentair heat pump will provide you with years of heated pool enjoyment. Heat pumps operate by taking heat from the surrounding air and transferring it into the water. The warmer the air and the more humidity in the air, the more latent heat is available for heating your pool. -
Page 10: General Features
General Features • Dual digital thermostats offer precise temperature control to maintain the desired separate water temperatures in pool/spa combinations without overheating or wasting energy. • Long-life corrosion resistant composite plastic cabinet stands up to severe climates and pool chemicals. •... -
Page 11: Section 2: Installation
Section 2 Installation ® The following general information describes how to install the UltraTemp heat pump. Installation Only a qualifi ed service person should install the heat pump. Before installing this product, read and follow all warning notices and instructions on pages iii-vi. Materials needed for Installation The following items are needed and are to be supplied by the installer for all heat pump installations: 1. -
Page 12: Ultratemp ® Heat Pump Dimensions
UltraTemp ® Heat Pump Dimensions 38.7" 30.7" (983 mm) (780 mm) 11.25" (286 mm) 9.25" (235 mm) Figure 1. 4.5" 32.0" (114 mm) (813 mm) 34.0" (864 mm) MODEL # / ULTRATEMP ® 120 H/C 120C 100I 33.5” 45.5” 45.5” 45.5”... -
Page 13: Clearances
Clearances All criteria given in the following sections refl ect minimum clearances. However, each installation must also be evaluated, taking into account the prevailing local conditions such as proximity and height of walls, and proximity to public access areas. The heat pump must be placed to provide clearances on all sides for maintenance and inspection. 1. -
Page 14: Drainage And Condensation
Drainage and Condensation Condensation will occur from the evaporator coil while the unit is running and drain at a steady rate, usually three to fi ve gallons per hour, depending upon ambient air temperature and humidity. The more humid the ambient conditions, the more condensation will be produced. The bottom of the unit acts as a tray to catch rainwater and condensation. -
Page 15: Water Connections
Anchor Clamp(s) Installation, continued AIR COIL GUARD 6. Use a masonry drill bit and drill a hole in the cement COIL with a diameter as determined by the concrete anchor, 1-3/8" HEX BOLT at each of the marks on the equipment pad. The hole (installer provided) should be approximately 1½... -
Page 16: Water Connections (Quick Connect)
Water Connections at the Heat Pump CAUTION — Make sure that fl ow requirements and pool water turnover rates can be maintained with the installation of additional heat pumps and plumbing restrictions. Two inch Quick Connect fi ttings have been installed on the water inlet and outlet connections, see Figure 7. -
Page 17: Multiple Unit Installation
Multiple Unit Installation Heat Pump, Heater and/or Solar Combination In certain regions of the country it may be more economical to run a heat pump during the warmer months and a gas heater during the cooler months. In some situations it may be desirable to run the heat pump in the “Chiller”... -
Page 18: Multiple Heat Pump Connections
Multiple Heat Pump Connections All plumbing on multiple heat pump installations must be done in parallel see Figures 9 and 10. An equal fl ow of water to each heat pump is important for optimum operation. NOTE: It may be necessary to adjust the water pressure switch if a unit is installed below the water level. -
Page 19: Electrical Connections
Electrical Connections — Risk of electrical shock or electrocution. WARNING This heat pump contains wiring that carries high voltage. Contact with these wires could result in death or serious injury to pool or spa users, installers, or others due to electrical shock, and may also cause damage to property. -
Page 20: Remote Operation
Remote Operation The heat pump may be connected to an automation system via the remote spade terminals on the back of the control board or via the RS-485 communication connector on the back of the control board. ® NOTE: Remote connection via the RS-485 connector is only available on IntelliTouch ®... -
Page 21: Connecting The Heat Pump To Intellitouch
Connecting the Heat Pump to the IntelliTouch ® or EasyTouch ® Load Center via the Heat Pump Spade Terminals ® ® To connect the heat pump cable to the Personality Board in the IntelliTouch or EasyTouch Load Center: 1. Turn off the main system power before making any connections. ®... -
Page 22: Connecting The Heat Pump To Intellitouch
® ® Connecting the Heat Pump to the IntelliTouch or EasyTouch Load Center via the RS-485 Connector ® ® The heat pump can be controlled by an IntelliTouch or EasyTouch system via the RS-485 ® ® communication cable. In this confi guration, IntelliTouch or EasyTouch overrides present Temperature Set points on the heat pump and will start or stop the heat pump. -
Page 23: Pin Confi Guration For The Heat Pump Control Board To Intellitouch
Connecting the Heat Pump Control Board to IntelliTouch ® or EasyTouch ® (Continued) ® 6. Close the IntelliTouch control panel and secure it with the two access screws. 7. Install the high voltage panel cover and secure it with the two retaining screws. 8. -
Page 24: Water Pressure Switch Adjustment
Water Pressure Switch Adjustment CAUTION — The water pressure switch should be adjusted to turn the heater off when the pump is off. Setting the switch to close at too low of a fl ow can damage the appliance. Adjust the switch to turn the heater off, not on. The pressure switch is preset at the factory for activation at 1.5 psi [10 kPa]. -
Page 25: Section 3: Operating The Heat Pump
Section 3 Operating the Heat Pump This section describes how to operate the heat pump. Initial Start-up Precautions CAUTION — Do not use this heat pump if any part has been under water. Immediately call a qualifi ed service technician to inspect the heater and replace any part of the control system which has been under water. -
Page 26: Heat Pump Control Panel Overview
Heat Pump Control Panel Overview Control Panel Layout 1. ON/OFF button – Turns the heat pump On and Off. 2. MENU SELECT button – If pressed from the Run Screen it will bring up the Menu Select Menu Tree Screens. It is also used to scroll through the Operator Setup Menu Tree. 3. -
Page 27: Control Panel Operation
Control Panel Operation 1. Starting and Stopping the Heat Pump – The heat pump is started and stopped with the ON/OFF button. a. Starting - If power is supplied to the heat pump and the ON light is not illuminated, pressing the ON/OFF button will start the heat pump which causes the ON light to illuminate. - Page 28 3. Heat, Cool and Auto Modes Operation – Certain models have the ability to both heat and cool. a. These heat pumps can be setup to operate in any one of three modes: i. Heat only mode ii. Cool only mode iii.
- Page 29 5. Relay Remote – In relay remote operation, the heat pump is started and stopped by remote relays which are connected to the remote POOL, COMMON and SPA quick connect connectors on the back of the control board. When conductivity is provided between the pool and common connections or the spa and common connections, the heat pump will start as long as the water temperature is not over the local set point (under for chiller operation).
- Page 30 b. Then press the MENU SELECT button repeatedly until the Temperature Scale screen is displayed. Once displayed, press the UP or DOWN arrows to toggle between the Fahrenheit and Celsius options. The last option shown on the display will become active. TEMPERATURE SCALE FAHRENHEIT / CELSIUS 8.
-
Page 31: Timers And Delays
Timers And Delays 1. Water Sensing Timer – One minute timer to allow water from the pool to reach the Heat Pump before acquiring temperature. This timer initiates when water fi rst begins to run from stopped or low water fl ow conditions or when the heat pump is turned ON. Countdown time is in Minutes and Seconds. -
Page 32: Control Panel Menu Tree Screens
Control Panel Menu Tree Screens (Press MENU SELECT Button) MENU SELECT MENU TREE POOL IDLE/HEAT/COOL SET=__ ACT=__ IDLE/HEAT/COOL SET=__ ACT=__ HEAT / COOL / AUTO Menu appears only if heat and cool mode is SET TO - H/C/A enabled at the factory. HEAT PUMP RUNTIME REMAINING = NONE RELAY REMOTE... -
Page 33: Control Panel Menu Screens
Control Panel Menu Screens To scroll through the menu screens press the MENU SELECT button to view each screen. While in the menu screens, if no activity is detected after 15 seconds, the main screen is displayed. 1. Pool Run Screen – Displays whether the heat pump is idle, heating or cooling if the Pool set point is active. - Page 34 6. AutoSet On/Off Screen – This screen is only shown if the AutoSet mode is enabled during factory setup. Allows the operator to turn the AutoSet mode On and Off. AutoSet mode periodically energizes a fi lter pump contactor to start a remote fi lter pump which allows the heat pump to heat or cool the water as necessary.
-
Page 35: Operator Setup Menu Tree Screens
Operator Setup Menu Tree Screens (Press UP and DOWN Arrows Simultaneously) OPERATOR SETUP MENU TREE LANGUAGE - IDIOMA ENGLISH / ESPANOL SOFTWARE VERSION REV. ____ PUMP START TIME TIME = 1 - 4 HRS INTELL ADDRESS ADDRESS = 1 - 16 TEMPERATURE SCALE FAHRENHEIT / CELSIUS WATER TEMP OFFSET... -
Page 36: Operator Setup Menu Screens
Operator Setup Menu Screens To access this menu, press the Up and Down arrows simultaneously. While in the Operator Setup Menu screen, if no activity is detected after 15 seconds, the main screen is displayed. To get back into the Setup menu you must press the Up and Down arrows simultaneously again. -
Page 37: Locking The Control Panel
Operator Setup Menu Screens 8. Input Screen – The Input screen is a diagnostic display which shows the status of the input sensors. The number 1 is displayed when the associated input is on and zero is displayed when the associated input is off. -
Page 38: Autoset
Autoset Autoset is a feature that allows the heat pump to automatically turn on your water circulation pump at predetermined time intervals after the water circulation pump shuts off. To utilize this feature, the water circulation pump must be wired in parallel with your mechanical time clock using the auxiliary relay supplied in the high voltage power panel of the heat pump. -
Page 39: Control Panel Alarm Messages
Control Panel Alarm Messages HIGH WATER TEMP Water temperature is above 108°. LOW WATER TEMP Water temperature is below 40°. LOW WATER FLOW The pressure switch sensing water fl ow is open. Pool and Spa relay remote inputs are simultaneously REMOTE POOL SPA energized. -
Page 40: Heat Pump Wiring Diagram - (Single Phase - 50/60 Hz)
Wiring Diagram – (Single Phase – 50Hz/60Hz) RS-485 Heat Pump Control Board INTELLITOUCH CONNECTION INPUT OUTPUTS 3 - WIRE SWITCHES TEMP TEMP REMOTE TERM. 24 VAC POOL YELLOW BLUE 10K ohm GREEN WHITE Thermistors WHITE/RED WHITE WHITE BLUE /RED WHITE/RED YELLOW PURPLE WHITE... -
Page 41: Heat Pump Wiring Diagram - (Three Phase - 60 Hz)
Wiring Diagram – (Three Phase – 60Hz) RS-485 Heat Pump Control Board INTELLITOUCH CONNECTION INPUT OUTPUTS SWITCHES 3 - WIRE TEMP TEMP REMOTE TERM. 24 VAC POOL YELLOW 10K ohm BLUE Thermistors WHITE WHITE GREEN BLUE YELLOW PURPLE WHITE WHITE WHITE WHITE PURPLE... -
Page 42: Heat Pump Wiring Diagram - (Three Phase - 50 Hz)
Wiring Diagram – (Three Phase – 50Hz) Heat Pump Control Board CONNECTION INPUT OUTPUTS 3 - WIRE SWITCHES TEMP TEMP REMOTE TERM. 24 VAC POOL YELLOW 10K ohm BLUE Thermistors WHITE BLUE WHITE GREEN YELLOW WHITE PURPLE WHITE WHITE WHITE PURPLE BLACK BLACK... -
Page 43: Autoset Contactor To Mechanical Timer Wiring Example
AutoSet Contactor to Mechanical Timer Wiring Example Intermatic CLOCK T104 MOTOR Timer 240V SUPPLY GROUND FILTER PUMP LINE 1 LINE 2 GROUND AutoSet Contactor NOTES: 1. Mechanical timer is not provided with the heat pump. 2. Example only, other timers will be similarly wired. 3. -
Page 44: Section 4: General Maintenance
Section 4 General Maintenance Water Chemistry Proper chemical balances are necessary for sanitary bathing conditions as well as ensuring your heat pump’s long life. Be sure to keep your chemical and mineral concentration levels within the values indicated in Table 1. Failure to maintain proper water chemistry may cause damage to the heat pump and may void the warranty. -
Page 45: Spring Start-Up
Spring Start-Up If your heat pump has been winterized, perform the following steps when starting the system in the Spring: 1. Uncover the heat pump and inspect the top and sides for any debris or structural problems. 2. Connect the water inlet and outlet unions located on the lower front panel of the heat pump. 3. -
Page 46: Professional Maintenance And Service
Professional Maintenance and Service The Pentair line of Heat Pumps are some of the most effi cient ways to heat a pool or spa. The heat pump transfers heat from the outside air to the pool or spa water by means of an internal heat exchanger. When the fan is turned on, warm air is drawn through the R410A refrigerant charged air coil, turning the cold liquid refrigerant to a warm gas. -
Page 47: Section 5: Troubleshooting
Section 5 Troubleshooting Use the following troubleshooting information to resolve possible problems with your heat pump. WARNING — RISK OF ELECTRICAL SHOCK OR ELECTROCUTION. Improperly installation will create an electrical hazard which could result in death or serious injury to pool users, installers, or others due to electrical shock, and may also cause damage to property. - Page 48 Problems or Symptoms Possible Cause Corrective Action Supply voltage to the transformer should be between 208 BROWNOUT Alarm: The 24 VAC supply 1. Bad transformer and 260 volts. Transformer should output between 24 and voltage to the control board is low. 28 volts.
- Page 49 Problem or Symptoms Possible Cause Corrective Action Control failure. No power supply to heater. Reset breaker. Replace fuse. Call dealer or factory for advice Unable to turn Heat Pump ON. Display is Tripped breaker or blown fuse. Faulty before attempting to replace parts. Replace Transformer. Blank.
-
Page 50: Temperature Resistance Chart Table
Problem or Symptoms Possible Cause Corrective Action Higher than Normal Head Pressure, lower TXV stuck closed. 1. Disconnect TXV bulb from suction line (SL), have it in your than normal suction pressure with high hand, if pressures go back to normal, then reinstall the bulb superheat and very cold or frosty distribu- on suction line (it may have some debris stuck in the port). -
Page 51: Ambient/Water Flow Table For Professional Maintenance And Service
The table below should be used by trained air-conditioning and refrigeration service people. The table below should not be used for adjusting the charge in the system. Use of interpolation or extrapolation of the table data may not be appropriate unless it is closely matched by the ambient and water fl... -
Page 52: Section 6: Replacement Parts
Section 6 Replacement Parts ® UltraTemp Illustrated Parts DETAIL B – Single Phase DETAIL B DETAIL B – Three Phase ® UltraTemp Heat Pump Installation and User’s Guide... -
Page 53: Replacement Parts List (Ultratemp ® )
® UltraTemp Replacement Parts List ITEM PART NO. DESCRIPTION ITEM PART NO. DESCRIPTION 473665 Probe Thermister Defrost Sensor 470159 Screw #10 x .75” Pan Head Phillips, Almond 470284 Nut, J-Clip Screw #10 x .75” Pan Head Phillips, Black 470198 473285 Nut, 1/4 - 20 S/S Acorn Screw #10 x 1”... - Page 54 NOTES ® UltraTemp Heat Pump Installation and User’s Guide...
- Page 55 NOTES SAVE THESE INSTRUCTIONS...
- Page 56 P/N 474099 Rev. E 9/27/11...