Table of Contents
Advertisement
Quick Links
Advertisement
Table of Contents

Related Manuals for Korg EMX-1


Summary of Contents for Korg EMX-1
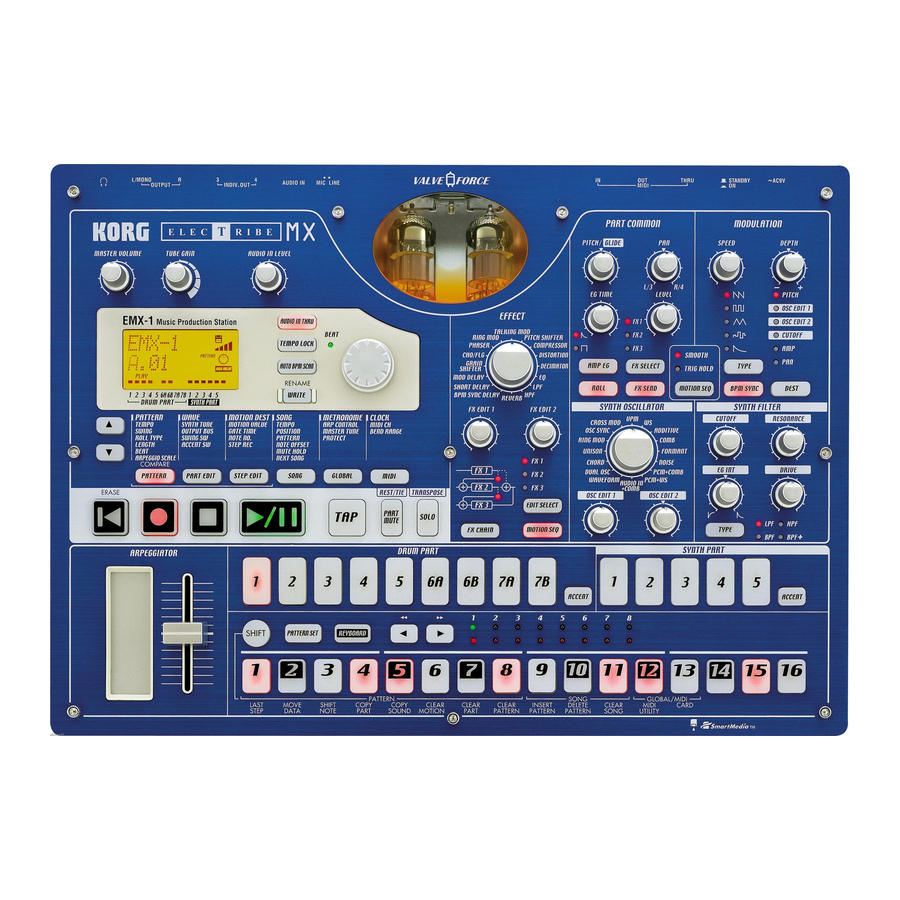
- Page 1 Owner‘s Manual...
-
Page 2: Power Supply
Be careful not to let metal objects get into the equipment. If something does slip into the equipment, unplug the AC/AC power supply from the wall outlet. Then contact your nearest Korg dealer or the store where the equipment was purchased. THE FCC REGULATION WARNING (for U.S.A.) -
Page 3: Table Of Contents
Table of Contents 1. Introduction ... 7 Main features ... 7 Saving your data on the EMX-1 ... 8 About the vacuum tubes ... 8 What is ? ... 8 What is ? (Multi Modeling Technology) ... 8 2. Parts and their functions ... 9 Top panel ... - Page 4 Oscillator type list ... 34 Drum PCM List ... 39 Synth PCM List ... 40 Effects ... 41 Using the effects ... 41 To apply an effect ... 41 To edit an effect ... 41 Effect types ... 42 1. Stereo ... 42 2.
- Page 5 7. MIDI mode ... 79 About MIDI channels ... 79 Using the EMX-1 as a sound module ... 79 If you connect a multi-track MIDI sequencer to the EMX-1 ... 79 Setting the MIDI channel of each part ... 79 MIDI Utility ...
-
Page 7: Introduction
The EMX-1 is the ideal tool for the mu- sician, DJ, sound creator, or desktop-music user who wants an easy way to add originality to their music. -
Page 8: Saving Your Data On The Emx-1
( p.89 “Restoring the factory settings”). About the vacuum tubes Do not attempt to remove, replace or change the tubes in the EMX-1. The tubes are not a user ser- viceable part. What is VALVE FORCE is KORG’s proprietary vacuum tube audio technology. -
Page 9: Parts And Their Functions
2. TUBE GAIN This knob adjusts the level of the EMX-1’s output signal that is being sent through the vacuum tubes. As you increase this level, the vacuum tubes will produce more distortion. -
Page 10: Common Section
Common section 1. AUDIO IN THRU key Selecting this key will send the sound from the au- dio in jack directly to the line output jacks and headphone jacks unchanged. This key will have no effect for a synth part whose oscillator type is set to “AUDIO IN + COMB,”... -
Page 11: Edit Section
: Adjusts the effect. The actual parameter being controlled will depend on the effect type. FX CHAIN (effect chain): On the EMX-1, the output of one effects processor can be fed to the input of another. The connection will change each time you press this, and the connection that is lit will be used. -
Page 12: Part Select Section
5. SYNTH FILTER These parameters modify the tonal character of the synth part. : supports motion sequence. CUTOFF : Adjusts the cutoff frequency of the fil- ter. EG INT (EG intensity) filter envelope. Part select section 1. (DRUM PART) 1...5, 6A-6B, 7A-7B (drum part keys) These keys select drum parts. -
Page 13: Arpeggiator Section
5. Select LEDs The upper row of LEDs (green) indicates the loca- tion within the currently-playing pattern (length 1 through 8). The lower row of LEDs (red) indicates the posi- tion shown by the step keys (length 1 through 8). When the Keyboard function is on, these LEDs indicate the octave position. -
Page 14: Rear Panel
1 from an external MIDI device, or to re- ceive a data dump. This connector transmits MIDI data. Use this when you want to use the EMX-1 to control another MIDI device, or to trans- mit a data dump. THRU... -
Page 15: Items And Functions In The Display
Items and functions in the display 1. Parameter display This area displays pattern names, song names, and parameter names. 2. Value display This area displays the selected parameter’s value. 3. PATTERN, SONG, WAVE indicator When the number of a pattern or song is shown in the value display, this will indicate the corre- sponding mode. -
Page 17: Basic Operation
2. Make sure that the card indicator in the display is not lit. Set the power switch to the standby position. If you will not be using the EMX-1 for an extended period of time, unplug the AC/AC power supply from the AC outlet. -
Page 18: Playing A Demo Song
Playing a Demo song The EMX-1 contains several demo songs. Here’s how you can listen to the demo songs to get an idea of the EMX-1’s sound and potential. 1. Press the SONG key. The SONG key will light. 2. The display will show the current song name and number. -
Page 19: Pattern Mode
(drum sounds) and phrase patterns (melodic lines) created by synth parts. The EMX-1 lets you create and store 256 patterns. Each pattern con- sists of 16 parts. In addition to the sound of each part, a pattern contains effect settings and phrases, and can also record knob move- ments. -
Page 20: Selecting A Pattern
You can use the dial to select from a total of 256 patterns: A.01–A.64, B.01–B.64, C.01–C.64, D.01–D.64. You can also select patterns while the EMX-1 is playing. To check which patterns playing When the PATTERN key is lit, press the PATTERN key and the dis- play will show “(pattern name ).”... -
Page 21: Using The Tap Key To Set The Tempo
The intervals at which you press the key will be detected and the tempo will be set accordingly. You can set the tempo this way even when the EMX-1 is stopped or paused. Auto BPM Scanning Detecting the tempo from the input of the AUDIO IN jacks Here’s how you can automatically detect the tempo of an audio sig-... -
Page 22: Playing The Sound Of A Part
( p.29 “Editing sounds”). The EMX-1 uses three types of parts, for a total of sixteen parts. — Drum parts (1–5, 6A-B, 7A-B) Each of the drum parts contains a drum sound, rhythm pattern (note timing), and motion sequence data. -
Page 23: Selecting A Part
Selecting a part Use the part keys to select the part that you want to edit. Drum part When you press a drum part key, the assigned sound will play and that part will be selected (the part key will light). The step keys will light to indicate the trigger locations for that part within the rhythm pattern. -
Page 24: Adding Accents To A Part
Adding accents to a part Specifying the accent locations and strength You can apply an accent (volume emphasis) independently to the drum parts and to the synth parts. If accent is on, notes at the accented location (step) will be empha- sized. -
Page 25: Making A Pattern "Swing
Making a pattern “swing” Specifying the amount of swing SWING ... 50...75 The Swing setting modifies the timing at which certain steps are played. You can use this to transform a straight 16-beat rhythm by giving it a slight shuffle character. You can adjust the amount of swing in a range of 50 to 75 (%), and this will affect the timing of the even- numbered steps. -
Page 26: Assigning The Output Of Each Part
3. Turn the dial to set the roll type. You cannot apply a roll to note-on data from an external MIDI de- vice. Assigning the output of each part OUTPUT BUS ... L/R, 3/4 For each part, you can route the sound to the line out jacks (L/ MONO, R) or to the individual out jacks (3, 4). -
Page 27: Using The Arpeggiator
Using the arpeggiator Performing with the arpeggiator To arpeggiate a drum part 1. Select the drum part that you want to play. 2. When you touch the ribbon controller, the selected part will begin playing automatically. The timing of the repeated notes will vary depending on the location you touch. -
Page 28: Changing The Scale Of The Arpeggiator
Changing the scale of the arpeggiator ARPEGGIO SCALE ... Chroma...Octave You can change the scale that is being used when you arpeggiate a synth part. 1. Press the PATTERN key (it will light). 2. Press the [ ] cursor key to select “ArpScale” in the parameter dis- play. -
Page 29: Editing Sounds
Editing sounds For each drum part, you can select a drum sound wave, or sample. For each synth part, you can select a synth oscillator model. You can then edit the sound of each part using the oscillator, level, and pan knobs, and the effect and amp EG keys. -
Page 30: Modulation
LEVEL ... 0...127 Sets the output level. Turning the knob toward the right will increase the level. AMP EG ... Switches the operation of the amp EQ. Each time you press this key, the envelope type will alternate between ally decay over the time specified by EG TIME) and will stop after the time specified by EG TIME). -
Page 31: Editing The Sound Of A Synth Part
Editing the sound of a synth part Synth oscillator SYNTH OSCILLATOR TYPE ... Turn the OSCILLATOR TYPE knob to select the synth oscillator type. You can choose from sixteen oscillator algorithms that include typi- cal analog synthesizer waveforms and much, much more. For details on each oscillator type, refer to the Oscillator Type List ( p.34). -
Page 32: Part Common Parameters
DRIVE ... 0...127 This is a new circuit that controls the amount of distortion intro- duced by the filter. By adjusting this in conjunction with the cutoff frequency and resonance of the synth filter to intentionally create distortion, you can generate overtones that were not present in the original waveform. -
Page 33: Modulation
Normally you will leave this set at +00 (A=440 Hz). If you want to adjust the tuning of the entire EMX-1, use the Global mode parameter Master Tune instead of this. -
Page 34: Oscillator Type List
Oscillator type list WAVE FORM This oscillator type provides two oscillators whose waveform you can modify continuously. OSC EDIT2 adjusts the pitch of oscillator 2 (i.e., the pitch difference relative to oscillator 1), letting you create detuned sounds or octave-doubled sounds. Waveform OSC1 OSC2... -
Page 35: Ring Modulator
CHORD OSC (Chord oscillator) This oscillator type provides four oscillators that can output basic waveforms. Using this, you can produce a chord of the form specified by the OSC EDIT1 setting by playing just a single note. Chord Name OSC1 OSC2 Pitch Calculator... - Page 36 OSC SYNC This oscillator type forcibly resets the phase of the oscillator 2 waveform (the “slave”) at the frequency of oscillator 1 (the “master”), producing new overtones. WAVE = Tri ModPitch = 0 ModPitch = 8 ModPitch = 47 Waveform Mod Pitch WAVE ...
- Page 37 ADDITIVE OSC (Additive oscillator) The additive oscillator creates a waveform by adding three oscillators. This is a good way to make organ or bell sounds. OSC1 OSC2 OSC2 Harmonics OSC3 OSC3 Harmonics WAVE ... Saw, Squ, Tri, Sin Selects the basic waveform. OSC EDIT1: OSC2Harm ...
-
Page 38: Pcm Osc+Comb
AUDIO IN+COMB (Audio in + comb filter) This oscillator type uses the audio signal input to the audio input of the EMX-1 as an oscillator, and applies a comb filter to this signal. WAVE ... --- (none) OSC EDIT1: Feedback ...0...127 Raises the amount of feedback returned to the comb fil- ter. -
Page 39: Drum Pcm List
Drum PCM List No. Name Category BD-Dark Kick BD-99 1 BD-99 2 BD-Syn1 BD-Syn2 BD-Syn3 BD-Syn4 BD-Syn5 BD-Syn6 BD-Syn7 BD-Syn8 BD-Syn9 BD-Syn10 BD-Dist1 BD-Dist2 BD-Dist3 BD-Dist4 BD-Dist5 BD-Dist6 BD-Dist7 BD-Squas BD-88 1 BD-88 2 BD-Digi BD-DDD1 BD-DDD2 BD-Lynn BD-Dry1 BD-Dry2 BD-Dry3 BD-Dry4 BD-Soft... -
Page 40: Synth Pcm List
Synth PCM List No. Name Category Piano Keyboard E.Piano Clav M1-Organ Organ Marimba Mallet Vibe Cymbell Flute Woodwind AltoSax M1-T.Sax Trumpet Brass MuteTp BrassEns VoiceAh Choir M1-Choir VoiceWav Violin String Strings Pizzicat F.Guitar Guitar A.Guitar MuteGtr FunkGtr Sitar A.Bass Bass E.Bass M1-Bass PickBass... -
Page 41: Effects
Effects Using the effects The EMX-1 contains three separate effect processors. For each pattern, you can use up to any three of the sixteen effect types. The sound of each part can be sent to any one of the effect processors. You can also change the way in which the three effects are connected to each other, and in this way apply more than one effect to a part. -
Page 42: Effect Types
( p.58 “Motion sequence”). Effect types The effects of the EMX-1 can be classified into the following three groups. 1. Stereo This group includes: CHO/FLG, PHASER, RING MOD, COMPRES- SOR, DECIMATOR, EQ, LPF, HPF For some of these effects you can adjust the level of the direct sound. -
Page 43: Effect Parameters
Effect parameters REVERB This effect simulates the reverberation and spatial character of a hall. FX EDIT1: Time ...0...127 Turning the knob toward the right will lengthen the re- verb time. FX EDIT2: Level ...0...127 Turning the knob toward the right will increase the re- verb level. - Page 44 FX EDIT1: Speed ... 1...127 Specifies the sampling interval and the sampling time. The sampling interval is synchronized to the number of steps in the sequencer. When the BPM changes, the length per step will also change, so the sampling interval will change together with this.
- Page 45 PITCH SHIFTER This effect modifies the pitch. FX EDIT1: Pitch ... -2400...+2400 Specifies the amount of pitch change in units of cents. When the knob is in the center position, the pitch of the input sound will not be changed. Turning the knob to- ward the left will lower the pitch, and toward the right will raise the pitch.
-
Page 47: Recording A Phrase
Recording a phrase You can specify a synth sound or rhythm sound for each part, and record a phrase pattern for it. If you want to erase the rhythm and phrase data of each part before you create a pattern, refer to “Erasing the sequence data of a part” ( p.56). -
Page 48: To Record During Playback
6. Use the step keys as a keyboard to record the phrase, pressing the appropriate key to enter the desired pitch at the desired time. 7. The pattern will play back repeatedly. You can continue recording while the REC key is lit. Recording will stop when you press the STOP/CANCEL key, and the REC key and PLAY/PAUSE key will go dark. -
Page 49: To Record A Phrase For A Synth Part
To record a phrase for a synth part 1. If the EMX-1 is playing, press the STOP/CANCEL key to stop play- back. 2. Press the PATTERN key (it will light). Press the [ ] cursor key until the display reads “(pattern name).”... -
Page 50: Editing Sequence Data
Editing sequence data Here’s how to edit patterns that you have recorded or patterns that are saved in memory. If you want to keep the changes you made to a pattern, you must perform the Write/Rename operation before you select another pat- tern or turn off the power. -
Page 51: Editing The Note Number (Pitch)
5. Press a step key to change the trigger setting for the corresponding location. Each time you press a step key, the trigger will be switched alternately on (lit) or off (dark). You cannot edit the trigger locations when the STEP EDIT key is lit. Editing the note number (pitch) NOTE NO. -
Page 52: Specifying The Length And Time Signature Of A Pattern
Here’s how the Length, Beat (time signature), and Last Step are related. On the EMX-1, the total number of measures (or bars) in a pattern is called the “length.” The number of steps (or beats) in one of these measures is designated as the “last step.”... -
Page 53: Setting The Last Step
If you change the beat, Last Step will be reset to 16 or 12. Last Step is a function that is unique to the EMX-1; if you are playing the EMX-1 in synchronization with an external sequencer or a differ- ent model of the Electribe series, regions where you have used an irregular time signature will not be synchronized. -
Page 54: Moving Data Within A Pattern
Last Step setting. Here's how to change the location at which the pattern begins. 1. If the EMX-1 is playing, press the STOP/CANCEL key to stop play- back. 2. Hold down the SHIFT key and press step key 2 (MOVE DATA). -
Page 55: Transposing The Pitch Of A Synth Phrase Part
This operation lets you shift the pitch of the note data (i.e., trans- pose) for all steps in the selected synth part(s). 1. If the EMX-1 is playing, press the STOP/CANCEL key to stop play- back. 2. Hold down the SHIFT key and press step key 3 (SHIFT NOTE). -
Page 56: Copying A Part
Here’s how you can copy the selected part (with its sound settings and sequence data, including motion sequence) to another part. 1. If the EMX-1 is playing, press the STOP/CANCEL key to stop play- back. 2. Press a part key to select a destination (copy-destination) for the part being copied (the key will light). -
Page 57: To Erase Trigger Data While Recording Or Playing Back
1. If the EMX-1 is playing, press the STOP/CANCEL key to stop play- back. 2. Hold down the SHIFT key and press step key 7 (CLEAR PART). (Key 7 will blink.) 3. Press the part key whose data you want to erase. You may select more than one part at this time. -
Page 58: Motion Sequence
Motion sequence What is a motion sequence? The EMX-1 has a Motion Sequence function that lets you record and playback realtime changes made to the knobs and keys ( “Record- ing a motion sequence”). There are two types of motion sequence; one type for effects and one type for each of the parts. -
Page 59: Playing A Motion Sequence
If you press the STOP/CANCEL key to stop playback and then save the pattern as described in “Saving a pattern,” the motion sequence data you recorded will be saved together with the pattern. You can record a maximum of twenty-four motion sequences in each pattern. -
Page 60: Editing Motion Sequence Data
Editing motion sequence data Here's how you can edit motion sequence data for each part or effect. You can edit the data in units of a single step. Selecting the motion sequence that you want to edit MOTION DEST ... *** 1. -
Page 61: Erasing A Motion Sequence For A Part Or Effect
The motion sequence you edit will return to the state prior to editing if you switch to another pattern before you write the data. If you want to keep the edited motion sequence, execute the Write operation ( p.64 “Saving a pattern”). You cannot use the step keys to turn steps on/off while editing a motion sequence. -
Page 62: Pattern Set
Pattern Set What is Pattern Set? Pattern Set is a function that lets you assign a favorite pattern to each of the sixteen step keys, and select these patterns by pressing the appropriate key. This gives you an easy way to switch between favorite patterns while performing. -
Page 63: Assigning A Pattern To A Pattern Set
1. Press step key 1 of group 1 (select LED 1 lit). 2. Continue holding down step key 1, and press step key 5. Step keys 1 through 5 will be selected for chain play, and will all light. While chain play is playing back, you can press the RESET/ERASE key to play the currently-playing pattern from its beginning. -
Page 64: Saving A Pattern
Saving a pattern If you want to keep a pattern that you edited or created, you must perform the Write/Rename operation explained below. When you perform the Write/Rename operation, the “Copying data within a pattern” operation will be performed automatically depending on the length of the pattern. If you decide not to save a pattern you create Simply switch patterns without performing the Write/Rename operation. -
Page 65: Song Mode
Each song consists of patterns arranged in a particular playback order. You can create and store up to 64 songs in the EMX-1. In addition to the pattern playback, event recording allows you to record drum part performance, synth phrase per- formance, arpeggiator performance, knob movements, solo/mute operations and tempo changes into a song. -
Page 66: Playing A Song
Playing a song 1. Press the SONG key. The SONG key will light. 2. Press the [ ] cursor key until the display reads “(song name).” 3. Turn the dial to select a song (S01–S64). 4. Press the PLAY/PAUSE key to play back the song (the key will light). When the song ends, playback will stop automatically (the key will go dark). -
Page 67: Using The Tap Tempo Key To Set The Tempo
The interval at which you press the key will be de- tected, and converted into the tempo. You can use this method to set the tempo even when the EMX-1 is paused or stopped. Locking the tempo of a song Turn the TEMPO LOCK key on if you want to play back the song at the tempo specified by the song. -
Page 68: Creating A Song
Creating a song You can create a song by arranging patterns in the desired order. If while editing a song, you switch to a dif ferent song, the data you had been editing will be lost. If you want to keep the song you edited, you must perform the W rite operation. -
Page 69: Song Mode
4. Use the [ ]/[ ] cursor keys to make the display read “NoteOfs.” 5. Use the dial to specify the pitch. A setting of 1 offsets the pitch (note) by a semitone, 2 by a whole step, 7 by a fifth, and 12 by one octave. -
Page 70: Editing A Song
This operation lets you insert a pattern at the desired position. Sub- sequent patterns will move toward the end of the song. 1. If the EMX-1 is playing, press the STOP/CANCEL key to stop play- back. 2. Hold down the shift key and press step key 9 (INSERT PATTERN). -
Page 71: Erasing Data From A Song
Erasing data from a song CLEAR SONG ... 1. If the EMX-1 is playing, press the STOP/CANCEL key to stop play- back. 2. Hold down the shift key and press step key 11 (CLEAR SONG). (Key 11 will blink.) 3. Press step key 11 once again to erase the data from the song. If you decide to cancel, press the STOP/CANCEL key. -
Page 72: Event Recording
Event recording Recording song event data In addition to letting you arrange patterns to create a song, the EMX-1’s Song mode also lets you record your realtime performances using the drum pad keys, the keyboard function, the arpeggiator, and knob operations. -
Page 73: Saving A Song
Saving a song If you want to keep song data that you created, you must perform this Write/Rename operation. If you don’t want to keep the song you created, simply switch songs without performing Write/Rename. Be aware that when you save a song, the song that had pr e viously occupied the save-destination will be overwritten. -
Page 75: Global Mode
Matching the tuning with another instrument You can adjust the basic tuning of the EMX-1 in steps of one cent. Normally you will leave this set at “+00” (A=440 Hz). Adjust this setting if you need to match the pitch of the EMX- 1 to another instrument. -
Page 76: Saving Your Global Mode Settings
You can use a SmartMedia card to save or load the EMX- 1’s internal data. The EMX-1 uses 3V (3.3V) SmartMedia in a range of 4 MB~128 MB capacity. Make sure that the SmartMedia card is oriented in the correct direction, and insert it all the way into the SmartMedia slot. -
Page 77: Formatting Smartmedia
In this case, re-format it on the EMX-1. Saving data to SmartMedia (Save All) Here’s how you can save all of the EMX-1’s pattern data, song data, and global data onto SmartMedia. 1. Insert the SmartMedia into the SmartMedia slot. -
Page 78: Loading A Single Pattern From Smartmedia (Load Pattern)
Deleting an EMX-1 file from SmartMedia (Delete File) Here’s how a user file containing EMX-1 pattern data, song data, and global can be deleted from a SmartMedia card. Once a file has been deleted, it cannot be read again. -
Page 79: Midi Mode
2. Use the [ ]/[ ] cursor keys to select “MIDI ch” in the display 3. Press the EMX-1’s synth part 1 Part key, and then turn the dial to set the MIDI channel for part 1 to match the channel being transmitted by the con- nected MIDI keyboard or other device. -
Page 80: Midi Utility
MIDI data. Making MIDI filter settings MIDI FILTER ... You can select which MIDI messages the EMX-1 will receive and transmit. 1. Press the MIDI key. 2. Hold down the shift key and press step key 12 (MIDI UTILITY) (key 12 will blink). -
Page 81: About Note-On/Note-Off
When the EMX-1 receives note-on/off messages on the MIDI channel assigned for a part, that part will be sounded. If the EMX-1’s MIDI filter “N” setting is set to “x,” note-on/off messages will not be transmitted or re- ceived. ( p.80 “Making MIDI filter settings”) -
Page 82: Transmitting Sound Settings And Other Data
Transmitting sound settings and other data Song, pattern, global, and MIDI settings can be transmit- ted from the EMX-1 as MIDI exclusive data and stored on an external device. Transmitting/receiving a data dump Data dumps are transmitted and received on the MIDI channel specified by the MIDI mode MIDI Ch setting. -
Page 83: Setting The Pitch Bend Range
Setting the pitch bend range When the EMX-1 receives a pitch bend message [En, vv, vv] (vv, vv: lower and upper bytes of the value, together express- ing a range of 16384 steps with 8192 [vv,vv=00H, 40H]), pitch bend will be applied to the synth part receiving on that chan- nel. -
Page 84: Playing Back In Sync With Other Electribe Models
2. Press the [ ] cursor key to change the display to read “Clock.” 3. Turn the dial of each device to set the EMX-1 to “Int” and the ES-1 to “Ext.” 4. Press the EMX-1’s PLAY/PAUSE key to start the pattern or song (the PLAY/PAUSE key will light). -
Page 85: About Synchronization In Song Mode
About synchronization in Song mode In Song mode, the EMX-1 will also transmit Song Select and Song Position Pointer messages. Song Select When you switch songs, a Song Select message [F3, ss] (ss: song number) will be transmitted. On the EMX-1 you can select 64 songs. -
Page 87: Appendix
[ ] Is the MIDI cable connected correctly? — When playing the EMX-1 from an external device [ ] Is the EMX-1 set to receive MIDI data on the chan- nel that the external device is transmitting? ( p.79) [ ] Is the MIDI mode MIDI Channel parameter set to the channel you want to use? ( p.79) -
Page 88: Error Messages
Use your computer or other device to back up the data on the SmartMedia™ card. Then format the SmartMedia™ on the EMX-1, rewrite the desired files to it, and access it once again from the EMX-1. CardFull There is insufficient free space in the EMX-1 or on SmartMedia™. -
Page 89: Restoring The Factory Settings
Restoring the factory settings The pattern and song data with which the EMX-1 was shipped from the factory is called the “preload data.” You can load this preload data to restore the EMX-1 to its factory-set condition. When you do this, the patterns or songs you created will be erased, and replaced by the preload data. -
Page 90: Pattrn Name List
Pattrn name list Name Programmer A01 Electro1 KORG A02 PrgHous1 KORG A03 HardHs1 Fernando Lopez A04 UKHouse1 Tomoki Hirata A05 House1 KORG A06 GarageH1 KORG A07 FJazz1 KORG A08 NuSklBr1 KORG A09 NuSklBr2 James Bernard A10 DnB1 James Bernard A11 DnB2... - Page 91 D53 Init D54 Init D55 Init D56 Init D57 Init D58 Init D59 Init D60 Init D61 Init D62 Init D63 Init D64 Init All Patterns and All Songs —©2003 KORG Inc. All rights reserved. 8. Appendix Audio In Tempo Length...
-
Page 92: Knob/Sw - Midi List
Knob/Sw - MIDI List PART MIDI CH(INITIAL) SYNTH1-5 1(GLOBAL)=CH1 2=CH2 3=CH3 4=CH4 5=CH5 DRUM1-7B 1-7B=CH10 SYNTH ACCENT GLOBAL(SYNTH1)=CH1 LEVEL DRUM ACCENT GLOBAL(SYNTH1)=CH1 LEVEL GLOBAL(SYNTH1)=CH1 FX TYPE GLOBAL(SYNTH1)=CH1 FX TYPE GLOBAL(SYNTH1)=CH1 FX TYPE COMMON GLOBAL(SYNTH1)=CH1 TEMPO PARAMETER CC(INITIAL) NRPN OSC TYPE CC#70 WAVE SYNTH TUNE... -
Page 93: Index
Index 6Tri ... 52 8Tri ... 52 ACCENT ... 24 Accent parts ... 22 ADDITIVE OSC ... 37 AMP EG ... 30 ARP CONTROL ... 75 arpeggiator ... 27 ARPEGGIO SCALE ... 27 Audio in ... 38 AUDIO IN+COMB ... 38 Auto BPM ... - Page 94 Realtime Recording ... 47 Recording a motion sequence ... 58 rename ... 73 REPEAT ... 54 RESONANCE ... 31 REVERB ... 43 RING MOD ... 35, 44 ROLL ... 25, 30 Saving a pattern ... 64 Saving a song ... 73 Saving data to SmartMedia .
-
Page 96: Block Diagram
Block diagram Synth Part 1 OSC Type, Wave, OSC Edit1, OSC Edit2, Glide Audio In Level, Synth OSC Line/Mic Audio In Audio In Thru Synth Part 2 Synth Part 3 Synth Part 4 Synth Part 5 Drum Part 1 Mod Type, Dest, Speed, Depth, BPM Sync Modulation Wave, Pitch Drum OSC... -
Page 97: Midi Implementation Chart
*1: Sent but not received when Global mode Clock is “Int.” When set to “Ext,”received but not sent. *2: In addition to Korg exclusive messages, also responds to Inquiry messages. *3: Contorol Change Nummbar is specified by MIDI mode “#CC ASSIGN.”... - Page 99 Please also retain your receipt as proof of purchase otherwise your product may be disqualified from the manufacturer's or distributor's warranty. 15-12, Shimotakaido 1-chome, Suginami-ku, Tokyo, Japan Printed in China © 2003 KORG INC.