Table of Contents
Advertisement
Quick Links
Advertisement
Table of Contents

Related Manuals for Korg D888


Summary of Contents for Korg D888
- Page 1 Owner’s Manual...
-
Page 2: Important Safety Instructions
IMPORTANT SAFETY INSTRUCTIONS • Read these instructions. • Keep these instructions. • Heed all warnings. • Follow all instructions. • Do not use this apparatus near water. • Mains powered apparatus shall not be exposed to dripping or splashing and that no objects filled with liquids, such as vases, shall be placed on the apparatus. - Page 3 Incorrect operation or malfunction may cause the contents of memory to be lost, so we recommend that you save impor- tant data on a CD or other media. Please be aware that Korg will accept no responsibility for any damages which may re- sult from loss of data.
-
Page 4: Table Of Contents
Table of Contents Introduction...6 Included items...6 Before using the D888 for the first time...6 Power on/standby/off ...6 Connection example...7 Main features ...8 Parts and their function ...9 Top panel ...9 Rear panel...12 Screens and operations...13 Basic operation ...14 1: Setup and listening to the demo song ...14 1-1. - Page 5 Serious error messages...46 File details...47 The structure of the D888’s hard drive ... 47 WAV files that can be used on the D888 ...47 Song file details ... 48 Settings common to all songs...48 Settings stored independently for each song...48 Block diagram...48...
-
Page 6: Introduction
When turning the power on and off, follow the procedures shown below to protect your D888, your data, and your other equip- ment. Before you turn on the power, make sure that the power cable is firmly plugged into the D888 and into an AC outlet. ● Power-on 1) Lower the D888’s monitor LEVEL knob to the... -
Page 7: Connection Example
● Power -off 1) If you will not be using the D888 for an extended period of time, press the main power switch (POWER ON) located on the rear panel of the D888 to turn off the power. -
Page 8: Main Features
♦ Eight analog input jacks offering your choice of TRS phone or +48V phantom-powered XLR connectors All of the D888’s analog inputs use high-performance balanced pre amps to take full advantage of its high-quality full-digital audio processing. The phone jack inputs are all TRS balanced types. Unbalanced input is also supported, allowing you to directly connect a variety of audio sources. -
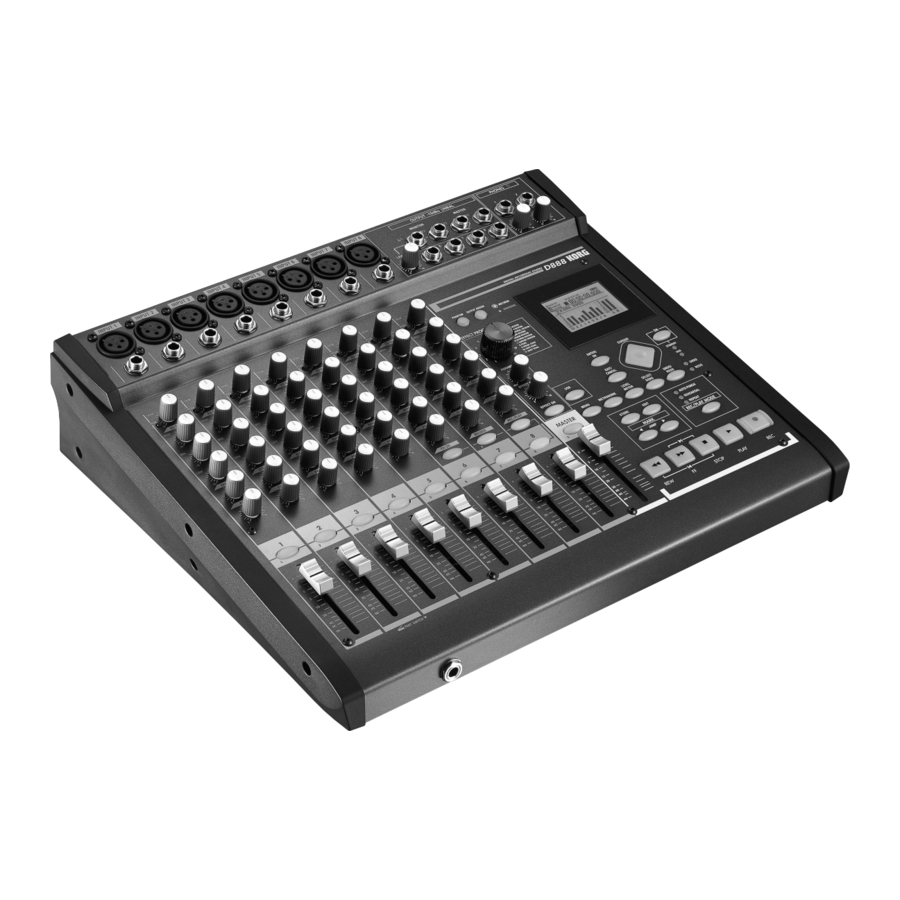
Page 9: Parts And Their Function
Parts and their function Top panel 1 INPUT 1, INPUT 2...INPUT 8 jacks Mic or line sources (such as keyboards) may be connected to these input jacks. Both XLR jacks and balanced 1/4" TRS phone jacks are provided. You may also connect unbalanced phone plugs to the 1/4" jacks. You can use either the TRS phone jack or the XLR jack for each INPUT 1–8, but the XLR jack of an input will be unavailable if a plug is also connected to the corresponding TRS phone jack. - Page 10 These adjust the volume that is sent from each channel to the master bus. 8 FOOT SWITCH jack By connecting a foot switch (we recommend the separately sold KORG PS-1 pedal switch) you can use it to punch-in/out when performing manual punch recording (→p.29, 40).
- Page 11 22 HDD LED This will light when the hard drive is being accessed during recording, playback, or editing, etc. Never power-off the D888 or subject it to vibration or physical shock while the HDD LED is lit or blinking. 23 EFFECT selector This is used to select the program that the effect processor will use.
-
Page 12: Rear Panel
In the standby mode, pressing the ON button will turn the D888 on. While the D888 is operating, hold the ON button down to access the Power Off dialog box and select Yes to shutdown the D888 and return to the standby mode. Then you can use the main power switch to turn the power off completely. -
Page 13: Screens And Operations
Screens and operations 1 Selecting a mode screen Press a mode button (MENU, METRONOME, LEVEL METER, etc.) to access the corresponding screen in the display. 2 Selecting a parameter and editing its value In screens that allow editing, you will mainly use the cursor buttons, ENTER/OK button, and EXIT/CANCEL button to select a parameter and edit its value. -
Page 14: Basic Operation
Connect your monitor speakers or headphones, and turn on the power. Before you start recording your own songs, take a minute to listen to the demo song provided with the D888. 2: Recording Connect your keyboard, mic, guitar, or other instrument, and record your per- formance on a channel track. -
Page 15: Listen To The Demo Song
1-3. Listen to the demo song When shipped from the factory, the D888 contains a pre-recorded demo song. 1) Make sure that the display shows the demo song. If something other than the demo song is shown, select the demo song as described in p.21 “1-2. -
Page 16: Connecting Your Input Device
7) When you’re finished performing, press the STOP button to stop recording (the button will go dark). The D888’s recording level is set “pre-fader”; meaning the record levels are adjusted only by the TRIM knobs. The channel faders only adjust the audio level to the master and monitor outputs. -
Page 17: Adjusting The Playback Sound
3-2. Adjusting the playback sound • Turning the three EQ GAIN knobs of channels 1 and 2 will adjust the tone. • Turning the PAN knobs of channels 1 and 2 will adjust the stereo position of each channel. In this example, channel 1 should be panned left, and channel 2 panned right to preserve the stereo imaging of your keyboard. -
Page 18: 5: Mixdown And Mastering
“Mixdown” is the process of adjusting effects, EQ, and pan for the audio recorded on each track to create the overall balance you want, and recording this as stereo data. The D888 provides a master track for mixdown. Here’s how to mix down the song you recorded. 5-1. Adjusting the tone and volume of each track... -
Page 19: Saving Your Song
You can also save data manually (→p.36 “1-4. Saving a song”). 6: Structure The following illustration is a simplified diagram showing the audio signal flow of the D888’s re- corder and how the knobs and faders control the sound. Use section “A” to adjust the recording level from each channel input to the channel tracks. -
Page 20: Operation
When you turn on the power, the display will show this Lev- el Meter screen. You can also access this screen by pressing the LEVEL METER button. In this screen you can also view the D888 ’s operating status and settings. 1. Display content and settings... -
Page 21: Song And Location
1-1. Creating a new song This operation allocates space on the hard drive for record- ing. On the D888 , this unit is called a “song”. You must create a new “song” before you can start a new recording. You can also refer to p.15 “2-1. Creating a new song”. -
Page 22: Location
The song will rewind as long as you continue holding down the REW button. 2. Location On the D888 , “location” means the position within the play- back data of a song. The counter in the Level Meter screen indicates the present location in the song, displayed in currently selected format (→p.20 “... - Page 23 Storing a mark 1) Move to the location that you want to store. Use the counter or the FF or REW buttons to move. 2) Press the STORE button; a screen will ask you for con- firmation. If you decide not to store the mark, press the EXIT/ CANCEL button.
-
Page 24: Mixer
If you use phantom power, please be aware that it is supplied to all eight channels. You may damage your mic or the D888 if you connect or discon- nect a mic while phantom power is turned on. 1-2. Adjusting the input level On the D888 , the input channels correspond to the channel tracks. -
Page 25: When Individual Is Selected
7, and 8 from a point immediately before the channel faders. You can use these as pre-outputs for the devices connected to the D888 . The output of channel tracks 1 and 2 can be adjusted by the monitor LEVEL knob. -
Page 26: Recording (Basic)
Recording (basic) During regular recording, the D888 can record up to eight in- dividual tracks. During mixdown, the D888 can record a sin- gle stereo master track. 1. Virtual tracks The D888 has eight channel tracks for each song, and each channel track has eight virtual tracks. -
Page 27: Recording Channel Tracks
A master track WAV file is created in the song folder each time you record, up to the available capacity of the hard disk drive. However, the D888 is able to recognize only one hundred such files. The most recently recorded WAV file will be selected for the mas- ter track. -
Page 28: Recording The Master Track
If the bounce-destination already contains recorded data, it will be overwritten and replaced by the newly recorded data; i.e., you will lose the previously recorded data. 3) Adjust the EQ and pan of each playback track. Press the PLAY button to play back. Use the track 1–8 EQ GAIN knobs to adjust the tone, and the PAN knobs to adjust the stereo position. -
Page 29: Recording (Advanced)
Using a foot switch for manual punch-in/out You can alternately punch-in or punch-out by pressing a foot switch (we recommend the Korg PS-1 pedal switch). This is convenient when your hands are occupied with playing your instrument, or if you need to punch-in/out from a distance. -
Page 30: Repeat Recording
5) Specify how playback will occur before and after the recording. Use the cursor up/down buttons to select “Pre=...” (the location at which playback will start, before the begin- ning of recording) or “Post=...” (the location at which playback will end, after the end of recording), and press the ENTER/OK button. -
Page 31: Recording-Related Functions
If the Auto Input function is on, an icon is shown in the Level Me- ter screen (→p.20). If you want to practice on an instrument connected to the D888 while playing back previously-recorded tracks, you’ll need to turn the Auto Input function off in order to hear the input signal. -
Page 32: Playback
Playback The D888 is able to play back eight tracks simultaneously. If the Auto Input setting is on, channels that are set to Record mode can be played simply by pressing the PLAY button, without your having to switch the channel buttons between Record and Play modes. -
Page 33: Effects
Effects The D888 provides eleven different effect types. The effect is shared between the channel tracks, and you can use the EF- FECT knob of each channel track to adjust the depth of the effect. Use the EFFECT RTN knob to adjust the overall amount of effect for the entire song. -
Page 34: Saving Effect Settings
Checking the program When you reload or select a song that uses an effect, you also have the option of loading the effect parameter setting that were saved with that song, regardless of the physical posi- tion of the EFFECT selector, PARAMETER, and EFFECT RTN knobs. -
Page 35: Editing
Editing 1. Song editing 1-1. Reloading a song This operation reloads the current song in the state in which it was last saved. At this time you can choose whether the mixer settings and effect settings saved with the song will also be loaded (→p.48 “Song file details”). -
Page 36: Saving A Song
We recommend that you use this command to save the data periodically after recording or editing for an extended peri- od, or if you are using the D888 in an environment where the power supply is unreliable. The song will also be saved automatically when you press the USB button to enter USB mode. -
Page 37: Track Editing
2. Track editing The D888 provides various track editing operations that let you copy, delete, or exchange tracks. In order to copy or delete tracks, you will need to store the appropriate locate points beforehand. In some cases, it may be impossible to execute a track editing op- eration if there is insufficient free space on the song drive. -
Page 38: Erase A Track (Erase)
2-2. Erase a track (Erase) This command erases track data from the specified region (IN–OUT) of a track. The region will become blank. This Erase Track command will not cause the data following the OUT point to move. • You can also erase the IN through OUT region of a pair of two tracks. -
Page 39: Selecting A Master Track File (Master)
You can select a virtual track (VT1–VT8), a master track WAV file, or a WAV file that you loaded into the D888 using USB mode. However, you can only select WAV files (44.1 kHz 16-bit) that are in the same folder as the current song. -
Page 40: Deleting Track Data (Delete)
Connect your foot switch to the FOOT SW jack. You will need to specify the correct polarity for the foot switch you’re using. You don’t need to specify the polarity if you’re using a Korg PS-1 pedal switch. Specifying the foot switch polarity 1) Press the MENU button to access the Menu screen. -
Page 41: Undo And Redo
CD-R/RW drive to the D888. The D888 has a USB connector that lets you connect it direct- ly to your computer so that you can save data from the D888 ’s hard drive onto your computer or write data from your com- puter to the D888 ’s hard drive. -
Page 42: Usb Mode
Windows users (Windows Me/2000 or later) In order to use the D888 with Windows 98, you must install a device driver. For details on obtaining and installing the device driver, refer to the Korg website (http://www.korg.com). -
Page 43: Synchronization Via Midi
The frame rate is 30 fps, and the MTC format is 30 NDF. The D888 can operate as the master, but not as a slave. About the MIDI implementation chart The owner’s manual of each MIDI device includes a MIDI implementation chart. -
Page 44: Appendices
→ If the screen is difficult to read, adjust the contrast (→p.40). No sound Is the power of the D888 or a connected device turned off? (→p.7) Is the MASTER fader, monitor LEVEL knob, or PHONES level knobs set to low? Is the each channel volume level set to low? Can’t hear the playback... -
Page 45: A Button Does Not Function When Pressed
→ Connect the D888 to your computer in USB mode and perform the Optimize command. In some cases, ultra-low frequencies played back in the studio may cause “Disk too busy”. -
Page 46: Confirmation Messages
→ Press the ENTER/OK button and continue operation. Serious error messages Fatal: “****” This will appear if a problem or malfunction has occurred on the D888. → If this type of message appears, write down the contents of “****” and contact your Korg distributor. -
Page 47: File Details
There will be one of these folders for each song you cre- ate. When you create a new song, a folder will be created sequentially, starting with SONG0001. When you rename a song on the D888, the name of the song setting file in the folder will also change automati- cally. -
Page 48: Song File Details
Song file details The D888 has settings that are stored independently for each song, and settings that apply in common to all songs. Settings of the monitor LEVEL knob, headphone level knobs, and TRIM knobs are not memorized. You will need to read- just these yourself. -
Page 49: Specifications
USB2.0 High-Speed device USB Mass Storage Class Supported OS: Window Me, Windows 2000 or later Mac OS 9.0.4 or later * If using the D888 with Windows 98, please refer to the Korg website or contact your Korg distributor. <MIDI IN/OUT> Connectors: DIN 5-pin <FOOT SW>... -
Page 50: Index
Index Adjusting the volume Analog input Auto Input Backup Block diagram Channel output Computer Connect mic Connection Contrast Copy Song Track Counter Cursor keys Delete Song Track data Display Download Effect Equalizer Erase Erase Track Error message Exchanging tracks Files you can use Foot switch Formatting Info: “****”... -
Page 51: Midi Implementation Chart
Active Sense Reset Notes Mode 1 : OMNI ON, POLY Mode 3 : OMNI OFF, POLY Consult your local Korg distributor for more information on MIDI IMPLEMENTATION. MIDI Implementation Chart Recognized Transmitted Mode 2 : OMNI ON, MONO Mode 4 : OMNI OFF, MONO Date: 2006.1.16... - Page 52 Please also retain your receipt as proof of purchase otherwise your product may be disqualified from the manufacturer’s or distributor’s warranty. KORG INC. 4015-2 Yanokuchi, Inagi-city, Tokyo 206-0812 Japan 2006 KORG Inc.