Table of Contents
Advertisement
Quick Links
Advertisement
Table of Contents

Related Manuals for Telex Echelon 25XT


Summary of Contents for Telex Echelon 25XT
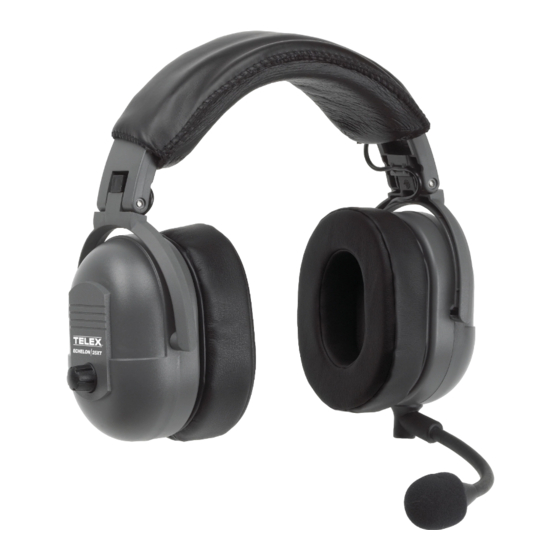
- Page 1 User Instructions Echelon 25XT Noise Reduction Headset LIT000014 Rev B 6/2009...
- Page 2 Uniform Limited Warranty Limitation of Remedies; Certain Damages Excluded Bosch branded products are warranted by Bosch Security Systems, Inc. against REPAIR OR REPLACEMENT OF malfunction due to defects in materials and DEFECTIVE PRODUCTS ARE THE workmanship for a specified period, as noted SOLE AND EXCLUSIVE REMEDIES in the individual product line statements PROVIDED BY BOSCH TO THE...
-
Page 3: Customer Service
The equipment must be accompanied by documentation stating you name, return address, and telephone number. Bosch Warranty Term Lengths 1 Month 3 Months Months Months Months Other Aviation Echelon 25XT ** Warranty subject to change without notice. - Page 4 Ordering Information Parts List Part No. Description 800456022 Replacement Head Pad 590637000 Cord Clip 800136100 Microphone Element Assembly 800456021 Foam Ear Pads (set of 2) 800456000 Windscreen CME000009000 Carrying Case 550216002 Cell Phone Accessory Cable 550216003 Auxillary Device Accessory Cable...
-
Page 5: Table Of Contents
Table Contents Headband Size Adjustment ..............4 Headband Pressure Adjustment ............5 Left or Right Side Microphone Placement ..........6 Connection ....................7 Stereo Mono Switch ................7 Cell Phone/Audio Interface ..............7 Volume Adjustment ................8 Microphone Gain Adjustment ...............8 Ear Cushion Replacement ..............9 Mic Element Removal .................10 Specifications ..................11... - Page 7 Echelon 25XT Noise Reduction Headset FIGURE 1.
-
Page 8: Headband Size Adjustment
Headband Size Adjustment Headband Size Adjustment FIGURE 2. To adjust the headband size, do the following: Move the earcup sliders up or down on the headband. Size is properly adjusted when the earcups are centered over the ears. It is important to make the same adjustments to both sides of the headband to keep the headband and pad properly centered over the head. -
Page 9: Headband Pressure Adjustment
Headband Pressure Adjustment There are three (3) pressure settings for headband comfort. Increasing the pressure improves the seal between the earcup and the head for greater noise reduction. Comfort Cam™ ADJUSTMENT KNOB SETTINGS HIGH MEDIUM Headband Pressure Adjustment FIGURE 3. To change the pressure setting, do the following: Remove the headset. -
Page 10: Left Or Right Side Microphone Placement
Left or Right Side Microphone Placement To adjust the microphone to the left or right, do the following: Rotate the boom, as shown inFigure 4. Rotating and Reshaping the Boom FIGURE 4. Reshape the boom so the microphone is at the corner of the mouth. -
Page 11: Connection
Cell Phone/Audio Interface The Echelon 25XT includes a unique amplified interface allowing for the connection of a cellular telephone and an audio input simultaneously. This configuration allows the user to set up before take-off and eliminates the need to re-configure cords and equipment when operating the aircraft. -
Page 12: Volume Adjustment
The Telex Echelon 25XT cell phone/audio interface has been designed to function with the widest array of cellular telephones and portable audio devices. There are cell phones and audio devices on the market not designed to industry physical and electrical standards. These devices are not guaranteed to function properly with the Echelon 25XT headset. -
Page 13: Ear Cushion Replacement
Turn the gain pot clockwise to increase gain. Turn the gain pot counter-clockwise to decrease gain. Ear Cushion Replacement To remove an old ear cushion, do the following: Grasp the ear cushion and pull it off the earcup. > To install a new ear cushion, do the following: Starting at the top of the earcup, place the flap on the back of the ear cushion over the lip along the top of the earcup. -
Page 14: Mic Element Removal
Mic Element Removal To remove the mic element, do the following: Press and release the catch on the microphone element. Carefully pull out the element. NOTE: Avoid pulling the microphone wires. Pull the plastic connector housing to unplug the microphone element. RELEASE CATCH MIC ELEMENT Mic Element Removal for Replacement... -
Page 15: Specifications
Specifications Receivers Type: Dynamic Impedance: accepts 150 Ohm (stereo) 300 Ohm (mono) source Frequency Response: 350Hz -3.0 kHz ±6dB Sensitivity: 90 ±5dB SPL for 1mW, 1kHz input Maximum Power Input: 30mW Microphone/Amplifier Assembly Microphone Type: Noise-canceling electret condenser Output Impedance: 50 Ohm Frequency Response: 100Hz –...