
Related Manuals for Kodak EasyShare DX7590


Summary of Contents for Kodak EasyShare DX7590
- Page 1 Kodak EasyShare DX7590 zoom digital camera User’s guide www.kodak.com For interactive tutorials, www.kodak.com/go/howto For help with your camera, www.kodak.com/go/dx7590support...
- Page 2 © Eastman Kodak Company, 2004 All screen images are simulated. Kodak and EasyShare are trademarks of Eastman Kodak Company. Schneider-Kreuznach, Xenar, and Variogon are trademarks of Jos. Schneider Optische Werke GmbH used under license by Eastman Kodak Company. P/N 4J1301...
-
Page 3: Product Features
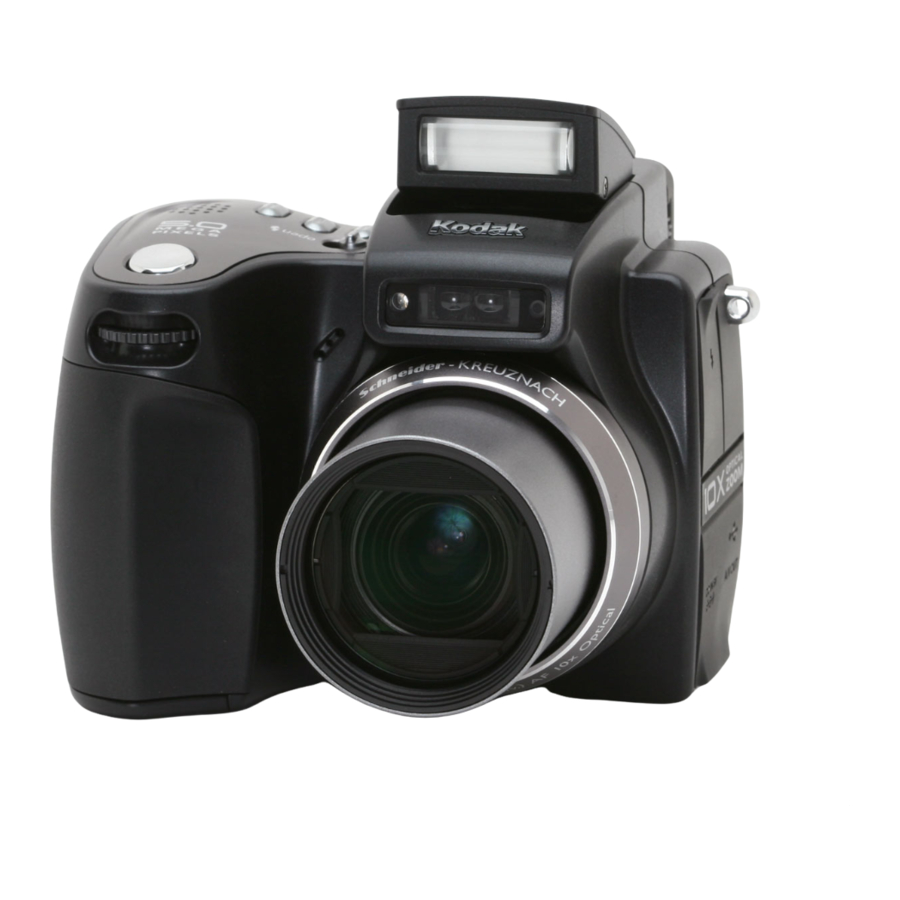
Top, front view Jog dial Shutter button Microphone Side views SD/MMC card slot Diopter dial External flash connector External-flash-connector cover www.kodak.com/go/support Flip-up flash Self-Timer/Video light Lens USB port/ DC-In/ A/V-Out cover USB port DC-In (5V) A/V Out (for TV viewing) Product features... -
Page 4: Back View
3 EVF (Electronic Viewfinder) 4 On/Off button 5 Zoom (Wide Angle/Telephoto) 6 Neck strap post 7 Status button 8 Share button 9 Joystick (move OK button (press) Mode dial Review button Menu button Delete button Power ring LCD screen (Liquid Crystal Display) www.kodak.com/go/support... - Page 5 Exposure bracketing First burst /Last burst Close-up /Landscape Flash button Flip-up flash Open flash switch Shutter button www.kodak.com/go/support Bottom Battery door Tripod socket/locator for button EasyShare camera dock or printer dock button Dock connector Locator for EasyShare camera dock or printer dock...
-
Page 6: Table Of Contents
Viewing single pictures and videos ... 37 Viewing multiple pictures and videos ... 38 Playing a video... 38 Deleting pictures and videos... 39 Magnifying pictures... 39 Changing optional review settings... 39 Protecting pictures and videos from deletion... 40 Viewing picture/video information ... 40 www.kodak.com/go/support... - Page 7 6 Transferring and printing pictures ... 51 Transferring pictures/videos with the USB cable ... 51 Printing from a Kodak EasyShare printer dock or your computer ... 52 Printing from an optional SD or MMC card ... 52 Ordering prints online ... 52 Direct printing with a PictBridge-enabled printer ...
- Page 8 www.kodak.com/go/support...
-
Page 9: Getting Started
Kodak EasyShare software CD. Contents may change without notice. Installing the software first IMPORTANT: Install the software from the Kodak EasyShare software CD before connecting the camera (or dock) to the computer. Otherwise, the software may install incorrectly. See the Start Here! guide or Installing the software, page www.kodak.com/go/support... -
Page 10: Charging The Battery
The indicator light turns red. When the indicator light turns green, remove the battery and unplug the charger. Charging takes approximately 3 hours. You can also charge the battery using an optional Kodak EasyShare printer dock or camera dock. Purchase these and other accessories at a dealer of Kodak products or visit www.kodak.com/go/dx7590accessories. -
Page 11: Important Battery Information
Li-Ion rechargeable battery, 1700 mAh (KLIC 5001) (included with camera) We recommend using only a Kodak EasyShare Li-Ion rechargeable battery. Not all manufacturers’ 3.7V Li-Ion rechargeable batteries are compatible with the camera. Damage caused by unauthorized accessories is not covered under warranty. -
Page 12: Turning The Camera On And Off
For rechargeable battery disposal information, see the Rechargeable ■ Battery Recycling Corporation Web site at www.rbrc.com. For more information on batteries, see www.kodak.com/global/en/service/batteries/batteryUsage.jhtml Turning the camera on and off Power ring Setting the language 1 Turn on the camera. Press the Menu button. -
Page 13: Setting The Date And Time
5 When finished, press the OK button. 6 Press the Menu button to exit the menu. NOTE: Depending on your computer operating system, Kodak EasyShare software may update the camera clock when you connect the camera. See the EasyShare software Help for details. -
Page 14: Changing The Display, Evf Or Lcd
EVF to LCD, and back. The selection remains until you press the button again. ■ Look through the EVF. Turn the Diopter dial until the viewfinder ■ image is sharp. Press the Status off and on. www.kodak.com/go/support button to turn the icons... -
Page 15: Storing Pictures On A Sd Or Mmc Card
SD cards for removable, reusable storage for your pictures and videos. NOTE: We recommend Kodak SD or MMC cards. Other SD brands are acceptable, but must possess the SD When using the card for the first time, format it in this camera before taking pictures... -
Page 16: Taking Pictures And Videos
Auto Focus (AF) and Auto Exposure (AE). The AF/AE indicator is displayed. If the focus and/or exposure fails, recompose the shot and try again. 5 Continue pressing the Shutter button completely down to take the picture. www.kodak.com/go/support for other AF/AE indicator AF/AE indicator: green—successful red—failed... - Page 17 NOTE: Framing marks do not appear in Landscape or Video mode. When you use Focus Zone (page 28) and set Center Zone, the framing marks are fixed at Center Wide. www.kodak.com/go/support Taking pictures and videos Center focus Center wide focus...
-
Page 18: Capture Modes
Auto focus framing marks Aperture Shutter speed Burst Pictures/time remaining (flashing = exhausted) Flash compensation Exposure compensation Exposure compensation www.kodak.com/go/support Picture size Compression Storage location AF mode Focus zone Exposure metering White balance Low battery Camera mode Auto Focus/... -
Page 19: Taking A Video
NOTE: If you prefer, press the Shutter button completely down and hold it for more than 2 seconds to begin recording. To stop recording, release the Shutter button. Recording also stops if the storage location is full. See www.kodak.com/go/support Taking pictures and videos to highlight the desired Size, then press the... -
Page 20: Quickview-Reviewing The Picture Or Video Just Taken
24) or burst series (see during Quickview. If you select Delete, all pictures in the burst series are deleted. To delete selectively, do so in Review (see page 39). www.kodak.com/go/support to adjust the page 47) or as a are displayed. page... -
Page 21: Using Optical Zoom
1 MP. For an acceptable 4 x 6 in. (10 x 15 cm) print, ensure that the slider remains blue. www.kodak.com/go/support Taking pictures and videos page 34.) You can change optical zoom before 1 Use the EVF or LCD screen to frame your subject. -
Page 22: Picture-Taking Modes
P, A, S, M, and C modes, page 18.) Press the Menu button to change other 18.) Press the Menu button to change other settings. www.kodak.com/go/support 18.) Press the P, A, S, M, and C P, A, S, M, and C modes,... - Page 23 Use Telephoto to exaggerate background blur. The camera pre-settings are f/2.8–f/3.7, Multi-Pattern Exposure Metering, Multi-Zone Focus, ISO 100. www.kodak.com/go/support Taking pictures and videos P, A, S, M, and C modes, page 18.) Press the Menu button to choose a capture...
-
Page 24: Scene Modes
White Balance, Center-Weight Metering, Daylight White balance, ISO 100 f/2.8–f/3.7, +1 Exposure Compensation, Center-Weight Metering, Multi-Zone Focus, ISO 100 f/2.8–f/3.7, +1 Exposure Compensation, Center-Weight Metering, Daylight White balance, ISO 100 f/2.8–f/3.7, Macro Focus, +1 Exposure Compensation, Center-Weight Metering, ISO 140 www.kodak.com/go/support... - Page 25 Action pictures of children in bright light. Backlight Subjects that are in shadow or “backlit” (when light is behind the subject). www.kodak.com/go/support Taking pictures and videos Camera pre-settings f/5.6, 2 second exposure, Infinity Focus, Center-Weight Metering, Daylight White Balance, ISO 100 f/2.8–f/3.7, Macro Focus, Daylight...
- Page 26 Smaller f-numbers are good for portraits and low-light conditions. The highest and lowest aperture numbers may be affected by optical zoom. Picture Size, page 26.) page www.kodak.com/go/support page 29) to reset P, A, S,...
- Page 27 Rotate the Jog dial to change the setting ■ Press the Jog dial to save the setting. 3 Press the Menu button to change other settings (see 4 Take a picture. www.kodak.com/go/support Taking pictures and videos Jog dial: • Rotate to move the cursor or change settings.
-
Page 28: Using The Flip-Up Flash
EVF/LCD screen status area. Flash distance 2–16.1 ft (0.6–4.9 m) @ ISO 140 6.6–12.1 ft (2.0–3.7 m) @ ISO 140 Action Wait. Take picture when the icon stops blinking. Open flash unit or take the picture without flash. www.kodak.com/go/support... -
Page 29: Flash Settings In Each Mode
Sports P, A, S, M, or C P, A, S, M, C Scene modes Close-up Landscape Night Portrait www.kodak.com/go/support Taking pictures and videos Default setting Available settings Auto* Auto, Off, Fill Flash, Red-eye Auto* Auto, Off, Fill Flash, Red-eye Auto*... - Page 30 Default setting Available settings Auto* Auto, Off, Fill Flash, Red-eye Auto* Auto, Off, Fill Flash, Red-eye Auto, Off Auto, Off, Fill Flash Red-eye* Auto, Off, Fill Flash, Red-eye Red-eye* Auto, Off, Fill Flash, Red-eye Auto* Auto, Off, Fill Flash, Red-eye Fill Fill www.kodak.com/go/support...
-
Page 31: Using An External Flash Unit
Shooting close-up and landscape pictures Use the Close-up/Landscape button very close or very far away. (Not available in Scene modes.) Close-up/Landscape www.kodak.com/go/support Taking pictures and videos 1 Turn off the camera and flash unit. 2 Open the External-flash-connector cover. 3 Plug your external-flash-unit cable into the External flash connector on the camera. -
Page 32: Using Exposure Bracketing
3.9 to 6.9 ft (1.2 to 2.1 m) page to gain maximum sharpness of far away 9) are not available in Landscape. Purpose Determine the best exposure level for your conditions based on your evaluation of 3 pictures. Exposure Bracketing Interval, (See www.kodak.com/go/support... -
Page 33: Using Burst
The camera stops taking pictures when you release the Shutter button, when the pictures are taken, or when there is no more storage space. NOTE: The EVF/LCD screen will not display during burst. www.kodak.com/go/support Taking pictures and videos Then the exposures taken are –0.3, 0.0, +0.3... -
Page 34: Changing Picture-Taking Settings
3.1 MP—for printing up to 11 x 14 in. (28 x 36 cm); pictures are medium resolution with smaller file size. 1.8 MP—for printing 4 x 6 in. (10 x 15 cm) prints, emailing, Internet, screen display, or for conserving space. www.kodak.com/go/support... - Page 35 P, A, S, M, C: This setting remains until you change it or take pictures. Auto, Scene: This setting remains until you turn the Mode dial or turn off the camera. www.kodak.com/go/support Taking pictures and videos Icon Options and icons that appear in Liveview Standard (default) Fine NOTE: The Fine setting renders a larger file size.
- Page 36 Single AF —uses external AF sensor and TTL-AF when the Shutter button is pressed halfway down. Accessory Lens AF Unavailable in Video mode. www.kodak.com/go/support —evaluates —evaluates the —similar to —evaluates 3 —evaluates the small —move the focus...
- Page 37 This setting remains until you change it. Video Length (Video) Choose a default video length (useful in self-timer videos). Setup Menu Choose additional settings. www.kodak.com/go/support Taking pictures and videos Icon Options and icons that appear in Liveview High Color Natural Color (default) Low Color Black &...
-
Page 38: Using Setup To Customize Your Camera
The slider turns red when the picture may no longer render an acceptable 4 x 6 in. (10 x 15 cm) print. None—no pause. Shutter Only Default Classical Jazz Sci-fi www.kodak.com/go/support... - Page 39 CAUTION: Formatting deletes all pictures and videos, including those that are protected. Removing a card during formatting may damage the card. About View camera information. www.kodak.com/go/support Taking pictures and videos Icon Options Low (default) Medium High On (default) page NTSC (default)—used in North America and Japan.
-
Page 40: Putting Yourself In The Picture Or Video
(To get the latest version of EasyShare software, go to www.kodak.com/go/dx7590downloads.) Then copy up to 32 album names to the camera’s album name list the next time you connect the camera to the computer. See Kodak EasyShare software Help for details. to highlight Self-Timer page www.kodak.com/go/support... - Page 41 When you transfer the tagged pictures and videos to your computer (see page 51), the Kodak EasyShare software opens and categorizes your pictures and videos in the appropriate album. See the Kodak EasyShare software Help for details. www.kodak.com/go/support Taking pictures and videos...
-
Page 42: Tips For Better Pictures
If the picture is too light, decrease (–) the setting; if it’s too dark, increase (+) the setting. Use the Jog dial to access this function (see Images taken at f/3.7, 1/500 second Exposure Compensation www.kodak.com/go/support page 19). - Page 43 Images have a greater focus range with a larger f-number, such as f/8. But it is not the best choice when shooting a moving object, so a smaller f-number is preferred, such as f/2.8. Wide Angle, f/2.8 10X Zoom, f/3.6 NOTE: Some of the shutter speeds are not shown. www.kodak.com/go/support...
-
Page 44: Fill Flash
Close-up wide at 5 in. (12.7 cm) page 21), and is a popular feature. page 18). Fill-flash on Fill-flash off Images taken in Portrait mode Close-up telephoto at 30 in. (76.2 cm) Images taken at f/5,1/500 second www.kodak.com/go/support... -
Page 45: Reviewing Pictures And Videos
Reviewing pictures and videos Press the Review button to view and work with your pictures and videos. To save battery power, use the optional Kodak EasyShare camera or printer dock, or Kodak 5-volt AC adapter. (See www.kodak.com/go/dx7590accessories.) Viewing single pictures and videos 1 Press the Review button. -
Page 46: Viewing Multiple Pictures And Videos
To replay the video, press the OK button. To go to the previous or next picture or video, move the Joystick to locate a video. (In Multi-up view, highlight a , then press the OK button. www.kodak.com/go/support , then press the OK button. -
Page 47: Deleting Pictures And Videos
(page Image Storage (page Slide Show (page www.kodak.com/go/support Reviewing pictures and videos to locate a picture or video (or highlight one in to highlight an option, then press the OK button: deletes the displayed picture or video. 1 Press the Review button. -
Page 48: Protecting Pictures And Videos From Deletion
Use Kodak EasyShare software that came with your camera (see create album names on your computer. (To get the latest version of EasyShare software, go to www.kodak.com/go/dx7590downloads.) Then copy up to 32 album names to the camera’s internal memory. See Kodak EasyShare software Help for details. to highlight Protect , then press the OK button. -
Page 49: Running A Slide Show
When you transfer the tagged pictures and videos to your computer (see page 51), the Kodak EasyShare software opens and categorizes your pictures and videos in the appropriate album. See Kodak EasyShare software Help for details. Running a slide show Use the Slide Show to display your pictures and videos on the camera screen. -
Page 50: Displaying Pictures And Videos On A Television
(yellow) and audio-in port (white). See your television user’s guide for details. 2 Review pictures and videos on the television. to highlight On, then press the OK button. www.kodak.com/go/support to highlight Interval, to highlight Loop, then page... -
Page 51: Copying Pictures And Videos
(see Tags that you applied for print, email, and favorites are not copied. Protection settings are not copied. To apply protection to a picture or video, see www.kodak.com/go/support Reviewing pictures and videos to highlight Copy to highlight an option: copies the current picture or video. -
Page 52: Installing The Software
Macintosh OS X 10.2.3, 10.3 Safari 1.0 or higher Minimum hardware requirements ■ 128MB RAM (64 MB RAM for Windows 98, 98SE, 2000 SPI, or ME OS) ■ 200 MB hard disk space available ■ CD-ROM drive ■ Available USB port www.kodak.com/go/support... -
Page 53: Install The Software
Install the software 1 Close all software applications that are open on your computer (including anti-virus software). 2 Place the Kodak EasyShare software CD into the CD-ROM drive. 3 Install the software: Windows OS-based computer— choose Run from the Start menu and type d:\setup.exe where d is the drive letter that contains the CD. -
Page 54: Sharing Pictures And Videos
After pressing the Review button (see Press the Share button to “tag” your pictures and videos. When they are transferred to your computer, you can share them by: page 37). www.kodak.com/go/support Pictures Videos ✔ ✔ ✔ ✔ ✔ page 12). -
Page 55: Tagging Pictures For Printing
Tagging pictures and videos for emailing First—on your computer Use Kodak EasyShare software that came with your camera to create an email address book on your computer. (To know the latest version EasyShare software, go to www.kodak.com/go/dx7590downloads.) Then copy up to 32 email addresses to the camera’s internal memory. - Page 56 When you transfer the tagged pictures and videos to your computer (see page 51), the email screen opens and lets you send them to the addresses you specified. See the Kodak EasyShare software Help for details. to highlight Email , then press the OK button.
-
Page 57: Tagging Pictures As Favorites
NOTE: The camera holds a limited number of favorites. Use Camera Favorites in the EasyShare software to customize the size of your camera Favorites section. For more information, click the Help button in the Kodak EasyShare software. www.kodak.com/go/support Sharing pictures and videos Press the Share button. -
Page 58: Optional Settings
4 Press the Menu button to exit the menu. Preventing favorites from transferring to the camera 1 Open the Kodak EasyShare software. Click the My Collection tab. 2 Go to the Albums view. 3 Click the Camera Favorites Album for your camera. -
Page 59: Transferring And Printing Pictures
Transferring pictures/videos with the USB cable NOTE: Visit www.kodak.com/go/howto Also available for transferring You can also use these Kodak products to transfer your pictures and videos: Kodak EasyShare camera dock, Kodak EasyShare printer dock ■ ■ Kodak multi-card reader, Kodak SD multimedia card reader-writer Purchase these and other accessories at a dealer of Kodak products or www.kodak.com/go/dx7590accessories. -
Page 60: Printing From A Kodak Easyshare Printer Dock Or Your Computer
SD or MMC card slot. See your printer user’s guide for details. ■ Make prints at an SD or MMC card-capable Kodak picture maker. (Contact a location prior to visiting. See www.kodak.com/go/picturemaker.) Take the card to your local photo retailer for professional printing. -
Page 61: Transferring And Printing Pictures
Connecting the camera to the printer 1 Turn off the camera and printer. 2 Optional: If you have a Kodak 5-volt AC adapter (optional accessory), plug it into the camera and into an electrical outlet. IMPORTANT: Do not use the AC adapter included with the Kodak EasyShare camera dock or printer dock to power your camera. -
Page 62: Troubleshooting
Troubleshooting When you have questions about your camera, start here. Additional technical information is available in the ReadMe file located on the Kodak EasyShare software CD. For updates to Troubleshooting information, see www.kodak.com/go/dx7590support. Camera problems If... Try one or more of the following ■... - Page 63 ■ Memory card not recognized or camera ■ freezes with card. www.kodak.com/go/support Open the flash unit (page Check the flash setting and change as needed Transfer pictures to the computer Delete pictures from the card or insert a new one...
-
Page 64: Computer/Connectivity Problems
Use P mode to adjust the Exposure and Flash Compensations (page (page (page 51). 31). (page 20) or change your position so light is not (page 19). (page 19) and Selectable Zone (see Focus Zone on 28). (page 20). (page 19). www.kodak.com/go/support (page 44). 20). 20). -
Page 65: Power-Ring-Light Status
■ ■ ■ Power ring blinks amber. ■ www.kodak.com/go/support (page 64). Turn on the camera. Recharge the battery or install a new one Turn Mode dial off, then back on. Camera is on and ready to take a picture or video. -
Page 66: Direct Printing Problems
Cannot print pictures. Camera or printer display an error message. Still having problems? Visit www.kodak.com/go/dx7590support, or see For Direct printing issues, contact the printer manufacturer. Cause The Mode dial is set to Favorites. Camera is accessing a card or internal memory. -
Page 67: Getting Help
Other Get support for cameras, software, accessories, more Get information on Kodak EasyShare printer docks Get information on Kodak inkjet products Optimize your printer for truer, more vibrant colors Register your camera www.kodak.com/go/support www.kodak.com/go/dx7590support www.kodak.com/go/dx7590accessories www.kodak.com/go/dx7590downloads... -
Page 68: Telephone Customer Support
Japan 03 5540 9002 For the most up-to-date listings, visit: http://www.kodak.com/US/en/digital/contacts/DAIInternationalContacts.shtml Amount of free hard disk space ■ ■ Camera serial number Version of Kodak EasyShare software ■ Exact error message you received ■ Korea Netherlands New Zealand Norway Philippines/... -
Page 69: Appendix
Appendix Camera specifications For more specifications, visit www.kodak.com/go/dx7590support. Kodak EasyShare DX7590 zoom digital camera CCD (charge-coupled device) 1/2.5 in. CCD, 4:3 aspect ratio Output image size 2576 x 1932 (5.0 M) pixels (picture size) 2576 x 1716 (4.4 M) pixels 2304 x 1728 (4.0 M) pixels... - Page 70 Appendix Kodak EasyShare DX7590 zoom digital camera Accessory lens Yes (inside lens ring) thread Lens barrier Lens cap Exposure Exposure metering TTL–AE with program modes; Multi-Pattern AE, Center-Weight AE, Center-Spot AE Exposure range AE range: EV 5.3 to 16.0 (@ wide) Full range: EV 0 to 16.0 (@ wide)
- Page 71 32 MB internal memory capacity Review Quickview Video output NTSC or PAL Power Kodak EasyShare Li-Ion rechargeable battery (KLIC–5001); 5V AC adapter, optional Communication with computer USB, via USB cable; EasyShare camera dock or printer dock Languages English/German/Spanish/French/Italian/Portuguese/Chinese/Korean/Japanese Other features Self-timer...
-
Page 72: Tips, Safety, Maintenance
For rechargeable battery disposal information, visit the Rechargeable Battery Recycling Corporation Web site at www.rbrc.com. ■ For digital camera disposal or recycling information, contact your local authorities. In the US, visit the Electronics Industry Alliance Web site at www.eiae.org or the Kodak Web site at www.kodak.com/go/dx7590support. www.kodak.com/go/support... -
Page 73: Storage Capacities
32 MB internal memory 32 MB SD/MMC 64 MB SD/MMC 128 MB SD/MMC 256 MB SD/MMC 512 MB SD/MMC www.kodak.com/go/support Number of pictures 5.0 MP 4.4 MP (3:2) 4.0 MP Number of pictures 5.0 MP 4.4 MP (3:2) 4.0 MP Appendix 3.1 MP 1.8 MP... -
Page 74: Power-Saving Features
7 min. 59 sec. 15 min. 58 sec. 31 min. 57 sec. To turn it back on Press any button or insert/remove card. www.kodak.com/go/support QVGA (320 x 240) 1 min. 53 sec. 3 min. 23 sec. 3 min. 46 sec. -
Page 75: Accessories
Kodak 5-volt AC Easy way to extend battery life. Plug adapter your camera in while downloading or viewing your pictures. Kodak performance Stylish, but rugged, for Kodak series digital camera EasyShare series digital cameras. case Kodak EasyShare Delivers outstanding capacity and... -
Page 76: Upgrading Your Software And Firmware
Regulatory compliance FCC compliance and advisory Kodak EasyShare DX7590 zoom digital camera This equipment has been tested and found to comply with the limits for a Class B digital device, pursuant to Part 15 of the FCC Rules. These limits are designed to provide reasonable protection against harmful interference in a residential installation. -
Page 77: Canadian Doc Statement
Install and use the equipment according to the instruction manual. MPEG-4 Use of this product in any manner that complies with the MPEG-4 visual standard is prohibited, except for use by a consumer engaging in personal and non-commercial activities. www.kodak.com/go/support... - Page 78 , 51 transfer to , 51 contents, camera box , 1 copy pictures card to memory , 43 memory to card , 43 to computer via USB cable , 51 custom , 15 custom exposure mode , 26 www.kodak.com/go/support...
- Page 79 , 2 SD or MMC card , 7 installing software , 45 internal memory storage capacity , 65 jog dial , i joystick , ii Kodak EasyShare software installing , 45 upgrading , 68 Kodak web sites , 59 Index...
- Page 80 PictBridge printer , 52 picture size , 26 picture status , ii pictures copying , 43 deleting , 39 emailing tagged , 47 magnifying , 39 printing tagged , 47 reviewing , 37 storage capacity , 65 tagging , 40 www.kodak.com/go/support...
- Page 81 , 39 magnifying , 39 slide show , 41 reviewing videos camera screen , 37 deleting , 39 www.kodak.com/go/support slide show , 41 running slide show , 41 safety , 64 SCN , 15 SD or MMC card inserting , 7...
- Page 82 , iii troubleshooting , 54 turning camera on and off , 4 upgrading software, firmware , 68 URLs, Kodak web sites , 59 USB (universal serial bus) connection location , i transferring pictures , 51 USB port/DC-in/A/V-out cover , i...