Table of Contents
Advertisement
Quick Links
Download this manual
See also:
Setup Manual
Advertisement
Table of Contents

Related Manuals for RCA IP115


Summary of Contents for RCA IP115
- Page 1 IP Phone IP115/125...
-
Page 2: Fcc Rf Radiation Exposure Statement
Warning: The changes or modifications not expressly approved by the party responsible for compli- ance could void the user’s authority to operate the equipment. The RCA IP115/IP125 phone is designed for business environment use. It is a full-featured SIP solution, interoperable with most IP PBX and VoIP providers. -
Page 3: Table Of Contents
Network Setting Getting Started Change network settings About Load default settings Illustrate Reboot Feature Highlights: Modify Password Technical Features Customizing Rings and Volume Connecting Your Phone Change the ring tone Phone overview Adjust the volume level Understanding Buttons and Customizing Screen settings Hardware Adjust the Brightness Understanding Phone Screen... - Page 4 Broadsoft Con guration les Download a con guration 3.2 LDAP le from the phone 3.3 Example for Con guration Extern.xml les on 4. Con guration on the RCA Phone TFTP/HTTP/HTTPS/FTP Server Service Phonebook on Warranty TFTP/HTTP/HTTPS/FTP Server Automatic Provisioning using...
-
Page 5: Getting Started
Packing List The following components are included: IP115/IP125 Handset & Handset Cord Setting up your IP115/IP125 This section introduces how to set up the phone with the components in the pack- ing list: Connecting the Handset Cord Connecting to the Network and Power. -
Page 6: Feature Highlights
Note: If connect the Ethernet cable not the AC adapter (sold separately), make sure the ethernet cable and switch/hub are PoE compliant. Telephone Features and your VoIP Service Provider Not all phone features are available with all VoIP service providers. Please make the IP115/IP125. Power Socket Network Socket Headset... -
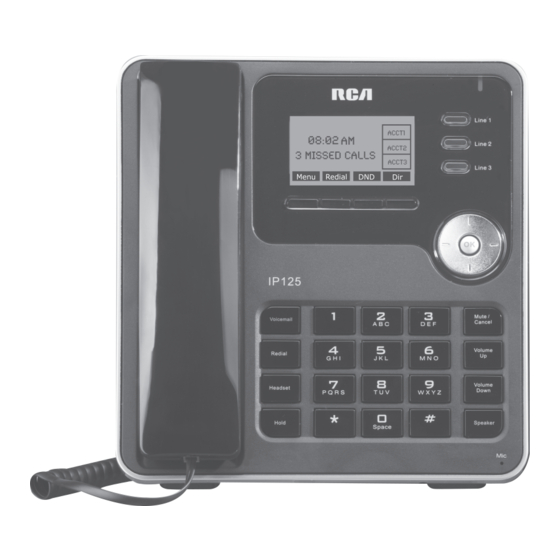
Page 7: Phone Overview
Overview 2 Lines Menu/Back Hold/DND Conference DIR/Toggle Mute/Cancel Volume Up Volume Down Speake r Voicemail Call Transfer Headset Hold 3 Lines Soft Keys Mute/Cancel Volume Up Volume Down Speake Voicemail Redial Headset Hold... - Page 8 Num Screen Functions Time Shows current time. Auto-answer When auto-answer is enabled, the screen displays “AA” Missed calls or date Shows the number of missed calls or show current date. Line status Show the phone line status: 1) : Disconnected from the network. 2) : Only Peer-to-Peer call.
-
Page 9: Basic Call Handling
Basic Call Handling Users can perform basic call-handling tasks using a range of features and services. Feature availability can vary; consult the system administrator or service provider for more information. Placing a Call Then If you want to: Place a call using •... -
Page 10: Answering A Call
Tips • Users can dial on-hook, without a dial tone (pre-dial). To pre-dial, enter a number, and then lift the handset or press the softkey, Headset or Speaker buttons. • To delete digits before dialing, press the Del softkey to erase. Answering a Call Users can answer a call by simply lifting the handset, or using the following meth- ods to active the speakerphone, headset, or other options. -
Page 11: Ending A Call
Ending a Call Hang up while using the Handset 1. Return the handset to its cradle, -or press the softkey Hang up while using the Speakerphone 1. Press Speaker button, -or press Line button for the line that is active, -or press the softkey Hang up while using the Headset... -
Page 12: Transferring Calls
Transferring Calls Transfer redirects a connected call. The target is the number to which you want to transfer the call To talk to the transfer recipient before transferring a call (consult transfer) 1. Press the XFER softkey; 2. Enter the destination number; 3. -
Page 13: Do Not Disturb
Enable Auto Answer on a group 1. Press MENU softkey or the OK button [Function setting [Auto Answer [Enable&Filter. 2. Select a Group on the list and press softkey .This feature will auto answer the call from the caller in the selected group only Device Press MENU... -
Page 14: Expansion Installation
Expansion Installation (IP125 only) 1. Press MENU or OK button[ Function Settings [ Expansion Installation, 2. The phone will direct you to press one of the lit blue LCD buttons on the EM32 between 1 and 6. Pressing a key will cause it to flash red. Then press the OK but- ton on the IP125. -
Page 15: T M I E & A D E T
Time and Date Time and date are displayed on the IP115/IP125 idle screen. By default the date and time of the phone are configured manually, but users can set the phone to obtain them from a preconfigured SNTP server if desired. Please contact the net- work administrator if the time or date is incorrect. -
Page 16: Advanced Call Handling
Advanced Call Handling Hot Line The Hot Line feature allows the phone to dial a number automatically if it has Hot Line Enabled it will also dial the hot line number immediately if the Line 1 seconds after pressing the Line 1. 1. - Page 17 2. Press the Opt. softkey. : 3. Select Add Group, press OK button or the Enter softkey; 4. Name the Group using the alphanumeric keys on the keypad. 5. Press the softkey to complete. Modify group 1. Press the MENU softkey [Phone book, -or press the DIR button [ Personal Phone Book;...
-
Page 18: Using Call Logs
Call from phone book 1. Press the MENU softkey Phone book, -or press the DIR button Enterprise Phone book or Personal Phone Book; 2. Select View ALL, -or select a contact in a group; 3. Select a contact, then press the DIAL softkey, (If there are multiple numbers of one contact, press the... -
Page 19: Keypad Instruction
Note: The default setting is English. SIP Account Settings To make calls on your IP115/125, users must have an account with a SIP based service provider. Using the account information supplied by a service provider, follow these steps to provision the phone to work with their network. -
Page 20: Disable Sip Account
Note: Accounts need at least a User Name, Password and SIP1 server to work properly. Note:You can set a Global SIP replace accounts SIP,it can simplify the settings. Disable sip account 1. Press the Menu softkey 2. Choose System Settings 3. -
Page 21: Load Default Settings
Reboot 1. Press the Menu softkey 2. Choose System Settings Advanced Settings 3. Enter the password (The default is blank, just press OK if the password is unchanged) 4. Choose Reboot and press OK, then select Reboot to reboot the phone. Modify Password 1. -
Page 22: Backlight On/O
4.Press to save Backlight On/Off 1. Press the Menu softkey 2. Choose System Settings [Phone Settings [Backlight [Backlight. 3.Select Enable/All/Disable. 4.Press Ok to save. Note:If Enable is selected, users can set the backlight time out from System Settings[Phone Settings[Backlight[Time. Check the software version 1. -
Page 23: Check The Lights
Check the lights 1. Press the Menu softkey 2. Choose Diagnose Lights 3. Press the OK button and the phone will illuminate all of its button and screen lighting. Check the sound 1. Press the Menu softkey 2. Choose Diagnose Audio 3. - Page 24 On this screen users can select what kind of IP type to use, set the DNS, or man- age ports and proxies. Please see the network administrator for assistance in using this page to work with the local area network.
-
Page 25: Network
for the SIP account to be used on the phone. Some accounts may require more information. Please see the service provider for help. Network Click on the Network tab on the menu bar to enter network settings in more detail. -
Page 26: Sip Account
SIP Account To make calls on your IP115/125, users must have an account with a SIP based service provider. Using the account information supplied by a service provider, fol- low these steps to provision the phone to work with their network. -
Page 27: Using Multiple Sip Accounts
For each SIP account, users can modify the following parameters: Field Description Enable Enable/disable the line. Display Name What is shown as Caller ID when making a phone call Username Username provided by service provider Authenticate Name by service provider Password Password provided by service provider SIP Server... -
Page 28: Expansion Module
Expansion Module The EM32 expansion module provides users of the IP125 with 32 more speed dial or BLF keys. Please see the section titled “Expansion Installation” for more details on how to set up this unit. Expansion module Each Expansion module supports 32 keys. Mode Five modes: --Speed Dial: Enable speed dialing in this key;... -
Page 29: Audio
Audio The IP115 and IP125 phones support the following voice codecs: G.722, G.711A, G.711U, G.723, ,G.729A and iLBC. You can enable/disable the desired codecs via Web interface. Please contact your system administrator for more details about the codecs. To enable/disable the codecs, click Audio on the menu bar. -
Page 30: Favorite Ring Tone
Use the navigation keys to highlight the desired codec in the Enabled/Disable Codecs list, and press the to move to the other list. Click Submit to save the change. Note: The Audio Codec Selection can only be managed via the web interface. Favorite Ring Tone To upload a new ring tone, click the BROWSE.. -
Page 31: Contact
Group Unique ID number of the group Description Description of the group Group Name Name of the group After clicking submit, the group is automatically saved to the phone. Contact Users can add, edit and delete any contact in the phone book. The phonebook can store a maximum of 300 contacts. -
Page 32: Ldap
An LDAP directory can be distributed among many servers on a network, then replicated and synchronized regularly. Please note that the IP115/IP125 supports LDAP Phonebook version V2.2.3.1-2210 and higher. Click PhoneBook, then LDAP to access the LDAP Phonebook set up page. -
Page 33: Banlist
BanList You can add, edit and delete banlist in a phone book on web page of IP115. Click PhoneBook on the menu bar and then click BanList. To add a banned number, click Add BanList. To edit an existing banned number, click . -
Page 34: Enterprise Phonebook
When adding or editing an existed banned contact, users can modify several parameters: BanList Serial Number Unique ID number of the banned contact Description Description of the banned contact First Name First Name of a banned contact Last Name Last Name of a banned contact Mobile Number Phone number of the ban contact Home Number Phone number of the ban contact... -
Page 35: Advanced Settings
Advanced Settings Phone Setting With the Advanced settings menu, users can modify the time settings, VLAN and VPN settings. Users can click Phone Settings on the menu bar to modify the following parameters: Phone Setting DTMF The DTMF transmission mode. RFC 2833, Inband, or SIP Info. BackLight The backlight of the phone LCD screen. -
Page 36: Vlan Settings
Daylight Saving Enable/disable automatic daylight savings adjustment Time for the clock. Time Format 24 hour time format or 12 hour time format Time Zone-GMT Users can set the proper time zone. This feature only applies when using the SNTP or SIP server modes. Manual Setting Users can input the correct time manually. - Page 37 Users can click VPN Settings on the menu bar to modify the following parameters: VPN Setting Enable VPN Enable/disable VPN for phone and pc VPN Type: There is two choose you can choice. VPN Server Addr VPN Server IP address VPN User Name VPN user name VPN Password...
-
Page 38: Dial Plan
Dial Plan To set up a dial plan, click Dial Plan on the menu bar. Click “add rule” to entry this interface. From here users can set up dial plans for their phone by setting up the following parameters: Dial Plan Setting Dial Plan ID The IP address of the phone to be called. -
Page 39: Global Sip
Note: Users can add code and delete code at the same time. First, add any code changes needed. Then, based on the numbers added, decide the position and length of the code to be deleted. Global SIP Users can also setup the SIP server on Global SIP by clicking on Global SIP in the menu bar. -
Page 40: Password
Password Password users can also change the password used to log in to the advanced features on web interface. To change the password, click Phone Maintenance on the menu bar, then Pass- word to modify the following parameters: Password Username The login username of the web page Old Password The old password used to login of the web page... -
Page 41: Auto Provision
Press the ‘Reset to Factory Setting’ button, then reboot the phone. All settings will revert to the factory default. Auto Provision When auto provisioning is set up for this phone, it will automatically check for updates to the software or kernel. For more information, please see the appendix of this booklet or ask the system administrator. - Page 42 When using auto provisioning, users and system administrators can set the follow- ing parameters: Auto Provision Auto Provision Enable/disable auto provision by selecting on/off Protocol The protocol used for auto provisioning. TFTP, HTTP or FTP. Software Server URL The server address of the auto provision Username The username provided by provision server Password...
-
Page 43: Ftp Upgrade
FTP Upgrade Users can click Phone Maintenance on the menu bar then FTP Upgrade to input the following parameters: FTP Upgrade Server IP The IP address of the FTP server Filename Username The username provided by FTP server Password The password provided by FTP server Software Upgrade Upgrade the software of the phone Kernel Upgrade... -
Page 44: Tftp Upgrade
TFTP Upgrade Users can click Phone Maintenance on the menu bar then TFTP Upgrade to input the following parameters: TFTP Upgrade Server IP The IP address of the TFTP server Filename Software Upgrade Upgrade the software of the phone Kernel Upgrade Upgrade the kernel of the phone Phone Book Update/backup the phonebook of the phone... -
Page 45: Http Upgrade
HTTP Upgrade Users can click Phone Maintenance on the menu bar then TFTP Upgrade to input the following parameters: HTTP Upgrade Select a File HTTP Software Upgrade Upgrade the software of the phone Kernel Upgrade Upgrade the kernel of the phone Phone Book Upload/download the phonebook of the phone EXT Module... -
Page 46: Reboot
Reboot Click Phone Maintenance on the menu bar, then Reboot. Clicking the Reboot but- ton will restart the phone remotely. Phone Status Click Phone Status on the menu bar to see the current status of the phone. -
Page 47: System Info
System info Click Phone Status on the menu bar to see the system information like software version and kernel version. -
Page 48: Appendix
Auto Provision for Kernel: 1. Create a notepad file named“K000X00.cfg”(the “X” is decided by the model of the IP phone you are using, for example, if the model is IP115, the file name is “K000115.cfg”); *Named rule of the file: K00115.cfg: for IP115;... -
Page 49: Tftp/Http/Https/Ftp Server
(see the following chapter to see how to down- load a configuration file from an RCA IP phone) and modify it. If the IP phone’s MAC address is 00:11:22:33:44:55, the normal configuration file of it should be named 001122334455.xml. -
Page 50: Extern.xml Les On Tftp/Http/Https/Ftp Server
*Users can’t rename the file on the provisioning server. The file name is fixed to Account1_Extern.xml. (Account1 is the first account you register) Phonebook on TFTP/HTTP/HTTPS/FTP Server The RCA IP phones support both the Enterprise Phonebook and Personal Phone- book. Enterprise Phonebook: Enterprise Phonebook may be used by all staff in an office. -
Page 51: Automatic Provisioning Using Dhcp Option 66
Automatic Provisioning using DHCP Option 66 The following steps will describe auto-provisioning by TFTP. Users also can use HTTP and FTP for auto-provisioning with RCA IP phones. DHCP Server: (Microsoft Windows 2003 server) 1. Start up the DHCP Management Console;... -
Page 52: Ip Phone
5. Click Submit to save changes. IP Phone: 1. Input the IP Phone’s IP Address in browser; 2. Enter user and password (default: root:root) then open the web page; 3. Click Phone Maintenance and select Auto Provision; 4. Select as follows:... -
Page 53: Username
It supports three protocols in Auto-Provisioning: TFTP, HTTP and FTP. The format with provisioning server URL is: TFTP: TFTP://192.168.0.201 (192.168.0.201 is the default Server IP address) HTTP: HTTP://192.168.0.201 HTTPS: HTTPS://192.168.0.201 FTP: FTP://192.168.0.201 Username: The user to login FTP/HTTP/HTTPS server Password: The password of the user using to login FTP/HTTP/HTTPS server *Username and password are available in FTP/HTTP/HTTPS only (unavailable in TFTP). -
Page 54: Auto Provision Time
An LDAP directory can be distributed among many servers on a network, then replicated and synchronized regularly. Please note that on the IP115/IP125, the LDAP Phonebook version must be V2.2.3.1-2210 or higher Access the web UI and click PhoneBook on the menu bar,... -
Page 55: Attributes
3. Attributes 3.1 Common Attributes Abbreviation Name Description commonName Full name of the user. company company Company or organization name givenName First name homePhone homeTelephoneNumber Home Phone number 3.2 LDAP 3.2.1 LDAP Name Filter Default Value: <blank> Examples: (&(telephoneNumber=%s)(sn=%)) (|(cn=%s)(sn=%s)) - Page 56 (!(cn=%s)) 3.2.2 LDAP Number Filter (ipPhone=%s)) Default Value: <blank> Examples: (|(telephoneNumber=%s)(Mobile=%s)(ipPhone=%s)) Returns all LDAP records which have the “telephoneNumber” or “Mobile” or “ip- (&(telephoneNumber=%s)(sn=*)) 3.2.3 Server Address Description: This setting refers to the DNS name or IP address of the LDAP server. Default Value: 0.0.0.0 Example: 192.168.1.100...
- Page 57 LDAP search results. This setting compresses the search results, as the server only returns the attributes which are requested by the RCA IP phone. The setting allows the user to configure multiple space separated name attributes. Please consult the system administrator regarding...
- Page 58 Valid Values: Space separated name attributes, see examples below. Default Value: <blank> Examples: : cn sn displayName Requires “cn”, “sn” and “displayName” fields for each LDAP record. : givenName Requires “givenName” field for each LDAP record. : vorName nachName Requires “vorName” and “nachName” fields for each LDAP record. 3.2.10 LDAP Number Attributes Description: This setting can be used to specify the “number”...
-
Page 59: Example For Con Guration
3.2.13 LDAP Lookup for Incoming Call Description: This setting can be used to enable calling line identification using LDAP. When the setting is enabled, the phone performs an LDAP number search for the incoming number and displays the name of the calling party accordingly. Valid Values: <Enabled>, <Disabled>... -
Page 60: Con Guration On The Rca Phone
LDAP Lookup for Incoming Call: Enabled LDAP Sorting Results: Enabled LDAP Lookup for PreDial/Dial: Enabled 4. Configuration on the RCA Phone ... -
Page 61: Service
Service If trouble is experienced with this equipment, for repair or warranty information, please contact customer service at 1-800-511-3180. If the equipment is causing harm to the telephone network, the telephone company may request that you disconnect the equipment until the problem is resolved. This product may be serviced only by the manufacturer or its authorized service agents. -
Page 62: Warranty
• Contact RCA Customer Care at (800) 511-3180. Our representatives will help you troubleshoot and diagnose the problem. As you may be asked to disconnect your RCA telephone from it’s power source, you must call from another telephone. If the issue cannot... -
Page 63: Product Registration
• Products purchased or serviced outside the USA • Acts of nature, such as, but not limited to lightning damage • 3rd party products, such as headsets Product Registration: • Please complete and mail the Product Registration Card packed with your unit. It will make it easier to contact you should it ever be neccessary. - Page 64 send will 13-10...