Advertisement
Table of Contents
- 1 Installation Instructions
- 2 Product Specification
- 3 Installation
- 4 Thermostat Wiring
- 5 Your Programmer
- 6 Preset Programmes
- 7 Before You Start
- 8 Setting the Time & Day
- 9 Running Your Programme
- 10 Programming in 7-Day Mode
- 11 Programming in 5/2 Day Mode
- 12 BOOST Function
- 13 Changing Clocks Forward & Back
- 14 Battery Replacement
- 15 Still Having Problems
- Download this manual
Advertisement
Table of Contents

Related Manuals for Danfoss WP75- RF


Summary of Contents for Danfoss WP75- RF
- Page 1 7 day electronic WP75 programmable hot water controller Installation & User Instructions Certification Mark...
- Page 2 Index Installation Product specifi cation Thermostat (WP75-RF) installation Sensor (CS1) installation Wiring Commissioning User What is a Cylinder Thermostat? Your programmer How to read the display Preset programmes Resetting the unit Setting the Time and Day Running your programme Before changing the preset programmes Programming the unit (7-day mode) Programming the unit (5/2-day mode) Running your programme...
-
Page 3: Installation Instructions
Installation Instructions Please Note: This product should only be installed by a qualifi ed electrician or competent heating installer and should be in accordance with the current edition of the IEEE wiring regulations. Product Specifi cation Thermostat features WP75-RF Power supply 2 x AA/MN1500/LR alkaline cells Memory back-up 1 min for battery change... -
Page 4: Installation
Installation WP75-RF installation Select a position for the WP75-RF that provides easy access to the unit (it could be used on a daily basis by the user, so the display needs to be clearly visible) and bearing in mind that the maximum distance between the thermostat and sensor is 10 metres. - Page 5 Attach the control module to the wallplate by placing the slots in the top of the module over the lugs on the top edge of the wallplate and hinging down until the slot in the bottom edge of the module locates over the screw attached to the wallplate.
- Page 6 Connect the cable to the sensor terminals and replace the cover. Place the sensor on the cylinder and clamp tightly to the cylinder using the strap provided. Cable entry is from behind if fi tted to a single gang fl ush box, or from above, below or from the left if surface fi xed cable is used.
-
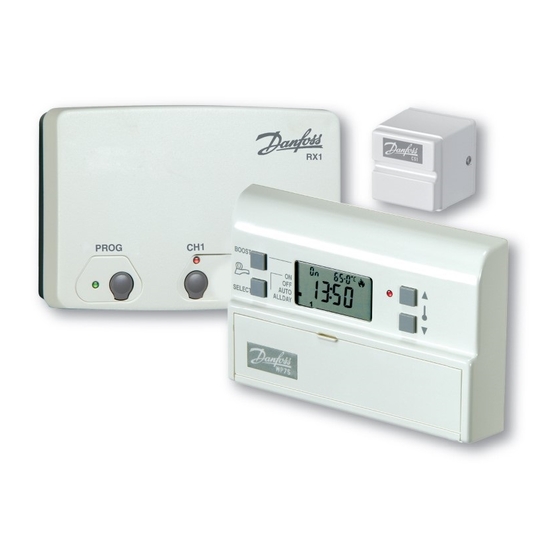
Page 7: Thermostat Wiring
The sensor must be connected to the WP75-RF using double insulated cable greater than 0.75mm Connect the cable to the sensor terminals and replace the cover. Place the sensor on the cylinder and clamp tightly to the cylinder using the strap provided. Thermostat Wiring WP75-RF RX1 Receiver... - Page 8 Commissioning If the thermostat and the receiver have been supplied together in a combined pack, the units have been paired in the factory and no commissioning is required (RX1 only). To tune the RX receiver to the frequency of the thermostat signal, follow steps 1-5 below.
- Page 9 The text below has been edited and approved by the Plain English Campaign, who has issued a Crystal Mark to be displayed with it. What is a cylinder thermostat? ... an explanation for householders. A cylinder thermostat switches on and off the heat supply from the boiler to the hot-water cylinder.
-
Page 10: Your Programmer
User Instructions Your programmer The WP75-RF is a wireless programmable thermostat, designed to control the temperature of the water in your hot water cylinder. Heating water to a temperature which is higher than necessary is wasteful of energy. The WP75-RF lets you heat your water to a temperature you require, just at the times you need it. -
Page 11: Preset Programmes
Preset Programmes Your WP75-RF comes ready programmed with a set of operating times and temperatures which often suit most people. Weekdays (Mon-Fri) Weekend (Sat-Sun) Event Time Temp °C Event Time Temp °C 06:30 55.0 07:30 55.0 08:30 09:30 12:30 45.0 11:30 45.0 13:30... -
Page 12: Setting The Time & Day
Setting the Time & Day Press PROG until the time and day number begin to blink in the display. DAY - Press DAY until correct day is shown (1=Monday, 2=Tuesday etc). change To change TIME TIME - Press + and - to change time (press and hold to change in 10 min increments). - Page 13 Before you change the preset programme Your installer will have set your unit to operate in either 7-day mode or 5/2 day mode. To tell which mode your unit is set press PROG until Event 1 fl ashes in the display. If your display looks like this, your unit is in 7-day mode and you can programme diff erent settings for each day of the week...
-
Page 14: Programming In 7-Day Mode
Programming in 7-day mode (separate programmes for each day of the week) Press PROG until Event 1 fl ashes, then press DAY to move from current day to Day 1 (Event 1, Day 1). Amend the time and temperature as follows: Use + and –... -
Page 15: Programming In 5/2 Day Mode
Programming in 5/2 day mode (one set of programmes for weekdays, another set for weekends) For Days 1-5 (weekdays) a) Press PROG until Event 1 fl ashes in display (Event 1, Days 1,2,3,4,5). b) Use + and – buttons to alter time (press and hold to change in 10 min increments). - Page 16 Running your programme To run the hot water programme press the SELECT button. As you press the SELECT button a bar in BOOST the display will move to indicate which RUN mode has been selected. AUTO ALLDAY The four available functions and their meanings are as follows: ON = the water will be heated continuously to the highest temperature set for the day shown on the display.
-
Page 17: Boost Function
BOOST function Sometimes you may have an immediate requirement for hot water which is outside the set programme. For instant hot water press the BOOST button. If the system is OFF when you press BOOST - the water will heat up to the highest setting of the day and then turn itself off again. -
Page 18: Changing Clocks Forward & Back
Cylinder more than full of hot water. Cylinder between and full of hot water. Cylinder less than full of hot water. Changing clocks forward & back Open the fl ap on the front of the unit to reveal the programming buttons. To change from Summer to Winter (clocks back) - press and hold - button... -
Page 19: Battery Replacement
Battery Replacement When batteries are low a battery symbol will fl ash in the LCD display. You have 2 weeks to replace the battery before the unit will switch off . When changing batteries, remove old batteries and insert new ones within one minute and programming will not be lost. -
Page 20: Still Having Problems
Call our technical department 0845 121 7505 (8.45-5.15 Mon-Thurs, 8.45-4.45 Fri) For a large print version of these instructions please contact the Marketing Services Department on 0845 121 7400. Danfoss Randall Ltd Ampthill Road Bedford MK42 9ER Tel: 01234 364621 Fax: 01234 219705...