Advertisement
Quick Links
Download this manual
See also:
User Manual
WLX-PRO WIRELESS MICROPHONE SYSTEM INSTRUCTION MANUAL
Thank you for purchasing the AZDEN WLX-PRO WIRELESS MICROPHONE SYSTEM.
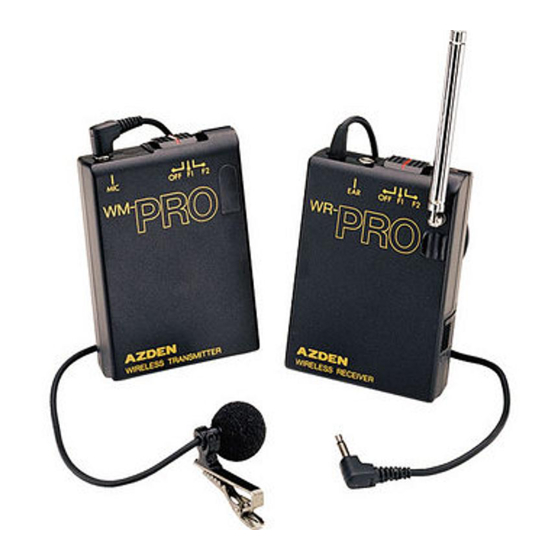
The WLX-PRO consists of• F the WM-PRO transmitter, WR-PRO receiver, and EX-503 clip-on electret
microphone. Read this instruction manual carefully for correct use and retain it for future reference.
The WLX-PRO operates in the low-interference VHF band and has 2 switchable frequencies :
(F1) 187.550 and (F2) 187.900. You should select the quieter frequency for use.
WR-PRO RECEIVER SET-UP :
(1) LOADING THE BATTERY : (see diagram)
Insert one (1) 9 volt battery into the Receiver, BEING CAREFUL NOT TO FORCE THE BATTERY
COMPARTMENT CLOSED. If it doesn't close easily, take the battery out and turn it around.
(2) POWER/FREQUENCY SELECTOR SWITCH :
This slide switch is used to turn the system on and off to select a frequency. When not using the WLX-PRO,
make sure that the switch is turned to OFF.
(3) SIGNAL INDICATOR :
This LED has two functions : When you first turn the Power/Frequency Selector Switch of the Receiver on, and
if the Transmitter is not on, the LED will go on and off, indicating that the battery is good. If the Transmitter is
turned on and the Receiver is turned on, and they are on the same frequency, the Signal Indicator LED will
remain on. If the LED is not functioning properly, check your batteries.
(4) SHOE MOUNT :
The Receiver comes with an attached shoe mount for mounting to a video camera. You can also attach the
Receiver with the enclosed Velcro. The shoe mount can be easily removed from the Receiver by unscrewing the
philips head screw in the center of the shoe mount.
(5) OUTPUT PLUG :
Connect the plug from the Receiver into the camera's "Ext. mic jack".
(6) TELESCOPIC ANTENNA :
Fully extend the antenna for the best reception.
(7) EARPHONE JACK :
Plug the supplied earphone into the jack to monitor the sound you are recording. Or, you can plug the earphone
into the camera's earphone jack if it has one.
LOADING BATTERY:
Open the battery compartment lid by sliding it down and raising the lid. Insert a 9 volt battery, into the battery
compartment with the correct polarity. Directions are on the inside left of the battery compartment.
WM-PRO TRANSMITTER
WR-PRO RECEIVER
Advertisement

Related Manuals for Azden WLX-PRO


Summary of Contents for Azden WLX-PRO
- Page 1 COMPARTMENT CLOSED. If it doesn’t close easily, take the battery out and turn it around. (2) POWER/FREQUENCY SELECTOR SWITCH : This slide switch is used to turn the system on and off to select a frequency. When not using the WLX-PRO, make sure that the switch is turned to OFF.
- Page 2 WM-PRO TRANSMITTER SET-UP : (1) LOADING THE BATTERY : (see diagram) Insert One (1) 9 volt battery into the Transmitter BEING CAREFUL NOT TO FORCE THE BATTERY COMPARTMENT CLOSED. If it doesn’t close easily, take the battery out and turn it around. (2) MICROPHONE : Plug the EX-503 (lapel mic) into the mic jack.