Table of Contents
Advertisement
Quick Links
Advertisement
Table of Contents

Related Manuals for Pioneer SC-LX81


Summary of Contents for Pioneer SC-LX81
- Page 1 Operating Instructions audio/video multi-channel receiver...
-
Page 2: Operating Environment
IMPORTANT CAUTION RISK OF ELECTRIC SHOCK DO NOT OPEN The lightning flash with arrowhead symbol, CAUTION: The exclamation point within an equilateral within an equilateral triangle, is intended to TO PREVENT THE RISK OF ELECTRIC triangle is intended to alert the user to the alert the user to the presence of uninsulated SHOCK, DO NOT REMOVE COVER (OR presence of important operating and... - Page 3 Voltage selector If the AC plug of this unit does not match the AC You can find the voltage selector switch on the rear outlet you want to use, the plug must be removed panel of multi-voltage models. and appropriate one fitted. Replacement and mounting of an AC plug on the power supply cord of The factory setting for the voltage selector is this unit should be performed only by qualified...
-
Page 4: Table Of Contents
Thank you for buying this Pioneer product. Please read through these operating instructions so you will know how to operate your model properly. After you have finished reading the instructions, put them away in a safe place for future reference. - Page 5 ZONE Audio Setup ......92 10 Playback with HOME MEDIA GALLERY SR+ Setup for Pioneer flat screen TVs... . 92 inputs Flicker Reduction Setup.
- Page 6 Features ........131 Pioneer Authorized Distributors ....133...
-
Page 7: Before You Start
Before you start Chapter 1: Before you start Checking what’s in the box Loading the batteries Please check that you’ve received the following supplied accessories: • Setup microphone (cable: 5 m) • Remote control unit • AA/IEC R6P dry cell batteries x2 •... -
Page 8: Simple Home Theater Guide
Simple Home Theater Guide Chapter 2: Simple Home Theater Guide Center (C) Introduction to home theater Front Right (R) Subwoofer (SW) Home theater refers to the use of multiple audio tracks to create a surround sound effect, making you feel like Front you’re in the middle of the action or concert. -
Page 9: Automatically Setting Up For Surround Sound (Mcacc & Full Band Phase Control)
Simple Home Theater Guide Switch on the receiver and your TV. Automatically setting up for surround Connect the microphone to the MCACC SETUP MIC sound (MCACC & Full Band Phase jack on the front panel. Place the microphone so that it’s about ear level at your Control) normal listening position (use a tripod if possible). -
Page 10: Problems When Using The Auto Mcacc Setup
Simple Home Theater Guide If no operations are performed for 10 seconds while the The settings made in the Auto MCACC Setup should give speaker configuration check screen is being displayed, you excellent surround sound from your system, but it is the Auto MCACC Setup will resume automatically. -
Page 11: Better Sound Using Phase Control And Full Band Phase Control
Simple Home Theater Guide Set the operation selector switch to RCV, then press Using Phase Control AUTO/DIRECT (AUTO SURR/STREAM DIRECT) to During multichannel playback, LFE (Low-Frequency select ‘AUTO SURROUND’ and start playback of the Effects) signals as well as low-frequency signals in each channel are assigned to the subwoofer or other the source. -
Page 12: Using Full Band Phase Control
Simple Home Theater Guide Phase Control technology provides coherent sound This receiver analyzes the frequency-phase characteristics of the speakers by calibrating test signals reproduction through the use of phase matching for an output from the speakers with the supplied microphone, optimal sound image at your listening position. - Page 13 Simple Home Theater Guide Full Band Phase Control ON Tweeter Midrange Woofer Group Delay Characteristics With the phase distortion corrected, the frequency-phase characteristics are improved across all ranges. • Sound with live dynamics • Sound of musical instruments with superb reality •...
-
Page 14: Connecting Your Equipment
This receiver provides you with many connection possibilities, but it doesn’t have to be difficult. This page explains the kinds of components you can connect to make up your home theater system. Important • Illustration shows the SC-LX81, however connections for the SC-LX71 are the same except where noted. Rear panel 12 V... -
Page 15: When Making Cable Connections
• To avoid hum, do not lay connected cables over the See Using the component video jacks on page 22. top of the receiver. 10 SC-LX81 only: ZONE 2 component video output Use to connect monitors or TVs in a separate room. See MULTI-ZONE listening on page 63. -
Page 16: About The Video Converter
COMPONENT VIDEO IN About the video converter above for more on HDMI compatibility. SC-LX81 only: When connecting to an HDMI/DVI- compatible monitor or a flat screen TV using the HDMI OUT2 terminal, switch the HDMI output setting to HDMI S-VIDEO IN... -
Page 17: About Hdmi
Connecting your equipment SC-LX81 AC IN (10/100) 12 V TRIGGER COAXIAL (OUTPUT (DVD) (VIDEO1) ANTENNA ASSIGNABLE (VIDEO2) TOTAL 50mA ASSIGNABLE - FM UNBAL 75 AM LOOP (DVD) MAX) COMPONENT VIDEO ZONE 2 OUT MONITOR HDMI HDMI S-VIDEO VIDEO FRONT CENTER... -
Page 18: Connecting Your Blu-Ray Disc Player
Connecting your equipment Connecting your Blu-ray disc player SC-LX81 (10/100) 12 V AC IN TRIGGER COAXIAL (OUTPUT (DVD) (VIDEO1) ANTENNA ASSIGNABLE (VIDEO2) TOTAL 50mA ASSIGNABLE - FM UNBAL 75 AM LOOP (DVD) MAX) COMPONENT VIDEO ZONE 2 OUT MONITOR HDMI... -
Page 19: Connecting Your Tv And Dvd Player
Connecting your equipment Connecting your TV and DVD player SC-LX81 12 V AC IN (10/100) TRIGGER (OUTPUT COAXIAL (DVD) (VIDEO1) ANTENNA ASSIGNABLE (VIDEO2) TOTAL 50mA ASSIGNABLE - (DVD) (DVD) FM UNBAL 75 AM LOOP MAX) COMPONENT VIDEO ZONE 2 OUT... -
Page 20: Connecting A Satellite/Cable Receiver
Connecting your equipment Connecting a satellite/cable receiver or other set-top box Satellite and cable receivers, and terrestrial digital TV tuners are all examples of so-called ‘set-top boxes’. SC-LX81 (10/100) 12 V AC IN TRIGGER COAXIAL (OUTPUT (DVD) (VIDEO1) ANTENNA ASSIGNABLE... -
Page 21: Connecting A Dvd/Hdd Recorder, Vcr And Other Video Sources
S-Video cable for the video Use an optical cable for the connection. connection. • SC-LX81 only: For a second recorder, use the • For a second recorder, use the DVR 2 IN inputs. COAXIAL IN 3 (DVR 2) input. -
Page 22: Using The Component Video Jacks
(if your source and TV are both compatible), which delivers a very stable, flicker- free picture. See the manuals that came with your TV and source component to check whether they are compatible with progressive-scan video. SC-LX81 12 V AC IN... -
Page 23: Connecting Digital Audio Sources
This receiver has both digital inputs and outputs, allowing you to connect digital audio components for playback and for making digital recordings. Most digital components also have analog connections. See Connecting analog audio sources on page 24 if you want to connect these too. SC-LX81 12 V AC IN (10/100) -
Page 24: Connecting Analog Audio Sources
One of the audio inputs (PHONO) is a dedicated turntable input which should not be used for any other type of component. This input also has a grounding terminal that most turntables require. SC-LX81 AC IN (10/100) 12 V... -
Page 25: Installing Your Speaker System
MANUAL ZONE3/ SELECTABLE SOURCE VOIR LE MODE D'EMPLOI (HDMI CTRL) SOURCE RS-232C OPTICAL DIGITAL SC-LX81 Surround Surround left right Surround Surround back right back left Connecting the speakers Caution Each speaker connection on the receiver comprises a • These speaker terminals carry HAZARDOUS LIVE positive (+) and negative (–) terminal. -
Page 26: Placing The Speakers
Connecting your equipment • Make sure that all the bare speaker wire is twisted • If you’re using a center speaker, place the front together and inserted fully into the speaker terminal. speakers at a wider angle. If not, place them at a If any of the bare speaker wire touches the back panel narrower angle. -
Page 27: Connecting Antennas
AM and FM radio. If you find that reception quality is with two surround back speakers connected. poor, an outdoor antenna should give you better sound quality—see Connecting external antennas on page 28. 90° to 120° 0° to 60° SC-LX81 fig. A fig. B AC IN ANTENNA ANTENNA... -
Page 28: Fm Wire Antenna
(vinyl-coated wire) cause a fire or give you an electric shock. Check the power cord once in a while. If you find it damaged, ask your nearest Pioneer authorized independent ANTENNA service company for a replacement. FM UNBAL 75 Ω... -
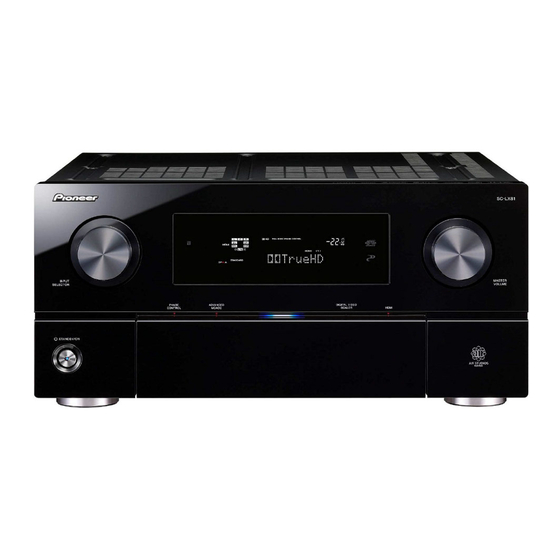
Page 29: Controls And Displays
Controls and displays Chapter 4: Controls and displays Front panel Illustration shows the SC-LX81 front panel. SC-LX81 INPUT MASTER SELECTOR VOLUME PHASE ADVANCED DIGITAL VIDEO CONTROL MCACC SCALER HDMI STANDBY/ON 11 12 AUDIO PARAMETER VIDEO AUTO SURR/ HOME STANDARD... -
Page 30: Operating Range Of Remote Control Unit
Controls and displays MASTER VOLUME dial 18 iPod DIRECT USB terminal Use to connect your Apple iPod as an audio source Front panel controls (page 71), or connect a USB audio device for playback To access the front panel controls, push gently on the (page 72). -
Page 31: Display
Controls and displays Display DIGITAL FULL BAND TUNED AUTO WMA9 Pro MULTI-ZONE DIALOG E OVER STEREO MONO DSD PCM S.RTRV SOUND Hi-Bit/Sampling V.SB HDMI SBL SB DIGITAL TUNER VIDEO ANALOG [ 2 ] CD-R PHONO HDMI [ 1 ] [ 3 ] STREAM DIRECT PRO LOGIC ADV.SURROUND... -
Page 32: Remote Control
2PRO LOGIC IIx – This lights to indicate 2 Pro Remote control Logic II / 2 Pro Logic IIx decoding (page 35). Illustration shows the SC-LX81 remote control. Neo:6 – When one of the Neo:6 modes of the receiver is on, this lights to indicate Neo:6 processing (page 35). - Page 33 Controls and displays VIDEO PARAMETER – Use to access the Video Input source buttons Press to select control of other components (see options (page 95). Controlling the rest of your system on page 99). HOME MENU – Use to access the HOME MENU (pages 43, 51, 53 and 55).
- Page 34 Pioneer DVD recorder supporting HDMI Control is connected to this receiver via HDMI) (page 40). SC-LX81 only: HDMI OUT – Switch the HDMI output terminal (page 97). Press TUNER first to access: D.ACCESS – After pressing, you can access a radio station directly using the number buttons (page 41).
-
Page 35: Listening To Your System
Listening to your system Chapter 5: Listening to your system Important Listening in surround sound • The listening modes and many features described in Using this receiver, you can listen to any source in this section may not be available depending on the surround sound. -
Page 36: Using The Home Thx Modes
2 Neural THX can be selected for 2-channel signals for which the input signal is PCM 48 kHz or less or for analog 2-channel signals. 3 • If you only have one surround back speaker connected, THX Ultra2 GAMES (SC-LX81)/THX Select2 GAMES (SC-LX71) is not available. -
Page 37: Listening In Stereo
Listening to your system • ENT.SHOW – Suitable for musical sources While listening to a source, press STEREO/A.L.C. for stereo playback. • EXPANDED – Creates an extra wide stereo field Press repeatedly to switch between: • TV SURROUND – Provides surround sound for both •... -
Page 38: Using Stream Direct
Listening to your system Using Stream Direct Selecting MCACC presets Use the Stream Direct modes when you want to hear the • Default setting: MEMORY 1 truest possible reproduction of a source. All unnecessary If you have calibrated your system for different listening signal processing is bypassed, and you’re left with the positions , you can switch between settings to suit the... -
Page 39: Using Surround Back Channel Processing
Listening to your system Set the operation selector switch to RCV. • HDMI – Selects an HDMI signal. Press SBch repeatedly to cycle the surround back • PCM – Only PCM signals are output. The receiver channel options. selects the first available signal in the following order: Each press cycles through the options as follows: HDMI;... -
Page 40: Using The Genre Synchronizing Function
Virtual Surround Back mode. b.Not applicable when using the Virtual Surround Back mode. c.SC-LX81: Sound is output from the surround back speakers only when THX Ultra2 CINEMA, THX Ultra2 MUSIC or THX Ultra2 GAMES is selected. -
Page 41: Using The Tuner
Using the tuner Chapter 6: Using the tuner Using Neural THX Listening to the radio ® This feature uses Neural Surround™, THX technologies to achieve optimal surround sound from FM radio. The following steps show you how to tune in to FM and AM radio broadcasts using the automatic (search) and •... -
Page 42: Naming Station Presets
Using the tuner Tune to a station you want to memorize. Listening to station presets See Listening to the radio on page 41 for more on this. You will need to have some presets stored to do this. See Saving station presets above if you haven’t done this Press T.EDIT (TUNER EDIT). -
Page 43: The Advanced Mcacc Menu
A/V RECEIVER The Advanced MCACC (Multi Channel ACoustic 1. Advanced MCACC 2. MCACC Data Check Calibration) system was developed in Pioneer’s 3. Data Management 4. System Setup laboratories with the aim of making it possible for home users to perform adjustments of the same level as in a studio easily and with high precision. -
Page 44: Automatic Mcacc (Expert)
The Advanced MCACC menu Select the parameters you want to set. Use / to select the item, then use / to set. Automatic MCACC (Expert) If your setup requires more detailed settings than those 1b.Auto MCACC 1b.Auto MCACC A/V RECEIVER A/V RECEIVER provided in Automatically setting up for surround sound Speaker Setting... - Page 45 The Advanced MCACC menu • With error messages (such as Too much ambient for several seating positions in your listening area. noise! or Check microphone) select RETRY after Place the microphone at the reference point checking for ambient noise (see Problems when indicated on-screen and note the last microphone using the Auto MCACC Setup on page 10) and placement will be at your main listening position:...
-
Page 46: Manual Mcacc Setup
The Advanced MCACC menu The Auto MCACC Setup has finished! The MCACC Data Check screen appears. Manual MCACC setup You can use the settings in the Manual MCACC setup 2.MCACC Data Check A/V RECEIVER menu to make detailed adjustments when you’re more a. -
Page 47: Fine Channel Level
The Advanced MCACC menu Select ‘Manual MCACC’ from the Advanced Adjust the level of the left channel. MCACC menu. This will be the reference speaker level, so you may want See Making receiver settings from the Advanced MCACC to keep the level around 0.0dB so that you’ll have plenty menu on page 43 if you’re not already at this screen. -
Page 48: Standing Wave
The Advanced MCACC menu overly resonant sounds in your listening area. During Select each channel in turn and adjust the distance as necessary. playback of a source, you can customize the filters used Use / to adjust the delay of the speaker you selected for Standing Wave Control for each of your MCACC to match the reference speaker. -
Page 49: Acoustic Calibration Eq Professional
1 This system allows you to customize your system calibration with the help of a graphical output that can be displayed on-screen, or using a computer (with software available from Pioneer—see Connecting a PC for Advanced MCACC output on page 69 for more on this). - Page 50 The Advanced MCACC menu The graph below shows the difference between If your room isn’t affected by the factors above, it is often conventional acoustic calibration and professional not necessary to make a 30~50ms setting. Later time calibration (the gray circle indicates the point where the settings may provide a more detailed sound experience microphone captures sound during frequency analysis).
-
Page 51: Checking Mcacc Data
The Advanced MCACC menu Use / to select the channel, frequency, and time The following options determine how the reverb setting. Use / to switch between them. characteristics of your listening area are displayed in Reverb View and Output PC (see Connecting a PC for Select the setting from the following time periods (in Advanced MCACC output on page 69): milliseconds): 0~20ms, 10~30ms, 20~40ms, 30~50ms,... - Page 52 The Advanced MCACC menu • Acoustic Cal EQ – Used to check the calibration Speaker Distance values of the listening environment’s frequency Use this to display the distance from the different response. See Acoustic Cal EQ on page 53 for more channels to the listening position.
-
Page 53: Data Management
The Advanced MCACC menu Acoustic Cal EQ Use this to display the calibration values for the Data Management frequency response of the various channels set in the This system allows you to store up to six MCACC presets, different MCACC presets. See Acoustic Calibration EQ allowing you to calibrate your system for different Adjust on page 48 for more on this. - Page 54 The Advanced MCACC menu Renaming MCACC presets Select ‘OK’ to confirm and copy the settings. When MCACC Memory Copy? is displayed, select YES. If you have several different MCACC presets that you’re If NO is selected, the memory is not copied. using, you may want to rename them for easier identification.
-
Page 55: The System Setup Menu
The System Setup menu Chapter 8: The System Setup menu • Manual SP Setup – Sets the type of connection used for surround back terminals and the size, number Making receiver settings from the distance and overall balance of the connected System Setup menu speakers (see Manual speaker setup below). -
Page 56: Surround Back Speaker Setting
The System Setup menu • ZONE 2 – Select to use the (surround back) B Select the setting you want to adjust. If you are doing this for the first time, you may want to speaker terminals for an independent system in adjust these settings in order: another zone (see MULTI-ZONE listening on page 63). -
Page 57: Channel Level
The System Setup menu • SB – Select the number of surround back speakers Select ‘Channel Level’ from the Manual SP Setup menu. you have (one, two or none). Select LARGE if your surround back speakers reproduce bass frequencies 4a.Manual SP Setup 4a3.Channel Level effectively. -
Page 58: Speaker Distance
1 Since the principal is the same, X-Curve isn’t applied when you’re using any of the Home THX modes (see Using the Home THX modes on page 36). 2 Ultra2 for the SC-LX81, Select2 for the SC-LX71. 3 If you don’t have surround back speakers, or just have one, you won’t be able to select this setting. - Page 59 THX Ultra2 SW Exit Finish If your subwoofer isn’t THX Ultra2/Select2 certified, but you still want to switch boundary gain compensation on, select YES here, but the effect might not work properly. Note 1 Ultra2 for the SC-LX81, Select2 for the SC-LX71.
-
Page 60: Other Connections
Other connections Chapter 9: Other connections Use INPUT SELECT to select MULTI CH IN. Caution You can also use the INPUT SELECTOR dial on the front panel. • Before making or changing the connections, switch off the power and disconnect the power cord from the •... -
Page 61: Switching The Speaker System
Other connections Switching the speaker system Bi-amping your speakers If you selected Speaker B in Surround back speaker setting on page 56, three speaker system settings are Bi-amping is when you connect the high frequency driver possible using SPEAKERS. If you selected Normal or and low frequency driver of your speakers to different Front Bi-Amp, the button will simply switch your main amplifiers for better crossover performance. -
Page 62: Bi-Wiring Your Speakers
When bi-wiring, make sure you’ve selected ANALOG Normal or Speaker B in Surround back speaker setting on INPUT SC-LX81 page 56. Front channel amplifier • To bi-wire a speaker, connect two speaker cords to ANALOG the speaker terminal on the receiver. -
Page 63: Multi-Zone Listening
COMPONENT VIDEO ZONE2 OUT jack is only provided on the SC-LX81. d.SC-LX81 only: The video convert function does not work for ZONE 2. Connect the composite video and component video to the same types of jacks for the inputs and outputs. - Page 64 SURROUND FRONT CENTER (Single) (Single) SELECTABLE (CD-R) SEE INSTRUCTION ASSIGNABLE - ASSIGNABLE MANUAL SELECTABLE ZONE3/ VOIR LE MODE SOURCE D'EMPLOI (HDMI CTRL) SOURCE RS-232C OPTICAL DIGITAL Note 1 SC-LX81 only: ZONE2 COMPONENT OUT can be used to output clear images.
-
Page 65: Using The Multi-Zone Controls
S-VIDEO VIDEO AUDIO SETUP MIC PHONES • MULTI-ZONE OFF – Switches the MULTI-ZONE feature off SC-LX81 The MULTI-ZONE indicator lights when the MULTI-ZONE control has been switched ON. INPUT MASTER Press CONTROL to select the sub zone(s) you want. SELECTOR... -
Page 66: Connecting An Ir Receiver
Please see the manual supplied with your IR receiver for the type of cable necessary for the connection. • If you want to link a Pioneer component to the IR receiver, see Operating other Pioneer components with this unit’s sensor on page 105 to connect to the CONTROL jacks instead of the IR OUT jack. -
Page 67: Switching Components On And Off Using The 12 Volt Trigger
1 Triggered connections with up to two devices compatible with 12-volt triggers can be made with this receiver. 2 The 3-ringed SR+ cable from Pioneer is commercially available under the part number ADE7095. Contact the Pioneer Customer Support division for more information on obtaining an SR+ cable (you can also use a commercially available 3-ringed mini phone plug for the connection). -
Page 68: Using The Sr+ Mode With A Pioneer Flat Screen Tv
• Automatic video input switching on the flat screen • Automatic volume muting on the flat screen TV. DVD player Satellite receiver, etc. See also SR+ Setup for Pioneer flat screen TVs on page 92 for more on setting up the receiver. TV/SAT AUDIO IN... -
Page 69: Connecting A Pc For Advanced Mcacc Output
(the cable must be cross type, female–female). The software to output the results is available by contacting the Pioneer Authorized Distributor for your area (as listed on page 134 of this manual) as well as the Personal computer instructions necessary for using it. -
Page 70: Playback With Home Media Gallery Inputs
See Connecting a USB device on page 72 for more on this. created, edited, and managed by the vTuner database service exclusively for use with the Pioneer Playback with Home Media Gallery. products. Also, you can listen to Internet radio station See Playback with Home Media Gallery on page 73 for more on this. -
Page 71: Playing Back Audio Files Stored On An Ipod
• Features such as the equalizer cannot be controlled using this receiver, and we recommend switching the equalizer off before connecting. • Pioneer cannot under any circumstances accept responsibility for any direct or indirect loss arising from any inconvenience or loss of recorded material resulting from the iPod failure. -
Page 72: Connecting A Usb Device
(MP3 players) of format FAT16/32. It is not possible to connect this unit to a personal computer for USB playback. • Pioneer cannot guarantee compatibility (operation and/or bus power) with all USB mass storage devices and assumes no responsibility for... -
Page 73: Content Playable Over A Network
Media Gallery as the input source. It may take several seconds for this receiver to access the Pioneer is not responsible for any malfunction of the network. The following screen appears when the Home player and/or the Home Media Gallery features due to Media Gallery is selected as the input source. - Page 74 Playback with HOME MEDIA GALLERY inputs Use / to select the category you want to play • In case of an iPod back, and then press ENTER. iPod Select a category from the following list: Top Menu A/V RECEIVER Playlists •...
-
Page 75: Playing Back Audio Files Stored On Components
Playback with HOME MEDIA GALLERY inputs • Internet radio stations – See Listening to Internet Button(s) Function radio stations on page 77. RETURN Press to return to the previous level. • Server – See Playing back audio files stored on components on the network on page 75 and Playing Playing back audio files stored on an iPod back photo files stored in components on the network... -
Page 76: Playing Back Audio Files Stored On A Usb Memory Device
Playback with HOME MEDIA GALLERY inputs Navigation through categories on your iPod looks like Button What it does this: / When browsing, press to move to previous/next Playlists Songs levels. Artists Albums Songs / Albums Songs During Audiobook playback, press to switch the playback speed: Faster ... -
Page 77: Basic Playback Controls
Playback with HOME MEDIA GALLERY inputs • Reconnect the USB device with the receiver switched Continue browsing until you arrive at what you off. want to play, then press to start playback. • Use a dedicated AC adapter (supplied with the Track title or File name device) for USB power. - Page 78 The access code required for registration on the special Track Title Top Menu Play mode PLAY 0003:02 -0002:02 Pioneer Internet radio site is displayed. Make a memo of Artist Name Random On Artist name Channel Name this address. Channel name...
-
Page 79: Listening To Neural Music Direct
Playback with HOME MEDIA GALLERY inputs Listening to Neural Music Direct About Neural Music Direct Neural Music Direct is an Internet radio station managed and operated by Neural Audio Corporation. Neural radio stations deliver multichannel surround sound. The Neural-THX Surround mode is automatically selected and lets you enjoy a rich multichannel surround sound experience. -
Page 80: About Playable File Formats
Playback with HOME MEDIA GALLERY inputs About playable file formats The Home Media Gallery feature of this receiver supports the following file formats. Note that some file formats are not available for playback although they are listed as playable file formats. Also, the compatibility of file formats varies depending on the type of server. -
Page 81: Advanced Operations For Internet Radio
Playback with HOME MEDIA GALLERY inputs Photo files Set the operation selector switch to SOURCE. Files of up to 12 M pixels can be played. Progressive JPEG Select the class that you want to retrieve an images are not supported. Internet radio station from. - Page 82 Playback with HOME MEDIA GALLERY inputs Proxy Hostname/Proxy Port Either ‘Network Found’ or ‘No Network Found’ This setting is required when you connect this receiver to appears. Check the network connection status and the Internet via a proxy server. Enter the IP address of press ENTER.
- Page 83 Playback with HOME MEDIA GALLERY inputs 11 Select ‘Change’ and press ENTER to confirm your 17 Select ‘No’ or ‘Yes’ for the proxy server setting to selection. deactivate or activate the proxy server. The Edit Gateway IP screen appears. In case you select ‘No’, proceed with Step 22. In case you select ‘Yes’, on the other hand, proceed with Step 18.
-
Page 84: Checking The Network Settings
Information on software updates may be posted on the use to develop digital home products that share content Pioneer website. through wired or wireless networks in the home. http://www.pioneer.eu DNS is an abbreviation for the Domain Name System, which stores and associates many types of information with domain names. - Page 85 TV broadcasts on the Internet. vTuner lists thousands of stations from over 100 different countries around the globe. For more detail about vTuner, visit the following website: http://www.radio-pioneer.com...
-
Page 86: Hdmi Control
• You cannot use this function with components that this receiver. do not support HDMI Control. • SC-LX81 only: To use the HDMI control function, • We cannot guarantee this unit will work with HDMI connect this receiver and flat screen TV using the Control-compatible components other than those HDMI OUT 1 terminal. -
Page 87: Setting The Hdmi Options
• With HDMI Control set to ON, Input Setup and HDMI Input are automatically set to off. 2 • When this set is connected by HDMI cable to a Pioneer player that is compatible with the PQLS function via HDMI connection and a CD is played or HDMI re-authentication is performed (the HDMI indicator blinks), the PQLS effect is enabled and the listening mode is set to stereo. -
Page 88: Synchronized Amp Mode
HDMI Control Synchronized amp mode About PQLS Synchronized amp mode begins once you carry out an PQLS (Precision Quartz Lock System) is a digital audio operation for the flat screen TV. For more information, signal transfer control technology using the KURO LINK see the operating manual of your flat screen TV. -
Page 89: Other Settings
2 You will have to make an SR+ cable connection from a CONTROL OUT jack on the display to the CONTROL IN jack on this receiver (opposite from the setup in Using this receiver with a Pioneer flat screen TV on page 67). Note that to control this receiver using the remote, you will have... -
Page 90: Input Function Default And Possible Settings
Select ‘OK’ to change the language. TUNER PHONO 4c.OSD Language A/V RECEIVER a.With HDMI Control set to ON, assignments cannot be made (see Language : English HDMI Control on page 86). b.SC-LX81 only Exit Return You will return to the System Setup menu. -
Page 91: The Other Setup Menu
• SR+ Setup – Specify how you want to control your When the multi-channel input is selected as an input Pioneer flat screen TV (see SR+ Setup for Pioneer flat source, you can display the video images of other input screen TVs on page 92). -
Page 92: Zone Audio Setup
A/V RECEIVER A/V RECEIVER 1. Multi Ch In Setup Flicker Reduction : on page 67 and Using the SR+ mode with a Pioneer flat 2. ZONE Audio Setup 3. SR+ Setup 4. HDMI Control Setup screen TV on page 68. -
Page 93: Using Other Functions
Using other functions Chapter 13: Using other functions Setting What it does Option(s) Setting the Audio options Some monitors have a slight 0.0 to 6.0 DELAY There are a number of additional sound settings you can (Sound delay when showing video, so the (frames) Delay) soundtrack will be slightly out of... - Page 94 Using other functions Setting What it does Option(s) Setting What it does Option(s) DUAL Specifies how dual mono CH1 – Adjusts the depth of the surround –3 to +3 DIMENSION (Dual encoded Dolby Digital Channel 1 is sound balance from front to back, Default: 0 Mono) soundtracks should be played.
-
Page 95: Setting The Video Options
Using other functions Setting What it does Option(s) Setting the Video options Specifies the output resolution of AUTO There are a number of additional picture settings you can the video signal (when analog (Resolution) PURE video input signals are output at make using the VIDEO PARAMETER menu. -
Page 96: Reducing The Level Of An Analog Signal
Using other functions AUDIO VIDEO MULTI PARAMETER PARAMETER OPERATION TUNE + EXIT TOOLS DVR1 DVR1 DVR2 Using the sleep timer TOP MENU MENU BAND T.EDIT VIDEO2 VIDEO3 VIDEO1 VIDEO1 VIDEO2 VIDEO3 DVR2 ENTER ST + The sleep timer switches the receiver into standby after a HOME MEDIA HOME MEDIA GALLERY... -
Page 97: Switching The Hdmi Output
Using other functions When you’re finished, press STATUS again to switch off the display. Switching the HDMI output SC-LX81 only Set which terminal to use when outputting video and Resetting the system audio signals from the HDMI output terminals (HDMI Use this procedure to reset all the receiver’s settings to... -
Page 98: Default System Settings
Using other functions Default system settings Setting Default Setting Default Neo:6 Options Center Image Neo:6 MUSIC: 3 Neo:6 CINEMA: Digital Video Conversion SPEAKERS All Inputs Listening Mode AUTO Surround Back System Normal (2 ch) SURROUND Speaker System Front SMALL Listening Mode AUTO (x ch) SURROUND... -
Page 99: Controlling The Rest Of Your System
1 You can’t assign TUNER or HOME MEDIA GALLERY. 2 • When using a Pioneer HDD recorder, please select PIONEER DVR 487, 488, 489 or 493. • When using a Pioneer flat screen TV released prior to summer 2005, please select preset codes 637 or 660. -
Page 100: Programming Signals From Other
Note 1 The remote can store about 200 preset codes (this has been tested with codes of Pioneer format only). 2 • You can’t assign TUNER or HOME MEDIA GALLERY. • The TV CONTROL buttons (TV, TV VOL +/–, TV CH +/–, MUTE and INPUT) can only be learned after the operation selection switch is set to TV. -
Page 101: Resetting The Remote Control Presets
Controlling the rest of your system Repeat step 4 to erase other buttons. Press the input source button you want to rename then press ENTER. Press and hold MULTI OPERATION for a couple of Use / to select NAME EDT, then press ENTER. seconds when you’re done. -
Page 102: Multi Operation And System Off
3; Use / to select MULTI OP or SYS OFF from the • program a Pioneer TV or monitor to switch on if the menu and press ENTER. input function (selected in step 2) has video input If you selected Multi Operation (MULTI OP), the LCD on terminals;... -
Page 103: Using Multi Operations
Satellite TV/TV AUDIO The command sequence you programmed will run, then Use to display the TOOLS menu TOOLS all Pioneer components will switch off , followed by this on the flat screen TV. receiver. EXIT Use to return to the normal screen in one step. -
Page 104: Controls For Other Components
Controlling the rest of your system Button(s) Function Components Controls for other components D.ACCESS Selects tracks higher than 10. CD/MD/CD-R/ This remote control can control these components after (For example, press +10, then 3 VCR/LD player to select track 13.) entering the proper codes or teaching the receiver the commands (see Setting the remote to control other Use as the ENTER button. -
Page 105: Operating Other Pioneer Components With
• If you have connected a remote control to the CONTROL IN jack (using a mini-plug cable), you won’t be able to control this unit using the remote sensor. • See Using this receiver with a Pioneer flat screen TV on page 67 if you are connecting a Pioneer flat screen TV. -
Page 106: Additional Information
However, if all the speakers are pointed towards the listening position, the sound field will seem cramped. Testing by the Pioneer Multi-channel Research Group 60° has shown that a good sense of sound positioning can be 100°... - Page 107 Additional information Step 4: Positioning and adjusting the subwoofer Placing the subwoofer between the center and front speakers makes even music sources sound more natural • When adjusting the orientation of the speakers, turn (If there is only one subwoofer, it doesn’t matter if it is the speakers with the center of the speakers’...
-
Page 108: Positional Relationship Between Speakers
Additional information Positional relationship between speakers and monitor Position of front speakers and monitor The front speakers should be as equidistant as possible to the monitor. 45° to 60° Position of center speaker and monitor Since mostly dialogs are output from the center speaker, keeping the center speaker as close as possible to the screen makes the overall sound more natural. -
Page 109: Troubleshooting
• Try disconnecting the power cable, then connect again. AMP ERR blinks in the display, • The receiver may have a serious problem. Do not try switching the receiver on. Contact a Pioneer then the power automatically authorized independent service company for help. -
Page 110: No Sound
Additional information No sound Symptom Remedy No sound is output when an • Check the volume, mute setting (press MUTE) and speaker setting (press SPEAKERS). input source is selected. • Make sure the correct input source is selected. No sound output from the front •... -
Page 111: Other Audio Problems
Additional information Symptom Remedy No sound when using the • If the HDMI input source is selected, sound is muted until exiting either menu. HOME MENU or STATUS • If sound is muted in the sub zone (ZONE 2), it will be restored after exiting the HOME MENU. menu. -
Page 112: Video
Additional information Video Symptom Remedy No image is output when an • Check the video connections of the source component (see page 21). input is selected. • For HDMI, or when digital video conversion is set to OFF and a TV and another component are connected with different cords (in Setting the Video options on page 95), you must connect your TV to this receiver using the same type of video cable as you used to connect your video component. -
Page 113: Professional Calibration Eq Graphical Output
Additional information Professional Calibration EQ graphical output Symptom Remedy The EQ response displayed in • There are cases where the graph does not appear flat (even when selecting ALL CH ADJUST in the the graphical output following Auto MCACC Setup) due to adjustments made to compensate for room characteristics to achieve calibration does not appear optimal sound. -
Page 114: Remote Control
• Make sure that there is an analog or HDMI connection between the units. This is necessary for the remote. SR feature to work. • Check that the other component is made by Pioneer. The SR feature only works with Pioneer equipment. HDMI... -
Page 115: Important Information Regarding The Hdmi Connection
Additional information Symptom Remedy No picture. • Try changing the Resolution setting (in Setting the Video options on page 95). • Set the HDMI output setting to the connected HDMI OUT terminal (in Switching the HDMI output on page 97). No sound, or sound suddenly •... -
Page 116: Home Media Gallery
Additional information HOME MEDIA GALLERY Symptoms Causes Remedies Refer to Cannot access the The LAN cable is not firmly connected. Firmly connect the LAN cable. network. The router is not switched on. Switch on the router. — Internet security software is currently There are cases where a component with —... - Page 117 Additional information Symptoms Causes Remedies Refer to Audio playback is The audio file currently being played back Check whether the audio file was recorded in undesirably stopped or was not recorded in a format playable on this a format supported by this receiver. disturbed.
-
Page 118: About Status Messages
Additional information Symptoms Causes Remedies Refer to The Home Media Gallery The remote control is not currently set to the Press HOME MEDIA GALLERY to set the cannot be operated with Home Media Gallery mode. remote control to the Home Media Gallery the buttons on the remote mode. -
Page 119: Surround Sound Formats
Additional information Dolby Surround is an encoding system which embeds surround sound information within a stereo soundtrack, Surround sound formats which a Dolby Pro Logic decoder can then use for Below is a brief description of the main surround sound enhanced surround listening with greater sound detail. -
Page 120: Dts 96/24
Additional information Manufactured under license from Dolby Laboratories. DTS-EXPRESS Dolby, Pro Logic, Surround EX and the double-D symbol are DTS-EXPRESS is a low-bitrate encoding technology trademarks of Dolby Laboratories. supporting up to 5.1 channels with fixed data transfer rates. This format is incorporated with sub audio on HD DVD and secondary audio on Blu-ray Disc while boasting the potential applicability to upcoming broadcasts and The DTS technologies are explained below. -
Page 121: About Thx
THX Ultra2 logo, which is your guarantee that the Home Theatre products you purchase will give you superb performance for In case of SC-LX81 many years to come. THX Ultra2 requirements cover every aspect of the product including pre-amplifier and power amplifier performance and operation, and hundreds of other parameters in both the digital and analog domain. -
Page 122: About Neural - Thx Surround
This product is manufactured under license from Neural Audio the THX Surround EX playback mode, otherwise THX Ultra2/Select2 Corporation and THX Ltd. PIONEER Corporation hereby grants the user Cinema mode will apply ASA processing to provide optimum replay. a non-exclusive, non-transferable, limited right of use to this product •... -
Page 123: About Flac
Additional information About FLAC FLAC Decoder Copyright © 2000, 2001, 2002, 2003, 2004, 2005, 2006, 2007 Josh Coalson Redistribution and use in source and binary forms, with or without modification, are permitted provided that the following conditions are met: • Redistributions of source code must retain the above copyright notice, this list of conditions and the following disclaimer. -
Page 124: Formats
Additional information Listening modes with different input signal formats The following charts outline the listening modes available with different input signal formats, depending on the surround back channel processing and decoding method you have selected. Stereo (2 channel) signal formats SBch Processing Input signal format Standard... - Page 125 2 Pro Logic is selected. b.Unavailable with only one surround back speaker connected. c.This is only selectable when the input signal is an analog or PCM signal. d.Ultra2 for the SC-LX81, Select2 for the SC-LX71. e.Automatically selected if no surround back speakers are connected.
- Page 126 Additional information Multichannel signal formats SBch Processing Input signal format Standard Auto Surround Dolby Digital Plus Straight decoding Straight decoding SBch THX CINEMA Processing Dolby TrueHD THX MUSIC DTS-HD THX GAMES (7.1 channel DTS-HD Master Audio decoding used WMA9 Pro for all sources) (6.1/7.1 channel) Dolby Digital Plus...
- Page 127 Additional information SBch Processing Input signal format Standard Auto Surround SBch DTS-ES DTS-ES (Matrix/Discrete) DTS-ES Matrix+THX CINEMA DTS-ES (Matrix/Discrete) Processing (6.1 channel sources/ DTS-ES Discrete+THX CINEMA DTS+2 Pro Logic llx 6.1 channel flagged) DTS+2 Pro Logic IIx MOVIE (7.1 channel MOVIE+THX DTS+2 Pro Logic llx decoding used...
- Page 128 THX MUSIC THX GAMES a.Unavailable with only one surround back speaker connected. b.This can be selected when only one surround speaker is connected. c.Ultra2 for the SC-LX81, Select2 for the SC-LX71. d.Automatically selected if no surround back speakers are connected.
-
Page 129: Stream Direct With Different Input Signal Formats
Additional information Stream direct with different input signal formats The following charts show what you will hear with different input signal formats, depending on the Stream Direct mode (see Using Stream Direct on page 38) you have selected. Stereo (2 channel) signal formats Surround Back speaker(s) Input signal format DIRECT... -
Page 130: Specifications
Additional information Specifications Amplifier Section HDMI Section Multi channel simultaneous power output (1 kHz, 1 %, 8 Ω) Input ......... 19-pin 7ch total . -
Page 131: Cleaning The Unit
DTS-ES decoders for six-channel surround sound. new generation reference amplifier offers outstanding Furthermore, Dolby Digital Plus and Dolby TrueHD, performance (high output of 700 W (SC-LX81)/630 W (SC- which are designed for the next-generation high- LX71) simultaneous) with high sound quality and definition media such as Blu-ray Disc and HD DVD, reproduces the latest in multi-channel digital contents. - Page 132 DeepColor and x.v.Color feature (x.v.Color is trademarks of Sony Corporation). You can operate this receiver in synchronization with your Pioneer component that supports the HDMI Control function by connecting your component to this receiver via HDMI. Also, the built-in...
-
Page 133: Pioneer Authorized Distributors
When using the Advanced MCACC setup, you have the option of displaying the results using a computer. To obtain the software for this feature (as referred to in Connecting a PC for Advanced MCACC output on page 69), please contact the Pioneer Authorized Distributor for your area as listed above. - Page 134 253 Alexandra Road, #04-01, Singapore 159936 TEL: 65-6472-7555 PIONEER ELECTRONICS AUSTRALIA PTY. LTD. 178-184 Boundary Road, Braeside, Victoria 3195, Australia, TEL: (03) 9586-6300 PIONEER ELECTRONICS DE MEXICO S.A. DE C.V. Blvd.Manuel Avila Camacho 138 10 piso Col.Lomas de Chapultepec, Mexico,D. F. 11000 TEL: 55-9178-427 0 K002_B_En Published by Pioneer Corporation.