Table of Contents
Advertisement
Use & Care Guide
Manual de Usa y Cuidado
Guide d'Utlsaton
et d'Entretien
Englsh / Espaiol/Fran_ais
Models/Modelos/Mod_le_
795.5103 _
Kenmoreo
_
@°=
oo
"d
Co_'e
P/N
MFL63729302
Sears Brands Management
Corporation
Hoffman Estates, IL 60179
U.S.A.
www.kenmorecom
WWW.sea
rs._m
Sears Canada
inc.
Toronto, Ontario,
Canada
M5B 2B8
www.sears.ca
TM
Advertisement
Table of Contents

Related Manuals for Kenmore 795.5103 Series


Summary of Contents for Kenmore 795.5103 Series
- Page 1 Use & Care Guide Manual de Usa y Cuidado Guide d'Utlsaton et d'Entretien Englsh / Espaiol/Fran_ais Models/Modelos/Mod_le_ 795.5103 _ Kenmoreo @°= MFL63729302 Sears Brands Management Corporation Hoffman Estates, IL 60179 U.S.A. www.kenmorecom WWW.sea rs._m Sears Canada inc. Toronto, Ontario, Canada M5B 2B8 www.sears.ca...
-
Page 2: Table Of Contents
Requirements Refrigerator installation Unpacking Your Refrigerator installation Base Grille installation Leveling The Refrigerator Door Handle Removal Removing And Replacing Refrigerator Doors Door Alignment Connecting The Water Line Before You Begin What You Will Need installation instructions Refrigerator Features Using Your Refrigerator... -
Page 3: Warranty
This warranty gives you specific legal rights, and you may also have other rights which vary from state to state. Sears Brands Management Sears Canada, SIDE=BY-SIDE REFRIGERATOR according to all instructions supplied with the product, if this appliance fails due... -
Page 4: Protection Agreements
In the space below, record the date of purchase, model and serial number of your product. You will find the model and serial number printed on an identification label located on the right-hand side of the refrigerator compartment. Have these items of information available whenever you contact Sears concerning your product. -
Page 5: Important Safety Instructions
'Attention Installer' instructions that were taped to the front of the refrigerator. • After your refrigerator is in operation, do not touch the cold surfaces in the freezer compartment when hands are damp or wet. Skin may adhere to the extremely cold surfaces. -
Page 6: Grounding Requirements
(recycling). To recycle, please contact your local agency. Use of an extension cord will increase the clearance needed for the back of the refrigerator. If the supply cord is damaged, it must be replaced by the manufacturer or its service agent or a similarly qualified person in order to avoid any hazard. -
Page 7: Refrigerator Installation
2. To minimize noise and vibration, the refrigerator MUST be installed on a solidly constructed floor. 3. Carpeting and soft tile surfaces are not recommended. 4. NEVER install the refrigerator on a platform or a weakly supported structure. 5. Install this appliance in an area where the temperature is between 55°F (13°C)and... -
Page 8: Leveling The Refrigerator Door
LEVELING THE REFRIGERATOR Place level on top of the refrigerator as shown below. illl _ If your refrigerator is not level, insert a flat blade screwdriver into the grooves of the leveling legs (shown in picture below). Rotate legs clockwise to raise or counterclockwise to lower the front of the refrigerator. -
Page 9: Removing And Replacing Refrigerator Doors
2. Use a flat blade screwdriver to pry back the hooks (not shown) of the hinge cover from the top of the refrigerator cabinet (2). Lift up the cover. 3.Rotate the hinge lever (3) clockwise. Lift the top hinge (4) free of the hinge lever latch (5). - Page 10 Reinstalling the right (refrigerator) d oor Type 1 1. Place the door onto the lower hinge pin. 2. Fit top hinge (4) over hinge lever latch (5) into place. Rotate lever (3) counterclockwise hinge. NOTE: Regardless of hinge lever type, reinstallation process is the same.
-
Page 11: Door Alignment
Type 1 Adjusting tool: Fiat blade screwdriver If the freezer compartment door is lower than the refrigerator compartment door, level them by inserting a flat blade screwdriver into the groove of the left leveling leg and rotating it clockwise. Left leveling... -
Page 12: Connecting The Water Line
To determine how much tubing you need, measure the distance from the water valve on the back of the refrigerator to the water supply pipe. Then add 8 feet (2.4 m). Be sure there is sufficient extra tubing (about 8 feet [2.4 m] coiled into 3 turns of about 10"... -
Page 13: Installation Instructions
NOTE: Be sure there is sufficient extra tubing, [about 8 feet (2.4 m) coiled into 3 turns of about 10" (254 mm) diameter] to allow the refrigerator to move out from the wall after installation, 7. CONNECT... - Page 14 • If your refrigerator does not have a water filter, we recommend installing one. If your water supply has sand or particles that could clog the screen of the refrigerator's water valve, install the filter in the water line near the refrigerator.
-
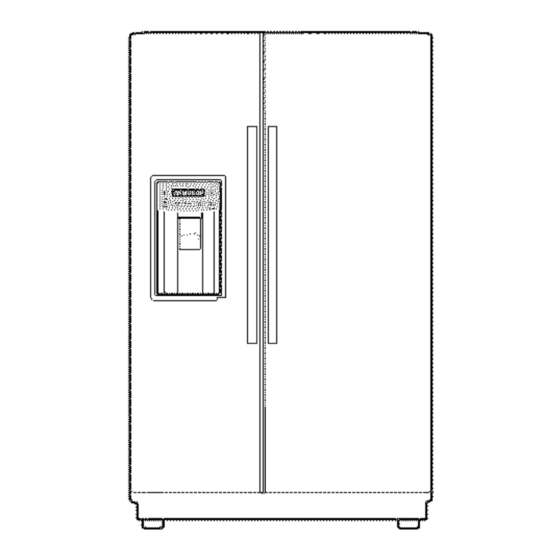
Page 15: Refrigerator Features
Use this page to become more familiar with the parts and features. NOTE: This guide covers several different models.The refrigerator you have purchased may have some or all of the items listed below, The locations of the features shown below may not match your model,... -
Page 16: Ensuring Proper Air Circulation
They are packed together to prevent possible damage during shipment. 3. Let your refrigerator run for at least 2 or 3 hours before putting food in it. Check the flow of cold air in the freezer compartment to ensure proper cooling. - Page 17 DOOR ALARM CONTROL LOCK HOLD 3 SEC When either the refrigerator or freezer door is left open for more than 1 minute, an alarm will sound to let you know the door is open. The alarm will repeat every 30 seconds until all doors are completely closed.
-
Page 18: Adjusting Control Settings
If you need to adjust temperatures in the refrigerator or freezer, start by adjusting the refrigerator and allow 24 hours for the temperature to stabilize. If it is too warm or too cold, then adjust the freezer control. -
Page 19: Food Storage Guide
FOOD STORAGE GUIDE Wrap or store food in the refrigerator in airtight and moisture-proof material unless otherwise noted. This prevents food odor and taste transfer throughout the refrigerator. For dated products, check date code to ensure freshness. items How t o Store... -
Page 20: Water And Ice Dispenser
WATER AND ICE DISPENSER Your refrigerator has a mechanism that can dispense cool water and ice cubes without opening the door • The dispenser tray can easily be removed by pressing down and lifting it out • First push the tray in the area labeled 'PUSH', then place... -
Page 21: Ice Storage Bin
• Lift the ice storage bin slightly @ and pull it out ® as shown in the figure. DOOR RACK AND SUPPORT Your refrigerator and freezer features racks which can easily be arranged for packaged products, • Lift the door rack holding both sides @ and pull it out in... -
Page 22: Snackpan
@. Lift the front part of the snack pan cover and pull out ®. REFRIGERATOR SHELVES The refrigerator compartment shelf is adjustable so that you can place it at a height according to the space requirement of foods. • Slide shelf Pull the shelf towards you (b, then lift both the front and rear parts of the shelf upward ®... -
Page 23: Filter
3. Dispense 2.5 gallons (9.46 liters) of water to purge the system, depressing and releasing the dispenser pad in cycles of 30 seconds ON and 60 seconds OFF. Open the refrigerator door and check the shelf area for water leaks. To purchase replacement water filters, call 1-800-4-MY-HOME ®. -
Page 24: Performance Data Sheet
This system has been tested according to NSF/ANSI 42 for the reduction of the substances listed below. The concentration of the indicated substances in water entering the system was reduced to a concentration less than equal to the permissible limit for water leaving the system, as specified in NSF/ANSl 42. -
Page 25: Care And Cleaning
To help remove odors, you can wash the inside of the refrigerator with a mixture of baking soda and warm water. Mix 2 tablespoons baking soda to 1 quart of water (26 g soda to 1 liter water.) Be sure the baking soda is completely dissolved so it does not scratch the surfaces of the refrigerator. -
Page 26: When You Go On Vacation
• When the water supply will be shut off for several hours. • When the ice storage bin is removed for more than a minute or two. • When the refrigerator will not be used for several days. NORMAL • The icemaker water valve will buzz as the icemaker fills with water. - Page 27 The high efficiency compressor may cause your new refrigerator to run longer than your old one, but it is still more energy efficient than previous models. While running you may hear a pulsating or high-pitched sound.
- Page 28 Adding food and opening the door warms the refrigerator. It is normal for the refrigerator to run longer in order to cool the refrigerator back down. In order to conserve energy, try to get everything you need out of the refrigerator at once, keep food organized so it is easy to find and close the door as soon as the food is removed.
- Page 29 When you open the door, warmer air enters the refrigerator. As the warm air cools, it can create a vacuum. If the door is hard to open, wait 5 minutes to allow the air pressure to equalize, then see if it opens more easily.
- Page 30 When the door is opened, warm, humid air is allowed in the freezer resulting in frost. COMPARTMENT Then... Press the Fridge Temp button to set the refrigerator compartment to a warmer temperature. When room temperature is below 41 °F (5°C), food can become frozen. The refrigerator should not be operated in temperatures below 55°F (13°C).
- Page 31 The dispenser is not set for water dispensing, Water filter needs to be changed, Then... Ice will not dispense if any of the refrigerator doors are left open, Check if something is holding the door open, Press and hold the Door Alarm button for 3 seconds to unlock the control panel and dispenser, The dispenser can be set for ice or water.
- Page 32 For troubleshooting, For repair - in your home - of all major brand appliances, lawn and garden equipment, no matter who made it, no matter For the replacement owner's manuals that you need to do-it-yourself. For Sears professional and items like garage door openers and water heaters. 1-800-4-MY-HOME ®...