Table of Contents
Advertisement
Quick Links
Advertisement
Table of Contents

Related Manuals for Planet WPG-210N


Summary of Contents for Planet WPG-210N
- Page 1 PLANET 802.11n Wireless Presentation Gateway WPG-210N...
-
Page 2: Federal Communication Commission Interference Statement
"as is". Should the programs prove defective following their purchase, the buyer (and not PLANET, its distributor, or its dealer) assumes the entire cost of all necessary servicing, repair, and any incidental or consequential damages resulting from any defect in the software. - Page 3 Do not dispose of WEEE as unsorted municipal waste and have to collect such WEEE separately. Revision User Manual for PLANET 802.11n Wireless Presentation Gateway Model: WPG-210N Rev: 1.0 (December, 2012)
-
Page 4: Table Of Contents
PLANET 802.11n Wireless Presentation Gateway WPG-210N Contents Chapter 1. PRODUCT INTRODUCTION ................6 Package Contents ....................6 Product Description ....................6 Product Features..................... 9 Product Specification ................... 10 Chapter 2. HARDWARE INSTALLATION ................12 Hardware Description ................... 12 2.1.1 The Front Panel ....................12 2.1.2... - Page 5 PLANET 802.11n Wireless Presentation Gateway WPG-210N 5.4.1. System Status ....................44 5.4.2. Network Setup ....................46 5.4.3. OSD Setup......................50 5.4.4. Device Setup..................... 51 5.4.5. Change Passwords................... 52 5.4.6. Reset to Default ....................52 5.4.7. Firmware Upgrade .................... 53 5.4.8.
-
Page 6: Chapter 1. Product Introduction
1.2 Product Description Deliver Smooth Presentations Wirelessly PLANET WPG-210N is a wireless presentation gateway based on IEEE 802.11n technology. It is equipped with both VGA and HDMI video output interfaces and one 10/100Mbps Ethernet port for LAN connection. With the hardware decoding capability, the WPG-210N can project high-definition video on the screen and audio through wireless or wired LAN connections. - Page 7 You can connect it to any type of projector, LCD TV, or other large screen display wirelessly right away. 4-to-1 Split Screen Projection With this 4-to-1 split screen feature, the WPG-210N allows up to four PC / Laptop screens be projected through one projector in the same time. Therefore the participants can easily do side-by-side comparison from...
- Page 8 WPG-210N web UI or simply execute the utility from the created USB token. It offers the most convenient way for the new user access to the presentation in seconds. Just link the PC / Laptop to the WPG-210N through wireless or Ethernet, the wireless projection can be performed via the connected projector easily.
-
Page 9: Product Features
Remote Desktop Plug standard USB keyboard or mouse into the USB port in front panel of WPG-210N, you can control your PC remotely. You don’t have to stand still aside of PC or WPG-210N, and it makes your presentation easily and freely. -
Page 10: Product Specification
PLANET 802.11n Wireless Presentation Gateway WPG-210N 1.4 Product Specification Product WPG-210N Hardware Specification Video VGA Port: D-Sub 15-Pin female port HDMI 1.2 Audio Out 2.5mm stereo jack Interfaces 10/100Base-TX RJ-45 Wireless IEEE 802.11n 300Mbps Antenna Gain 2 x 2dBi RP-SMA detachable antenna... - Page 11 PLANET 802.11n Wireless Presentation Gateway WPG-210N System Management Protocol TCP/IP IP Configuration Automatic: DHCP Manual: Static IP address Management Web-Based configuration Supported Windows Account Administrators Right Limited User Guest Supported Operation System Windows XP / Vista / 7 Windows Mobile 5/6 Mac OS X 10.5 and above...
-
Page 12: Chapter 2. Hardware Installation
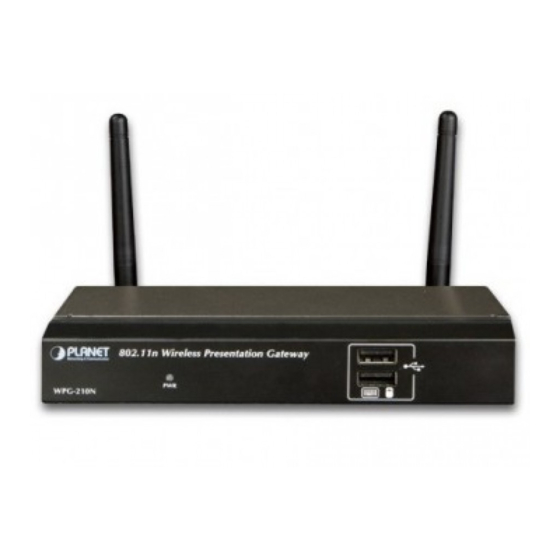
PLANET 802.11n Wireless Presentation Gateway WPG-210N Chapter 2. HARDWARE INSTALLATION Please follow the instructions below to build the wireless network connection between WPG-210N, display equipment and your computers. 2.1 Hardware Description 2.1.1 The Front Panel The front panel provides a simple interface monitoring the wireless presentation gateway. -
Page 13: Hardware Connection
Figure 2-2 the WPG-210N Rear Panel 2.2 Hardware Connection Step 1. Please turn off your projector first, and connect HDMI or D-sub cable of the projector to WPG-210N. Then you can power on WPG-210N. Figure 2-3 VGA / HDMI interface connection... - Page 14 PLANET 802.11n Wireless Presentation Gateway WPG-210N Step 2. When the projector shows the default screen as below, it indicates WPG-210N is ready now. Figure 2-4 Projector default screen Step 3. User your laptop or desktop to site survey the wirel ess signal of WPG-210N, and connect your PC with it wirelessly.
- Page 15 IP address 192.168.1.1 to access it. Figure 2-6 WPG-210N Web UI screenshot Now you can configure the WPG-210N and download the client utility (WPG) of Windows 7/Vista/XP or Windows M obile 5/6 via web UI. For further information of the configurations, please refer to the following...
-
Page 16: Chapter 3. Windows Client Utility - Wpg
WPG will start to search the available access points automatically if you have not connected your PC to WPG-210N manually. When the WPG-210N is displayed in the list, please click it to connect and then enter the Login Code shown on the projector screen. -
Page 17: Control Panel
PLANET 802.11n Wireless Presentation Gateway WPG-210N Step 3. Click the button to start projection Figure 3-3 WPG Utility – Control Panel 3.2. Control Panel Figure 3-4 WPG Utility – Control Panel function Introduction Button Description Button Description Start Full Screen Projection Project to Split No. -
Page 18: Show Receiver Information
Figure 3-5 WPG Utility – Show Receiver Information 3.2.2. Web Admin Click “Web Admin” to open the web UI page of WPG-210N. With regard to the web management UI page, please refer to the next chapter. Figure 3-6 WPG Utility – Web Admin... -
Page 19: Search Receiver Device
Click the “Select Projection Source” then you can select to project the main screen of desktop or the virtual extended screen. Object Description When “Main Desktop” is selected, WPG-210N will project out the main Main Desktop desktop screen. Extended Desktop When “Extended Desktop”... - Page 20 PLANET 802.11n Wireless Presentation Gateway WPG-210N The virtual second monitor is invisible, but it is just right of the main one. Just pull the presentation item out of right side screen, and you’ll see it appears on the projector screen.
-
Page 21: Projection Quality
PLANET 802.11n Wireless Presentation Gateway WPG-210N 3.2.5. Projection Quality Click the “Projection Quality”, choose “Normal” for faster projection speed with lower screen image quality, and “Best” for clear screen image quality but slower projection speed. Figure 3-9 WPG Utility – Projection Quality 3.2.6. -
Page 22: Advanced Screen Capture
PLANET 802.11n Wireless Presentation Gateway WPG-210N Figure 3-10 WPG Utility - Projection Latency Control 3.2.7. Advanced Screen Capture If you enable “Advanced Screen Capture”, all the tip windows and other layered windows (include the main UI) will be projected to the projector screen. However, the mouse cursor may blink from time to time when it is projecting. -
Page 23: Send Audio To Display
The Projector Screen without Tip Window 3.2.8. Send Audio to Display “Send Audio to Display” can project the audio wirelessly. Via the audio out jack, you can connect a speaker with WPG-210N and get more powerful volume than it in the laptop. - Page 24 PLANET 802.11n Wireless Presentation Gateway WPG-210N Figure 3-12 WPG Utility – Send Audio to Display Before starting the Audio Projection, please install the “VAC.exe” (Virtual Audio Control) first on your computer. Please find the software in the CD-ROM and you can hear the audio from the device when projecting.
-
Page 25: Auto Power Manager
PLANET 802.11n Wireless Presentation Gateway WPG-210N 3.2.9. Auto Power Manager If “Auto Power Manager” is enabled, WPG will turn the Windows Power Scheme from current settings to “High Performance” for getting the highest projection performance. However, you can still click it again to disable this function, and restore your power scheme immediately. -
Page 26: Make Wpg Token
PLANET 802.11n Wireless Presentation Gateway WPG-210N 3.2.11. Make WPG Token Click “Make WPG Token” to make a USB WPG Token, then you can insert the USB drive to any PC you want to make a presentation without installing any driver. Follow the instructions below to make the WPG Token. -
Page 27: Copy Application To Desktop
PLANET 802.11n Wireless Presentation Gateway WPG-210N Figure 3-18 USB Auto Setup Wizard Figure 3-19 USB Auto Setup Wizard 3.2.12. Copy Application to Desktop Click the “Copy Application to desktop”, then it will copy the application to your desktop immediately even... -
Page 28: About
PLANET 802.11n Wireless Presentation Gateway WPG-210N Figure 3-20 WPG Utility – Copy Application to Desktop 3.2.13. About Click “About” to show the system information. It includes the client version, server IP address, and login code. -
Page 29: Exit
PLANET 802.11n Wireless Presentation Gateway WPG-210N Figure 3-21 WPG Utility - About 3.2.14. Exit Click “Exit” to exit the WPG utility. It will stop the current projection and close the application immediately. Figure 3-22... -
Page 30: Chapter 4. Mac Os X Client Utility
Step 2: Highlight and select the wireless network (SSID) to connect (1) Select and SSID [WPG-210N] (2) Double-click on the selected SSID Figure 4-2 Step 3: Enter the encryption key of the WPG-210N (1) Enter the encryption key that configured in section 5.4.2 (1) Click the [Join] button... - Page 31 Step 4: Check if the AirPort is connect to the selected wireless network. If “Yes”, then there will be a “check” symbol in the front of the SSID. Step 5: Open the web browser and it will redirect to WPG-210N home page automatically. Or you can enter the default IP address http://192.168.1.1...
-
Page 32: Download Mac Os X Client Utility
PLANET 802.11n Wireless Presentation Gateway WPG-210N Figure 4-5 4.2. Download Mac OS X Client Utility Step 1. : Click “Download”. Step 2. : Choose the utility for “MAC”, then click Download button and execute the installation program. Figure 4-6... - Page 33 WPG will start to search the available access points automatically if you have not connected your MAC to WPG-210N manually. When the WPG-210N is displayed in the list, please click it to connect and then enter the Login Code shown on the projector screen.
- Page 34 PLANET 802.11n Wireless Presentation Gateway WPG-210N Figure 4-9 Step 6. Click “WPG” icon to execute the program. Figure 4-10...
-
Page 35: Main User Interface
PLANET 802.11n Wireless Presentation Gateway WPG-210N 4.3. Main User Interface Menu Area Status Indicator Control Area for Screen Projection Feature Figure 4-11 4.4. Screen Projection Click the “Play” button for full or split screen, you can project the main screen on to the display immediately, click the “Pause”... -
Page 36: Mac Audio Projection
PLANET 802.11n Wireless Presentation Gateway WPG-210N 4.5. MAC Audio Projection First, before starting Audio Projection, please install the “Soundflower.mpkg” (MAC system extension for audio using) on your computer. Please find the software in bundled CD-ROM. Second, click menu to open function list and enable Audio Projection, then you can hear the audio from device when projecting. - Page 37 PLANET 802.11n Wireless Presentation Gateway WPG-210N 3) After read the important information, please click “Continue” to go to the next step. Figure 4-15 4) Select the language, and click “Continue”. Figure 4-16...
- Page 38 PLANET 802.11n Wireless Presentation Gateway WPG-210N 5) Click “Agree” and then click “Continue”. Figure 4-17 6) Click “Install”. Figure 4-18...
- Page 39 PLANET 802.11n Wireless Presentation Gateway WPG-210N 7) Enter your Username and Password of the System. Then, click “Install Software”. 8) The window pops up the notice to remind you that computer will restart while finishing the installing. Please click “Continue Installation”.
- Page 40 10) After restart the computer, you will see there is a sunflower icon displayed in the system taskbar. Then, you can configure your audio output per your preference. ※ If the icon is not displayed, please execute the program of WPG-210N first.
-
Page 41: Chapter 5. Web Ui Management
Please follow the steps below to enter the web UI of WPG-210N. Step 1. First, please connect your PC to WPG-210N (via wire or wirelessly). Step 2. Open the web browser and it will redirect to WPG-210N home page automatically. Or you can enter the default IP address http://192.168.1.1... -
Page 42: Download
PLANET 802.11n Wireless Presentation Gateway WPG-210N The following sections will introduce the detailed instructions of the web UI functions. 5.2. Download Please follow the steps below to download and execute the WPG installation program. Step 1. Click “Download”. Step 2. Choose the WPG utility for “Windows 7 / Vista / XP” or “Mac OS X”, then click Download button and execute the installation program. -
Page 43: Conference Control
PLANET 802.11n Wireless Presentation Gateway WPG-210N 5.3. Conference Control This function allows you to host a meeting without the projector cable swapping, and each participant is able to show their own presentation easily. Please follow the steps below to execute Conference Control. -
Page 44: Admin
WPG-210N 5.4. Admin This function allows you to login web management UI of WPG-210N. Click “Admin”, and enter the password. The default value is “admin”. Then click the Login button or press the Enter key. Please refer to the following sections for further configuration of the web management UI. - Page 45 Description Model Name Product model name Firmware Version Product firmware version number Network Status IP Address The IP address of WPG-210N Subnet Mask The subnet mask Default Gateway The default gateway Wireless MAC Address The wireless MAC address The wire MAC address...
-
Page 46: Network Setup
Object Description IP Setup Obtain IP address If you select this option, the WPG-210N will detect the network environment automatically. automatically When WPG-210N is connected to a LAN that has DHCP server, the clients of WPG-210N will be assigned an IP by that server and the built-in DHCP server of WPG-210N will be disabled. - Page 47 Embedded AP SSID You can configure the SSID string here when Wireless LAN is enabled. Region The default value is “Worldwide”. SSID Broadcast The default value is “Enable”. If you select “Auto”, the WPG-210N will scan all of the wireless channels Channel...
- Page 48 AP Client Setup Check “Enable” radio button to switch WPG-210N to AP client mode. It can join other access point wirelessly. Besides, the clients can also login WPG-210N for presentation and surf the Internet via other AP simultaneously.
- Page 49 Click the Apply button to make the changes to take effect. To enable the WPG-210N to run as a AP Client to connect to other existing AP wirelessly, please set the encryption security type to “WPA AES” or “WPA2 AES”.
-
Page 50: Osd Setup
PLANET 802.11n Wireless Presentation Gateway WPG-210N 5.4.3. OSD Setup Users can customize their own OSD (on-screen display) standby image. Figure 4-8 The web page includes the flowing fields: Object Description Restore to the default OSD standby image. Restore Initial Image File Upload Upload the customized OSD standby image. -
Page 51: Device Setup
4-characters Number. The default setting of project output port is VGA. However, The HDMI cable will still works if you plug it before powering on the WPG-210N. Click the Apply button to make the changes to take effect. -
Page 52: Change Passwords
Click the Apply button to make the changes to take effect. 5.4.6. Reset to Default This page allows you to reset the current configuration to factory default. Figure 4-11 Click the Apply button to restore the WPG-210N to the factory default settings. -
Page 53: Firmware Upgrade
PLANET 802.11n Wireless Presentation Gateway WPG-210N 5.4.7. Firmware Upgrade This page allows you upgrade the WPG-210N firmware to new version. Please note, do not power off the device during the upload because it may crash the system. Figure 4-12 If it is necessary to upgrade the firmware, please follow the steps below to operate carefully. -
Page 54: Reboot System
Step 7. Login the web UI, and click Reset to Default to take effect. New firmware versions posted at the website of PLANET Technology can be downloaded for free. There is no need to upgrade the firmware unless the new firmware has a new feature you want to use. -
Page 55: Appendix A: Configuring The Pcs
PLANET 802.11n Wireless Presentation Gateway WPG-210N Appendix A: Configuring the PCs In this section, we’ll introduce how to install and configure the TCP/IP correctly in Windows XP. First make sure your Ethernet Adapter is working, refer to the adapter’s manual if needed. - Page 56 PLANET 802.11n Wireless Presentation Gateway WPG-210N Figure A-2 The following TCP/IP Properties window will display and the IP Address tab is open on this window by default. Now you have two ways to configure the TCP/IP protocol below: Setting IP address automatically...
- Page 57 PLANET 802.11n Wireless Presentation Gateway WPG-210N Figure A-3 Setting IP address manually Select Use the following IP address radio button. If the device's LAN IP address is 192.168.1.1, type in IP address 192.168.1.x (x is from 2 to 254), and Subnet mask 255.255.255.0.
- Page 58 PLANET 802.11n Wireless Presentation Gateway WPG-210N Figure A-4 Now click OK to keep your settings.
-
Page 59: Appendix B: Faq
(1) Plug the HDMI connector and turn on the projector or LCD first. (2) Then just power on the WPG-210N to achieve it. FAQ 3: With the Windows XP client, how to output the audio via the audio jack of the WPG-210N when the video is projected? [ANSWERS] (1) First of all, please install “VAC.exe”... - Page 60 \Utility\ of the CD-ROM. (2) After the driver is installed, please launch WPG utility. (3) Click Menu icon, and select “Send Audio to Display” to Yes. (4) After restarting WPG utility, you can have the audio via the audio jack of the WPG-210N.
- Page 61 *Model Number: WPG-210N * Produced by: Manufacturer‘s Name : Planet Technology Corp. Manufacturer‘s Address: 10F., No.96, Minquan Rd., Xindian Dist., New Taipei City 231, Taiwan (R.O.C.) is herewith confirmed to comply with the requirements set out in the Council Directive on the 1999/5/EC R&TTE.
- Page 62 ΣΥΜΜΟΡΦΩΝΕΤΑΙ ΠΡΟΣ ΤΙΣ ΟΥΣΙΩΔΕΙΣ essenciais e outras disposições da Directiva ΑΠΑΙΤΗΣΕΙΣ ΚΑΙ ΤΙΣ ΛΟΙΠΕΣ 1999/5/CE. ΣΧΕΤΙΚΕΣ ΔΙΑΤΑΞΕΙΣ ΤΗΣ ΟΔΗΓΙΑΣ 1999/5/ΕΚ Por medio de la presente, PLANET Technology Español Slovensky Výrobca PLANET Technology Corporation, Corporation, declara que 802.11n Wireless týmto deklaruje, že táto 802.11n Wireless Presentation Gateway cumple con los requisitos Presentation Gateway je v súlade so...