Table of Contents
Advertisement
Advertisement
Table of Contents

Related Manuals for Whirlpool ADP9000

Summary of Contents for Whirlpool ADP9000
- Page 1 ADP9000...
-
Page 2: Control Panel
For detailed operating method read the corresponding content on the instruction manual. Switch on the appliance Press the Power key-press to switch on the appliance. Open the door. Compartment With each wash cycle. Fill the detergent dispenser Compartment With pre-wash only. “... -
Page 3: Table Of Contents
Dear Customer, Please carefully read this manual bef ore using the dishwasher, it will help you to use and maintain the dishwasher properly. Keep it to refer to it at a later date. Control Panel...........2 Pass it on to any subsequent owner of the appliance. - Page 4 When using your dishwasher, follow the precautions listed below: Under certain conditions, Hydrogen gas may be produced in a hot-water system that has not been used for two weeks or more. HYDROGEN GAS IS EXPLOSIVE. If the hot-water system has not been used for such a period of time, before using the dishwasher turn on all the hot-water taps and let the water flow from each of them for several minutes.
- Page 5 To get the best performance from your dishwasher, read all operating instructions before using it for the first time. Display widow shows as foll ows: 1. Programs indicat ors: 2. Chi ld lock indicat or: 3. Rinse Aid indicator: 4. Del ay function indicator: 5.
-
Page 6: Rinse Aid Dispenser
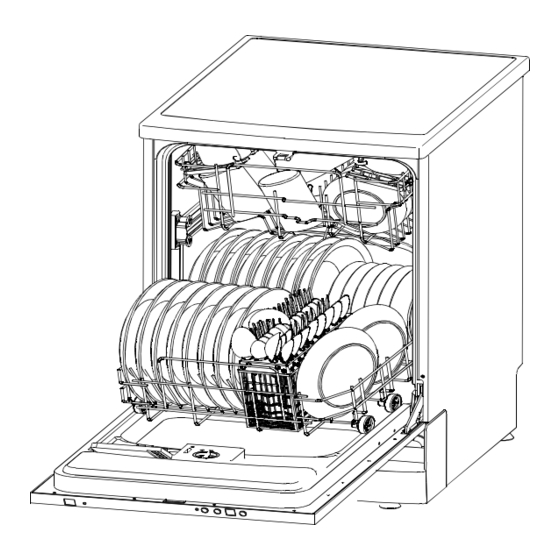
Front view Back View Upper Basket Cutl ery Bask et Drain hose connector Main F ilter Spray Arms Deterg ent Dispenser Water Inle t hose connector Coarse Filter Cup Shelf Rinse Aid Di spen ser Low er Basket Rinse Aid Dispenser The rinse aid is released during the final rinse to prevent water from forming droplets o n your dishes, which can leave spots and streaks. -
Page 7: Adjusting Rinse Aid Dispenser
As the rinse aid diminishes, the size of the black dot on the rinse aid level indicator changes, as illustrated below. Full 3 / 4 full 1 / 2 full 1 / 4 full - Should refill to eliminate spotting Empty To open the dispenser, turn the cap to the "open"... -
Page 8: Concentrated Detergent
Concentrated Detergent Based on th eir chemical composition, detergents can be split in two basic types: conventional , alkaline detergents with caustic components l ow alkaline concentrated detergents with natural enzymes “ ” The use of normal washing programs in combination with concentrated det ergents reduces poll ution and is g ood for your dishes;... -
Page 9: How To Use The All-In-1 Function
Use of All-in-1 Tablet Detergents These products are detergents with integrated and com bined detergent/ rinse aid and sal t functions. B efore using these products you should first check that t he water hardness in your su pply is co mp atibl e wi th the use of these products as per th e de terg ent manufacture r information on the prod uct packing. -
Page 10: Cutlery Basket
Consider buying utensils wh ich are ident ified as dishwasher-proof. Use a m ild detergen t that is describe d as 'kind to dish es'. If necessary, seek further informa tion from the detergent manufacturer. To prev ent damage, take glass and cutlery ou t of the dishwasher a s so on as possible after the program has ended. -
Page 11: Adjusting The Upper Basket
Th e upper b asket is designe d to hold more delica te and lighter dishware s uch as g lasses, coffee and tea cups and saucers, as we ll as plates, small bowls and shallow pans (as long as they are not too dirty ). - Page 12 We suggest that you place large items and items that are the most difficult to clean into the lower basket such as: pots, pans, lids, serving dishes and bowls, as shown in the figure below. It is preferable to place serving dishes and lids on the side of the racks in order to avoid blocking the rotation of the top spray arm.
- Page 13 ℃ Pre-wash(40 ) For all soiled loads, such as ℃ Autowash(50-60 ) pots, pans, casserole 5/27.5g Requir ed 120 ~170 1.1~1.4 10~13.5 Rinse dishes and dishes that have ℃ Rinse (70 ) baked on food. Auto Drying. ℃ Pre-wash(60 ) ℃...
- Page 14 Starting a cycle wash Open the door, draw out the lower and upper basket, load the dishes and push them back. It is recommended to load the lower basket first, then the upper one (see the section entitled “ ” Loading the Dishwasher ).
-
Page 15: Unloading The Dishwasher
Unloading the dishwasher It is normal that the dishwasher is wet in side. Empty the low er ba sket first and the n the up per one. Thi s wil l avoid water dripping fro m the upper basket onto the dis hes in the lower one. -
Page 16: Cleaning The Filter
The entire filter assembly should be cleaned at least once a week. Cleaning the Filter To cle an the f ilters, use a cleaning brush. R eassemble the filter parts as shown and re-insert t he entire assembly in the dish was her, position ing it in its seat and turn i t in clockwise direction. W hen cleaning the filters, do not knock on them. - Page 17 After Every Wash When not in Use for a LongTime It is recommended that you run a wash cycle with the After every wash, turn off the water supply to the dishwasher empty and then remove the plug from the appliance and leave the door slightly open so that socket, turn off the water supply and leave the door of moisture and odours are not trapped inside.
- Page 18 The a ppl iance must be conne cted to th e w ater mai ns using new hos e-sets. The o ld hose -sets sho uld not be re used. Water pressure must be between 0,04 MPa and 1 MPa. If the pressu re is below t he minimum consult our Service Department for advice.
-
Page 19: Water Outlet
Insert the drain hose into a drain pipe with a minimum diameter of 4 cm, or let it run into the sink, making sure to avoid bending or crimping. Use the special plastic support that comes with the appliance. The free end of the hose must be at a height between 40 and 100cm and must not be immersed in water. - Page 20 Fuse blown, or the Replace fuse or reset circuit breaker. Remove any other circuit breaker acted appliances sharing the same circuit with the dishwasher Power supply is not Make sure the dishwasher is turned on and the door is turned on closed securely.
-
Page 21: Wash Cycle Table
The dishes were not See notes in " Loading the Dishwasher ". loaded correctly. The programme was Select a more intensive programme. not adequate. See" Wash Cycle Table . " Not enough detergent Use more detergent, or change your detergent. was dispensed. -
Page 22: Water Connection
Height : 850mm Width : 600mm Depth : 610mm Voltage connected Load : see rating label Water pressure: 0.04-1.0MPa max 60 ℃ Hot water connection : Power supply: 230V-240V, 50Hz Capacity: 14 Place settings...