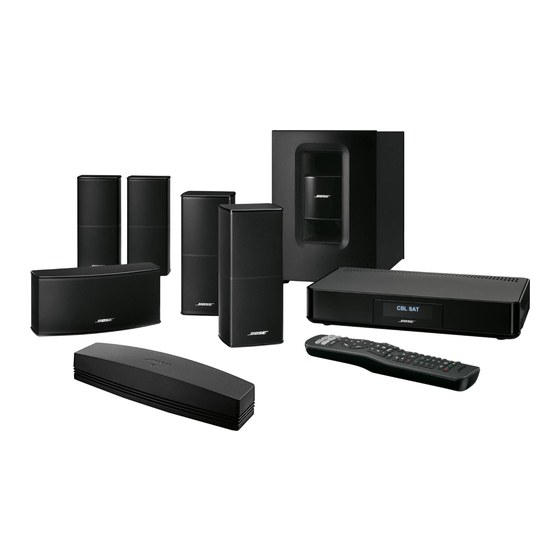
Bose CineMate 520 User Manual
Home theater system
Hide thumbs
Also See for CineMate 520:
- Owner's manual (100 pages) ,
- Quick start manual (2 pages) ,
- User manual (6 pages)
Table of Contents
Advertisement
Advertisement
Table of Contents

Related Manuals for Bose CineMate 520


Summary of Contents for Bose CineMate 520
- Page 2 ® CineMate home theater system...
-
Page 3: Important Safety Information
Important Safety Information Please read this owner’s guide carefully and save it for future reference. WARNINGS: CAUTIONS: WARNING: WARNING: NOTES: 2 - English... - Page 4 Important Safety Information Important Safety Instructions Note: English - 3...
- Page 5 Important Safety Information Names and Contents of Toxic or Hazardous Substances or Elements Toxic or Hazardous Substances and Elements Lead Mercury Cadmium Hexavalent Polybrominated Polybrominated (Pb) (Hg) (Cd) (CR(VI)) Biphenyl (PBB) diphenylether (PBDE) Please complete and retain for your records: ®...
-
Page 6: Table Of Contents
Introduction About your CineMate ® 520 home theater system ............7 System Features ......................7 ® Introducing SoundTouch™ from Bose ..............7 Unpacking the system ......................8 Placement guidelines ......................9 Sample system placement ..................9 ® Setting Up the Acoustimass Module Attaching the rubber feet to the Acoustimass module .......... - Page 7 Program the remote to control your source ............23 Source selection ........................24 ® Select a source connected to the Bose system ............ 24 Select a source connected to your TV ..............24 Universal source buttons and console connectors ............24 Adjusting the volume ......................
-
Page 8: About Your Cinemate ® 520 Home Theater System
• Simply add additional systems at any time for a multi-room listening experience. • Wide selection of Bose audio systems lets you choose the right solution for any room. English - 7... -
Page 9: Unpacking The System
The appropriate power cords for your region are supplied. Note: If part of the system is damaged, do not use it. Contact your authorized ® Bose dealer or Bose customer service. Refer to the contact sheet in the carton. 8 - English... -
Page 10: Placement Guidelines
Introduction Placement guidelines To avoid wireless interference, keep other wireless equipment away from the system. Place the system outside of and away from metal cabinets, away from other audio/video components and away from direct heat sources. ® Acoustimass • Stand the Acoustimass module on its rubber feet along the same wall module as your TV, or along any other wall in the front third of the room. -
Page 11: Attaching The Rubber Feet To The Acoustimass Module
® Setting Up the Acoustimass Module Attaching the rubber feet to the Acoustimass module Attach the rubber feet to the Acoustimass module to protect your floor. Turn the Acoustimass module upside down onto a soft surface to protect it from being damaged. Attach the rubber feet to the bottom of the Acoustimass module. -
Page 12: Setting Up The Acoustimass Module
® Setting Up the Acoustimass Module Connecting the Acoustimass module to power Plug the power cord into the connector on the Acoustimass module. Plug the power cord into an AC (mains) outlet. English - 11... -
Page 13: Setting Up The Speakers Connecting The Front Speakers
Setting Up the Speakers Connecting the front speakers Insert the front speaker cable’s L plug into the left speaker. Insert the front speaker cable’s C plug into the center speaker. Insert the front speaker cable’s R plug into the right speaker. Insert the other end of the front speaker cable into the 6-pin Speaker Connections connector on the console. -
Page 14: Connecting The Rear Speakers
Wall mounting the speakers You can mount the speakers on wall brackets, floor stands or table stands. To purchase these accessories, contact your local Bose dealer or visit www.Bose.com CAUTION: Do not use any other hardware to mount the speakers. -
Page 15: Setting Up The Console
Blu-ray Disc player or game system, from your TV. ® Insert one end of the Bose HDMI cable into the TV connector on the console. Insert the other end of the HDMI cable into your TV’s HDMI connector. Note: Use your TV’s HDMI connector labeled ARC or Audio Return Channel if available. -
Page 16: Tvs Without An Hdmi Arc Connector
Without this secondary connection, you may not hear audio from the ® Bose system. Use a secondary connection in the following configurations • You are using internal sources (such as Internet applications or an over-the-air antenna). -
Page 17: Connecting To Non-Hdmi Compatible Sources
Setting up the Console Connecting to non-HDMI compatible sources If your source is non-HDMI compatible, connect it to your TV using audio and video cables (available separately). Refer to your TV owner’s guide for more information. Tip: If your source has IN and OUT audio connector panels, use audio OUT. Audio-only sources If your audio-only source, such as a media or CD player, is non-HDMI compatible, connect it to the console’s optical, coaxial or analog connector. -
Page 18: Starting Up The System
Starting Up the System Installing the remote control’s batteries Slide open the battery compartment cover on the back of the remote control. Insert the two provided AA (IEC-LR6) 1.5V batteries. Match the + and – symbols on the batteries with the + and – markings inside the compartment. Slide the battery compartment cover back into place. -
Page 19: Finishing Setup Checking For Sound
® Check if sound is coming from the Bose speakers. Note: If you do not hear sound from the Bose speakers, see “Troubleshooting” on page 29. Press on the remote control. Check that no sound is coming from the TV speakers. -
Page 20: Running The Adaptiq Audio Calibration
Finishing Setup ® Running the ADAPTiQ audio calibration The ADAPTiQ audio calibration customizes the sound of the system to the acoustics of your listening area by taking five audio measurements. To perform an audio calibration, you need 10 minutes when the room is quiet. Put the ADAPTiQ headset on your head. -
Page 21: Using The System Remote Control Buttons
System menu. Toggles between ™ SoundTouch (available separately) connector Source selection Powers on/off the Selects a source ® Bose system connected to your TV Powers on/off a selected source Navigation pad Lists recorded Displays the Internet DVR programs... -
Page 22: Programming The Universal Remote Control
Using the System Programming the universal remote control You can use the remote to control your TV, cable/satellite box, DVD or Blu-ray ™ Disc player, game system, DVR or other auxiliary source. Consumer Electronics Control The system supports Consumer Electronics Control (CEC). CEC allows you to control multiple HDMI-connected sources without programming the remote. -
Page 23: Test Your Hdmi-Connected Sources For Cec
Test each of your sources for CEC using the remote control. Note: Your HDMI-connected source may not support CEC. Refer to your source owner’s guide for more information. ® Power off the Bose system. Prepare your source: • If you are testing your TV, power off your TV. -
Page 24: Program The Remote To Control Your Source
Using the System Program the remote to control your source If your source does not support CEC, you can program the remote to control your source. Power on your source. Locate the code for your source’s brand in the Universal Remote Device Codes book (provided). -
Page 25: Source Selection
You can switch between sources by pressing the appropriate source button on the remote control. Before you begin, program the remote to control your source (see page 23). Select a source connected to the Bose ® system If your source is connected to the console and does not use CEC, follow this procedure to set the console to the appropriate mode and turn on the source. -
Page 26: Adjusting The Volume
Programming a non-Bose remote control You can program a non-Bose remote control, such as your cable/satellite box remote, to control the system. Refer to your non-Bose remote control owner’s guide or cable/satellite website for instructions. -
Page 27: Getting System Information From The Display Understanding Messages On The Display
Getting System Information from the Display Understanding messages on the display The display on the front of the console allows you to access the System menu and shows system information and icons. Using the System menu Use the System menu to adjust audio levels, turn on/off features (such as AUTO OFF), change the language, set the coaxial, analog and optical inputs for a particular source, run ADAPTiQ ®... - Page 28 Getting System Information from the Display Display System state 9 SURROUND LEVEL Adjusts the volume of the rear speakers relative to front speakers. Changes the language on the console and ADAPTiQ ® 10 LANGUAGE 11 SET OPTICAL INPUT Sets the optical connector to Auto/TV (Default), CBL SAT, BD DVD, GAME or AUX source.
-
Page 29: Error Messages
The source is not connected to the connector on Nothing connected the console. ® ERROR Call Bose customer service. Refer to the contact Call Bose sheet in the carton. Acoustimass module status indicator The status indicator on the back of the Acoustimass module provides information on system activity. -
Page 30: Care And Maintenance
Care and Maintenance Troubleshooting Problem What to do ® No power • Secure the Acoustimass module’s and console’s power cords. • Reconnect the Acoustimass module’s and console’s power cords firmly into an AC (mains) outlet. • Use the remote control to power on the system. •... -
Page 31: If Your Console Cannot Find The Acoustimass Module
Care and Maintenance Problem What to do Poor or • Remove all protective films from the system. distorted • Secure all cable connections on the speakers, TV, and connected sources. sound • If you see the error message Cannot find Acoustimass: - Plug in the Acoustimass ®... -
Page 32: Factory Reset The System
Care and Maintenance Factory reset the system ® To troubleshoot problems, reset the System menu and ADAPTiQ to the factory settings. Press on the remote control. Press until 16 FACTORY RESET appears on the display. Press 5. The system resets. Run the ADAPTiQ audio calibration (see page 19). -
Page 33: Cleaning
Failure to register will not affect your limited warranty rights. The warranty information provided with this product does not apply in Australia and New Zealand. See our website at www.bose.com.au/warranty or www.bose.con.nz/warranty for details of the Australia and New Zealand warranty. Technical information ® Acoustimass... - Page 34 ©2014 Bose Corporation, The Mountain, Framingham, MA 01701-9168 USA AM715113 Rév. 00...