JVC RC-EX25S Instructions Manual
Jvc cd portable system instructions
Hide thumbs
Also See for RC-EX25S:
- Instructions manual (138 pages) ,
- Kayttoohje (26 pages) ,
- Service manual (4 pages)
Table of Contents
Advertisement
Available languages
Available languages
CD PORTABLE SYSTEM
CHAINE PORTABLE A CD
RC-EX25S
STANDBY/ON
DISPLAY
CD/
TUNER/
RANDOM
BAND
TAPE
CD PLAY
INTRO
STOP
/PAUSE
FM MODE
HBS/
+
CD REPEAT/
+
PRESET EQ
PRESET
MUTING
VOLUME
–
–
RM-SRCEX25A REMOTE CONTROL
INSTRUCTIONS
MANUEL D'INSTRUCTIONS
PUSH
REMOTE
DISPLAY
SENSOR
For Customer Use:
Enter below the Model No. and Serial No.
which are located on the rear of the
cabinet.
Retain this information for future reference.
Model No.
Serial No.
LVT1212-002A
[C]
Advertisement
Chapters
Table of Contents

Related Manuals for JVC RC-EX25S


Summary of Contents for JVC RC-EX25S
- Page 1 CD PORTABLE SYSTEM CHAINE PORTABLE A CD RC-EX25S STANDBY/ON RANDOM INTRO FM MODE CD REPEAT/ PRESET – RM-SRCEX25A REMOTE CONTROL INSTRUCTIONS MANUEL D’INSTRUCTIONS DISPLAY TUNER/ BAND TAPE CD PLAY STOP /PAUSE HBS/ PRESET EQ MUTING VOLUME – REMOTE SENSOR PUSH...
- Page 2 Warnings, Cautions and Others Mises en garde, précautions et indications diverses RISK OF ELECTRIC SHOCK DO NOT EXPOSE TO RAIN OR MOISTURE NE PAS EXPOSER À LA PLUIE NI À L'HUMIDITÉ ATTENTION:RISQUE DE CHOC ELECTRIQUE, NE PAS OUVRIR The lightning flash with arrowhead symbol, within an equilateral triangle is intended to alert the user to the presence of uninsulated “dangerous voltage”...
- Page 3 WARNING: TO REDUCE THE RISK OF FIRE OR ELECTRIC SHOCK, DO NOT EXPOSE THIS APPLIANCE TO RAIN OR MOISTURE. For Canada/pour le Canada CAUTION: TO PREVENT ELECTRIC SHOCK, MATCH WIDE BLADE OF PLUG TO WIDE SLOT, FULLY INSERT. ATTENTION: POUR EVITER LES CHOCS ELECTRIQUES, INTRODUIRE LA LAME LA PLUS LARGE DE LA FICHE DANS LA BORNE CORRESPONDANTE DE LA PRISE ET POUSSER JUSQUAU FOND.
-
Page 4: Table Of Contents
TURNING THE UNIT ON/OFF ... 6 SETTING THE CLOCK ... 7 FEATURES 1 Portable system incorporating CD player • CD functions can be operated with the remote control unit as well as on the main unit. • 8-cm CD playback capability 2 Digital LCD (Liquid Crystal Display) indicates general playback status. -
Page 5: Handling Precautions
HANDLING PRECAUTIONS Do not use this unit in direct sunlight or leave the unit in a closed automobile (or yacht, etc.) where it would be exposed to high temperatures above 40°C. 1 Avoid using the unit in the following places: •... -
Page 6: Power Supply
AC IN CAUTIONS: • Use only with the JVC power cord provided with this unit to avoid malfunction or damage to the unit. Remove batteries when using the power cord. • Be sure to unplug the power cord from the outlet when going out or when the unit is not in use for an extended period of time. -
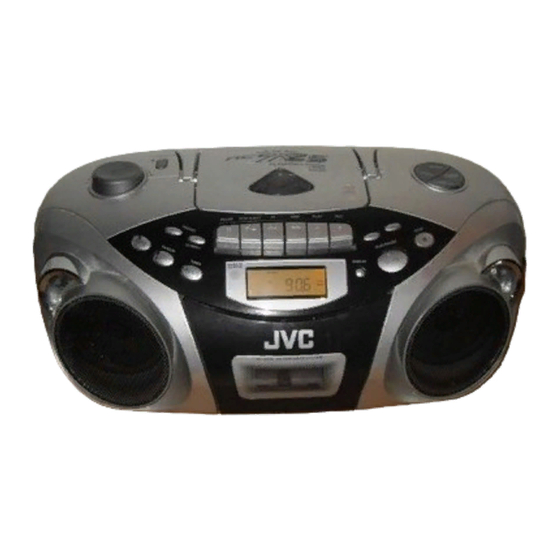
Page 7: Names Of Parts And Controls
NAMES OF PARTS AND CONTROLS Top and front sides 1 VOLUME knob 2 STANDBY/ON button 3 PRESET – button PRESET + / CD REPEAT button 4 Tape operation buttons PAUSE 8 button STOP/EJECT § button FF 1 button REW ¡ button PLAY 2 button REC ¶... -
Page 8: Remote Control Unit
Rear side 16 Telescopic antenna 17 RESET button 18 BEAT CUT switch 19 PHONES jack Connect stereo mini headphones (3.5-mm diameters, impedance of 16 to 32 ) to this jack. The speaker output is switched off with headphones connected. REMOTE CONTROL UNIT Installing batteries 1 Remove the battery cover from the back of the remote control unit. -
Page 9: Turning The Unit On/Off
Names of buttons STANDBY/ON DISPLAY TUNER/ BAND TAPE RANDOM CD PLAY INTRO STOP /PAUSE FM MODE HBS/ CD REPEAT/ PRESET EQ PRESET VOLUME MUTING – – TURNING THE UNIT ON/OFF STANDBY/ON STANDBY/ON STANDBY/ON button Press the STANDBY/ON button on the unit to turn on and off the unit. -
Page 10: Setting The Clock
SETTING THE CLOCK Before operating the unit any further, first set the clock built in this unit. The clock uses 12-hour indication. “AM 12:00” indicates midnight, and “PM 12:00” indicates noon. 1 Press STANDBY/ON to turn off the unit, if it is turned on. -
Page 11: Adjusting The Sound
ADJUSTING THE SOUND PHONES (on the rear) VOLUME Adjusting the volume Turn VOLUME clockwise to increase the volume or counterclockwise to decrease it. You can press VOLUME + or VOLUME – on the remote control unit to increase or decrease the volume respectively. -
Page 12: Playing Compact Discs
PLAYING COMPACT DISCS Notes on compact discs This unit has been designed only to play back the following CDs. • Digital audio CD • Recordable digital audio CD (CD-R) • Rewritable digital audio CD (CD-RW) When playing a CD-R or CD-RW You can play back finalized CD-R or CD-RW recorded in music CD format. -
Page 13: Basic Operation
Basic operation 1 Press CD/RANDOM to enter CD mode, if the unit is in TUNER or TAPE mode. You can press CD/RANDOM on the remote control unit to enter CD mode. 2 Press ) PUSH to open the disc door. 3 Load a disc with the label side facing up and close the disc door. - Page 14 Skipping • To skip back to the previous track During playback, press 4 once to return to the beginning of the current track, press twice to skip back to the beginning of the previous track. • To skip to the next track During playback, press ¢...
-
Page 15: Programmed Playback
Programmed playback Up to 20 tracks can be programmed to play in any desired order. Note: There is a time limit in doing the following steps. If the setting is canceled before you finish, start from step 2 again. 1 Press CD/RANDOM to enter CD mode. You can press CD/RANDOM on the remote control unit to enter CD mode. - Page 16 Playing back introductions – Intro playback Every track or every programmed track of a CD can be played for the beginning ten seconds. Press INTRO. The INTRO indicator appears in the display window and intro playback starts. To use intro playback for programmed and random playback, press the button after starting playback.
-
Page 17: Radio Reception
RADIO RECEPTION Tuning in a station 1 Press BAND/TUNER to enter the tuner mode. 2 Press BAND/TUNER to select the band, FM or 3 Press and hold 4 or ¢ for more than 1 second. The unit starts searching and stops when a station of sufficient signal strength is tuned in. -
Page 18: Presetting Stations
Presetting stations You can preset 10 FM and 10 AM stations. There is a time limit in doing the following steps. If the setting is canceled before you finish, start from step 3 again. Note: In some cases, test frequencies have been already memorized for the tuner since the factory examined the tuner preset function before shipment. -
Page 19: Cassette Playback
CASSETTE PLAYBACK Notes on cassette tapes • Use only type-I normal tapes. The recording/playback characteristics of this unit are those for normal tapes, which have different characteristics from CrO metal tapes. • The use of tapes longer than 120 minutes is not recommended, since characteristic deterioration may occur and these tapes easily jam in the pinch roller and the capstan. - Page 20 Basic operation 1 Press TAPE to enter the tape mode. 2 Load a cassette. Use only a type-I normal tape. 3 Press PLAY 2 to start playback. 4 Adjust the volume. To stop playback Press STOP/EJECT §. The tape also stops when it reaches the end. PUSH REMOTE DISPLAY...
-
Page 21: Recording
RECORDING Basic operation Standard recording 1 Prepare the recording source. • When recording from the radio: Set to the tuner mode and tune in a desired station. • When recording from a CD: Set to the CD mode and load a CD. 2 Load a blank or erasable cassette. - Page 22 Synchronized recording with CD playback You can make the CD player to start playback when the tape deck enters the recording mode. 1 Load a cassette. Use only a type-I normal tape. 2 Load a CD. 3 Press CD/RANDOM to enter CD mode.
-
Page 23: Maintenance
MAINTENANCE Cleaning the heads, capstan and pinch roller Cleaning is important! When the tape is running, magnetic powder and dust naturally accumulate on the heads, capstan and pinch roller. When they become too dirty; • Sound quality deteriorates. • The sound output level drops. •... -
Page 24: Troubleshooting
TROUBLESHOOTING • If you are having a problem with your unit, check this list for a possible solution before calling for service. Symptom Power cannot be turned on. When PLAY 2 is pressed, tape does not move. Playback sound is at a very low level. REC ¶... -
Page 25: Specifications
SPECIFICATIONS CD player CD capacity : 1 CD Signal-to-noise ratio : 75 dB Dynamic range : 60 dB Tuner Frequency range : FM 87.5 – 108.0 MHz AM 530 – 1 710 kHz Antennas : Telescopic antenna for FM Ferrite core antenna for AM... - Page 26 TABLE DES MATIÈRES CARACTÉRISTIQUES ... 1 CONSIGNES DE SÉCURITÉ ... 1 CONSIGNES D’UTILISATION ... 2 ALIMENTATION ... 3 DESCRIPTION ET COMMANDES ... 4 TÉLÉCOMMANDE ... 5 ALLUMER ET ÉTEINDRE L’UNITÉ ... 6 RÉGLAGE DE L’HORLOGE ... 7 CARACTÉRISTIQUES 1 Chaîne portable avec lecteur CD •...
-
Page 27: Consignes D'utilisation
CONSIGNES D’UTILISATION N’exposez pas cette unité aux rayons directs du soleil ou ne laissez pas cette unité dans une voiture fermée (ou dans un bateau, etc.) où elle serait exposée à des températures supérieures à 40°C. 1 Évitez d’utiliser cette unité dans les lieux suivants: •... -
Page 28: Alimentation
éviter un disfonctionnement ou des dommages à l’unité. • Quand le cordon d’alimentation JVC fourni avec l’unité est raccordé, l’alimentation passe automatiquement des piles à l’alimentation secteur, même quand des piles sont installées. -
Page 29: Description Et Commandes
DESCRIPTION ET COMMANDES Faces supérieure et avant 1 Bouton VOLUME 2 Touche STANDBY/ON 3 Touche PRESET – Touche PRESET + / CD REPEAT 4 Touches de commande cassette Touche PAUSE 8 Touche STOP/EJECT § Touche FF 1 Touche REW ¡ Touche PLAY 2 Touche REC ¶... -
Page 30: Télécommande
Face arrière 16 Antenne téléscopique 17 Touche RESET 18 Interrupteur BEAT CUT 19 Prise PHONES Raccordez des mini-écouteurs stéréo (diamètre 3,5- mm, impédance entre 16 et 32 ) à cette prise. La sortie des enceintes est désactivée si des écouteurs sont raccordés. -
Page 31: Allumer Et Éteindre L'unité
Noms des touches STANDBY/ON DISPLAY TUNER/ RANDOM BAND TAPE CD PLAY INTRO STOP /PAUSE FM MODE HBS/ CD REPEAT/ PRESET EQ PRESET VOLUME MUTING – – ALLUMER ET ÉTEINDRE L’UNITÉ STANDBY/ON STANDBY/ON Touche STANDBY/ON Appuyez sur la touche STANDBY/ON pour allumer et éteindre l’unité. Vous pouvez aussi appuyer sur la touche STANDBY/ON de la télécommande. -
Page 32: Réglage De L'horloge
RÉGLAGE DE L’HORLOGE Avant d’utiliser davantage cette unité, réglez d’abord l’horloge intégrée à cette unité. L’horloge utilise un affichage sur 12 heures. “AM 12:00” signifie minuit et “PM 12:00” signifie midi. 1 Appuyez sur STANDBY/ON l’unité, si elle était allumée. L’horloge clignote à... -
Page 33: Ajuster Le Son
AJUSTER LE SON PHONES (on the rear) PHONES (à l’arriere) VOLUME Pour ajuster le son Tournez VOLUME dans le sens des aiguilles d’une montre pour monter le volume ou dans le sens inverse pour le baisser. Vous pouvez appuyez sur VOLUME + ou VOLUME – sur la télécommande pour monter ou baisser le volume respectivement. -
Page 34: Lecture De Disques Compacts
LECTURE DE DISQUES COMPACTS Remarques sur les disques compacts Cette unité a été conçue uniquement pour lire les CD suivants. • CD audio numérique • CD audio numérique enregistrable (CD-R) • CD audio numérique réinscriptible (CD-RW) Pendant la lecture CD-R ou CD-RW Vous pouvez lire vos CD-R ou CD-RW clôturés qui sont enregistrés au format CD musical. -
Page 35: Fonctionnement De Base
Fonctionnement de base 1 Appuyez sur CD/RANDOM pour entrer dans le mode CD, si l’unité est dans le mode TUNER ou TAPE. Vous pouvez appuyer sur CD/RANDOM sur la télécommande pour entrer dans le mode CD. 2 Appuyez sur ) PUSH pour ouvrir le logement du disque. - Page 36 Changement de piste • Pour revenir à la piste précédente Pendant la lecture, appuyez sur 4 une fois pour revenir au début de la piste en cours, appuyez deux fois pour revenir au début de la piste précédente. • Pour aller à la piste suivante Pendant la lecture, appuyez sur ¢...
- Page 37 Lecture programmée Vous pouvez programmer un maximum de 20 pistes à lire dans n’importe quel ordre souhaité. Remarque: Il existe une limite de temps pour effectuer les étapes suivantes. Si le réglage est annulé avant d’avoir fini, recommencez à partir de l’étape 2. 1 Appuyez sur CD/RANDOM pour entrer dans le mode CD.
- Page 38 Lecture des introductions – Lecture intro Chaque piste ou chaque piste programmée d’un CD peut être lue pendant les dix premières secondes. Appuyez sur INTRO. L’indicateur INTRO apparaît à la fenêtre d’affichage et la lecture intro démarre. Pour utiliser la lecture intro avec la lecture programmée ou aléatoire, appuyez sur la touche après avoir lancé...
-
Page 39: Réception Radio
RÉCEPTION RADIO Réglage d’une station 1 Appuyez sur BAND/TUNER pour entrer dans le mode tuner. 2 Appuyez sur BAND/TUNER pour sélectionner la bande, FM ou AM. 3 Appuyez et maintenez 4 ou ¢ pendant plus de 1 seconde. L’unité commence à chercher et s’arrête quand une station avec une force de signal suffisante est trouvée. - Page 40 Préréglage des stations Vous pouvez prérégler 10 stations FM et 10 stations AM. Il existe une limite de temps pour effectuer les étapes suivantes. Si le réglage est annulé avant d’avoir fini, recommencez à partir de l’étape 3. Remarque: Dans certains cas, des fréquences de test ont été déjà mémorisées dans le tuner car l’usine a examiné...
-
Page 41: Lecture De Cassettes
LECTURE DE CASSETTES Remarques sur les bandes cassettes • Utilisez uniquement des bandes normales de type I. Les caractéristiques d’enregistrement/lecture de cette unité sont celles prévues pour les bandes normales, qui ont des caractéristiques différentes des bandes CrO métal. • L’utilisation de bandes plus longues que 120 minutes n’est pas recommandée, car une détérioration caractéristique peut se produire et ces bandes sautent facilement hors des galets d’entraînement et du... - Page 42 Fonctionnement de base 1 Appuyez sur TAPE pour entrer dans le mode cassette. 2 Insertion d’une cassette. Utilisez uniquement une bande normale de type I. 3 Appuyez sur PLAY 2 pour lancer la lecture. 4 Ajustez le volume. Pour arrêter la lecture Appuyez sur STOP/EJECT §.
-
Page 43: Enregistrement
ENREGISTREMENT Fonctionnement de base Enregistrement standard 1 Préparez la source d’enregistrement. • Si l’enregistrement provient de la radio: Réglez le mode tuner et syntonisez la station souhaitée. • Si l’enregistrement provient d’un CD: Réglez le mode CD et insérez le CD. 2 Insérez une cassette vierge ou effaçable. - Page 44 Enregistrement synchronisé avec la lecture d’un CD Vous pouvez faire en sorte que le lecteur CD lance la lecture lorsque la platine cassette démarre le mode enregistrement. 1 Insérez une cassette. Utilisez uniquement une bande normale de type I. 2 Insérez un CD. 3 Appuyez sur CD/RANDOM pour entrer dans le mode CD.
-
Page 45: Entretien
ENTRETIEN Nettoyage des têtes, du cabestan et du galet d’entraînement Le nettoyage est important! Lorsqu’une bande défile, il est naturel que de la poudre magnétique et de la poussière s’accumulent sur les têtes, le cabestan et le galet d’entraînement. S’ils deviennent trop sales, •... -
Page 46: Dépannage
DÉPANNAGE • Si vous avez un problème avec votre unité, vérifiez la présence dans cette liste d’une solution éventuelle avant d’appeler le service après-vente. Symptôme L’unité ne s’allume pas. Quand PLAY 2 est enfoncé, la cassette ne défile pas. Le son en lecture est très bas. REC ¶... -
Page 47: Spécifications
SPÉCIFICATIONS Lecteur CD Capacité de CD : 1 CD Rapport signal-bruit : 75 dB Plage dynamique : 60 dB Tuner Gamme de fréquence : FM 87,5 – 108,0 MHz AM 530 – 1 710 kHz Antennes : Antenne téléscopique pour FM Antenne ferrite pour AM Platine cassette Réponse en fréquence... - Page 48 EN, FR © 2004 Victor Company of Japan, Limited 0504MZMBICORI...