Table of Contents
Advertisement
Quick Links
Advertisement
Table of Contents

Related Manuals for Geemarc AMPLIPOWER60+


Summary of Contents for Geemarc AMPLIPOWER60+
- Page 2 Caution: This telephone product is specifically designed for people with hearing difficulties and is provided with a handset earpiece volume control for individual requirements. Due care must be taken by all users that the handset earpiece volume control is set to the lowest level acceptable by each respective user. Care should therefore be exercised to ensure that any new users are familiar with this requirement.
-
Page 3: Table Of Contents
CONTENTS INSTRUCTIONS DESCRIPTION SETTING UP - Connecting the telephone - Alarm and ring options - Ringer settings - Tone/Pulse switch (T/P) - Time break recall switch (600/100) - Hotel message waiting switch - Wall mounting USING THE PHONE - Answering incoming calls - Volume and tone receiving - Making a call - Last number redial... -
Page 4: Instructions
Its is important that you read the instructions below in order to use your Geemarc telephone to its full potential. Keep this user guide in a safe place for future reference. -
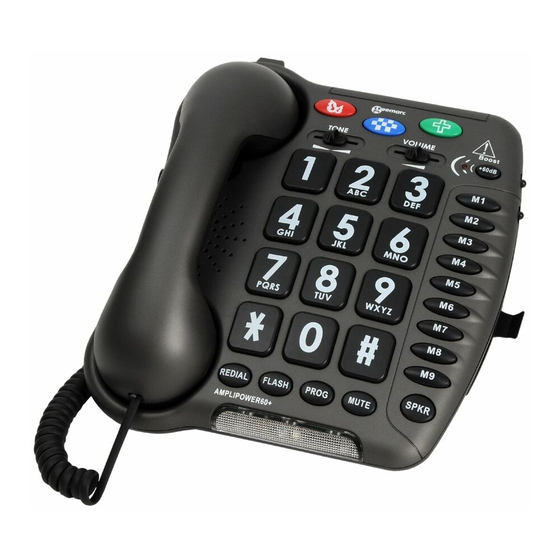
Page 5: Description
DESCRIPTION Tone and volume adjustment automatically Hotel message switch activated each time you hang-up the phone Shaker socket (*) 12 V DC adaptor socket Line socket Headset socket (*) 3 priority numbers Tone reception Key to activate tone adjustment and volume adjustment function Ringer level adjustment... -
Page 6: Setting Up
SETTING UP 1 - CONNECTING THE TELEPHONE - Connect the handset cord - Open the battery door by unscrewing the retaining screw. Insert 4 x AAA alkaline batteries. Snap the battery door in place. In case of power failure, batteries are required for the ring. - Connect the line cord . -
Page 7: Tone/Pulse Switch (T/P)
SETTING UP Middle High Melody 1 Melody 2 6 (by default) Melody 3 If you don’t like the ringer melody,you can choose a new one by changing the settings as follow: - Lift the handset. - Press PROG button. - Press button. -
Page 8: Wall Mounting
SETTING UP 7 - WALL MOUNTING To wall-mount your telephone,slide out the clip, turn around and slide back into the wall mounting position (located in the base unit, just below the ear piece).This will ensure that the handset stays firmly in position. Make 2 holes in the wall 80mm apart, insert the wall plugs and the wall mounting screws. -
Page 9: Using The Phone
USING THE PHONE 1 - ANSWERING INCOMING CALL Without headset: - When an incoming call is received, the phone will ring, to answer the call lift the handset and speak. - On completion of the call, carefully replace the handset in the cradle to release the line. -
Page 10: Making A Call
USING THE PHONE When this button is set to OFF only the volume can be adjusted from 0dB to 20dB. Tone Treble Bass +10dB max +10dB max Normal ™ AMPLIPOWER60+ Volume Normal 20dB 60dB 20dB * press button +60dB 3 - MAKING A CALL Without headset: - Lift the handset. -
Page 11: Last Number Redial
USING THE PHONE In handsfree mode - Press the SPKR button. - Await the dial tone and dial required number. - On completion of the call, press the SPKR button to release the line. - If your correspondent doesn’t answer your call, press the SPKR button again to release the line. -
Page 12: Storing Telephone Numbers
USING THE PHONE 7 - STORING TELEPHONE NUMBER Your phone can store 12 direct memories including 3 priorities numbers (21 digits maximum for each memory). For example, the 3 priority memories allow you to store the 3 numbers below: It is recommended to - Local,Police station, store these numbers - Your doctor... -
Page 13: Regulatory Compliance
REGULATORY COMPLIANCE - This equipment complies with Part 68 of the FCC rules and the require- ments adopted by the ACTA. On the bottom of this equipment is a label that contains, among other information, a product identifier in the format US:AAAEQ##TXXXX. - Page 14 REGULATORY COMPLIANCE NOTE: This equipment has been tested and found to comply with the limits for a Class B digital device, pursuant to Part 15 of the FCC Rules. These limits are designed to provide reasonable protection against harmful interference in a residential installation.
-
Page 15: Guarantee
GUARANTEE Sonic Alert warrants the phone against any defect in materials or workman- ship for the period of one year from the date of purchase. Should you experience a problem, contact our customer service depart- ment. Be sure to save your sales receipt as proof of purchase date should you need warranty service. - Page 16 GUARANTEE Sonic Alert shall not be responsible for loss of time, inconvenience, property damage caused by your phone or any other accidental or consequential damages Warranty service is available only with proof of purchase. Simply send the AMPLIPOWER60+™ (postpaid) and a copy of your sales slip as proof of purchase to: Sonic Alert Inc., 1050 E.