Table of Contents
Advertisement
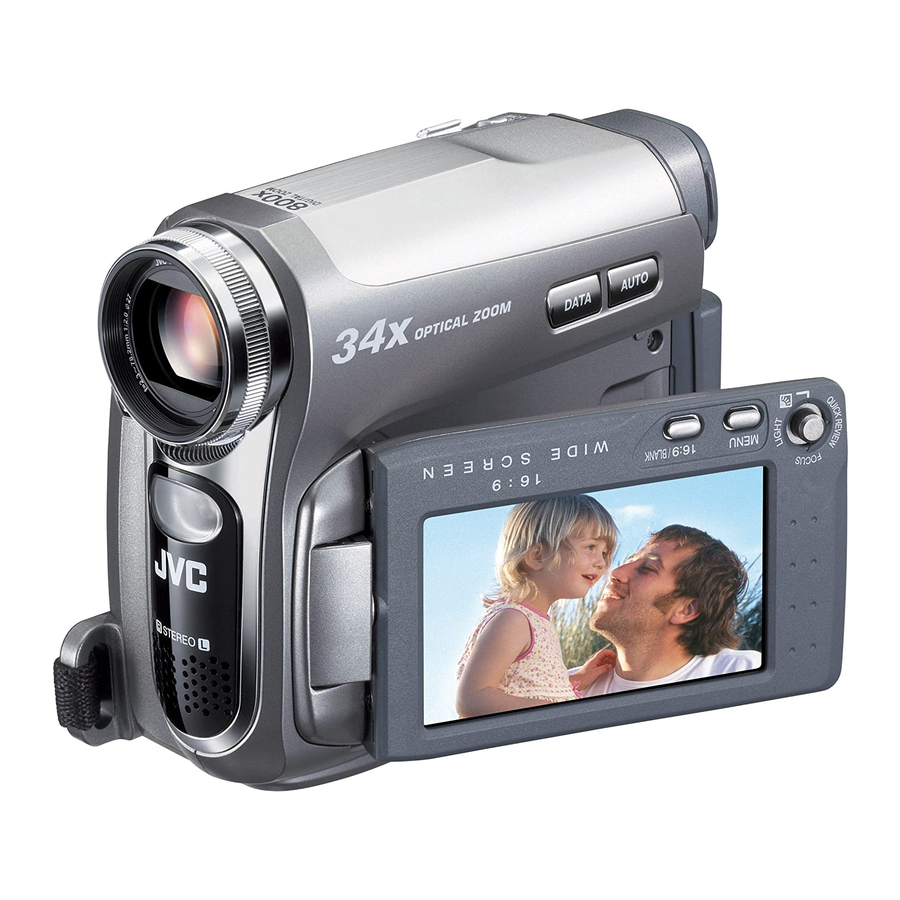
DIGITAL VIDEO CAMERA
GR-D770U
INSTRUCTIONS
Dear Customer,
Thank you for purchasing this digital
video camera. Before use, please
read the safety information and
precautions contained in the pages
3 – 5 to ensure safe use of this
product.
GETTING STARTED
RECORDING & PLAYBACK
DIGITAL STILL CAMERA
(D.S.C.) RECORDING &
PLAYBACK
ADVANCED FEATURES
REFERENCES
TERMS
For Customer Use:
Enter below the Model No. and
Serial No. which is located on the
bottom of the camcorder. Retain
this information for future reference.
Model No.
Serial No.
To deactivate the demonstration,
set "DEMO MODE" to "OFF".
(
pg. 29, 32)
LYT1652-001B
ENGLISH
7
18
24
29
42
48
Advertisement
Table of Contents

Related Manuals for JVC GR-D770U


Summary of Contents for JVC GR-D770U
-
Page 1: Digital Video Camera
DIGITAL VIDEO CAMERA GR-D770U INSTRUCTIONS Dear Customer, Thank you for purchasing this digital video camera. Before use, please read the safety information and precautions contained in the pages 3 – 5 to ensure safe use of this product. ENGLISH GETTING STARTED RECORDING &... - Page 2 Major Features of this Camcorder Wipe/Fader Effects You can use the Wipe/Fader Effects to make pro-style scene transitions. pg. 38) Fade out Program AE, Effects and Shutter Effects For example, “SPORTS” mode allows fast- moving images to be captured one frame at a time, for vivid, stable slow-motion.
-
Page 3: Read This First
SDHC Memory Card cannot be used with this camcorder. Remember that this camcorder is not compatible with other digital video formats. It is recommended that you use JVC brand cassette tapes. Your camcorder is compatible with all brands of commercially available cassette tapes... -
Page 4: Safety Precautions
This product includes patented and other proprietary technology and will operate only with JVC Data Battery. Use the JVC BN-VF808U/VF815U/VF823U battery packs and, to recharge them or to supply power to the camcorder from an AC outlet, use the provided multi-voltage AC Adapter. - Page 5 When using a cleaner or chemically treated cloth refer to the cautions of each product. To clean the viewfinder, please consult your nearest JVC dealer. USE CLEANING CASSETTE Appears if dirt is detected on the heads during recording. Use an optional cleaning cassette...
-
Page 6: Table Of Contents
CONTENTS GETTING STARTED Regarding This Manual ...7 Provided Accessories ...7 Index...8 Grip Adjustment...12 Power ...13 Language Settings...14 Date/Time Settings ...15 Viewfinder Adjustment...15 Brightness Adjustment Of The Display...15 Tripod Mounting...15 Loading/Unloading A Cassette ...16 Loading/Unloading A Memory Card ...17 16:9 Wide Mode ...17 RECORDING &... -
Page 7: Getting Started
Regarding This Manual Control Lever LCD Monitor Control lever There are two kinds of operation using the control lever: moving the lever towards up/down/left/right, or pressing down the lever. They are described and illustrated as shown below. 1) Move the control lever up/down/left/right (3/4/1/2) to select: Select Operation... -
Page 8: Index
GETTING STARTED Index How to open the LCD monitor Pull on the end A of the LCD monitor. The LCD monitor can rotate 270°. Power-linked operation When the power switch is set to “REC”, you can also turn the camcorder on/off by opening/ closing the LCD monitor or pulling out/pushing in the viewfinder. - Page 9 Controls 11 : Left/Rewind (1) ( pg. 21)/ Quick Review [QUICK REVIEW] ( 2 : Right/Fast-Forward (¡) ( LED Light [LIGHT] ( pg. 34) 3 : Up/Play/Pause (6) ( Manual Focus [FOCUS] ( 4 : Down/Stop (7) ( pg. 21)/ Backlight Compensation [ Spot Exposure ( pg.
- Page 10 GETTING STARTED LCD Monitor/Viewfinder Indications During Video Recording Only 16:9 SOUND 12 B I T 15:55 1Tape Running Indicator (Rotates while tape is running.) 2Selected Wide Mode Indicator ( (only 16:9 indicator is displayed) 3Recording Speed Mode (SP/LP) ( (only LP indicator is displayed) 4Tape Remaining Time ( 5REC: (Appears during recording.) pg.
- Page 11 During Video Playback B I T BLANK SEARCH PUSH "STOP" BUTTON TO CANCEL 2 0 : D E C 1Battery Remaining Power Indicator 2Sound L/R Indicator ( pg. 33) 3Blank Search Indicator ( 4Tape Speed (SP/LP) ( pg. 33) (only LP indicator is displayed) 5Variable Search Speed Indicator: x-10, x-3, x3 and x10 ( pg.
-
Page 12: Grip Adjustment
GETTING STARTED How To Attach The Lens Cap To protect the lens, attach the provided lens cap to the camcorder as shown in the illustration. NOTE: To confirm the lens cap is on correctly make sure the cap is flush to the camcorder. Place here during shooting. -
Page 13: Power
Power Charging The Battery Pack POWER/CHARGE Lamp Battery pack mount Arrow Battery pack BATT. Power Switch Lock Button To AC outlet Set the Power Switch to “OFF”. With the arrow on the battery pack pointing upward, push the battery pack slightly against the battery pack mount 1. -
Page 14: Language Settings
DATA several times, there may be a problem with your battery. In such a case, consult your nearest JVC dealer. Using AC Power Viewfinder on Perform step 4 – 5 in “Charging The Battery 2 hrs. -
Page 15: Date/Time Settings
Date/Time Settings Select CLOCK ADJ. MONTH. DATE. YEAR JAN. 03. 2007 02 : 10 AM The date/time is recorded onto the tape at all times, but its display can be turned on or off. pg. 32, 33) Perform steps 1 – 3 in “Language Settings” pg. -
Page 16: Loading/Unloading A Cassette
GETTING STARTED Loading/Unloading A Cassette The camcorder needs to be powered up to load or eject a cassette. PUSH Cassette holder cover OPEN/ EJECT Cassette holder Make sure the window side is facing out. Slide and hold OPEN/EJECT in the direction of the arrow, then pull the cassette holder cover open until it locks. -
Page 17: Loading/Unloading A Memory Card
Loading/Unloading A Memory Card Card Cover ( Memory card (Optional) Make sure the camcorder’s power is off. Open the card cover ( To load a memory card, firmly insert it with its clipped edge first. To unload a memory card, push it once. After the memory card comes out of the camcorder, pull it out. -
Page 18: Recording & Playback
VIDEO RECORDING Basic Recording NOTE: Before continuing, perform the procedures listed below: Power ( pg. 13) Loading A Cassette ( pg. 16) Remove the lens cap. ( Open the LCD monitor fully. Select videos at 4:3 size or 16:9 (wide) size. pg. -
Page 19: Zooming
Zooming While recording Zoom out W: Wide angle You can zoom in up to 34X by using the optical zoom. Zoom magnification over 34X is done through digital image processing, and is therefore called digital zoom. Digital zooming is possible up to 800X. -
Page 20: Time Code
VIDEO RECORDING Time Code During recording, a time code is recorded on the tape. This code is to confirm the location of the recorded scene on the tape during playback. Display Minutes Seconds Frames* (30 frames = 1 second) 12 : 34 : 24 * Frames are not displayed during recording. -
Page 21: Video Playback
Normal Playback VOL. +/– VIDEO/ MEMORY BLANK ¡ ¡ ¡ ¡ MENU Speaker Load a cassette. ( pg. 16) Set the VIDEO/MEMORY Switch to “VIDEO”. Set the Power Switch to “PLAY” while pressing down the Lock Button located on the switch. -
Page 22: Variable Shuttle Search
VIDEO PLAYBACK Variable Shuttle Search Allows variable-speed search in either direction during video playback. 1) During playback, press ¡ once or twice for forward search, or 1 once or twice for reverse search. x-10 2) To resume normal playback, press 6. During playback, press and hold The search continues as long as you hold the button. -
Page 23: Connections To A Tv Or Vcr
Connections To A TV Or VCR To AV connector Audio/Video cable (provided) 1Yellow to VIDEO IN (Connect when your TV/ VCR has only A/V input connectors.) 2Red to AUDIO R IN* 3White to AUDIO L IN* * Not required for watching still images only. Make sure all units are turned off. -
Page 24: D.s.c. Recording
D.S.C. RECORDING Basic Shooting (D.S.C. Snapshot) You can use your camcorder as a Digital Still Camera for taking snapshots. Still images are stored in the memory card. NOTE: Before continuing, perform the procedures listed below: Power ( pg. 13) Loading a Memory Card ( Remove the lens cap. -
Page 25: D.s.c. Playback
Normal Playback Of Images Images shot with the camcorder are automatically numbered, then stored in numerical order in the memory card. You can view the stored images, one at a time, much like flipping through a photo album. VIDEO/MEMORY [PLAY] , 3 3 3 3 2 2 2 2 1 1 1 1... -
Page 26: Additional Features For D.s.c
ADDITIONAL FEATURES FOR D.S.C. Resetting The File Name By resetting the file name, a new folder will be made. The new files you are going to make will be stored in the new folder. It is convenient to separate the new files from previously made files. -
Page 27: Deleting Files
Deleting Files Previously stored files can be deleted either one at a time or all at once. Perform steps 1 – 3 in “Normal Playback Of Images” ( pg. 25). Press MENU. Select “DELETE”, press SET . The DELETE Menu appears. -
Page 28: Initializing A Memory Card
ADDITIONAL FEATURES FOR D.S.C. To Print By Selecting Still Images And Number Of Prints Perform steps 1 – 3 in “To Print All Still Images (One Print For Each)” ( Select “CURRENT”, press SET or . The DPOF screen appears. Press to select the desired file. -
Page 29: Advanced Features
Changing The Menu Settings This camcorder is equipped with an easy-to- use, on-screen menu system that simplifies many of the more detailed camcorder settings. pg. 29 – 33) VIDEO/MEMORY Power Switch Select MENU For Video and D.S.C. Recording Menus: Set the VIDEO/MEMORY Switch to “VIDEO” or “MEMORY”. -
Page 30: Recording Menus
MENUS FOR DETAILED ADJUSTMENT In the following pages, [ ] refers to Factory preset settings. Recording Menus FUNCTION The following menu settings can be changed only when the Power Switch is set to “REC”. Each setting (except “EFFECT” and “SHUTTER”) which is set in Video Recording Menu is also applied in the D.S.C. - Page 31 GAIN UP OFF: Allows you to shoot dark scenes with no picture brightness adjustment. [AGC]: The overall appearance may be grainy, but the image is bright. AUTO : The shutter speed is automatically adjusted. Shooting a subject in low or poor lighting at slow shutter speed provides a brighter image than in the AGC mode, but the subject’s movements are not smooth or natural.
- Page 32 MENUS FOR DETAILED ADJUSTMENT DISPLAY The “DISPLAY” settings (except “CLOCK ADJ.”, “16:9 OUTPUT” and “BRIGHT”) are effective only for shooting. ON SCREEN LCD: Keeps the camcorder’s display (except the date, time and time code) from appearing on the connected TV screen. [LCD/TV]: Makes the camcorder’s display appear on screen when the camcorder is connected to a TV.
-
Page 33: Playback Menus
Playback Menus The settings below are effective only for video playback except “REC MODE”. The parameters (except “SOUND L/R”, “[T] ➝ [M] COPY” and “NARRATION” settings) are the same as in the description on page 31. SOUND L/R and NARRATION During tape playback, the camcorder detects the sound mode in which the recording was made, and plays the sound back. -
Page 34: Features For Recording
FEATURES FOR RECORDING LED Light LED Light can be used to brighten the subject in the dark place during video recording or D.S.C. shooting. LIGHT Press LIGHT repeatedly to change the setting. The light is on always. ( The light turns on automatically when dark. -
Page 35: Manual Focus
Manual Focus The camcorder’s Full Range AF system offers continuous shooting ability from close-up (as close as approx. 5 cm (2") to the subject) to infinity. However, correct focus may not be obtained depending on the shooting condition. In this case, use the manual focus mode. -
Page 36: Iris Lock
FEATURES FOR RECORDING Iris Lock Like the pupil of the human eye, the iris contracts in well-lit environments to keep too much light from entering, and dilates in dim environments to allow in more light. Use this function in the following situations: When shooting a moving subject. -
Page 37: White Balance Adjustment
White Balance Adjustment The white balance refers to the correctness of color reproduction under various lighting. If the white balance is correct, all other colors will be accurately reproduced. The white balance is usually adjusted automatically. However, more advanced camcorder operators control this function manually to achieve a more professional color/ tint reproduction. -
Page 38: Wipe Or Fader Effects
FEATURES FOR RECORDING Wipe Or Fader Effects These effects let you make pro-style scene transitions. Use them to spice up the transition from one scene to the next. Wipe or Fader works when video recording is started or stopped. Set the VIDEO/MEMORY Switch to “VIDEO”. -
Page 39: Dubbing Still Images Recorded On A Tape To A Memory Card
FEATURES FOR RECORING SHUTTER OFF: Disables the function. (Factory-preset) SHUTTER 1/60: The shutter speed is fixed at 1/60th of a second. Black bands that usually appear when shooting a TV screen become narrower. SHUTTER 1/100: The shutter speed is fixed at 1/100th of a second. The flickering that occurs when shooting under a fluorescent light or mercury-vapour lamp is reduced. -
Page 40: Dubbing To Or From A Video Unit Equipped With A Dv Connector (Digital Dubbing)
DV IN/OUT connector. When using a DV cable, be sure to use the optional JVC VC-VDV204U or VC-VDV206U DV cable. To use this camcorder as a recorder Make sure all units are turned off. -
Page 41: Connection To A Personal Computer
Core filter the camcorder. When using a DV cable, be sure to use the To DV optional JVC VC-VDV206U or VC-VDV204U connector DV cable depending on the type of DV connector (4 or 6 pins) on the PC. If the PC connected to the camcorder via the USB cable is not powered, the camcorder does not enter the USB mode. -
Page 42: References
➜Adjust the brightness and angle of the LCD monitor. ( When the LCD monitor’s fluorescent light reaches the end of its service life, images on the LCD monitor become dark. ➜Consult your nearest JVC dealer. pg. 16) pg. 35) pg. 34, 37) pg. 44) pg. - Page 43 Appears when the date/time is not set. pg. 15). The built-in clock battery has run out and the previously set date/time has been erased. ➜Consult your nearest JVC dealer for replacement. UNIT IN SAFEGUARD MODE REMOVE AND REATTACH BATTERY OR DC PLUG Error indications 01, 02 or 06.
-
Page 44: Cautions
AC wall outlet other than American National Standard C73 series type use an AC plug adapter, called a “Siemens Plug”, as shown. For this AC plug adapter, consult your nearest JVC dealer. Battery Packs The supplied battery pack is a lithium-ion battery. Before... - Page 45 After the camcorder plays back for about 20 seconds, it stops automatically. Also refer to the cleaning cassette’s instructions. If, after using the cleaning cassette, the problems still exist, consult your nearest JVC dealer.
- Page 46 Changes or modifications not approved by JVC could void the user’s authority to operate the equipment. This equipment has been tested and found to comply with the limits for a Class B digital device, pursuant to Part 15 of the FCC Rules.
-
Page 47: Specifications
Camcorder For General Power supply DC 11 V (Using AC Adapter) DC 7.2 V (Using battery pack) Power consumption Approx. 2.2 W (2.3 W*) (LCD monitor off, viewfinder on) Approx. 2.7 W (2.8 W*) (LCD monitor on, viewfinder off) Approx. 7.5 W (Maximum; when charging the battery pack) * Using LED Light Dimensions (W x H x D) -
Page 48: Terms
TERMS AC Adapter ...14 Auto/Manual Mode ...20 Backlight Compensation 36 Battery Pack ...13, 14, 44 Blank Search ...22 Bright ...15, 32, 33 Cam Reset ...32 Changing The Menu Settings ...29 – 33 Charging The Battery Pack Clock Adj..15, 32, 33 Connection To A Personal Computer ...41 Connections To A TV Or...