Table of Contents
Advertisement
Advertisement
Table of Contents

Summary of Contents for Nuvo NV-T2DAB
- Page 1 NV-T2DAB Dual AM/FM Tuner Installation Guide...
-
Page 3: Important Safety Instructions
ENGLISH IMPORTANT SAFETY INSTRUCTIONS Danger 1. Read all safety and operating instructions before using this Exposure to extremely high noise levels may cause a permanent product. hearing loss. Individuals vary considerably to noise induced hearing 2. All safety and operating instructions should be kept for future loss but nearly everyone will lose some hearing if exposed to sufficiently reference. - Page 4 FRENCH IMPORTANTES INSTRUCTIONS DE SECURITE 1. Lire avec attention toutes les recommandations et précautions d'emploi avant d'utiliser ce produit. Danger 2. Toutes les recommandations et précautions d'emploi doivent être L‘exposition a des niveaux eleves de bruit peut provoquer une perte conservées afin de pouvoir s'y reporter si nécessaire.
- Page 5 ANTENNA LEAD-IN WIRE GROUND CLAMPS ANTENNA DISCHARGE UNIT NEC SECTION 810-20 GROUNDING ELECTRIC CONDUCTORS SERVICE ENTRANCE GROUND CLAMPS POWER SERVICE GROUPING ELECTRODE SYSTEM NEC ART 250 NEC NATIONAL ELECTRICAL CODE PART H...
-
Page 6: Table Of Contents
Congratulations on your purchase of the NuVo T2DAB Dual Tuner. Enjoying broadcast music throughout the home has moved into the 21 century with NuVo's T2 Dual Tuner solutions. The T2DAB brings clear and precise FM and DAB radio listening into the home. -
Page 7: T2Dab Quick Setup Guide For Use With Nuvonet
The T2DAB Dual Tuner is the perfect broadcast music solution for whole-home audio. The internal NuVoNet capability of the T2DAB allows it to easily communicate in real time with the NuVo Grand Concerto and Essentia E6G Control Pads. The following is a step- by-step guide for setting up and installing the T2DAB for use with the Grand Concerto and Essentia NuVoNet Suites. - Page 8 FM band frequency by default. At this point, full tuning capability can be done from the Tuner's front panel or an addressed NuVo Control Pad. Step 9: When both Tuner outputs are set, make sure the “NuVoNet” CAT5 connection between the Tuner’s back panel and the system EZ Port is completed.
-
Page 9: Front Panel
NV-T2DAB Dual AM/FM Tuner AM 550 P103 MENU DISP FM 103.5 STANDBY P104 Ticket To Ride BAND RADIO DATA SYSTEM 13 14 Front Panel Features 1. Standby: This blue LED will light when the T2DAB is plugged into an AC power outlet. -
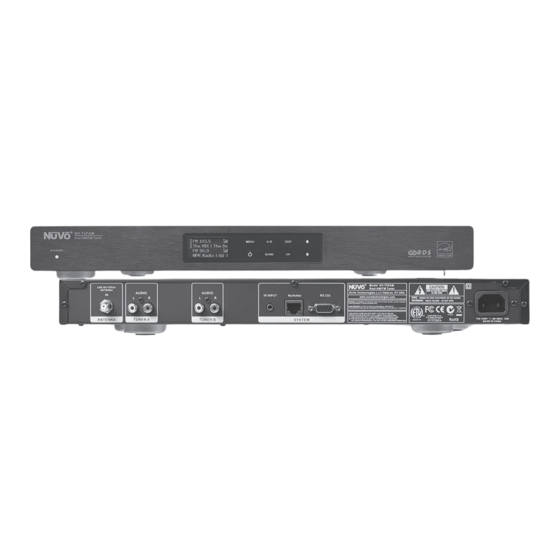
Page 10: Back Panel
3. IR Input: The T2DAB offers a single stereo mini, 3.5mm, connection for independent IR control of both tuners A and B. 4. NuVoNet: This single CAT5 connection provides full NuVoNet communication for both tuners A and B to the NuVo Grand Concerto and Essentia E6G audio distribution systems. -
Page 11: Nv-T2Rc4 Remote Control
TUNER TUNE BAND DISP T2 Tuner NV-T2RC4 REMOTE CONTROL NV-T2RC4 Remote Control 1. Power: The power button turns the Tuner on and off. 2. Tune Buttons: These buttons are the equivalent of using the Up and Down arrows on the front panel of the T2DAB to tune. 3. -
Page 12: Installing The T2Dab In The Home
Grand Concerto Systems, select Stand-alone. This will require IR or serial control of the T2DAB's functions. Regional Setup MENU Highlighting the appropriate Source number input for the NuVo DISP US and Canada Western Europe system and touching the OK button sets NuVoNet... -
Page 13: Fm And Dab Antenna Installation
Once the audio outputs are set at Standalone, the T2DAB offers 0728 Model NV -T2 DAB Dual SIRI US Ready AM/FM Tuner three methods for IR control. One is to take the IR output of NuVo Techno log ies LLC Hebr on, KY USA • IR INPUT NuVoNet RS 232 www.nuvot echno logi es. -
Page 14: Rs232 Serial Control
Potentially, all aspects of NuVoNet communication can be emulated using the serial control capability. The necessary protocol for serial use can be Fig. 7 downloaded from the NuVo website ProZone at Main Menu www.nuvotechnologies.com/prozone. II. T2DAB Front Panel Menu (Fig. 6) The Menu button on the front panel of the T2DAB allows access to the tuning and functionality of both tuners A and B. -
Page 15: T2Dab Options
Fig. 10 T2DAB Options (Fig. 10) The T2DAB Options menu allows the user to edit the presets, DAB Options configure the tuning mode and modify the stored DAB channel DAB Scan list. The following submenus will be displayed: DAB Order DAB Scan: This menu item provides the ability to scan Edit Presets for new available DAB ensembles and their related... -
Page 16: T2Dab Settings
Fig. 13 T2 DAB Settings (Fig. 13) There are several operational defaults that are set in this menu T2DAB Settings choice that are not available from the NuVo Control Pad menu: Operating Mod Enabled Bands Tuning Operating Mode (Fig. 14): This will display the set choice for each tuner output A and B with a check mark. -
Page 17: Diagnostics
Version Version: This displays the T2DAB's current Signal Streng.. firmware version. Upgraded versions are posted on the NuVo website ProZone and are loaded onto the Tuner by downloading a new configuration from the Tuner Configurator software through the RS232 port. -
Page 18: Iii. Nuvonet Control Of The T2Dab
Follow the Day Tuning Up and Down (Fig. 17) Tuning at the NuVo Control Pad is accomplished by touching MENU arrow forward >> or arrow back <<. A single touch advances one station frequency based on the tuning method selected, and a touch and hold will rapidly change the channel or frequency. -
Page 19: Control Pad Main Menu
For example, P103 notes preset bank 1 and Favorites The Loft preset 3 of 20 total. 700 WLW KROCK 89.9 55 KRC Oldies 91.9 Fig. 21 Sources NV-T2DAB (A) NV-T2DAB (B) NV-M3 (A) NV-M3 (B) NV-M3 (C) Cable... - Page 20 Fig. 22 T2DAB Options (Fig. 22): Tuning parameters for the T2DAB are easily set from any Control Pad using this T2DAB Options menu. There are three sub-menu choices: Edit Presets Seek Tune Edit Presets (Fig. 23): This allows the user to Tuning Mode establish the current channel or station frequency as a preset.
-
Page 21: Using The T2 Configurator Software
“Source 1- 6”. If you are using the Tuner as NuVoNet source with a NuVo System, you must select a unique, dedicated To start a new configuration or open an existing configuration, source input for each Tuner (A or B) being configured. “Stand click on the “Load Existing or Create New Configuration”... - Page 22 NuVoNet geographic locations need the advanced Custom setting (see causes the tuners to turn on when a zone within the NuVo System is turned on. The tuners will turn off when all NuVo section IV.
-
Page 23: 3.0 Presets
The Tuner Configurator software is an important setup tool for to name the bank and automatically add it to the Tuner's easily setting tuner presets and loading them on the NV-T2DAB presets. non-volitile memory prior to the installation. NuVoNet will automatically read the presets and make them available on the Fig. -
Page 24: Advanced Settings
4.2 Tuning Parameters (Fig. 37): This section determines how process for beginning a new configuration or editing an the NV-T2DAB tunes up and down within the FM frequency existing one does not change from the standard mode. range. Seek/Scan Levels for FM set the signal strength parameter for searching stations. -
Page 25: 5.0 Update System
Fig. 37 Fig. 38 4.3 Fine Tuning: When selected, Fine Tuning changes the 5.2 Download Configuration (Fig. 39): The final step in the tuning standard for FM from the default .10 MHz tuning to .05 setup is to download the configuration to the T2DAB via its MHz step tuning, and AM will tune by single kHz increments, RS232 serial port. - Page 26 5.3 Successful Download (Fig. 40): When the download is complete, a final window will appear indicating that all information has downloaded successfully. Actual download time will vary based on your computer's processing capabilities. Fig. 42...
-
Page 27: Nv-T2Dab Specifications
De-emphasis 50/75 ìs Shipping Weight Pounds 14.3 Antenna / Aerial Input 75 ? (unbalanced) *NuVo Technologies reserves the right to change specifications without Tuning Range 520 to 1710 kHz notice. Antenna / Aerial Input 75 ? (unbalanced) Audio Output Two Stereo Outputs... - Page 28 NuVo Technologies 3015 Kustom Dr. Hebron, KY 41048, USA www.nuvotechnologies.com Ph: 859-817-7200 TNDAB 0839...