Table of Contents
Advertisement
KD-R218
CD RECEIVER : INSTRUCTIONS/INSTALLATION
1009DTSMDTJEIN
EN
© 2009 Victor Company of Japan, Limited
Canceling the display demonstration
1
Turn on the power.
2
[Hold]
(Initial setting)
3
Setting the clock
1
Turn on the power.
2
[Hold]
(Initial setting)
3
Select <
>.
CLOCK
4
Select <
>.
CLOCK SET
Preparations
How to attach/detach the control
panel
How to reset your unit
Reset the unit after installation is
completed.
• Your preset adjustments will
also be erased.
How to forcibly eject a disc
• You can forcibly eject the loaded disc even if the
disc is locked. To lock/unlock the disc, see page 2.
• Be careful not to drop the disc when it ejects.
• If this does not work, reset your unit.
Preparing the remote controller
(RM-RK50)
When you use the remote controller for the first time,
pull out the insulation sheet.
Insulation sheet
Thank you for purchasing a JVC product.
Please read all instructions carefully before operation, to
ensure your complete understanding and to obtain the best
possible performance from the unit.
For customer Use:
Enter below the Model No. and Serial No. which are located
on the top or bottom of the cabinet. Retain this information
for future reference.
Model No.
Serial No.
4
Select <
>.
DEMO OFF
5
6
Finish the procedure.
5
Adjust the hour.
6
Adjust the minute.
7
Finish the procedure.
If the effectiveness of the remote controller
decreases, replace the battery.
Replacing the lithium coin battery
For USA-California Only:
This product contains a CR Coin Cell Lithium Battery
which contains Perchlorate Material—special
handling may apply.
See www.dtsc.ca.gov/hazardouswaste/perchlorate
Caution:
[Hold]
• Danger of explosion if battery is incorrectly
replaced. Replace only with the same or equivalent
type.
• Battery shall not be exposed to excessive heat such
as sunshine, fire, or the like.
Warning (about battery handling)
To prevent accidents and damage:
• Do not install any battery other than CR2025 or its
equivalent.
• Store out of reach of children.
• Do not recharge, short, or dismantle.
• Do not dispose of in fire.
• Do not carry around with other metallic materials.
• Wrap the battery with tape and insulate when
throwing away or saving it.
INFORMATION (For U.S.A.)
This equipment has been tested and found to comply with the limits for a Class B digital device, pursuant
to Part 15 of the FCC Rules. These limits are designed to provide reasonable protection against harmful
interference in a residential installation. This equipment generates, uses, and can radiate radio frequency
energy and, if not installed and used in accordance with the instructions, may cause harmful interference
to radio communications. However, there is no guarantee that interference will not occur in a particular
installation. If this equipment does cause harmful interference to radio or television reception, which can be
determined by turning the equipment off and on, the user is encouraged to try to correct the interference by
one or more of the following measures:
– Reorient or relocate the receiving antenna.
– Increase the separation between the equipment and receiver.
– Connect the equipment into an outlet on a circuit different from that to which the receiver is connected.
– Consult the dealer or an experienced radio/TV technician for help.
Caution:
Changes or modifications not approved by JVC could void the user's authority to operate the equipment.
IMPORTANT FOR LASER PRODUCTS
1. CLASS 1 LASER PRODUCT
2. CAUTION: Do not open the top cover. There are no user serviceable parts inside the unit; leave all
servicing to qualified service personnel.
3. CAUTION: (For U.S.A.)
(For Canada) Visible and/or invisible class 1M laser radiation when open. Do not view directly
GET0622-001A
4. REPRODUCTION OF LABEL: CAUTION LABEL, PLACED OUTSIDE THE UNIT.
[J]
[European Union only]
Warning:
If you need to operate the unit while driving, be sure
to look around carefully or you may be involved in a
traffic accident.
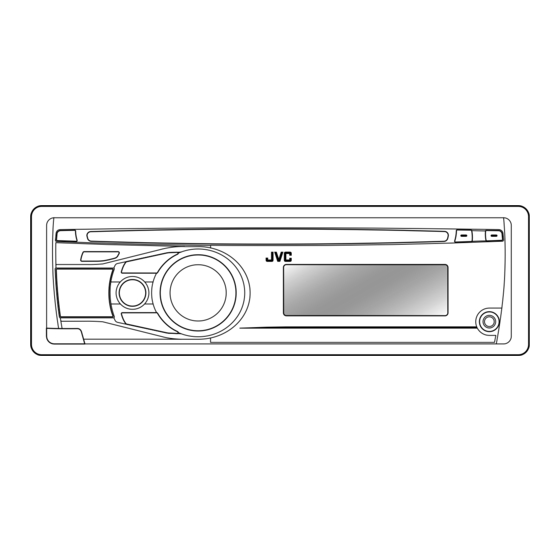
Basic operations
Ejects the disc
Loading slot
Detaches the panel
Returns to the previous menu
• DO NOT expose to bright sunlight.
When you press or hold the following button(s)...
Main unit
CR2025
1
Visible and/or invisible class II laser radiation when open. Do not stare into beam.
with optical instruments.
For safety...
• Do not raise the volume level too much, as this will
block outside sounds, making driving dangerous.
• Stop the car before performing any complicated
operations.
Temperature inside the car...
If you have parked the car for a long time in hot or
cold weather, wait until the temperature in the car
becomes normal before operating the unit.
Power off : Checks the current clock time
Power on : Changes the display information
Control dial
Display window
Remote sensor
Remote
General operation
controller
Turns on.
• When the power is on, pressing /I/ATT on the remote controller
also mutes the sound or pauses. Press /I/ATT again to cancel
muting or resume playback.
Turns off if pressed and held.
Selects the available sources (if the power is turned on).
• If the source is ready, playback also starts.
Adjusts the volume level.
—
Selects items.
• Mutes the sound while listening to a source. If the source is "CD,"
playback pauses. Press the control dial again to cancel muting or
—
resume playback.
• Confirms selection.
Selects the sound mode.
• Enters tone level adjustment directly (see page 2) if pressed and held
EQ BASS-TRE on the main unit.
—
Enters playback mode menu directly (see page 2).
Auxiliary input jack
Advertisement
Chapters
Table of Contents
Troubleshooting

Related Manuals for JVC 1009DTSMDTJEIN


Summary of Contents for JVC 1009DTSMDTJEIN
-
Page 1: Canceling The Display Demonstration
– Connect the equipment into an outlet on a circuit different from that to which the receiver is connected. – Consult the dealer or an experienced radio/TV technician for help. Caution: Changes or modifications not approved by JVC could void the user’s authority to operate the equipment. IMPORTANT FOR LASER PRODUCTS 1. CLASS 1 LASER PRODUCT 2. -
Page 2: Listening To External Components
Listening to the radio Ÿ ] “FM” or “AM” “ST” lights up when receiving an FM stereo broadcast with sufficient signal strength. Manual search Selecting a preset station “M” flashes, then press the button repeatedly. [Hold] When an FM stereo broadcast is hard to receive [Hold] Assigning title to a station... -
Page 3: Electrical Connections
The following illustration shows a typical installation. If you have any questions or require information Initial: Underlined regarding installation kits, consult your JVC car audio dealer or a company supplying kits. In-dash mounting When installing the unit without using the sleeve Flat head screws—M5 ×... -
Page 4: Specifications
Check to be sure the terminals of the speaker leads are no operations can be done. covered with insulating tape properly, then reset the unit. If “PROTECT” does not disappear, consult your JVC car audio dealer or a company supplying kits. This unit does not work at all. - Page 5 KD-R412 / KD-R411 / KD-R35 / KD-R312 / KD-R311 CD RECEIVER / RÉCEPTEUR CD For canceling the display demonstration, see page 4. / Pour annuler la démonstration des affichages, référez-vous à la page 4. For installation and connections, refer to the separate manual. / Pour l’installation et les raccordements, se référer au manuel séparé.
- Page 6 The sign Pb below the symbol for batteries indicates that this battery contains lead. ENGLISH Thank you for purchasing a JVC product. Warning: If you need to operate the unit while driving, be sure to look around carefully or you may be involved in a traffic accident.
-
Page 7: Table Of Contents
How to read this manual The following icons/symbols are used to indicate: Press and hold the button(s) [Hold] until the desired operation begins. Turn the control dial. Turn the control dial to make a selection, then press to confirm. Reference page number <XXXX>... - Page 8 Canceling the display demonstration Turn on the power. [Hold] Setting the clock Turn on the power. [Hold] Select < >. CLOCK Select < CLOCK SET Adjust the hour. ENGLISH Select <DEMO OFF>. (Initial setting) Finish the procedure. Adjust the minute. (Initial setting) Select <24H/12H>.
-
Page 9: Basic Operations
Basic operations Ejects the disc Control dial Detaches the panel Remote sensor (for KD-R412/KD-R411) You can control this unit with an optionally purchased remote control, RM-RK50 ( When you press or hold the following button(s)... Button • Turns on. • Selects the available sources (if the power is turned on). If the source is ready, playback also starts. -
Page 10: Listening To The Radio
Listening to the radio ] “FM” or “AM” Ÿ “ST” lights up when receiving an FM stereo broadcast with sufficient signal strength. Manual search “M” flashes, then press the button repeatedly. [Hold] When an FM stereo broadcast is hard to receive [Hold] ] <TUNER>... -
Page 11: Selecting A Preset Station
Manual presetting (FM/AM) You can preset up to 18 stations for FM and 6 stations for AM. Ex.: Storing FM station of 92.50 MHz into preset number “04.” ] “92.50MHz” [Hold] “PRESET MODE” flashes. ] Selects preset number “04.” “P04” flashes and “MEMORY” appears. Selecting a preset station The following features are available only for FM Radio Data System stations. -
Page 12: Listening To A Disc
PTY Standby Reception PTY Standby Reception allows the unit to switch temporarily to your favourite PTY programme from any source other than AM. To activate and select your favourite PTY code for PTY Standby Reception, see “Menu operations: <PTY-STANDBY>.” ( If the PTY indicator lights up, PTY Standby Reception is activated. -
Page 13: Selecting The Playback Modes
Selects folder of the MP3/WMA Selects track Fast-forwards or reverses the track [Hold] Selecting a track/folder For MP3/WMA discs, select the desired folder, then the desired track by repeating step 2. • To return to the previous menu, press BACK. Caution on volume setting: Discs produce very little noise compared with other sources. -
Page 14: Listening To The Usb Device
Listening to the USB device This unit can play MP3/WMA tracks stored in a USB device. ] Turn on the power. If a USB device has been attached... Pressing / SOURCE turns on the power and playback starts from where it has been stopped previously. -
Page 15: Listening To The Other External Components
Listening to the other external components You can connect an external component to the AUX (auxiliary) input jack on the control panel. Preparation: Make sure <AUX ON> is selected for the <SRC SELECT> = <AUX IN> setting. • For details, refer also to the instructions supplied with the adapter or external components. -
Page 16: Using The Remote Controller
Using the remote controller KD-R412/KD-R411 can be remotely controlled as instructed here (with an optionally purchased remote controller). We recommend that you use remote controller RM-RK50 with your unit. Installing the lithium coin battery (CR2025) Caution: • Danger of explosion if battery is incorrectly replaced. -
Page 17: Selecting A Preset Sound Mode
Selecting a preset sound mode You can select a preset sound mode suitable for the music genre. FLAT = NATURAL = DYNAMIC = VOCAL BOOST = BASS BOOST = USER = (back to the beginning) While listening, you can adjust the tone level of the selected sound mode. - Page 18 Category Menu item 24H/12H Time display mode CLOCK ADJ * Clock adjustment BASS MIDDLE TREBLE DIMMER SCROLL * TAG DISPLAY SSM * Strong-station Sequential Memory AF-REG * Alternative frequency/ regionalization reception PTY- STANDBY * Takes effect only when CT (clock time) data is received. Some characters or symbols will not be shown correctly (or will be blanked) on the display.
- Page 19 Category Menu item TA VOLUME * Traffic announcement volume P-SEARCH * Programme search MONO * Monaural mode IF BAND Intermediate frequency band FADER * BALANCE * LOUD Loudness AUX ADJUST * Auxiliary adjust (For KD-R312/ KD-R311) Only for FM Radio Data System stations. Depends on the amplifier gain control.
- Page 20 Category Menu item VOL ADJUST Volume adjust (For KD-R412/ KD-R411/KD-R35) L/O MODE * Line output mode SUB.W FREQ * Subwoofer cutoff frequency SUB.W LEVEL * Subwoofer level BEEP TEL MUTING Telephone muting AMP GAIN * Amplifier gain control AM * AM station AUX IN * Auxiliary input...
-
Page 21: More About This Unit
More about this unit Basic operations General • If you turn off the power while listening to a track, playback will start from where it had been stopped previously next time you turn on the power. • If no operation is done for about 60 seconds after pressing MENU button, the operation will be canceled. - Page 22 • Some CD-Rs or CD-RWs may not play back on this unit because of their disc characteristics, or for the following reasons: – Discs are dirty or scratched. – Moisture condensation has occurred on the lens inside the unit. – The pickup lens inside the unit is dirty. –...
- Page 23 Playing MP3/WMA tracks from a USB device (for KD-R412/KD-R411/ KD-R35) • While playing from a USB device, the playback order may differ from other players. • This unit may be unable to play back some USB devices or some files due to their characteristics or recording conditions.
-
Page 24: Maintenance
Maintenance How to clean the connectors Frequent detachment will deteriorate the connectors. To minimize this possibility, periodically wipe the connectors with a cotton swab or cloth moistened with alcohol, being careful not to damage the connectors. Connectors Moisture condensation Moisture may condense on the lens inside the unit in the following cases: •... -
Page 25: Troubleshooting
Check to be sure the terminals of the speaker leads are covered with insulating tape properly, then reset the unit ( If “PROTECT” does not disappear, consult your JVC IN-CAR ENTERTAINMENT dealer or a company supplying kits. Reset the unit. ( Check the <SRC SELECT>... - Page 26 Symptom Disc cannot be played back. Noise is generated. A longer readout time is required (“READING” keeps flashing on the display). Tracks do not play back in the order you have intended them to play. For KD-R412/KD-R411/KD-R35: “NO FILE” appears on the display. “NOT SUPPORT”...
- Page 27 (e.g. album name). While playing a track, sound is sometimes interrupted. JVC bears no responsibility for any loss of the data in the USB mass storage class device while using this System. Remedy/Cause The track played back is not an MP3/WMA track. Skip to another file.
-
Page 28: Specifications
Specifications Maximum Power Output: Continuous Power Output (RMS): Load Impedance: Tone Control Range: Frequency Response: Signal-to-Noise Ratio: Line-Out Level/Impedance: Subwoofer-Out Level/Impedance: Output Impedance: Other Terminal: Frequency Range: FM Tuner: MW Tuner: LW Tuner: ENGLISH Front/ 50 W per channel Rear: Front/ 19 W per channel into 4 Ω, 40 Hz to Rear:... - Page 29 Type: Signal Detection System: Number of Channels: Frequency Response: Dynamic Range: Signal-to-Noise Ratio: Wow and Flutter: MP3 Decoding Format: (MPEG1/2 Audio Layer 3) WMA (Windows Media® Audio) Decoding Format: Max. Bit Rate: 192 kbps USB Standard: Data Transfer Rate (Full Speed): Compatible Device: Compatible File System: Playable Audio Format:...
- Page 30 This apparatus is in conformance with the valid European directives and standards regarding electromagnetic compatibility and electrical safety. European representative of Victor Company of Japan, Limited is: JVC Technical Services Europe GmbH Postfach 10 05 04 61145 Friedberg Germany EN, FR ©...
- Page 31 The following illustration shows a typical installation. If you have any questions or require information regarding installation kits, consult your JVC IN-CAR ENTERTAINMENT dealer or a company supplying kits. In-dash mounting / Montage encastré When installing the unit without using the sleeve / Lors de l’installation de l’appareil scans utiliser de manchon Flat head screws (M5 ×...
- Page 32 À acheter séparément Consult your JVC IN-CAR ENTERTAINMENT dealer or a company supplying kits for details about connection. / Pour en savoir plus sur connexions, consultez votre revendeur d’autoradio JVC ou une compagnie fournissant des kits. TROUBLESHOOTING / EN CAS DE DIFFICULTES •...
- Page 33 KD-R414/KD-R314 CD RECEIVER : INSTRUCTIONS/INSTALLATION Thank you for purchasing a JVC product. Please read all instructions carefully before operation, to ensure your complete understanding and to obtain the best possible performance from the unit. 1009DTSMDTJEIN © 2009 Victor Company of Japan, Limited Canceling the display demonstration Turn on the power.
- Page 34 Listening to the radio Ÿ ] “FM” or “AM” “ST” lights up when receiving an FM stereo broadcast with sufficient signal strength. Manual search Selecting a preset station “M” flashes, then press the button repeatedly. [Hold] When an FM stereo broadcast is hard to receive [Hold] Assigning title to a station...
- Page 35 • To exit from the menu, press DISP or MENU. The following illustration shows a typical installation. If you have any questions or require information regarding installation kits, consult your JVC car audio dealer or a company supplying kits. Initial: Underlined...
-
Page 36: Troubleshooting
This unit does not work at all. Reset the unit. (See page 1.) JVC bears no responsibility for any loss of the data in the USB mass storage class device while using this System. Having TROUBLE with operation? - Page 37 ENGLISH KD-R416 / KD-R415 / KD-R316 / KD-R315 CD RECEIVER / For canceling the display demonstration, see page 4. / For installation and connections, refer to the separate manual. INSTRUCTIONS GET0623-001A [U/UH]...
- Page 38 If you have parked the car for a long time in hot or cold weather, wait until the temperature in the car becomes normal before operating the unit. ENGLISH Thank you for purchasing a JVC product. How to read this manual The following icons/symbols are used to indicate: [Hold] <XXXX>...
-
Page 39: How To Attach/Detach The Control Panel
How to attach/detach the control panel How to reset your unit Your preset adjustments will also be erased. How to forcibly eject a disc • You can forcibly eject the loaded disc even if the disc is locked. To lock/unlock the disc, •... -
Page 40: Canceling The Display Demonstration
Canceling the display demonstration Turn on the power. [Hold] Setting the clock Turn on the power. [Hold] Select <CLOCK>. Select <CLOCK SET>. Adjust the hour. Adjust the minute. Finish the procedure. ENGLISH Select <DEMO OFF>. (Initial setting) Finish the procedure. (Initial setting) -
Page 41: Preparing The Remote Controller
Preparing the remote controller (RM-RK50) When you use the remote controller for the first time, pull out the insulation sheet. Insulation sheet If the effectiveness of the remote controller decreases, replace the battery. Replacing the lithium coin battery Caution: • Danger of explosion if battery is incorrectly replaced. -
Page 42: Basic Operations
Basic operations Ejects the disc Detaches the panel Remote sensor • DO NOT expose to bright sunlight. When you press or hold the following button(s)... Remote Main unit controller — — — ENGLISH Control dial Loading slot General operation Turns on. •... -
Page 43: Listening To The Radio
Main unit Returns to the previous menu. Power off : Checks the current clock time. Power on : Changes the display information. Listening to the radio ] “FM” or “AM” Ÿ “ST” lights up when receiving an FM stereo broadcast with sufficient signal strength. Manual search “M”... -
Page 44: Listening To A Disc
Manual presetting (FM/AM) You can preset up to 18 stations for FM and 6 stations for AM. Ex.: Storing FM station of 92.50 MHz into preset number “04.” ] “92.50MHz” [Hold] “PRESET MODE” flashes. ] Selects preset number “04.” “P04” flashes and “MEMORY” appears. Listening to a disc Ÿ... - Page 45 Selects folder of the MP3/WMA Selects track Fast-forwards or reverses the track [Hold] Selecting a track/folder For MP3/WMA discs, select the desired folder, then the desired track by repeating step 2. • To return to the previous menu, press BACK. Changing the display information Disc title/Album name/performer (folder name)* = Track title (file name)* = Current...
-
Page 46: Listening To A Usb Device
Listening to a USB device This unit can play MP3/WMA tracks stored in a USB device. ] Turn on the power. If a USB device has been attached... Pressing / SOURCE turns on the power and playback starts from where it has been stopped previously. -
Page 47: Listening To The Other External Components
Listening to the other external components You can connect an external component to the AUX (auxiliary) input jack on the control panel. Preparation: Make sure <AUX ON> is selected for the <SRC SELECT> = <AUX IN> setting. • For details, refer also to the instructions supplied with the adapter or external components. -
Page 48: Selecting A Preset Sound Mode
Selecting a preset sound mode You can select a preset sound mode suitable for the music genre. FLAT = NATURAL = DYNAMIC = VOCAL BOOST = BASS BOOST = USER = (back to the beginning) While listening, you can adjust the tone level of the selected sound mode. -
Page 49: Menu Operations
Menu operations [Hold] Category Menu item DEMO • DEMO ON Display demonstration • DEMO OFF CLOCK SET [ 1:00 ] Clock setting BASS — MIDDLE TREBLE DIMMER • DIMMER ON • DIMMER OFF SCROLL * • SCROLL ONCE • SCROLL AUTO •... - Page 50 Category Menu item FADER * BALANCE * LOUD Loudness AUX ADJUST * Auxiliary adjust (For KD-R316/ KD-R315) VOL ADJUST Volume adjust (For KD-R416/ KD-R415) L/O MODE Line output mode SUB.W FREQ * Subwoofer cutoff frequency SUB.W LEVEL * Subwoofer level If you are using a two-speaker system, set the fader level to “00.”...
-
Page 51: Title Assignment
Category Menu item BEEP AMP GAIN * Amplifier gain control AM * AM station AUX IN * Auxiliary input The volume level automatically changes to “VOLUME 30” if you change to <LOW POWER> with the volume level is set higher than “VOLUME 30.” Displayed only when any source other than “AM”... -
Page 52: Maintenance
Maintenance How to clean the connectors Frequent detachment will deteriorate the connectors. To minimize this possibility, periodically wipe the connectors with a cotton swab or cloth moistened with alcohol, being careful not to damage the connectors. Connectors Moisture condensation Moisture may condense on the lens inside the unit in the following cases: •... -
Page 53: More About This Unit
More about this unit Basic operations General • If you turn off the power while listening to a track, playback will start from where it had been stopped previously next time you turn on the power. • If no operation is done for about 60 seconds after pressing MENU button, the operation will be canceled. - Page 54 • Do not use the following CD-Rs or CD-RWs: – Discs with stickers, labels, or a protective seal stuck to the surface. – Discs on which labels can be directly printed by an ink jet printer. Using these discs under high temperature or high humidity may cause malfunctions or damage to the unit.
-
Page 55: Troubleshooting
Check to be sure the terminals of the speaker leads are covered with insulating tape properly, then reset the unit ( If “PROTECT” does not disappear, consult your JVC car audio dealer or a company supplying kits. Reset the unit. ( Check the <SRC SELECT>... - Page 56 Symptom Disc cannot be played back. • CD-R/CD-RW cannot be played back. • Tracks on the CD-R/CD-RW cannot be skipped. Disc can neither be played back nor ejected. Disc sound is sometimes interrupted. “NO DISC” appears on the display. “PLEASE” and “EJECT“ appear alternately on the display.
- Page 57 The correct characters are not displayed (e.g. album name). JVC bears no responsibility for any loss of the data in the USB mass storage class device while using this System. Microsoft and Windows Media are either registered trademarks or trademarks of Microsoft Corporation in the United States and/or other countries.
-
Page 58: Specifications
Specifications Maximum Power Output: Continuous Power Output (RMS): Load Impedance: Tone Control Range: Frequency Response: Signal-to-Noise Ratio: Line-Out Level/Impedance: Subwoofer-Out Level/Impedance: Output Impedance: Other Terminal: Frequency Range: FM Tuner: AM Tuner: ENGLISH Front/ 50 W per channel Rear: Front/ 19 W per channel into 4 Ω, 40 Hz to Rear: 20 000 Hz at no more than 0.8% total harmonic distortion. - Page 59 Type: Signal Detection System: Number of Channels: Frequency Response: Dynamic Range: Signal-to-Noise Ratio: Wow and Flutter: MP3 Decoding Format: (MPEG1/2 Audio Layer 3) WMA (Windows Media® Audio) Decoding Format: Max. Bit Rate: 192 kbps USB Standard: Data Transfer Rate (Full Speed): Compatible Device: Compatible File System: Playable Audio Format:...
- Page 60 Having TROUBLE with operation? Please reset your unit Refer to page of How to reset your unit EN, TH © 2009 Victor Company of Japan, Limited 1009DTSMDTJEIN...
- Page 61 • The heat sink becomes very hot after use. Be careful not to touch it when removing this unit. The following illustration shows a typical installation. If you have any questions or require information regarding installation kits, consult your JVC car audio dealer or a company supplying kits. การติ ด ตั ้ ง จอแบบ...
- Page 62 IMPORTANT: A custom wiring harness (separately purchased) which is suitable for your car is recommanded for connection between the unit and your car. • Consult your JVC car audio dealer or a company supplying kits for details. PRECAUTIONS on power supply and speaker connections •...