Canon ST-E3-RT Instruction Manual
Speedlite transmitter
Hide thumbs
Also See for ST-E3-RT:
- Instruction manual (220 pages) ,
- Setup (27 pages) ,
- Instruction manual (220 pages)
Table of Contents
Advertisement
Advertisement
Table of Contents

Related Manuals for Canon ST-E3-RT


Summary of Contents for Canon ST-E3-RT
- Page 1 English Français INSTRUCTION MANUAL MODE D’EMPLOI Español MANUAL DE INSTRUCCIONES...
-
Page 2: Introduction
Introduction The Canon Speedlite Transmitter ST-E3-RT is a transmitter for wireless flash shooting. It can control up to 5 groups (15 units) of Canon Speedlites that have a wireless multiple flash shooting function using radio transmission. The transmitter also has dust and water resistance equivalent to EOS-1D series cameras. -
Page 3: Chapters
Chapters Introduction Getting Started Preparations for wireless flash shooting Wireless Flash Shooting: Radio Transmission Wireless flash shooting with radio transmission Setting Transmitter Functions with Camera Operations Setting the transmitter functions from the camera’s menu screen Customizing the Transmitter Customizing with Custom Functions and Personal Functions Reference System map, FAQ... -
Page 4: Table Of Contents
Contents Introduction Chapters ....................3 Nomenclature....................6 Conventions Used in this Manual ............10 Getting Started Installing the Batteries................12 Attaching and Detaching the Transmitter..........13 Turning on the Power................13 Wireless Flash Shooting: Radio Transmission ' Wireless Flash Shooting ..............16 Wireless Settings ..................20 a: Fully Automatic Wireless Flash Shooting........24 Using Fully Automatic Wireless Flash.............27 a: Wireless Multiple Flash Shooting with Flash Ratio ....31 q: Wireless Multiple Flash Shooting with Manual Flash Output ....34... - Page 5 Contents Customizing the Transmitter C / >: Setting Custom and Personal Functions ......54 C: Setting Custom Functions ............56 >: Setting Personal Functions ............58 Reference ST-E3-RT System .................. 60 Troubleshooting Guide................61 Specifications ..................64 Index ...................... 70...
-
Page 6: Nomenclature
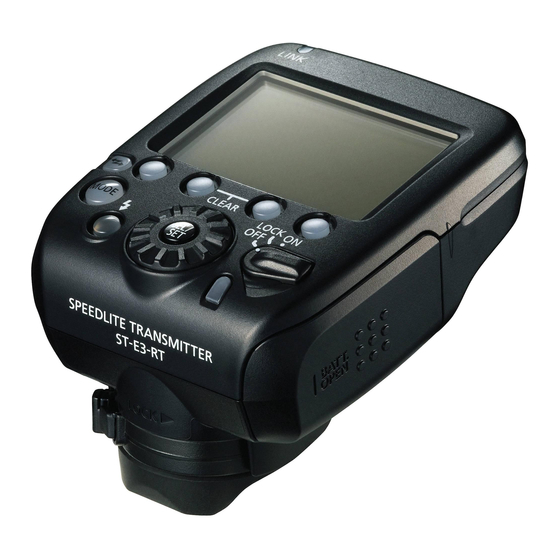
Nomenclature <D> Radio transmission LCD panel confirmation lamp (p.21, 23, 25, 30, 45) Function button 2 Function button 3 Function button 1 <I > Function button 4 Linked shooting button (p.44) <E > Flash mode button Battery compartment (p.24, 34, 35, 38) cover (p.12) Power switch (p.13) <K>... - Page 7 Nomenclature Nomenclature 02 Terminal cover Remote release terminal (p.42) Mounting foot (p.13) Contacts Locking pin Case...
- Page 8 Nomenclature LCD panel Radio transmission wireless shooting (p.15) E-TTL II/E-TTL autoflash (p.24) g : FEB (p.28, 50) FEB sequence (p.56) M : Master (p.20) : Sync speed warning (p.19) c : High-speed sync Flash exposure compensation amount T : Personal Functions (p.58) , : Flash ratio (p.31) Beep a : E-TTL II/E-TTL...
- Page 9 Nomenclature Stroboscopic flash (p.35) Multi (Stroboscopic) flash Number of flashes Flash frequency Group firing (p.38) [ : Group flash Flash mode Firing group Linked shooting (p.43) Linked shooting x : Slave M : Master...
-
Page 10: Conventions Used In This Manual
The operation procedures assume that the menu and Custom Functions of the camera and the Custom Functions and Personal Functions of the transmitter and the Speedlite are at their default settings. All figures are based on the use of two AA/LR6 alkaline batteries and Canon’s testing standards. -
Page 11: Getting Started
Getting Started This chapter describes the preparations before starting wireless flash shooting. -
Page 12: Installing The Batteries
You can perform wireless flash shooting for approx. 10 hours* continuously. * Based on new AA/LR6 alkaline batteries and Canon’s testing standards. Using AA/LR6 batteries other than the alkaline type may cause improper battery contact due to the irregular shape of the battery contacts. -
Page 13: Attaching And Detaching The Transmitter
Attaching and Detaching the Transmitter Attach the transmitter. Slip the transmitter’s mounting foot all the way into the camera’s hot shoe. Secure the transmitter. On the mounting foot, slide the lock lever to the right. When the lock lever clicks in place, it will be locked. - Page 14 Turning on the Power About Auto Power Off To save battery power, the power will turn off automatically after 5 min. of idle use. To turn on the transmitter again, press the camera’s shutter button halfway, or press the test flash button (charge lamp). About the Lock Function By setting the power switch to <a>, you can disable flash’s button and dial operations.
-
Page 15: Wireless Flash Shooting: Radio Transmission
Wireless Flash Shooting: Radio Transmission This chapter describes wireless flash shooting. For the accessories required for wireless shooting, see the system map (p.60). For the regions of use, restrictions, and precautions related to radio transmission, refer to the separate leaflet. When the camera’s shooting mode is set to a fully automatic mode or an Image Zone mode, the operations in this chapter are not available. -
Page 16: Wireless Flash Shooting
' Wireless Flash Shooting Using a transmitter and a Canon Speedlite compatible with radio transmission wireless shooting makes it easy to shoot with advanced wireless multiple flash lighting, in the same way as normal E-TTL II/ E-TTL autoflash shooting. The system is designed so that the settings of the transmitter attached to the camera (master) are automatically reflected on the Speedlite that is wirelessly controlled (slave). - Page 17 ' Wireless Flash Shooting Wireless Multiple Flash Shooting You can divide the slave units into two or three groups and perform E-TTL II/E-TTL autoflash shooting while changing the flash ratio (factor). In addition, you can set and shoot with a different flash mode for each firing group, for up to 5 groups.
- Page 18 ' Wireless Flash Shooting Shooting with a Different Flash Mode set for Each Group (p.38) Auto external flash metering Ceiling E-TTL II Manual flash Manual flash Manual flash * The flash mode settings are indicated only as an example.
- Page 19 ' Wireless Flash Shooting About Restrictions on Functions Depending on the Camera Used When performing radio transmission wireless flash shooting, restrictions may apply to the flash mode, maximum flash sync speed (referred to below as the “flash sync speed”) and high-speed sync function, depending on the camera that you use.
-
Page 20: Wireless Settings
Wireless Settings To perform wireless shooting, set the transmitter (master unit) and flash (slave unit) with the following procedure. Master Unit Setting Check that <M> is displayed. Check that <M> is displayed at the position shown in the figure. Slave Unit Setting Set a flash that is compatible with radio transmission wireless flash shooting as the slave unit. - Page 21 Wireless Settings Setting the Master Unit Transmission Channel / Wireless Radio ID Use the following procedure to set the master unit’s transmission channel and wireless radio ID. Set the same channel and ID for both the master unit and slave unit. For the slave unit settings, see the flash’s instruction manual.
- Page 22 Wireless Settings Scanning the Master Unit Transmission Channels to Set You can scan the radio reception status and set the master unit’s transmission channel automatically or manually. When the channel is set to “AUTO”, the channel with the best reception signal is automatically set.
- Page 23 Wireless Settings About the <D> Lamp The color of the <D> lamp changes depending on the transmission status of the master unit and the slave unit. Color Status Description Action Transmission Green – Not connected Check the channel and ID Master units + slave units = Too many units 16 units or less...
-
Page 24: A: Fully Automatic Wireless Flash Shooting
a: Fully Automatic Wireless Flash Shooting This section describes basic fully automatic wireless shooting when using a transmitter attached to the camera (master) and a wirelessly controlled flash (slave). Autoflash Shooting Using One Slave Unit Set the flash as the slave unit. For the slave unit settings, see the flash’s instruction manual. - Page 25 a: Fully Automatic Wireless Flash Shooting Check the transmission status and that the flash is ready. Check that the <D> lamp is lit in green. When the slave flash is ready, the AF-assist beam emitter blinks at 1-second intervals. Check that the <Q> slave flash-ready icon is lit on the master unit’s LCD panel.
- Page 26 a: Fully Automatic Wireless Flash Shooting Autoflash Shooting Using Multiple Slave Units When you need more flash output or you want to perform lighting more easily, you can increase the number of slave units and fire them as a single flash. To add slave units, use the same procedure as “Autoflash Shooting Using One Slave Unit”.
-
Page 27: Using Fully Automatic Wireless Flash
Using Fully Automatic Wireless Flash Flash exposure compensation and other settings set on the transmitter (master unit) will also be automatically set in the flash (slave unit). You do not need to operate the slave unit. f Flash Exposure Compensation In the same way as normal exposure compensation, you can set exposure compensation for flash. - Page 28 Using Fully Automatic Wireless Flash g FEB You can take three shots while automatically changing the flash output. This is called FEB (Flash Exposure Bracketing). The settable range is up to ±3 stops in 1/3-stop increments. Display <M>. Press function button 4 to display <M>.
- Page 29 Using Fully Automatic Wireless Flash c High-speed Sync With the high-speed sync function, the flash can synchronize with all shutter speeds. This is convenient when you want to use aperture- priority AE for fill-flash portraits of a subject. Display <P>. Press function button 4 to display <P>.
- Page 30 Using Fully Automatic Wireless Flash 7: FE Lock FE (Flash Exposure) lock locks the correct flash exposure setting for any part of the scene. Perform FE lock by operating the camera. For the operations, see the camera and flash’s instruction manual. If a correct exposure cannot be obtained when FE lock is performed, <Q>...
-
Page 31: A: Wireless Multiple Flash Shooting With Flash Ratio
a: Wireless Multiple Flash Shooting with Flash Ratio Autoflash Shooting with Two Slave Groups You can divide the slave units into two firing groups, A and B, and adjust the lighting balance (flash ratio) for shooting. The exposure is controlled automatically so that the total flash output of firing groups A and B results in the standard exposure. - Page 32 a: Wireless Multiple Flash Shooting with Flash Ratio Set the flash ratio. Press function button 3 <F>. Press function button 3 <A>. Turn <9> to set the flash ratio, and press the <8> button. Press function button 4 <?> to return to the shooting-ready state.
- Page 33 a: Wireless Multiple Flash Shooting with Flash Ratio Set flash exposure compensation as required. Press function button 3 <F>, turn <9> and select <6>. Press function button 3 <B>. Turn <9> to set the flash exposure compensation amount, and press the <8>...
-
Page 34: Q: Wireless Multiple Flash Shooting With Manual Flash Output
q: Wireless Multiple Flash Shooting with Manual Flash Output This describes wireless (multiple flash) shooting using manual flash. You can shoot with a different flash output setting for each slave unit (firing group). Set all parameters on the master unit. Set the flash mode to <q>. - Page 35 q: Wireless Multiple Flash Shooting with Manual Flash Output ?: Stroboscopic Flash Stroboscopic flash is an advanced manual flash shooting method. When using stroboscopic flash with a slow shutter speed, you can shoot multiple successive movements within a single picture, similar to stop- motion pictures.
- Page 36 q: Wireless Multiple Flash Shooting with Manual Flash Output Calculating the Shutter Speed In stroboscopic flash, to ensure that the shutter stays open until the end of the continuous flashes, set the camera with a shutter speed calculated with the following equation. Number of flashes ÷...
- Page 37 q: Wireless Multiple Flash Shooting with Manual Flash Output Maximum Number of Continuous Flashes 6 - 7 8 - 9 Flash Output 1/16 1/32 1/64 1/128 12 - 14 15 - 19 20 - 50 60 - 199 250 - 500 Flash Output 1/16...
-
Page 38: Shooting With A Different Flash Mode For Each Group
[: Shooting with a Different Flash Mode for Each Group When using an EOS digital camera Ceiling released since 2012, such as the EOS-1D X, you can shoot with a different flash mode set for each firing group, with up to 5 groups (A/B/C/D/E). - Page 39 [: Shooting with a Different Flash Mode for Each Group Set the flash mode. Set the flash mode of each firing group by operating the master unit. While <M> is displayed, press function button 3 <F> and turn <9> to select the group. Press function button 2 <2>...
-
Page 40: Clearing Transmitter Settings
Clearing Transmitter Settings/Test Flash from a Slave Unit Take the picture. Each slave unit fires in the flash mode that was set for each group. When the flash mode of the firing group is set to <a> or </>, exposure is controlled to obtain a standard exposure for the main subject as a single group. -
Page 41: Modeling Flash
Modeling Flash When the camera’s depth-of-field preview button is pressed, the flash fires continuously for 1 sec. This is called the modeling flash. It enables you to see the shadow effects of the flash on the subject and the lighting balance. -
Page 42: Remote Release From A Slave Unit
Remote Release from a Slave Unit You can perform remote release (remote control shooting) from a flash set as a slave unit. For the operations, see the flash’s instruction manual. When shooting with this function, the “Release Cable SR-N3” (sold separately) may be needed, depending on your camera. -
Page 43: Linked Shooting
To shoot with linked shooting, attach a flash that supports radio transmission wireless shooting or the Speedlite Transmitter ST-E3-RT to the camera. Note that when using a camera with an N3 type remote control terminal that was released up to 2011 as the “slave unit camera,”... - Page 44 Linked Shooting Set to linked shooting mode. Press the <I> button continuously until <b> is displayed on the LCD panel. Linked shooting mode’s “Slave unit” is set. Press the <I> button again to set “Master unit” of the linked shooting mode.
- Page 45 Linked Shooting Set up the slave unit cameras. Check that the <D> lamp of the slave unit is lit in green. Set up all the slave unit cameras within approximately 30 m/98.4 ft. of the master unit camera. Take the picture. Check that the <D>...
- Page 46 Linked Shooting Shooting with manual focus is recommended for the slave unit cameras. If focus cannot be achieved with autofocus, linked shooting is not possible with the corresponding slave unit camera. There is a short time lag between the release of the slave unit camera and the release timing of the master unit camera.
-
Page 47: Setting Transmitter Functions With Camera Operations
Setting Transmitter Functions with Camera Operations This chapter describes how to set the transmitter functions from the camera’s menu screen. When the camera’s shooting mode is set to a fully automatic mode or an Image Zone mode, the operations in this chapter are not available. -
Page 48: Transmitter Control From Camera's Menu Screen
Transmitter Control from Camera’s Menu Screen When using EOS digital cameras released since 2007, you can set flash functions, transmitter functions or Custom Functions from the camera’s menu screen. For the camera operations, see the camera’s instruction manual. Transmitter Function Setting Select [External Speedlite control]. - Page 49 Transmitter Control from Camera’s Menu Screen Settings Available in [Flash function settings] EOS digital cameras released since 2012 When using the transmitter with cameras such as EOS-1D X, you can set the functions for “Radio transmission wireless shooting” in the [Flash function settings] screen.
- Page 50 Transmitter Control from Camera’s Menu Screen Flash firing To perform wireless flash shooting, set to [Enable]. When [Disable] is set, wireless flash shooting is not available. E-TTL II flash metering For normal exposures, set it to [Evaluative]. If [Average] is set, the flash exposure will be averaged for the entire scene metered by the camera.
- Page 51 Transmitter Control from Camera’s Menu Screen Wireless flash functions (setting) Radio transmission wireless flash shooting is set automatically. For details, see Chapter 2. Clear Speedlite (function) settings You can return the transmitter settings to their default settings. When [Flash mode] is set to [Individual group control], you can select [E-TTL II], [Manual flash], [Auto external flash metering] or [Disable] as the flash mode for each group.
- Page 52 Transmitter Control from Camera’s Menu Screen Transmitter Custom Function Settings The displayed contents vary depending on the camera. If C.Fn-20 and 22 are not displayed, set them by operating the transmitter. For the Custom Functions, see pages 56 to 57. Select [Flash C.Fn settings].
-
Page 53: Customizing The Transmitter
Customizing the Transmitter This chapter describes how to customize the transmitter with the Custom Functions (C.Fn) and Personal Functions (P.Fn). When the camera’s shooting mode is set to a fully automatic mode or an Image Zone mode, the operations in this chapter are not available. -
Page 54: C / >: Setting Custom And Personal Functions
C / >: Setting Custom and Personal Functions You can customize the transmitter features to suit your shooting preferences with Custom Functions and Personal Functions. Note that the Personal Functions are customizable functions unique to the transmitter. C: Custom Functions Display the Custom Functions screen. - Page 55 C / >: Setting Custom and Personal Functions Custom/Personal Function List Number Function Page Custom Functions C.Fn-01 Auto power off C.Fn-02 Modeling flash p.56 ( FEB auto cancel C.Fn-03 C.Fn-04 FEB sequence C.Fn-07 Test firing with autoflash C.Fn-13 Flash exposure metering setting p.57 C.Fn-20 Beep...
-
Page 56: C: Setting Custom Functions
C: Setting Custom Functions C.Fn-01: (Auto power off) When the transmitter is not operated for 5 min., the power turns off automatically to save energy. You can disable this function. 0: ON (Enabled) 1: OFF (Disabled) C.Fn-02: (Modeling flash) 0: % (Enabled (Depth-of-field preview button)) Press the camera’s depth-of-field preview button to fire the modeling flash. - Page 57 C: Setting Custom Functions C.Fn-07: (Test firing with autoflash) You can change the flash output when firing the test flash in E-TTL II/E-TTL autoflash mode. 0: 1/32 (1/32) 1: 1/1 (Full output) C.Fn-13: (Flash exposure metering setting) 0: 4 (Speedlite button and dial) 1: 5 (Speedlite dial only) You can perform flash exposure compensation by directly turning <9>, without pressing the <@>...
-
Page 58: Setting Personal Functions
>: Setting Personal Functions P.Fn-01: (LCD panel display contrast) You can adjust the contrast of the LCD panel in 5 levels. P.Fn-03: (LCD panel illumination color: Master) Radio transmission wireless flash shooting, linked shooting: You can select the color of the LCD panel illumination when the transmitter is set as the master unit. -
Page 59: Reference
Reference This chapter contains a system map and frequently asked questions. -
Page 60: St-E3-Rt System
$ Mini stand (supplied with 600EX-RT) % Off-Camera Shoe Cord OC-E3 Enables the ST-E3-RT to be connected to the camera up to 60 cm / 2 ft. away. & Release Cable SR-N3 If the transmitter is connected using this cable to an EOS camera... -
Page 61: Troubleshooting Guide
If a problem occurs with the transmitter, first refer to this Troubleshooting Guide. If this Troubleshooting Guide does not resolve the problem, contact your dealer or nearest Canon Service Center. Power does not turn on. Make sure that the batteries are installed in the correct orientation (p.12). - Page 62 Troubleshooting Guide The slave flash does not fire or unexpectedly fires at full output. Run the channel scan and set the channel with the best radio reception signal (p.22). Position the slave unit in clear view of the master unit, without obstacles between them.
- Page 63 Troubleshooting Guide <k> is displayed. Set the shutter speed 1 stop slower than the flash sync speed (p.19). Cannot release from a slave unit. When an EOS camera which was released up to 2011, has an N3 type remote control terminal and is compatible with E-TTL II/E-TTL autoflash is used to perform remote release from a slave unit or when it has been set as the slave unit during linked shooting, the “Release Cable SR-N3”...
-
Page 64: Specifications
Specifications Type Type: On-camera Speedlite transmitter Compatible cameras: EOS type-A camera compatible with E-TTL II/E-TTL autoflash Radio Transmission Wireless Function Exposure control system: E-TTL II/E-TTL autoflash, manual flash, stroboscopic flash, auto external flash metering* * Only when the flash mode is set to <[> Frequency: 2405 - 2475 MHz Modulation system:... - Page 65 Approx. 67.4 (W) x 61.5 (H) x 77.4 (D) mm / 2.7 x 2.4 x 3.0 in. (excluding the dust- and water-resistant adapter) Weight: Approx. 110 g / 3.9 oz. (transmitter only, excluding batteries) All specifications above are based on Canon’s testing standards. Product specifications and external appearance are subject to change without notice.
- Page 66 50 and following of Italian legislative decree 22/97. For more information regarding return and recycling of WEEE products, please visit www.canon-europe.com/environment. (EEA: Norway, Iceland and Liechtenstein)
- Page 67 MEMO...
- Page 68 MEMO...
- Page 69 MEMO...
-
Page 70: Index
Index 4 sec., 6 sec., 16 sec. timer ..10 Flash sync. speed ....... 50 Flash sync. speed in Av mode ..50 Fully automatic wireless flash Auto external flash metering ..39 shooting ........24 Auto power off ......14, 56 High-speed sync ......29 Batteries ........12 Hot shoe ........ - Page 71 Index Shutter speed ......19 Shutter sync........ 50 Slave group control ..... 33 Slave unit setting ......20 Stroboscopic flash ....... 35 Test flash ......13, 25, 40 Transmission channel ..20, 21, 22 Type-A camera ......2 Wireless flash shooting ....16 Fully automatic one slave unit ...........
- Page 72 The cameras and accessories referred to in this Instructions booklet are current as of January 2012. For information on compatibility with the cameras and accessories marketed after this date, contact your nearest Canon Service Center.
- Page 73 CANON INC. 30-2, Shimomaruko 3-chome, Ohta-ku, Tokyo 146-8501, Japan CANON U.S.A. INC. U.S.A. One Canon Plaza, Lake Success, NY 11042-1198, U.S.A. For all inquires concerning this product, call toll free in the U.S. 1-800-OK-CANON CANON CANADA INC. HEADQUARTERS CANADA 6390 Dixie Road, Mississauga, Ontario L5T 1P7, Canada CANON CANADA INC.
- Page 74 (1) this device may not cause harmful interference, and (2) this device must accept any interference received, including interference that may cause undesired Lo Speedlite 600EX-RT/ST-E3-RT è conforme con le normative locali in materia di onde radio delle seguenti operation of this device.
- Page 75 Härmed intygar Canon Inc. att denna CH9-1216 står I överensstämmelse med de väsentliga egenskapskrav och övriga relevanta bestämmelser som framgår av direktiv 1999/5/EG. Hér með lýsir Canon Inc. yfir því að CH9-1216 er í samræmi við grunnkröfur og aðrar kröfur, sem gerðar eru í tilskipun 1999/5/EC.