Table of Contents
Advertisement
Advertisement
Table of Contents

Related Manuals for Kodak EasyShare M320


Summary of Contents for Kodak EasyShare M320
- Page 2 Installing the software Before connecting any cables, install the software that was included with your camera. Follow the on-screen instructions. After installing the software, return to this user guide. Loading the KLIC-7001 battery See the Extended user guide www.kodak.com/go/m320support www.kodak.com/go/m320support...
-
Page 3: The Camera
Charging the battery Turn OFF the camera. Connect the KODAK USB Cable, Model U-8. Battery Charging light: • Steady: charging • Off: finished See the Extended user guide www.kodak.com/go/m320support www.kodak.com/go/easysharecenter... - Page 4 Turning on the camera Setting the language and date/time Language: to change. OK to accept. Date/Time: At the prompt, press OK. to change current field. for previous/next field. OK to accept. OK (press) See the Extended user guide www.kodak.com/go/m320support www.kodak.com/go/m320support...
- Page 5 2 Press the Shutter button halfway to focus and set exposure. When the framing marks turn green, press the Shutter button completely down. Framing marks See more about Auto and other modes page 11 See the Extended user guide www.kodak.com/go/m320support www.kodak.com/go/easysharecenter...
- Page 6 Reviewing pictures/videos Press the Review button to enter/exit Review. View previous/next picture/video. Play a video. Review See the Extended user guide www.kodak.com/go/m320support www.kodak.com/go/m320support...
- Page 7 Transferring pictures/videos Turn on the camera. Connect the KODAK USB Cable, Model U-8. See the Extended user guide www.kodak.com/go/m320support Purchase accessories www.kodak.com/go/m320accessories www.kodak.com/go/easysharecenter...
- Page 8 Because the more you know your camera, the more confident you become. Press the Menu button, then highlight a menu choice. Press the Telephoto (T) button. Scroll through a Help topic Turn off Help See the Extended user guide www.kodak.com/go/m320support www.kodak.com/go/m320support...
- Page 9 • taken pictures • transferred pictures to your computer Keep learning! Finish reading this book, so you can take and share your best pictures! Visit www.kodak.com/go/m320support: • the extended user guide • interactive troubleshooting and repairs • interactive tutorials • FAQs •...
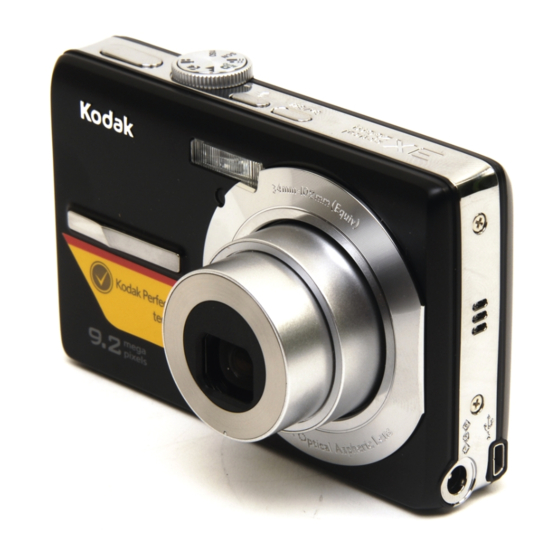
- Page 10 Front View Shutter button USB/AV Out Mode dial DC-In (5V) Flash button Microphone Power button 10 Self-timer light Speaker 11 Flash Lens/Lens cover www.kodak.com/go/m320support...
- Page 11 Back View SD/SDHC Card slot Battery charging light Share button Zoom (Telephoto/Wide Angle) button Menu button Delete button 10 Review button , OK button 11 Tripod socket Battery compartment www.kodak.com/go/easysharecenter...
- Page 12 Point-and-shoot simplicity when taking pictures in practically any situation. (See page 12.) Close-up Close range. Use available light instead of flash, if possible. Blur Reduction Reducing blur due to subject motion. High ISO Pictures of people indoors, in low light. Video Capturing video with sound. www.kodak.com/go/m320support...
- Page 13 Full-frame portraits of people. Flower Close-ups of flowers or other small subjects in bright light. Sunset Subjects at dusk. Backlight Subjects that are in shadow or “backlit” (when light is behind the subject). Candle Light Subjects illuminated by candle light. www.kodak.com/go/easysharecenter...
- Page 14 Night Portrait Reduces red eye of people in night scenes or low-light conditions. Night Landscape Distant scenery at night. Flash does not fire. Sports Action pictures. Panorama “Stitching” 2 or 3 pictures into a panorama. (Choose Right-to-Left, or Left-to-Right.) www.kodak.com/go/m320support...
-
Page 15: Using The Optical Zoom
NOTE: Optical zoom is not available in Video mode. You may notice decreased image quality when using digital zoom. The slider pauses and turns red when the picture quality reaches the limit for an acceptable 4 x 6-in. (10 x 15 cm) print. www.kodak.com/go/easysharecenter... - Page 16 The flash fires once and The flash fires once so the press the Menu button the camera eyes become accustomed and see Red Eye automatically corrects to the flash, then fires red-eye in the picture. again when the picture is Preflash. taken. Never www.kodak.com/go/m320support...
- Page 17 Capture/Video for the most common picture/video-taking settings ■ Setup for other camera settings ■ 3 Press to highlight a setting, then press OK. 4 Highlight an option, then press OK. (Some options let you use to choose a setting.) www.kodak.com/go/easysharecenter...
- Page 18 Understanding the picture-taking icons Picture size Self timer/Burst Date stamp Flash mode Pictures remaining Capture mode Storage location Album Zoom slider Focus zone Exposure metering Framing marks White balance Long time exposure Framing grid ISO speed Battery level Exposure compensation www.kodak.com/go/m320support...
-
Page 19: Viewing Pictures As Thumbnails
2 Press the Wide Angle (W) button to view pictures/videos as thumbnails. (Press it again to see more, smaller thumbnails.) 3 To see a single picture/video, press to highlight it. Then press Telephoto (T). ■ Press the Shutter button halfway down to return to Capture mode. www.kodak.com/go/easysharecenter... - Page 20 Protected Favorite tag Email tag Print tag/number of prints PERFECT TOUCH tech. Picture number Review Storage location Selected picture Previous/next picture Battery level Videos Video length Video number Review Image storage location Play time Volume control indicator Battery level www.kodak.com/go/m320support...
- Page 21 Photo gifts Prints • EASYSHARE Digital Picture Frame • 4 x 6 pictures • Cards • Enlargements, posters • HDTV devices • Calendars • Collages • Email • Mugs • Photo books • Ties ...and much more! • Shirts www.kodak.com/go/easysharecenter...
- Page 22 Share your stories! Pictures start here! Transfer Load pictures KODAK to your EASYSHARE computer. Software. Take pictures. Pictures become stories here! At home Online At a local photo retailer KODAK All-in-One Printers KODAK Picture Kiosk www.kodak.com/go/tips www.kodak.com/go/m320support...
-
Page 23: Solving Camera Problems
NOTE: The flash does not fire in all modes. Memory card is almost ■ Transfer the pictures to the computer (see page or entirely full ■ Delete pictures from the card (see page 18) or insert a new card. www.kodak.com/go/easysharecenter... - Page 24 If the LCD breaks, do not touch the glass or liquid. Contact Kodak customer support. ■ The use of an accessory that is not recommended by Kodak may cause fire, electric shock, or injury. For approved accessories, visit www.kodak.com/go/accessories. ■...
- Page 25 If Kodak is unable to repair or replace a product, Kodak will, at its option, refund the purchase price paid for the product provided the product has been returned to Kodak along with proof of the purchase price paid. Repair, replacement, or refund of the purchase price are the sole remedies under the warranty.
- Page 26 In countries other than the United States and Canada, the terms and conditions of this warranty may be different. Unless a specific Kodak warranty is communicated to the purchaser in writing by a Kodak company, no warranty or liability exists beyond any minimum requirements imposed by law, even though defect, damage, or loss may be by negligence or other act.
- Page 27 In Europe: For human/environmental protection, it is your responsibility to dispose of this equipment at a collection facility established for this purpose (separate from municipal waste). For more information, contact your retailer, collection facility, or appropriate local authorities; or visit www.kodak.com/go/recycle. VCCI Class B ITE Australian C-Tick N137 www.kodak.com/go/easysharecenter...
- Page 28 Appendix Korean Class B ITE China RoHS Eastman Kodak Company Rochester, New York 14650 © Eastman Kodak Company, 2008 Kodak, EasyShare, and Perfect Touch are trademarks of Eastman Kodak Company. 4H5119_en www.kodak.com/go/m320support...
-
Page 30: Digital Camera
KODAK EASYSHARE M320 Digital Camera Extended user guide www.kodak.com For interactive tutorials: www.kodak.com/go/howto For help with your camera: www.kodak.com/go/m320support... - Page 31 Eastman Kodak Company Rochester, New York 14650 © Eastman Kodak Company, 2008 All screen images are simulated. Kodak, EasyShare, and Perfect Touch are trademarks of Eastman Kodak Company. 4H5118_en...
- Page 32 Product features Front view Shutter button USB/AV Out Mode dial DC-In (5V) Flash button Microphone Power button 10 Self-timer light Speaker 11 Flash Lens/Lens cover www.kodak.com/go/support...
- Page 33 Product features Back view SD/SDHC Card slot Battery charging light Share button Zoom (Telephoto/Wide Angle) button Menu button Delete button 10 Review button , OK button 11 Tripod socket Battery compartment www.kodak.com/go/support...
-
Page 34: Table Of Contents
Selecting multiple pictures/videos ..............14 Making a multimedia slide show ..............15 Using the menu button in review..............17 Cropping pictures..................18 Using KODAK PERFECT TOUCH Technology..........18 Adding sound tags ..................19 Copying pictures/videos................20 Editing videos ..................... 21 Understanding the review icons.............. - Page 35 8 Appendix .....................47 Camera specifications ................. 47 Care and maintenance ................49 Upgrading your software and firmware............50 Storage capacities ..................50 Important safety instructions ............... 50 Battery replacement, battery life ..............51 Limited warranty ..................52 Regulatory compliance ................54 www.kodak.com/go/support...
-
Page 36: Setting Up Your Camera
Setting up your camera IMPORTANT: For package contents, see your product package. Attaching the strap Loading the KLIC-7001 battery For information on replacing the battery and extending battery life, see page www.kodak.com/go/support... -
Page 37: Charging The Battery
Setting up your camera Charging the battery Turn OFF the camera. Connect the KODAK USB Cable, Model U-8. Battery Charging light: • Steady: charging • Off: finished Learn other charging options page 4 Learn more about batteries page 51 Turning on the camera... -
Page 38: Setting The Language And Date/Time
Inserting or removing a card while the camera is on may damage the pictures, the card, or the camera. 1 Turn off the camera. optional 2 Insert or remove the optional card. 3 Turn on the camera. Purchase accessories www.kodak.com/go/m320accessories www.kodak.com/go/support... -
Page 39: Other Charging Options
First, turn OFF the camera. The charging light is steady during charging and turns off when the battery is fully charged. KODAK 5V AC Adapter (May be sold separately.) KODAK USB Cable and a USB computer port Ensure that the USB cable is connected to a powered USB... -
Page 40: Taking Pictures/Videos
NOTE: Multiple framing marks may appear when faces are detected. (The primary face gets a yellow framing mark.) When you press the Shutter button halfway down, the framing marks attempt to follow the main subject. Framing marks do not appear in all modes. www.kodak.com/go/support... -
Page 41: Using Optical And Digital Zoom
NOTE: Optical zoom is not available in Video mode. You may notice decreased image quality when using digital zoom. The slider pauses and turns red when the picture quality reaches the limit for an acceptable 4 x 6-in. (10 x 15 cm) print. www.kodak.com/go/support... -
Page 42: Using The Flash
The flash fires once so the page the camera eyes become accustomed automatically corrects to the flash, then fires red-eye in the picture. again when the picture is taken. Never Your camera saves the flash setting, even after you turn off the camera. www.kodak.com/go/support... -
Page 43: Using Different Modes
(See page Close-up Close range. Use available light instead of flash, if possible. Blur Reducing blur due to subject motion. Reduction High ISO Pictures of people indoors, in low light. Video Capturing video with sound. (See page 11.) www.kodak.com/go/support... - Page 44 Night Portrait Reduces red eye of people in night scenes or low-light conditions. Night Landscape Distant scenery at night. Flash does not fire. Sports Action pictures. Panorama “Stitching” 2 or 3 pictures into a panorama. (Choose Right-to-Left, or Left-to-Right.) www.kodak.com/go/support...
-
Page 45: Taking Panoramic Pictures
5 If you are taking only 2 pictures, press OK to stitch them together. After you take 3 pictures, the pictures are automatically stitched together. Take 2 or 3 pictures. Get 1 panoramic picture. NOTE: To use the self-timer 10-second or 2-second setting, see page www.kodak.com/go/support... -
Page 46: Taking A Video
Understanding the picture-taking icons Picture size Self timer Date stamp Flash mode Pictures remaining Capture mode Storage location Album Zoom slider Focus zone Exposure metering Framing marks White balance Long time exposure Framing grid ISO speed Battery level Exposure compensation www.kodak.com/go/support... -
Page 47: Working With Pictures/Videos
During playback: ■ Press OK to pause/resume. ■ Press to adjust the volume. ■ Press to play at 2X speed; press again for 4X. ■ Press to reverse at 2X speed; press again for 4X. Playback speed Forward Reverse www.kodak.com/go/support... -
Page 48: Deleting Pictures/Videos
IMPORTANT: Your camera offers a built-in Help system. See page CAUTION: Formatting internal memory or an SD or SDHC Card deletes all (including protected) pictures/videos. (Formatting internal memory also deletes email addresses and tag names. To restore them, see EASYSHARE Software Help.) www.kodak.com/go/support... -
Page 49: Viewing Pictures/Videos In Different Ways
2 Press OK to select pictures/videos. A check mark appears on the picture. You can now print, transfer, delete, etc. the selected pictures. You Selected can press OK a second time to remove a check mark. pictures www.kodak.com/go/support... -
Page 50: Making A Multimedia Slide Show
Preview Show, then press OK. Each picture/video is displayed once. To interrupt the slide show, press OK. After the slide show plays, you may save or modify it. IMPORTANT: Your camera offers a built-in Help system. See page www.kodak.com/go/support... -
Page 51: Displaying Pictures/Videos On A Television
To connect the camera directly to a television, use an A/V cable (may be sold separately). Purchase accessories www.kodak.com/go/m320accessories NOTE: Ensure that the Video Out setting (NTSC or PAL) is correct (see page 29). The slide show stops if you connect or disconnect the cable while the slide show is running. -
Page 52: Using The Menu Button In Review
■ Edit to edit pictures/videos ■ Setup to control how your camera operates 3 Press to highlight a setting, then press OK. 4 Highlight an option, then press OK. IMPORTANT: Your camera offers a built-in Help system. See page www.kodak.com/go/support... -
Page 53: Cropping Pictures
IMPORTANT: Your camera offers a built-in Help system. See page Using KODAK PERFECT TOUCH Technology KODAK PERFECT TOUCH Technology helps ensure better, brighter pictures. (You cannot apply PERFECT TOUCH Technology to videos, panoramic pictures, or pictures to which PERFECT TOUCH Technology is already applied.) -
Page 54: Adding Sound Tags
IMPORTANT: Your camera offers a built-in Help system. See page Playing a sound tag 1 Press the Review button, then to find a sound-tagged picture. 2 Press to play the sound tag. 3 Press to adjust the volume. 4 Press OK to stop playback. www.kodak.com/go/support... -
Page 55: Copying Pictures/Videos
Copy, then press OK. Highlight a choice (this picture, or all pictures), then press OK. NOTE: Pictures/videos are copied, not moved. To remove pictures/videos from the original location after copying, delete them (see page 13). IMPORTANT: Your camera offers a built-in Help system. See page www.kodak.com/go/support... -
Page 56: Editing Videos
Edit tab. Highlight Trim, then press OK. Video Trimmed video 3 Follow the screen prompts. The video is trimmed. (You can save it as a new video or replace the original.) ■ Press the Shutter button halfway down to return to Capture mode. www.kodak.com/go/support... -
Page 57: Making A Video Action Print
Manual—Choose the first and last frames; the camera chooses 2, 7, or 14 frames. A 4-, 9-, or 16-up picture is created. ■ Press the Shutter button halfway down to return to Capture mode. IMPORTANT: Your camera offers a built-in Help system. See page www.kodak.com/go/support... -
Page 58: Understanding The Review Icons
Protected Favorite tag Email tag Print tag/number of prints PERFECT TOUCH tech. Picture number Review Storage location Selected picture Previous/next picture Battery level Videos Video length Video number Review Image storage location Play time Volume control indicator Battery level www.kodak.com/go/support... -
Page 59: Doing More With Your Camera
4 Highlight an option, then press OK. Using the Capture tab Press Menu, Picture-taking Options and OK to access settings IMPORTANT: Your camera offers a built-in Help system. See page Exposure Compensation 0.0, +/-0.3, +/-0.7, +/-1.0, +/-1.3, +/-1.7, +/-2.0 Make a picture lighter or darker. www.kodak.com/go/support... - Page 60 Color Mode High Color Choose color tones. Natural Color Unavailable in Video mode. Low Color Black & White Sepia—for a reddish-brown, antique look. NOTE: EASYSHARE Software also lets you change a color picture to black-and-white or sepia. www.kodak.com/go/support...
- Page 61 Ideal for general picture taking. Select a large or concentrated area of focus. Center-Zone—evaluates the small area centered in the LCD. Ideal when you need precise focus. ISO Speed Auto Control the camera’s light ISO 80, 100, 200, 400, 800, 1000 sensitivity. www.kodak.com/go/support...
-
Page 62: Using The Setup Tab
Using the Setup tab Use Setup to customize your camera. Press Menu, to highlight Setup Options Setup, then to access IMPORTANT: Your camera offers a built-in settings Help system. See page LCD Brightness Power Save Choose LCD brightness. High Power www.kodak.com/go/support... - Page 63 On—the camera rotates pictures to their correct Orient pictures/videos so that they are orientation. displayed with the correct side up. Off—pictures are not rotated. Camera Sounds Exit Choose sound effects. Theme Power on Focus lock Shutter Self-Timer Error Sound Volume High Medium www.kodak.com/go/support...
- Page 64 Cancel—exits without making a change. Formatting deletes all Internal Memory—deletes everything in pictures/videos, internal memory including email addresses and tag including those that are names; formats the internal memory. protected. Removing a card during formatting may damage the card. About View camera information. www.kodak.com/go/support...
-
Page 65: Using The Self-Timer
The camera takes the picture/pictures after the delay. NOTE: In Panoramic modes (see page 10), only the 2- and 10-second options are available. Use the same procedure to take a 2- or 10-second self-timer video, but press the Shutter button completely down. www.kodak.com/go/support... -
Page 66: Using Burst Mode
The camera stops taking pictures when you release the Shutter button, when the pictures are taken, or when there is no more storage space. NOTE: During quickview, you can delete all pictures in the burst series. To delete selectively, do so in Review (see page 13). www.kodak.com/go/support... -
Page 67: Transferring, Printing, Tagging
Installing the software 1 Close all open software applications before starting the installation. NOTE: If running WINDOWS OS and installing EASYSHARE Software from the Kodak Web site, do not close the WinZip application. If prompted, allow EASYSHARE Software to access the Internet. -
Page 68: Transferring Pictures/Videos
Transferring pictures/videos Using the USB cable Turn on the camera. Connect a KODAK USB Cable, Model U-8. Using other options You can also use a KODAK Card Reader to transfer your pictures/videos. Purchase accessories www.kodak.com/go/m320accessories Learn more about connecting www.kodak.com/go/howto www.kodak.com/go/support... -
Page 69: Printing Pictures
Transferring, printing, tagging Printing pictures Direct printing with a KODAK All-in-One Printer Your camera is compatible with PICTBRIDGE Technology, so you can print directly to PICTBRIDGE enabled Printers. You need a camera with a fully charged battery, a PICTBRIDGE enabled Printer, and a USB cable. -
Page 70: Ordering Prints Online
After you transfer pictures from the camera to your computer, you can print them from EASYSHARE Software. For details, see Help in EASYSHARE Software. Ordering prints online KODAK Gallery (www.kodakgallery.com) is one of the many online print services offered in EASYSHARE Software. You can easily: ■... -
Page 71: Tagging Your Pictures
Press the Shutter button halfway down to return to Capture mode. IMPORTANT: Your camera offers a built-in Help system. See page Printing tagged pictures When you transfer the tagged pictures to your computer, the EASYSHARE Software print screen opens. For details on printing, see Help in EASYSHARE Software. www.kodak.com/go/support... -
Page 72: Tagging Pictures/Videos For Emailing
2 Press to highlight Email or Tag, then press OK. 3 Press to highlight New Email or New Tag, then press OK. 4 Use the on-camera keyboard, then press OK. The email address or tag name are now available. www.kodak.com/go/support... - Page 73 To remove a selection, highlight a tag name and press OK. To remove all tag selections, highlight Clear All, then press OK. When you transfer the tagged pictures/videos to your computer, EASYSHARE Software opens and categorizes your pictures/videos with the appropriate tag. IMPORTANT: Your camera offers a built-in Help system. See page www.kodak.com/go/support...
- Page 74 Press the Shutter button halfway down to return to Capture mode. When you transfer the tagged pictures/videos to your computer, EASYSHARE Software opens and categorizes your pictures/videos with the appropriate tag. IMPORTANT: Your camera offers a built-in Help system. See page www.kodak.com/go/support...
-
Page 75: Troubleshooting
32). or entirely full ■ Delete pictures from the card (see page 13) or insert a new card. The battery does not ■ page 2 or visit www.kodak.com/go/USBcharging. charge using USB ■ Insert a new battery (see page charging www.kodak.com/go/support... - Page 76 ■ Turn on the camera. ■ Make sure the USB cable model U-8 is connected to the camera and the computer (see page 33). ■ Make sure EASYSHARE Software is installed (see page 32). www.kodak.com/go/support...
-
Page 77: Picture Quality Problems
To automatically set exposure and focus, press the Shutter button halfway. When the framing marks turn green, press the Shutter button completely down to take the picture. ■ In Panorama SCN mode, adjust the Exposure Compensation (see page 24). www.kodak.com/go/support... - Page 78 Make sure there is a connection between the camera and the printer (see page 34). ■ Make sure the printer and the camera have power. Camera or printer ■ Follow the prompts to resolve the issue. display an error message www.kodak.com/go/support...
-
Page 79: Getting Help
If you learn nothing else about your camera, learn how to use on-camera Help. Because the more you know your camera, the more confident you become! Turning on camera Help Press the Menu button, then highlight a menu choice. Press the Telephoto (T) button. Scroll through a Help topic Turn off Help www.kodak.com/go/support... -
Page 80: Getting Help On The Web
(or see Help in EASYSHARE Software) Get help with the WINDOWS Operating System and www.kodak.com/go/pcbasics working with digital pictures Other Get support for cameras, software, accessories, more www.kodak.com/go/support Get information on KODAK Inkjet Products www.kodak.com/go/inkjet Optimize your printer for truer, more vibrant colors www.kodak.com/go/onetouch www.kodak.com/go/support... -
Page 81: Getting Help On The Telephone
Getting help Getting help on the telephone NOTE: If you have questions concerning this product, you may speak with Kodak customer support. Australia 1800 267 588 Netherlands 020 346 9372 Austria 0179 567 357 New Zealand 0800 880 120 Belgium... -
Page 82: Appendix
10 m (32.8 ft)–infinity @ wide, Landscape mode Auto focus control—Still: Continuous and Single AF; Video: Continuous Face detection—Up to 3 faces Shutter speed—4–1/1400 seconds; long time exposure 0.5–4 seconds ISO speed—Auto: 80–160; Manual: 80, 100, 200, 400, 800, 1000 Exposure metering—TTL-AE; Multi-Pattern, Center-Weight, Center-Spot www.kodak.com/go/support... - Page 83 Sharpness modes—Sharp, Normal, Soft Video capture— < 80 minutes maximum VGA (640 x 480 @ 30 fps) QVGA (320 x 240 @ 30 fps) Communication with computer—USB 2.0 full speed (PIMA 15740 protocol); via USB cable model U-8 Video output—NTSC or PAL www.kodak.com/go/support...
-
Page 84: Care And Maintenance
Do not allow chemicals, such as suntan lotion, to contact painted surfaces. ■ Service agreements may be available in your country. Contact a dealer of KODAK Products for more information. ■ For digital camera disposal or recycling information, contact your local authorities. -
Page 85: Upgrading Your Software And Firmware
If the LCD breaks, do not touch the glass or liquid. Contact Kodak customer support. ■ The use of an accessory that is not recommended by Kodak may cause fire, electric shock, or injury. For approved accessories, visit www.kodak/go/accessories. ■... -
Page 86: Extending Battery Life
■ Remove the battery when the product is stored for an extended period of time. In the unlikely event that battery fluid leaks inside the product, contact Kodak customer support. ■ In the unlikely event that battery fluid leaks onto your skin, wash immediately with water and contact your local health provider. -
Page 87: Limited Warranty
If Kodak is unable to repair or replace a Product, Kodak will, at its option, refund the purchase price paid for the Product provided the Product has been returned to Kodak along with proof of the purchase price paid. - Page 88 Appendix operation, maintenance or repacking instructions, failure to use items supplied by Kodak (such as adapters and cables), or claims made after the duration of this warranty. Kodak makes no other express or implied warranty for this product, and disclaims the implied warranties of merchantability and fitness for a particular purpose.
-
Page 89: Regulatory Compliance
In Europe: For human/environmental protection, it is your responsibility to dispose of this equipment at a collection facility established for this purpose (separate from municipal waste). For more information, contact your retailer, collection facility, or appropriate local authorities; or visit www.kodak.com/go/recycle. Product weight: 125 g (4.4 oz) www.kodak.com/go/support... - Page 90 Appendix Australian C-Tick N137 Korean Class B ITE Korean Class B ITE Russian GOST-R Eastman Kodak Company Rochester, NY 14650 AIO-40 www.kodak.com/go/support...
-
Page 91: Canadian Doc Statement
This device complies with Industry Canada RSS-210 and FCC Rules. Operation is subject to the following two conditions: (1) this device may not cause harmful interference, and (2) this device must accept any interference received, including interference that may cause undesired operation. www.kodak.com/go/support... - Page 92 9 date setting, 3 blur warning, 27 date stamp, 28 button DC-in, i delete, ii, 6 delete button, ii menu, ii deleting review, ii during quickview, 6 telephoto/zoom, 6 from internal memory, 13 from SD/SDHC card, 13 www.kodak.com/go/support...
- Page 93 26 upgrading, 50 favorites tagging, 38 KODAK PERFECT TOUCH FCC compliance, 54 Technology, 18 fireworks, 9 Kodak Web sites, 44 firmware, upgrading, 50 flash, i language, 29 flash button, i LCD, ii flash, using, 7 reviewing pictures, 12...
- Page 94 24 pictures microphone, i copying, 20 mode dial, i cropping, 18 modes, 8 emailing tagged, 37 auto, 8 KODAK PERFECT TOUCH, 18 backlight, 9 printing, 35 beach, 9 printing tagged, 36 children, 9 protecting, 13 fireworks, 9 review icons, 23...
- Page 95 (SCN), 9 upgrading, 50 SD Card slot, ii sound volume, 28 SD/SDHC card speaker, i inserting, 3 specifications, camera, 47 printing from, 35 strap, 1 select multiple pictures/videos, 14 support, technical, 46 self-portrait, 9 self-timer, 30, 31 www.kodak.com/go/support...
- Page 96 40 zoom turning camera on and off, 2 optical, 6 zoom button, ii undelete, undo, 13 upgrading software, firmware, 50 URLs, Kodak Web sites, 44 transferring pictures, 32 USB/AV Out, i video action print, 22 www.kodak.com/go/support...