Advertisement
Advertisement

Related Manuals for Sharper Image CA825

Summary of Contents for Sharper Image CA825
- Page 1 Electric Shoe Buffer CA825 Instructions Read and save these instructions.
- Page 3 We offer generous return privileges and excellent warranties on all our products. For more than 25 years, The Sharper Image has shared the fun of discovering innovative products that make life better and more enjoy- able.
-
Page 4: Table Of Contents
Table of Contents Important Safety Instructions ............5 Parts Diagram................7 Assembly..................8 Buff Installation ................10 Operating Instructions ..............11 Warranty ..............Back Cover... -
Page 5: Important Safety Instructions
IMPORTANT SAFETY INSTRUCTIONS THIS PRODUCT IS INTENDED FOR HOUSEHOLD USE. WHEN USING ELECTRICAL APPLIANCES, BASIC SAFETY PRECAUTIONS SHOULD ALWAYS BE FOLLOWED. WARNING : •Make sure outlet is 120V. •To reduce the risk of electric shock, buffer has a polarized plug (one blade is wider than the other). - Page 6 IMPORTANT SAFETY INSTRUCTIONS •Do not operate with a damaged power cord or plug, or if buffer has malfunctioned or has been damaged in any manner. •Unplug when not in use, or before cleaning or moving. •Do not disconnect plug by pulling cord. •Keep out of reach of children.
-
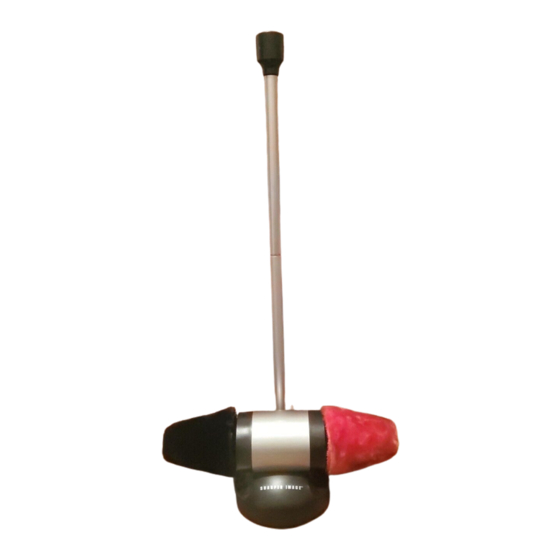
Page 7: Parts Diagram
Parts Diagram Main Body Buff Holder Upper Tube with On-Off Switch Lower Tube Small Screw Buff (Black) Large Screw Buff (Red) -
Page 8: Assembly
Assembly Ensure that the rear side of the Upper Tube is facing the same direction as the rear side of the Main Body. Rear Side of the Front Side of the Upper Tube Upper Tube Insert narrow end of Upper Tube (with button) into Lower Tube, matching screw holes. - Page 9 Assembly (Fig. 1) (Fig. 2)
-
Page 10: Buff Installation
Buff Installation 1. Unplug the unit. 2. Detach the Buff Holder from the Main Body of the unit. (See Fig. 3.) 3. Place the buff on the buff holder with the ribbon as indicated. Ensure that the ribbon is around the edge of the Buff Holder and not through the center. -
Page 11: Operating Instructions
Operating Instructions 1. Plug in the unit. 2. Press and hold the button slightly. The polisher starts. (See Fig. 6.) 3. Move your shoe under the rotating buff. Use the black buff when wearing black or dark shoes. Use the red buff for light colored shoes. -
Page 12: Warranty
The Sharper Image will repair any defects in materials or workmanship. In the event repair is not possible, The Sharper Image will either replace this product with one of similar features and price, or refund the full purchase price of the product, whichever you prefer.