Table of Contents
Advertisement
Advertisement
Table of Contents

Related Manuals for Akai KHT-S558


Summary of Contents for Akai KHT-S558
- Page 1 KHT-S558 5.1 Channel DVD Home Theatre System Instruction Manual...
-
Page 2: Remote Control
Remote Control Power Number keys 0 /10 Go To Program Stop Source Menu / PBC 10 Navigation (arrow) buttons 11 Enter 12 Setup 13 DVD/USB 14 Search 15 Subtitle 16 Angle 17 CEN - / + (Centre) 18 SW - / + (Subwoofer) 19 Mute 20 Open / Close 21 CH -... -
Page 3: Table Of Contents
Contents Remote Control Warranty Details Welcome General Safety Instructions Product Overview Getting Started Instructions FAQs Other Useful Information Repair and Refurbished Goods or Parts Notice... -
Page 4: General Safety Instructions
General Safety Instructions Read this manual thoroughly before first use and keep it in a safe place for future reference, along with the warranty card, purchase receipt and carton. The safety precautions enclosed herein reduce the risk of fire, electric shock and injury when correctly adhered to. - Page 5 General Safety Instructions (Cont.) Installation Location: When installing the unit, make sure to place it: • In a well ventilated area. Do not build it into a frame. • Away from heat sources, radiators or other products that produce heat. •...
-
Page 6: Moisture Condensation
General Safety Instructions (Cont.) Moisture condensation The unit may suffer from condensation in the following situations: • When you take the unit directly from a cold to a warm place, and vice versa. • When you use the unit in a room where you just turned on a heater, or where cold air from an air conditioner is directed on to the unit. -
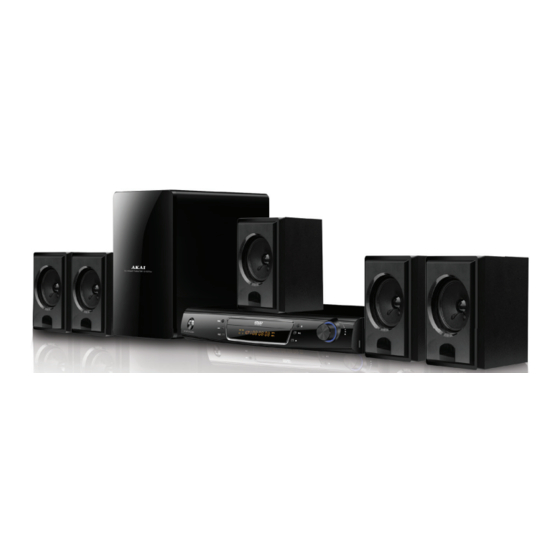
Page 7: Product Overview
Product Overview Front Panel 1. STANDBY 6. LED DISPLAY 11. USB PORT 2. NEXT ( CH+) 7. STOP 3. PREV ( CH-) 8. PLAY/PAUSE 4. SOURCE 9. OPEN/CLOSE 5. DVD TRAY 10. VOLUME CONTROL Rear Panel 1. R/L AUDIO OUTPUT 6. -
Page 8: Getting Started
Getting Started Loading batteries Open the cover at the back of the remote control unit. Insert two AAA size batteries following the polarity (+ / -) markings. Place the cover back into position. Precautions for batteries • CAUTION: Danger of explosion! Ensure to insert batteries according to the polarity markings inside the battery compartment. - Page 9 Getting Started (Cont.) Installing and connecting the system • Before installing the components of the home theatre system, and before connecting any other components to the system, make sure the power has been disconnected to all units. • Audio video cables are connected according to the different colour identification. They should all be connected firmly, as illustrated below.
-
Page 10: Adjusting The Volume
Getting Started (Cont.) Preparations • All parts of the home theatre system must be placed on a stable, flat surface that is strong enough to support the weight. • Make sure to connect the system to a 240V~50Hz AC power supply. •... -
Page 11: Instructions
Instructions DVD Playback Starting up • Connect the 5.1 Channel DVD Home Theatre System to your TV. • Switch on your TV set and select the appropriate input mode. • Plug the 5.1 Channel DVD Home Theatre System into an appropriate power point and switch on power to the outlet. -
Page 12: Other Functions
Instructions (Cont.) Basic playback controls • Press the PLAY/PAUSE button to play or pause the disc. • Press the CH- button to skip backward to the previous title/chapter. • Press the CH+ button to skip forward to the next title/chapter. •... -
Page 13: Menu/Pbc
Instructions (Cont.) Subtitles Press the SUBTITLE button to display the subtitles when watching movies/ recordings on multi-subtitle encoded discs. (This function only works with multi- subtitle encoded discs.) For example, to select language 1 (English) from 8 options, press the SUBTITLE button and select “English”. -
Page 14: Search
Instructions (Cont.) FM Radio Preparations Insert the FM antenna cable in the FM ANT socket at the back panel of the unit. • Press the SOURCE button to change to FM mode. NOTE: You cannot switch to FM mode when the system is in USB mode. Auto-searching stations •... -
Page 15: Usb Playback
Instructions (Cont.) USB Playback This 5.1 Channel DVD Home Theatre System supports the following USB playback multimedia formats: MP3, WMA, AVI, JPEG. • Insert your USB device firmly into the USB port on the right side of the front pannel. (a) If there is no disc in the disc tray, the player will automatically play the multimedia files from the USB device. - Page 16 Instructions (Cont.) Audio CD ripping • NOTE: The CD, MP3 disc must be in good condition, have no scratches or marks and should play smoothly. • NOTE: The destination USB device must be compatible with the DVD Player and have enough space. In CD playback mode, press the COPY button on the remote control to display the CD ripping interface.
-
Page 17: Setup Menu
Instructions (Cont.) Setup Menu Setup options for your General Setup, Audio Setup, Dolby Setup, Video Setup and Preferences can be accessed from the main setup menu. Available options for each are listed on the following pages. The general procedure for selecting setup options is as follows: •... -
Page 18: Subtitle
Instructions (Cont.) Angle mark Press the ANGLE button repeatedly to view the same image from different angles when watching sport, concerts or theatrical programs on multi-angle encoded discs. This function only works with multi-angle encoded discs. OSD language Use this option to set the language of the on-screen display and setup menu. You can choose from eight different languages. -
Page 19: Speaker Setup
Instructions (Cont.) Speaker setup Downmix setup Select the speakers setup between to LT/RT STEREO, 3D SURROUND 5.1CH. Front speaker Here you can set the front speakers' volume: Large, Small. Centre speaker Here you can set the centre speaker's volume: Large, Small or Off. Rear speaker Here you can set the rear speakers' volume: Large, Small or Off. - Page 20 Instructions (Cont.) Equaliser EQ type Here you can set the audio output to simulate the various kinds of music effect. Bass boost Here you can enhance the bass degree. Super bass Here you can enhance the super bass degree. Treble boost Here you can enhance the treble boost degree.
- Page 21 Instructions (Cont.) 3D processing Under this menu you can select options to enable a group of sound effects that manipulate the sound produced by surround sound speakers to give 3D audio effect. Dolby setup Dual mono Select from Stereo, L-Mono, R-Mono and Mix-Mono output options. Dynamic Use this setting to dynamically lower the volume and still keep the original tone...
-
Page 22: Video Setup
Instructions (Cont.) Video setup Component Change the video output setting to S-Video or YUV (Component/YPbPr). Quality Sharpness: Set the sharpness of the video output. Brightness: Set the brightness of the video output. Contrast: Set the contrast level of the video output. Gamma: Set the gamma value of the video output. - Page 23 Instructions (Cont.) Preferences The preference setting is active only when no disc is inserted, or when the disc has completely stopped. The setting will be effective the next time the power is switched on, until the saved setting is changed. TV type Use this setting to select NTSC, PAL or AUTO, depending on your TV system.
-
Page 24: Parental Control
Instructions (Cont.) Audio Set the preferred audio language as default when playing a DVD (if the DVD supports the language). Subtitle Set the preferred subtitle language as default when playing a DVD (if the DVD supports the language). Disc menu Set the preferred menu language as default when playing a DVD (if the DVD supports the language). -
Page 25: Faqs
FAQs If you encounter problems with your home theatre system, check in the list below for solutions to common problems. If none of the solutions offered help you solve the problem, contact our after sales support line for advice. Problem Solution Make sure that the power connection is secure. -
Page 26: Other Useful Information
Other Useful Information Specifications Power Supply ~110-240V 50/60Hz 120W Power consumption Output power Front, Rear, Centre 10W x 5 Subwoofer Frequency response 20Hz – 20kHz Disc Playback DVD, VCD, Audio CD, MP3CD FM Tuner Frequency range FM 87.5 MHz ~ 108.0 MHz Specification File system FAT, FAT32... - Page 27 Warranty Certificate If your product is faulty or you are experiencing difficulties using this product and require assistance please call our customer assistance helpline as listed below: info@tempo.org This product has been manufactured to the highest quality standards. This product is warranted to the original purchaser or gift recipient and is not transferable.
- Page 28 – The product can be personally returned to the original place of purchase for product repair, replacement or refund. Please ensure the product is properly packaged so as to ensure, that no damage occurs to the product during transit. Also make sure that you have included an explanation of the problem.