Table of Contents
Advertisement
Quick Links
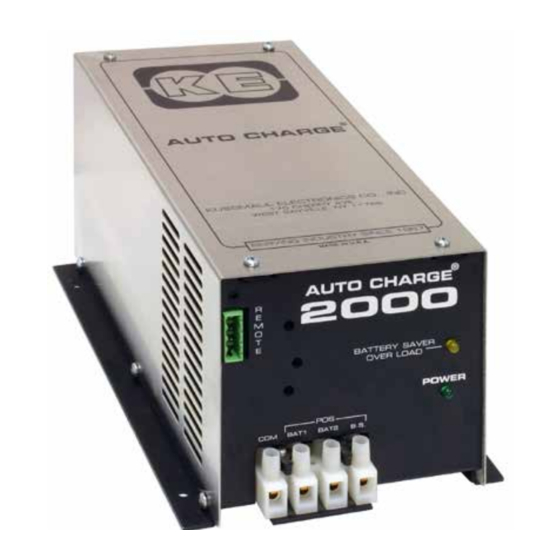
AUTO CHARGE 2000
AUTOMATIC DUAL OUTPUT BATTERY CHARGER
File: IM_091-39-12_revd.indd
Rev: D
Revised By: MFG
Date: 10-18-2013
170 Cherry Avenue
West Sayville, NY 11796
www.kussmaul.com
INSTRUCTION MANUAL
MODEL #: 091-39-12
INPUT: 120 Volt, 50/60 Hz, 3.5 Amps
OUTPUT BATTERY 1 & 2: 15 Amps
OUTPUT BATTERY SAVER: 3 Amps
3 YEAR WARRANTY
scan using your mobile
device for more information
Ph: 800-346-0857
Fax: 631-567-5826
sales@kussmaul.com
Advertisement
Table of Contents

Related Manuals for KUSSMAUL 091-39-12


Summary of Contents for KUSSMAUL 091-39-12
-
Page 1: Instruction Manual
INSTRUCTION MANUAL AUTO CHARGE 2000 AUTOMATIC DUAL OUTPUT BATTERY CHARGER MODEL #: 091-39-12 INPUT: 120 Volt, 50/60 Hz, 3.5 Amps OUTPUT BATTERY 1 & 2: 15 Amps OUTPUT BATTERY SAVER: 3 Amps File: IM_091-39-12_revd.indd Rev: D scan using your mobile... -
Page 2: Important Safety Instructions
IMPORTANT SAFETY INSTRUCTIONS I. PERSONAL PRECAUTIONS: 1. Someone should be within range of your voice or close enough to come to your aid when you work near a lead-acid battery. 2. Have plenty of fresh water and soap nearby in case battery acid contacts skin, clothing, or eyes. 3. - Page 3 INTRODUCTION The Auto Charge 2000 is a compact, completely automatic, dual channel battery charger designed for vehicles with two batteries. The charger is ruggedized to withstand the shock and vibration encountered by vehicle mounted equipment. FEATURES I. AUTO CHARGE 2000 BATTERY CHARGER •...
-
Page 4: Battery Saver
IV. BATTERY SAVER A 3 ampere Battery Saver is built into the charger. When connected as shown in the installation wiring diagram, loads on battery #1 such as radios and rechargeable hand lights are automatically switched to the Battery Saver when power is applied to the charger. The Battery Saver allows more efficient charging by removing these loads. -
Page 5: Wiring Specifications
WIRING I. BATTERY CHARGER WIRING INSTRUCTIONS 1. Refer to Installation Wiring Diagram. 2. Refer to Wiring Specifications to determine the recommended wire size and maximum lengths. Using a smaller gauge may cause overheating of the terminal. Additional information is available upon request if longer, larger wiring is required. -
Page 6: Installation Wiring Diagram
INSTALLATION WIRING DIAGRAM I. WIRING DIAGRAM IS FOR A 10 FOOT INSTALLATION... -
Page 7: Specifications
SPECIFICATIONS Input Power: 120 Volt, 50/60 Hz, 3.5 Amperes Input Fuse: 6 ampere, fast blow Output Power - Bat 1 & Bat 2: 12 Volts DC, 15 Amperes Max, Total Output Output Power - Battery Saver: 12 Volts DC, 3 Amperes Max Remote Sensing: Electronic, sense wires not required LED Status Indicators: Power: Red LED, Indicates 120 Volt AC power applied... -
Page 8: Installation Record
VEHICLE OWNER _______________________________________________________ WARRANTY POLICY All products of Kussmaul Electronics Company Inc. are warranted to be free of defects of material or workmanship. Liability is limited to repairing or replacing at our factory, without charge, any material or defects which become apparent in normal use within 3 years from the date the equipment was shipped.