Table of Contents
Advertisement
SOYO KT333
Congratulations on your new purchase of
DRAGON Plus
motherboard for the AMD platform!
This new motherboard offers support for ultra fast DDR400 memory.
However, since DDR400 is not a JEDEC (The Joint Electron Device
Engineering Council) approved memory specification, some users might
experience DDR400 incompatibilities as a result of discrepancy in memory
manufacturing.
In an effort to provide our customers the highest product quality and
performance, SOYO has tested a number of memory modules to ensure
compatibility. Please visit our web site at
http://www.soyousa.com/products/proddesc.php?id=176
for information
on Recommended Memory.
In some cases BIOS upgrade might be required to take advantage of this
new feature. Please refer to our Support section on the web site for more
information.
Advertisement
Table of Contents

Related Manuals for SOYO SY-KT333 DRAGON Plus


Summary of Contents for SOYO SY-KT333 DRAGON Plus
- Page 1 DDR400 incompatibilities as a result of discrepancy in memory manufacturing. In an effort to provide our customers the highest product quality and performance, SOYO has tested a number of memory modules to ensure compatibility. Please visit our web site at http://www.soyousa.com/products/proddesc.php?id=176 for information on Recommended Memory.
- Page 2 SY-KT333 DRAGON Plus Motherboard **************************************************** AMD Athlon & Duron Processors Supported VIA KT333CE AGP/PCI Motherboard 100/133 MHz Front Side Bus supported ATX Form Factor **************************************************** User's Manual...
- Page 3 It is the policy of SOYO Computer Inc. to respect the valid patent rights of third parties and not to infringe upon or to cause others to infringe upon such rights.
-
Page 4: Table Of Contents
CHAPTER 1 MOTHERBOARD DESCRIPTION......1 INTRODUCTION.............1 UNPACKING THE MOTHERBOARD ......1 KEY FEATURES..............2 HANDLING THE MOTHERBOARD ......6 ELECTROSTATIC DISCHARGE PRECAUTIONS..6 SY-KT333 DRAGON Plus MOTHERBOARD LAYOUT..7 ...8 SY-KT333 DRAGON Plus MOTHERBOARD COMPONENTS CHAPTER 2 HARDWARE INSTALLATION ........10 PREPARATIONS............10 INSTALLATION GUIDE ..........11 QUICK BIOS SETUP.............38 CHAPTER 3 BIOS SETUP UTILITY..........43... - Page 5 Table of Contents SY-KT333 DRAGON Plus CHAPTER 6 VIA LAN DRIVER INSTALLATION......98 APPENDIX A .......101 TROUBLESHOOTING AT FIRST START APPENDIX B ...........107 CONTACT INFORMATION...
-
Page 6: Chapter 1 Motherboard Description
Chapter 1 MOTHERBOARD DESCRIPTION 1-1 INTRODUCTION The SY-KT333 DRAGON Plus AGP/PCI motherboard is a high performance Socket A, ATX form-factor system board. The SY-KT333 DRAGON Plus uses VIA Chipset technology and supports AMD Socket class processors. This motherboard is fully compatible with industry standards and adds many technical enhancements. -
Page 7: Key Features
CPU SETTINGS The SY-KT333 DRAGON Plus provides the user with a very complete and convenient CPU setting environment. The CPU settings are all adjusted through the special SOYO COMBO page in the BIOS, therefore rendering the use of jumpers obsolete. -
Page 8: Memory Support
The SY-KT333 DRAGON Plus supports PC1600, PC2100 and PC2700 DDR Memory module. EXPANDABILITY The SY-KT333 DRAGON Plus provides all the standard expansion slots, and many more additional expansion features: Expansion slots 1 x 32-bit bus master AGP Slot supports 4x (1.5v only). -
Page 9: Hardware Monitor
The SY-KT333 DRAGON Plus supports advanced functions such as: Wake-On-LAN Some advanced network cards can wake the system up over the network, the WOL connector is provided by the SY-KT333 DRAGON Plus to support this function. Multiple boot Booting from devices such as CD-ROM. - Page 10 This voltage is always fed into the motherboard and is used for functions such as WOL. SOYO Bonus Pack CD-ROM COMPLIANCE The SY-KT333 DRAGON Plus complies with all important industry standards. The following underlines the reliability of the SY-KT333 DRAGON Plus, a motherboard to trust. PC99, ACPI compliant WARRANTY All SOYO motherboards are back with one-year manufacturer’s warranty...
-
Page 11: Handling The Motherboard
Motherboard Description SY-KT333 DRAGON Plus 1-4 HANDLING THE MOTHERBOARD To avoid damage to your motherboard, please follow these simple rules while unpacking: Before handling the motherboard, ground yourself by grasping an unpainted portion of the system's metal chassis. Remove the motherboard from its anti-static packaging. Hold the motherboard by the edges and avoid touching its components. -
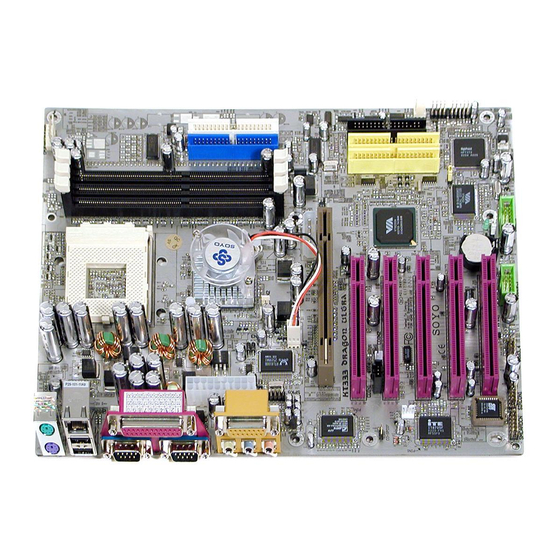
Page 12: Sy-Kt333 Dragon Plus Motherboard Layout
Motherboard Description SY-KT333 DRAGON Plus 1-6 SY-KT333 DRAGON Plus MOTHERBOARD LAYOUT PS/2 KB PS/2 Mouse Connector Connector USB 1_2 COM 1 ATX Power COM 2 LINE-OUT LINE-IN IDE 1 IDE 2 GAME PORT AGP Slot Audio PCI Slot #1 CD_SPDIF... -
Page 13: Sy-Kt333 Dragon Plus Motherboard Components
Motherboard Description SY-KT333 DRAGON Plus 1-7 SY-KT333 DRAGON Plus MOTHERBOARD COMPONENTS □... - Page 14 Motherboard Description SY-KT333 DRAGON Plus MIC & LAN LED Connector ATX Power Supply Connector LAN PHY Chassis Cooling Fan Connector Socket A Connector VIA KT333CE North Bridge Chip DDR DIMM Banks CPU Cooling Fan Connector ABR Buzzer Bus Mastering EIDE/ATAPI Ports...
-
Page 15: Chapter 2 Hardware Installation
SY-KT333 DRAGON Plus Chapter 2 HARDWARE INSTALLATION Congratulations on owning a-SY-KT333 DRAGON Plus. You are about to install and connect your new motherboard. Note: Do not unpack the motherboard from its protective anti-static packaging until you have made the following preparations. -
Page 16: Installation Guide
Hardware Installation SY-KT333 DRAGON Plus 2-2 INSTALLATION GUIDE We will now begin the installation process. Please follow the step-by-step procedure designed to lead you to a complete and correct installation. Step 1- Install the Central Processing Unit (CPU) Step 2- Install memory modules... - Page 17 Hardware Installation SY-KT333 DRAGON Plus Align the blunt edge of the CPU with the matching pinhole distinctive edge on the socket. Seat the processor in the socket completely and without forcing. Then close the socket handle to secure the CPU in place.
-
Page 18: Cpu Fan Installation
Hardware Installation SY-KT333 DRAGON Plus Remember to connect the CPU Cooling Fan to the appropriate power connector on the motherboard. The fan is a key component that will ensure system stability. It prevents overheating, therefore prolonging the life of your CPU. - Page 19 Hardware Installation SY-KT333 DRAGON Plus 3. To install this clip, push firmly only on the end of the clip. To install the clip, typically requires 12 to 24 pounds of force. 4. The fans power connector should be connected to CPUFAN1.
- Page 20 For more info about ABR, check pages 17. FOC ( Fan-Off Control ) The newly designed SOYO “FOC” is based on the concept of total protection for CPU, which is very different from currently seen on the market. The H/W control function is used to see a passive security system of monitoring and warning.
- Page 21 Hardware Installation SY-KT333 DRAGON Plus Warning” function, provided by the H/W monitoring system, the double-protection purpose is achieved. “FOC” includes the following functions: (1) Simultaneous Signal Follow Ups: Before the system enters the O/S, H/W will detect the signals of the CPU fan pins, get their revolution information and send it to the BIOS.
-
Page 22: Step 2 Install Memory Module
Hardware Installation SY-KT333 DRAGON Plus ABR (Anti Burn Regulator) SOYO's ABR (Anti Burn Regulator) is specially designed hardware circuits that works hand in hand with the CPU’s internal sensor in monitoring the temperature of the CPU and prevent it from overheating. -
Page 23: Memory Configuration Table
Hardware Installation SY-KT333 DRAGON Plus Your board comes with three DIMM sockets, providing support for up to 3GB of main memory using unbuffered and non-ECC DIMM modules from 128MB to 1GB. On this motherboard, DRAM speed can be set independent from the CPU front side bus speed. - Page 24 Hardware Installation SY-KT333 DRAGON Plus AGP Slot This motherboard supports AGP 4x VGA CARD. Insert the AGP VGA card into the AGP slot. Then connect the monitor information cable to the AGP card back plane external connector. Assigned Interrupt Table for PCI Device...
- Page 25 Hardware Installation SY-KT333 DRAGON Plus This motherboard offers two primary and two secondary IDE device connectors (IDE1, IDE2), can support up to four high-speed Ultra DMA 33/66/100/133 HDD or CD-ROM. Connect one side of the ATA 66/100 flat cable to the IDE device (HDD or CD-ROM) and plug the other end to the primary (IDE1) or secondary (IDE2) directionally keyed IDE connector on the motherboard.
-
Page 26: Floppy Drive
Hardware Installation SY-KT333 DRAGON Plus B. Floppy Drive Installation Pin -1 Floppy Drive Connector □ The system supports 5 possible floppy drive types: 720 KB, 1.2 MB, 1.44 MB, 2.88 MB, and LS-120. Connect one side of the 34-pin flat cable to the floppy drive and plug the other end to the floppy drive connector on the motherboard. -
Page 27: Power Led
Hardware Installation SY-KT333 DRAGON Plus Front Panel Connections Speaker Power LED Reset PWRBT HDD LED □ Plug the computer case's front panel devices to the corresponding headers on the motherboard. 1. Power LED Please install according to the following pin assignment: pin 1,3 are for Power LED. - Page 28 Hardware Installation SY-KT333 DRAGON Plus 2. Reset Plug the Reset push-button cable into the 2-pin Reset header on the motherboard. Pushing the Reset button on the front panel will cause the system to restart the boot-up sequence. Reset Pin Assignment Power Good 3.
- Page 29 Hardware Installation SY-KT333 DRAGON Plus 5. ATX Power On/Off Switch Attach the 2-pin momentary type switch to the PWRBT header for turning ON or OFF your ATX power supply. PWRBT Pin Assignment Power On/Off D. Back Panel Connections All external devices such as the PS/2 keyboard, PS/2 mouse, printer, modem, USB can be plugged directly onto the motherboard back panel.
- Page 30 Hardware Installation SY-KT333 DRAGON Plus 1. Onboard Serial Ports COM1/COM2 External peripherals that use serial transmission scheme include: serial mouse modem Plug the serial device cables directly into the COM1/COM2 9-pin male connectors located at the rear panel of the motherboard.
- Page 31 Hardware Installation SY-KT333 DRAGON Plus 5. Universal Serial Bus (USB1/USB2, USB20_1/USB20_2) This motherboard provides 6 USB ports for your additional devices. Plug the USB device jack into the available USB connector USB1 or USB2. USB20_1 and USB20_2 are available. To make use of these USB ports, purchase a USB cable from your dealer.
- Page 32 Hardware Installation SY-KT333 DRAGON Plus E. Other Connections 1. Wake-On-LAN (WOL) Attach the 3-pin connector from the LAN card that supports the Wake-On-LAN (WOL) function to the JP44 header on the motherboard. This WOL function lets users wake up the connected computer through the LAN card.
- Page 33 Hardware Installation SY-KT333 DRAGON Plus 2. Standard Infrared (SIRCON) Plug the 5-pin infrared device cable to the SIRCON header. This will enable the infrared transfer function. This motherboard meets both the ASKIR and HPSIR specifications. Please install according to the following pin assignment:...
- Page 34 Hardware Installation SY-KT333 DRAGON Plus 3. Cooling Fan Installation (1) CPU Cooling Fan (CPUFAN1,CPUFAN2) After you have seated the CPU properly on the processor, attach the 3-pin fan cable to the CPUFAN connector on the motherboard. The fan will stop when the system enters into Suspend Mode.
- Page 35 Hardware Installation SY-KT333 DRAGON Plus (2) Chassis Cooling Fan (CHAFAN1,CHAFAN2,CHAFAN3) Some chassis also feature a cooling fan. This motherboard features a CHAFAN connector to provide 12V power to the chassis fan. Connect the cable from the chassis fan to the CHAFAN 3-pin connector. Install according to the following...
- Page 36 Hardware Installation SY-KT333 DRAGON Plus 4. CD Line-in (CDIN1,CDIN2) This motherboard provides two CD-Line in connectors. Please connect the 4-pin audio cable from your CD-ROM drive to either CDIN1 or CDIN2. (It fits in only one, depending on the cable that came with your CD-ROM drive)
- Page 37 Hardware Installation SY-KT333 DRAGON Plus 6. SPK5 (optional) Connect one end of the Audio flat cable to SPK5 connector in the motherboard, and the other end to the SPDIF audio card connector. This card is optional, Please check with your dealer if this card is included.
- Page 38 Hardware Installation SY-KT333 DRAGON Plus 7. CD_SPDIF CD_SPDIF SPDIF IN2 8. MIC & LED Connector (J30) You can connect the Line-out /MIC in/LAN LED to the front panel of your PC case. (If this option is available in your PC case.)
-
Page 39: Atx Power
Hardware Installation SY-KT333 DRAGON Plus F. ATX Power Supply Plug the connector from the power directly into the 20-pin male ATX PW connector on the motherboard, as shown in the following figure. ATX Power □ Warning: Follow these precautions to preserve your motherboard... - Page 40 Hardware Installation SY-KT333 DRAGON Plus Please install the ATX power according to the following pin assignment: ATX Power 5VSB PW-OK Pay special care to the directionality. PS-ON 3.3V -12V 3.3V 3.3V G. CMOS Clear (JP5) In some cases the CMOS memory may contain wrong data, follow the steps below to clear the CMOS memory.
- Page 41 4-channel audio. To upgrade your DRAGON Plus on-board audio to 5.1-channel and enjoy digital sound quality, simply add a SPDIF audio connector to the motherboard. For more information on purchasing a compatible SPDIF audio connector, please go to the SOYO e-Store at www.soyousa.com/commerce.
-
Page 42: Step 5 Power On
Hardware Installation SY-KT333 DRAGON Plus Step 5 Power On You have now completed the hardware installation of your KT333 DRAGON Plus successfully. 1. Turn the power on. 2. It takes awhile to boot-up to the system. You will hear 3 beeps before seeing a display on the screen. -
Page 43: Quick Bios Setup
Advanced User settings. SOYO Combo Default setting. The default setting in the SOYO Combo setup is set to “AUTO”. It can be changed to “Manual” for advance User to have better control of the BIOS. If “Manual” option is selected, there are few rules that have to be following. - Page 44 Hardware Installation SY-KT333 DRAGON Plus Phoenix – Award BIOS CMOS Setup Utility SOYO COMBO Feature System Performance Normal Item Help CPU Frequency Mode Auto X Frequency 1MHz Stepping Menu Level X CPU To PCI Divider X DRAM:AGP:PCI Clock SPD: 66: 33...
-
Page 45: Hardware Installation
Hardware Installation SY-KT333 DRAGON Plus Phoenix – Award BIOS CMOS Setup Utility SOYO COMBO Feature System Performance Normal Item Help CPU Frequency Mode Manual Frequency 1MHz Stepping Menu Level CPU To PCI Divider DRAM:AGP:PCI Clock SPD: 66: 33 DRAM Clock... - Page 46 Hardware Installation SY-KT333 DRAGON Plus Changing “CPU ratio” (Multiplier) The ratio (or multiplier) of the CPU can be changed depend on the CPU. Some CPUs are “unlocked”, which mean the ratio can be changed through the BIOS settings. Some CPU ratio can be higher or lower than the predefined value.
- Page 47 13.0x or above multiplier option in the [CPU Ratio Select] will only work with CPU with 13.0x or above multiplier SOYO is not responsible for damage done in your CPU or system instability due to overclocking. You are now ready to configure your system with the BIOS setup program. Go...
-
Page 48: Chapter 3 Bios Setup Utility
BIOS Setup Utility SY-KT333 DRAGON Plus Chapter 3 BIOS SETUP UTILITY This motherboard's BIOS setup program uses the ROM PCI BIOS program from Award Software Inc. To enter the Award BIOS program's Main Menu: 1. Turn on or reboot the system. - Page 49 BIOS Setup Utility SY-KT333 DRAGON Plus Hot Keys: Function keys give you access to a group of commands throughout the BIOS utility. Function Command Description Gives the list of options available for each General Help item. Previous Restore the old values. These are the values Values that the user started the current session with.
-
Page 50: Save And Exit Setup
BIOS Setup Utility SY-KT333 DRAGON Plus SAVE AND EXIT SETUP Select the [SAVE & EXIT SETUP] option from the Main Menu to save data to CMOS and exit the setup utility. This option saves all your changes and causes the system to reboot. -
Page 51: Soyo Combo Setup
<DEL> key during the system diagnostic checks to enter the Award BIOS Setup program. The CMOS SETUP UTILITY will display on screen. Then, select the [SOYO COMBO SETUP] option from the main menu and press the <Enter> key. -
Page 52: Soyo Combo Feature
BIOS Setup Utility SY-KT333 DRAGON Plus The [SOYO COMBO SETUP] menu combines the main parameters that you need to configure, all in one menu, for a quick setup in BIOS. System Performance Setting Description Note Normal Adjust your computer Default... - Page 53 BIOS Setup Utility SY-KT333 DRAGON Plus SOYO COMBO Feature (Continue) Setting Description Note Auto Allows you to select your CPU Default CPU Ratio Ratio. Select 5.0x, 5.5x, 6.0x, 6.5x, 7.0x, 7.5x, 8.0x, 8.5x, 9.0x, 9.5x, 10.0x, 10.5x, 11.0x, 11.5x, 12.0x, 12.5x, 13.0x,...
-
Page 54: Quick Power On Self Test
BIOS Setup Utility SY-KT333 DRAGON Plus AGP Voltage Adjust Setting Description Note AGP Voltage Default This function allow to adjust the Default Select AGP voltage. 1.6V 1.7V 1.8V C.I.H. 4-WAY Protection Settings Setting Description Note C.I.H. Disabled When set to enabled, the BIOS can only... -
Page 55: System Boot Control Settings
BIOS Setup Utility SY-KT333 DRAGON Plus System Boot Control Settings Setting Description Note First Floppy Select Your Boot Device /Second/Third Priority LS120 Boot Device HDD-0 SCSI CDROM HDD-1 HDD-2 HDD-3 ZIP100 USB-FDD USB-ZIP USB-CDROM USB-HDD Disabled Boot Other Device Disabled... - Page 56 BIOS Setup Utility SY-KT333 DRAGON Plus 3-1.1 Advanced Tune-up Settings Caution: Change these settings only if you are already familiar with the Chipset. The [DRAM Clock/Drive Control] option changes the values of the chipset registers. These registers control the system options in the computer.
- Page 57 BIOS Setup Utility SY-KT333 DRAGON Plus DRAM Control Setting Description Note DRAM Timing By SPD If enable the DRAM will auto Default detect the DRAM timing. Manual DRAM CAS When synchronous DRAM is installed, the number of clock Latency cycles of CAS latency depends Default on the DRAM timing.
- Page 58 BIOS Setup Utility SY-KT333 DRAGON Plus DRAM Control (Continue) Setting Description Note Increase DRAM performance. Write Recovery Time Default AGP Control Setting Description Note AGP Performance Normal Increase AGP performance. Default Fast AGP Fast Write Disabled The VIA chipset will use fast...
-
Page 59: Standard Cmos Setup
BIOS Setup Utility SY-KT333 DRAGON Plus 3-2 STANDARD CMOS SETUP Select the [STANDARD CMOS SETUP] option from the Main Menu and press [Enter] key. Phoenix – Award BIOS CMOS Setup Utility Standard CMOS Features Date (mm:dd:yy) Mon, Jul 22 2002... - Page 60 BIOS Setup Utility SY-KT333 DRAGON Plus This Main Menu function automatically detects the hard disk type and configures the [Standard CMOS Features] accordingly. Phoenix – Award BIOS CMOS Setup Utility IDE Primary Master IDE HDD Auto-Detection Press Enter Item Help...
-
Page 61: Floppy Drives
BIOS Setup Utility SY-KT333 DRAGON Plus Hard Disks Type & Mode Choose the type and mode for the hard disks that you have already installed. Setting Description Note Press Enter To auto-detect the HDD’s size, IDE HDD head… on this channel. - Page 62 BIOS Setup Utility SY-KT333 DRAGON Plus Others Optional Setting Description Note EGA/VGA Select the video mode. Default Video CGA 40 CGA 80 MONO (Monochrome) ALL Errors When the BIOS detects system Default Halt On errors, this function will stop the No Errors system.
-
Page 63: Advanced Bios Features
BIOS Setup Utility SY-KT333 DRAGON Plus 3-3 ADVANCED BIOS FEATURES Select the [Advanced BIOS Features] option from the Main Menu and press [Enter] key. Phoenix – Award BIOS CMOS Setup Utility Advanced BIOS Features Virus Warning Disabled Item Help CPU Internal Cache... -
Page 64: Boot Up Floppy Seek
BIOS Setup Utility SY-KT333 DRAGON Plus Cache Memory Options Setting Description Note Disabled CPU Internal Cache Enabled Enables the CPU's internal Default cache. External Cache Disabled Enabled Enables the external Default memory. CPU L2 Cache ECC Disabled Disabled/Enabled L2 Checking cache error checking. -
Page 65: Security Option
BIOS Setup Utility SY-KT333 DRAGON Plus Typematic Settings Setting Description Note Disabled Keystrokes repeat at a rate Default Typematic Rate Setting determined by the keyboard. Enabled When enabled, the typematic rate and typematic delay can be selected. The following [Typematic Rate] and [Typematic Delay] fields are active... - Page 66 BIOS can then execute from RAM. Full Screen Enabled Enable/Disable DRAGON Logo Default LOGO Show during Boot-up. Disabled EPA LOGO LOGO-0 Allows user to display SOYO logo Default SELECT or own logo. LOGO-1 Logo-0 Shows SOYO logo. Logo-1 Shows user logo (Default Blank). Small Disabled Set Enabled to Show Logo (EPA).
-
Page 67: Advanced Chipset Features
BIOS Setup Utility SY-KT333 DRAGON Plus 3-4 ADVANCED CHIPSET FEATURES Select the [Advanced Chipset Features] option from the Main Menu and press [Enter] key. Caution: Change these settings only if you are already familiar with the Chipset. The [Advanced Chipset Features] option changes the values of the chipset registers. - Page 68 BIOS Setup Utility SY-KT333 DRAGON Plus CHIPSET FEATURES SETUP (Continue) Setting Description Note Video RAM Disabled When synchronous DRAM is installed, Default Cacheable the number of clock cycles of CAS Enabled latency depends on the DRAM timing. Do not reset this field from the default...
- Page 69 BIOS Setup Utility SY-KT333 DRAGON Plus 3-4.1 AGP & P2P Bridge Control Caution: Change these settings only if you are already familiar with the Chipset. The [AGP & P2P Bridge Control] option changes the values of the chipset registers. These registers control the system options in the computer.
- Page 70 BIOS Setup Utility SY-KT333 DRAGON Plus AGP & P2P Bridge Control (Continue) Setting Description Note Auto This item allows you to adjust the AGP Default AGP Driving driving force. Choose Manual to key in Control Manual a AGP Driving Value in the next selection.
- Page 71 BIOS Setup Utility SY-KT333 DRAGON Plus 3-4.2 CPU & PCI Bus Control Caution: Change these settings only if you are already familiar with the Chipset. The [CPU & PCI Bus Control] option changes the values of the chipset registers. These registers control the system options in the computer.
-
Page 72: Integrated Peripherals
BIOS Setup Utility SY-KT333 DRAGON Plus 3-5 INTEGRATED PERIPHERALS Select the [Integrated Peripherals] option from the Main Menu and press [Enter] key. Caution: Change these settings only if you are already familiar with the Chipset. The [INTEGRATED PERIPHERALS] option changes the values of the chipset registers. - Page 73 BIOS Setup Utility SY-KT333 DRAGON Plus INTEGRATED PERIPHERALS (Continue) Setting Description Note All Disabled This should be enabled if your OnChip USB Controller system has a USB installed on All Enabled Default the system board and you want to use it. Even when so...
-
Page 74: Via Onchip Ide Device
BIOS Setup Utility SY-KT333 DRAGON Plus 3-5.1 VIA OnChip IDE Device Caution: Change these settings only if you are already familiar with the Chipset. The [VIA OnChip IDE Device] option changes the values of the chipset registers. These registers control the system options in the computer. - Page 75 BIOS Setup Utility SY-KT333 DRAGON Plus VIA OnChip IDE Device Setting Description Note Disabled Turn off the on-board On-Chip IDEChannel 0 /IDE Channel 1 Enabled Use the on-board IDE Default Primary Secondary mode 0-4 0 is the slowest speed Primary Master PIO...
-
Page 76: Superio Device
BIOS Setup Utility SY-KT333 DRAGON Plus 3-5.2 SuperIO Device Caution: Change these settings only if you are already familiar with the Chipset. The [SuperIO Device] option changes the values of the chipset registers. These registers control the system options in the computer. - Page 77 BIOS Setup Utility SY-KT333 DRAGON Plus SuperIO Device (Continue) Setting Description Note Disabled Onboard Serial Port 1 / 3F8/IRQ4 Choose serial port 1 & 2's I/O Default Serial Port 2 address. (port 1) Do not set port 1 & 2 to the same...
-
Page 78: Power Management Setup
BIOS Setup Utility SY-KT333 DRAGON Plus 3-6 POWER MANAGEMENT SETUP The [POWER MANAGEMENT SETUP] sets the system's power saving functions. Phoenix – Award BIOS CMOS Setup Utility Power Management Setup ACPI Suspend Type S1 (POS) Item Help Power Management Option... - Page 79 BIOS Setup Utility SY-KT333 DRAGON Plus After you have completed the Power Management Setup, press [Esc] to return to the Main Menu. Power Management Controls Setting Description Note ACPI Suspend S1(POS) The system will enter the S1 Default Type states during suspend. (Low...
- Page 80 BIOS Setup Utility SY-KT333 DRAGON Plus Power Management Controls (Continue) Setting Description Note Soft-Off by Instant-off Default PWR-BTTN Delay 4 Sec. Turns off the system power 4 seconds after pushing the power button. Auto Some OS (win xp/2k) requires to...
- Page 81 BIOS Setup Utility SY-KT333 DRAGON Plus IRQ/Event Activity Detect (Continue) Setting Description Note PS2MS Enabled You can boot-up your system by Default Wakeup from PS/2 mouse. Disabled S1-S5 LPT & COM LPT/COM When On of LPT & COM, any Default...
-
Page 82: Irqs Activity Monitoring
BIOS Setup Utility SY-KT333 DRAGON Plus 3-6.1 IRQs Activity Monitoring This option sets the IRQs Activity Monitoring. Phoenix – Award BIOS CMOS Setup Utility IRQs Activity Monitoring Primary INTR Item Help IRQ3 (COM 2) Enabled IRQ4 (COM 1) Enabled Menu Level... - Page 83 BIOS Setup Utility SY-KT333 DRAGON Plus IRQs Activity Monitoring Setting Description Note When set to On, any event occurring Default Primary INTR at will awaken a system which has been powered down. Enabled IRQ3(COM2), IRQ4(COM1), IRQs Activity Monitoring IRQ5(LPT2), IRQ6(Floppy Disk),...
-
Page 84: Pnp/Pci Configurations
BIOS Setup Utility SY-KT333 DRAGON Plus 3-7 PNP/PCI CONFIGURATIONS This option sets the motherboard’s PCI Slots. Phoenix – Award BIOS CMOS Setup Utility PNP/PCI Configurations PNP OS Installed Item Help Reset Configuration Data Disabled Menu Level Resources Controlled By Auto (ESCD) -
Page 85: Pnp/Pci Configuration Controls
BIOS Setup Utility SY-KT333 DRAGON Plus PNP/PCI Configuration Controls PNP/PCI Setting Description Note Controls Set this field to [Yes] if you PnP OS are running Windows 95, Installed which is PnP compatible. If the OS you are running Default does not support PnP... - Page 86 BIOS Setup Utility SY-KT333 DRAGON Plus PNP/PCI Configuration Setup (Continue) PNP/PCI Setting Description Note Setup Interrupt How to set the BIOS to release the IRQ to the PnP Interrupt pool: Line PnP / PCI configuration Integrated Peripherals IRQ 15 IRQ 15: PCI / ISA PnP...
-
Page 87: Pc Health Status
BIOS Setup Utility SY-KT333 DRAGON Plus 3-8 PC HEALTH STATUS This option sets the motherboard's PC Health Status. Phoenix – Award BIOS CMOS Setup Utility PC Health Status FOC (Fan-Off Control) Enabled Item Help ABR (Anti Burn Regulator) Default(85°C) Vcore 1.75 V... - Page 88 BIOS Setup Utility SY-KT333 DRAGON Plus CPU Device Monitoring (Continue) Setting Description Note ABR (Anti Burn Set the CPU temperature for the 120°C/248°F system to shutdown. Regulator) 115°C/239°F 110°C/230°F 105°C/221°F 100°C/212°F 95°C/203°F 90°C/194°F 85°C/185°F 80°C/176°F 75°C/167°F 70°C/158°F 65°C/149°F 60°C/140°F 55°C/131°F 50°C/122°F...
-
Page 89: Load Fail-Safe Defaults
BIOS Setup Utility SY-KT333 DRAGON Plus 3-9 LOAD FAIL-SAFE DEFAULTS Select the [Load Fail-Safe Defaults] option from the Main Menu to load a pre-defined safe bios settings. This option is recommended if you have instability issue. Phoenix – Award BIOS CMOS Setup Utility... -
Page 90: Load Optimized Defaults
BIOS Setup Utility SY-KT333 DRAGON Plus 3-10 LOAD OPTIMIZED DEFAULTS Select the [Load Optimized Defaults] option from the Main Menu to load a pre-defined optimized BIOS settings. Phoenix – Award BIOS CMOS Setup Utility SOYO COMBO Feature PC Health Status... -
Page 91: Set Supervisor Password
BIOS Setup Utility SY-KT333 DRAGON Plus 3-11 SET SUPERVISOR PASSWORD Based on the setting you have made in the [Security Option] of the [BIOS FEATURES SETUP] section, the password prevents access to the system or the setup program by unauthorized users. Follow this procedure to set a new... -
Page 92: Set User Password
BIOS Setup Utility SY-KT333 DRAGON Plus Enter your new password and press [Enter]. The following message appears, prompting to confirm the new password: Confirm Password: Re-enter your password and then press [Enter] to exit to the Main Menu. This diagram outlines the password selection procedure: Type the Password Press <Enter>... -
Page 93: Boot Menu
BIOS Setup Utility SY-KT333 DRAGON Plus Boot Menu Boot Menu enables user to boot-up on different boot device without going into the BIOS setup. To enable boot Menu, press “ESC” after memory initialization, user will see a device menu, in which user can choose the device they wish to boot from. -
Page 94: Chapter 4 Drivers Installation
In that case the following dialog will pop up. Please choose your motherboard model number and press OK. Now the SOYO-CD Start Up Menu will come up as shown on the following page (SOYO CD Start Up Program Menu) - Page 95 SOYO motherboard the system uses and displays the corresponding model name. The user's manual files included on the SOYO CD are in PDF (Postscript Document) format. In order to read a PDF file, the appropriate Acrobat Reader software must be installed in your system.
- Page 96 Drivers installation SY-KT333 DRAGON Plus VIA 4 in 1 driver. C-Media 8738 audio driver. – Only required if you are using the onboard audio. VIA USB 2.0 driver. LAN driver. Should be installed manually. The rest of the available drivers are optional.
- Page 97 Drivers installation SY-KT333 DRAGON Plus A description of 4 drivers follows: Bus Master PCI IDE Driver The ATAPI IDE driver enables the performance enhancing bus mastering functions on ATA-capable Hard Disk Drives and ensures IDE device compatibility. AGP VxD Driver VIA AGP VxD Driver is to be installed if you are using an AGP VGA device.
- Page 98 Step 3. Check the Latest Releases Click the 'Check the latest Releases' button to go the SOYO Website to automatically find the latest BIOS, manual and driver releases for your motherboard. This button will only work if your computer is connected to the internet through a network or modem connection.
- Page 99 Drivers installation SY-KT333 DRAGON Plus After Windows XP installation, your device manager should look like this:...
- Page 100 Drivers installation SY-KT333 DRAGON Plus After driver installation, your Windows XP device manager should look like this:...
- Page 101 Drivers installation SY-KT333 DRAGON Plus Drivers directory list in the CD driver...
-
Page 102: Chapter 5 Audio Driver Installation
Audio Driver Installation SY-KT333 DRAGON Plus Chapter 5 AUDIO DRIVER INSTALLATION Audio Driver Installation for Windows 98/98se After you have installed the audio driver, windows may prompt you to restart your computer. When your computer restarted it may look for windows driver from your Win98CD and ask you to insert your Win98/98se CD to your CD-drive. -
Page 103: Chapter 6 Via Lan Driver Installation
Click on "Next". Select the following directory. The directory is in SOYO CD "D:\LAN\VIALAN" (where D: is your CD-ROM) then click ok and you will need windows 98 second Edition CD to complete the installation, put it in your CD-ROM. - Page 104 VIA Onboard LAN Driver Installation SY-KT333 DRAGON Plus The directory is in SOYO CD " D:\LAN\VIALAN" (where D: is your CD-ROM) and click ok. After informing windows of the driver directory the driver will be installed Restart your system after installation.
- Page 105 Double click "VIA PCI 10/100Mb Fast Ethernet Adapter". Click "Driver". Click "Update Driver". Select "Install from a list or specific locations", click it. Click on "Next". Click "Browse" The LAN driver directory is in SOYO CD "D:\LAN\VIALAN" (where D: is your CD-ROM), then press "ok".
-
Page 106: Appendix A Troubleshooting At First Start
APPENDIX A Troubleshooting at First Start Boot-up Issues The system do not power-up, no beeping sound heard and the CPU fan does not turn on. Check if the power cord is plug to the power source. Check if the power is connected to the M/B. Check if the cable of the case power button is connected to the M/B power button connector (see connectors and plug-ins in the manual for more info). - Page 107 3. Check the memory module and the VGA card if inserted properly on the M/B. 4. If yes, change the memory module, it might be defective. Make sure the memory specification is supported by the M/B. (for more info on this, check our FAQ website). Change the VGA card.
- Page 108 3. Change the CMOS battery, the battery might be drained. The BIOS chip might be failing. I hear 1-2 beeping sound and then the system shutdown, what is the problem? Make sure to connect the CPU fan to CPUFAN1 connector. Stability Issue My system intermittently locks up, very unstable Check the CPU Temp, it might be overheating.
-
Page 109: Vga Issue
SOYO branch for re-flashing. Is there a way to reprogram my BIOS after an unsuccessful flash? No other way, you need to send back the BIOS ROM to your nearest SOYO branch for re-flashing I’m using a 133MHz FSB CPU, I cannot find the DDR 100MHz option in the BIOS, why? The DDR speed should not be lower than the CPU FSB speed. -
Page 110: Audio Issue
VGA card support Suspend to Ram function Audio Issue How can I disable the on-board Audio? Go to the SOYO Combo Feature in the BIOS setup, then set the “onboard 6CH H/W audio” to disable. I cannot get the sound working on my system. -
Page 111: Hard Disk/Fdd/ Cd-Rom Issue
(don't trust the "key lock" or "notch") and use the end-connector of the cable (don't use middle one). LAN Issues During LAN driver installation, the system hangs on 75%, why? Enable the onboard LAN in the BIOS setup. For updated FAQs, please check http://www.soyo.com.tw/faq.htm http://www.soyousa.com/faqs.html... -
Page 112: Appendix B
APPENDIX B How to contact us: If you are interested in our products, please contact the SOYO sales department in the region you live. If you require Technical Assistance, please contact our Technical Support in the region you live. SOYO prefers Email as communication medium, remember to always add to the email the country that you live in.