Table of Contents
Advertisement
Available languages
Available languages
GARANTÍA LIMITA DA POR UN AÑO
(Válida únicamente en los EE. U U. )
Este producto está garantizada contra defectos en los materiales de fabri-
cación o de mano de obra de por vida para el comprador original, a partir de
la fecha de compra al por menor. No cubre daños ni desgastes que sean
consecuencia de accidentes, uso inadecuado, abuso, uso comercial ni
ajustes y/o reparaciones no autorizadas.
Si este producto requiere mantenimiento (o cambio a nuestro entender)
mientras esté en garantía, sírvase empacar el artículo cuidadosamente y
envíelo con el franqueo pagado, junto con el recibo de la tienda en el que
aparezca la fecha de compra y una nota explicando el motivo de la
devolución a:
Taylor Precision Products
2220 Entrada Del Sol
Las Cruces, New Mexico 88001
w w w.taylorusa.com
No existen garantías expresas excepto las enunciadas anteriormente. Esta
garantía le otorga derechos legales específicos y es posible que usted tenga
otros derechos que varían de un estado a otro.
©2006 Taylor Precision Products y sus compañías afiliadas, todos los
derechos reservados.
Taylor® y Leading the Way in Accuracy® son marcas registrada de Ta y l o r
Precision Products y sus compañías afiliadas. Todos los derechos
reservados.
Fabricado en China según nuestras especificaciones exactas.
Digital Projection
Instruction Manual and
Warranty Information
1497 5.06
Thermometer
1 4 9 7
Advertisement
Table of Contents

Related Manuals for Taylor 1497


Summary of Contents for Taylor 1497
- Page 1 ©2006 Taylor Precision Products y sus compañías afiliadas, todos los derechos reservados. Taylor® y Leading the Way in Accuracy® son marcas registrada de Ta y l o r Precision Products y sus compañías afiliadas. Todos los derechos reservados.
-
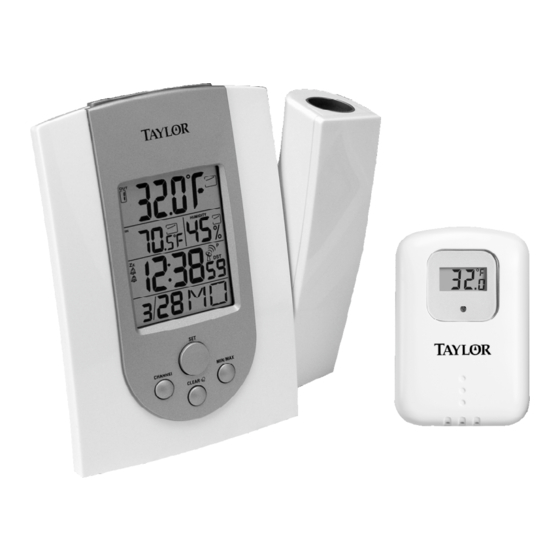
Page 2: Radio-Controlled Clock
GETTING STARTED 4. Antenna icon will appear on screen if the radio time reception is successful. The radio-controlled clock will have a daily synchronization 1. IMPORTANT: Insert power supply cord into the home receiver at 1:00 am everyday. If previous attempts of reception were unit first. -
Page 3: Setting Alarm Time
SETTING ALARM TIME TEMPERATURE/ HUMIDITY ALERT Press “ALERT” on back of unit to turn temperature & 1. Hold the “CLEAR” button for 3 seconds. humidity alert on and off. 2. To select either first alarm (A1) or second alarm (A2) - Press “ + , - ” on back to 1. -
Page 4: Low Battery Indication
One remote sensor is included. To purchase additional batteries as necessary and follow the setup procedure as Remote Sensors (Taylor model 1439), please call 1-877 858-0065 Monday- mentioned earlier in the “GETTING STARTED” section. Friday 9am to 6pm CST or visit www.partshelf.com. -
Page 5: Troubleshooting
signal can be affected by mobile phones, TV, electrical appliances or other Outdoor Temperature Reading shows “- -” electronic interference. To get the best performance of the Atomic clock, This is usually an indication that the channel selector (located in the top left please install the home receiver near a window and away from large metallic corner of the home receiver) is set incorrectly to receive the signal from the objects. -
Page 6: Fcc Disclaimer
FCC DISCLAIMER Note: This equipment has been tested and found to comply with the limits for a Class B digital Outdoor Temp. device, pursuant to Part 15 of the FCC Rules. These limits are designed to provide reasonable protection against harmful interference in a residential installation. This equipment generates, uses and can radiate radio frequency energy and, if not installed and used in accordance with Remote Sensor/ the instructions, may cause harmful interference to radio communications. - Page 7 ©2006 Taylor Precision Products. and its affiliated companies, all rights reserved. Taylor® and Leading the Way in Accuracy® are reg- istered trademarks of Taylor Precision Products and its affiliated com- panies. All rights reserved.
-
Page 8: Para Empezar
4 . El icono de la antena aparecerá en la pantalla si la recepción de la señal horaria de PARA EMPEZAR radio es exitosa. El reloj controlado por radio tendrá una sincronización diaria, todos los días a la 01:00 am. Si los intentos de recepción anteriores fracasaron, el receptor 1 . -
Page 9: Ajuste De La Alarma
A L E R TA DE TEMPERATURA/ HUMEDA D Oprima “ALERT” en la parte posterior de la unidad para AJUSTE DE LA ALARMA encender o apagar la alerta de temperatura y humedad. 1 . Oprima y mantenga el botón “A L E R T” al respaldo del receptor 1 . -
Page 10: Indicador De Batería Baja
2 y canal 3 si fuera necesario. La unidad interior puede monitorear hasta 3 sensores diferentes. Un sensor es incluido. Para comprar sensores remotos adicionales (modelo 1439 del Taylor), llame por favor 1-(877) 858- INSTRUCCIONES DE MONTAJE 0065 Lunes-Viernes 9am a 6pm CST o visite www. -
Page 11: Solución De Problemas
SOLUCIÓN DE PROBLEMAS Es possible que el receptor doméstico esté “rastreando” – buscando lecturas desde más de un sensor remoto. Este receptor doméstico puede funcionar con hasta tres sensores remotos (se incluye sólo uno). Si el receptor doméstico está buscando más de un sensor Las temperaturas interior y exterior no corresponden remoto, el icono “... -
Page 12: Sensor Remoto
DESCARGO DE RESPONSABILIDAD de la FCC Temperatura exterior Nota: Este equipo ha sido probado y se encontró que cumple con los límites para los dispositivos digitales Clase B, según la Parte 15 de las Normas de la FCC. Estos límites están diseñados para proporcionar una protección razonable contra la interferencia perjudicial en una instalación residencial.