Carrier Infinity Control Homeowner's Manual
Zone control
Hide thumbs
Also See for Infinity Control:
- Homeowner's manual (44 pages) ,
- Installation instructions manual (20 pages) ,
- Homeowner's manual (36 pages)
Table of Contents
Advertisement
Quick Links
Advertisement
Table of Contents

Related Manuals for Carrier Infinity Control


Summary of Contents for Carrier Infinity Control
- Page 1 Infinity Control Homeowner’s Guide Zone Control The New Feeling of Comfort...
- Page 2 Carrier has been delivering Left Button provides accessary the finest indoor comfort status. equipment since 1902. Your Hold/Unoccupied Button new Infinity Control offers yet maintains desired temperature another example of the high indefinitely or activates quality comfort technology for “unoccupied” comfort settings.
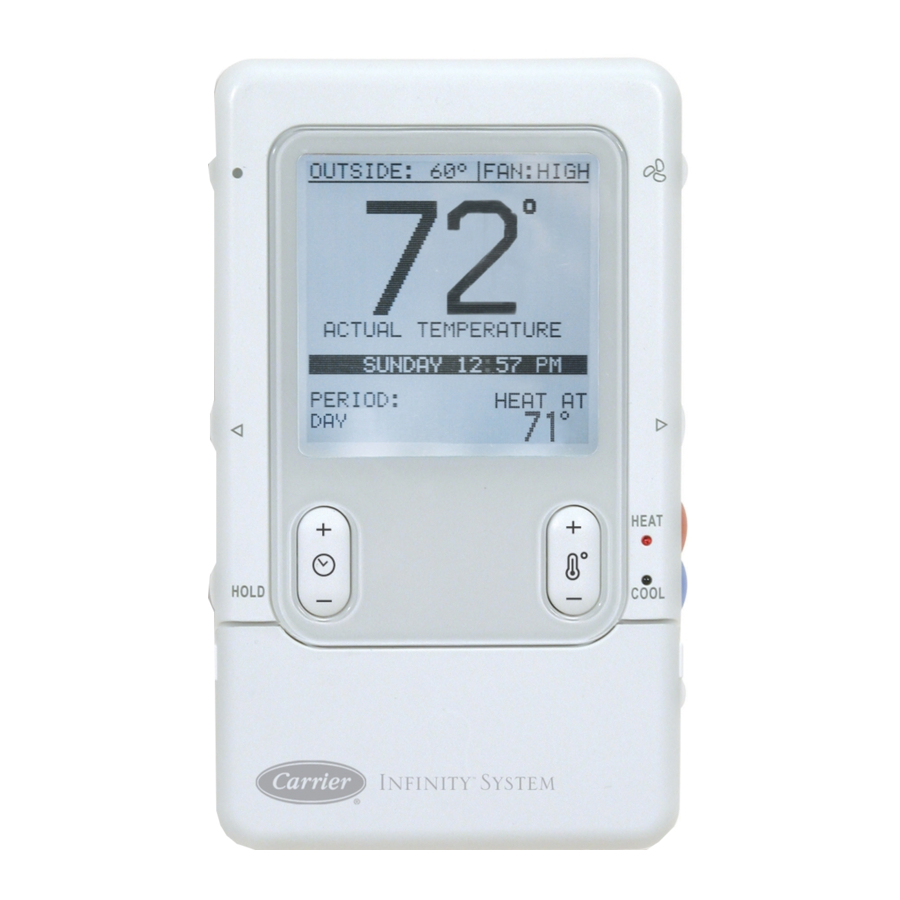
- Page 3 Fan Setting Fan Button chooses “high,” “medium,” “low,” or “auto” fan mode. Outside Temperature Desired Heating/Cooling Temperature Right Button provides system status. Heat Button selects heating operation. Cool Button selects cooling operation. Heat/Cool LEDs indicate heating or cooling operation. Temp (+\-) Button Off Button turns the system on and off.
-
Page 4: Table Of Contents
TABLE OF CONTENTS One Schedule for All Days ..18 QUICK GUIDE INSTRUCTIONS . . .2 Weekdays Schedule ..20 BASIC SETUP ....6 Weekend Schedule . -
Page 5: Quick Guide Instructions
QUICK GUIDE INSTRUCTIONS This guide provides the basic operations for setting up and operating your Infinity Control. ™ Set Day, Time & Desired Humidity 1 Flip down the door at the base of the Infinity Control. ™ 2 Press the BASIC button. 3 Adjust the highlighted HOUR setting using the TIME (+\-) button. - Page 6 QUICK GUIDE INSTRUCTIONS 2 Press the ZONE button until the name of the zone you wish to control appears on the upper left screen. Selecting “ALL ZONES” allows you to select one temperature for the entire home. Press the ZONE button for three seconds to activate the “ALL ZONES”...
- Page 7 QUICK GUIDE INSTRUCTIONS 4 You can change the override time to 15-minute increments by pressing the TIME (+\-) button until the desired override time is selected. - OR - Press the HOLD button to override the schedule indefinitely. Quick Programming Instructions These instructions will guide you through creating one comfort schedule that will repeat every day.
- Page 8 QUICK GUIDE INSTRUCTIONS 7 Set the heating temperature using the TEMP (+\-) button. 8 Press the blue COOL button. Cooling temperature will begin flashing. 9 Set the cooling temperature using the TEMP (+\-) button. 10 Set the remaining periods, “DAY,” “EVENING,” AND “SLEEP” by using the SCROLL button to select a time period, then follow steps 5 –...
-
Page 9: Basic Setup
BASIC SETUP Set Day, Time & Desired Humidity 1 Flip down the door at the base of the Infinity Control. ™ 2 Press the BASIC button. 3 Adjust the highlighted HOUR setting using the TIME (+\-) button. 4 Press SCROLL to highlight MINUTE. 5 Adjust the MINUTE setting using the TIME (+\-) button. -
Page 10: Normal Operation
NORMAL OPERATION Turn System On/Off The OFF button is used to turn the system both on and off. Heating To select heating, press the red HEAT button. Heating is confirmed when the red LED adja- cent to the red HEAT button is lit. Heating is operating when the red LED is gradually puls- ing on and off at a rate of 2.5 cycles per sec- ond. -
Page 11: Cooling
NORMAL OPERATION the homeowner manually activates emergency heat. Emergency heat is manually activated by pressing the red HEAT button for four seconds. Emergency heat operation is confirmed when the red LED adjacent to the red HEAT button is lit, pulsing on, then off, continuously every 1.25 seconds. -
Page 12: Adjust Heating Temperature
NORMAL OPERATION Adjust Heating Temperature The Infinity Control allows you to adjust your indoor temperature ™ at any time, overriding your programmed settings. 1 Press the red HEAT button. Heating is confirmed when the red LED adjacent to the red HEAT button is lit. 2 Press the ZONE button until the name of the zone you wish to control appears on the upper left screen. -
Page 13: Adjust Fan Speed
2 Press the FAN button to adjust the fan speed between LOW, MEDIUM, HIGH or AUTO airflow. OFF is also a selection when the system has been turned off at the Infinity Control. Your fan speed selection will only apply to the displayed zone. -
Page 14: Unoccupied Function
NORMAL OPERATION NOTE: HOLD is not available if programming has been turned off. Also, if you switch from HOLD to either VACATION or UNOCCUPIED, the system will revert back to HOLD when those functions are cancelled. Unoccupied Function & Settings UNOCCUPIED allows you to instantly set the system for energy saving operation. -
Page 15: Check System Status
NORMAL OPERATION Note: You have up to 15 minutes to make changes to the temperature or duration after VACATION has been activated. Any changes made after the 15 minute period will be treated as a temporary override to vacation settings. 7 The system will automatically revert back to its normal opera- tion after the selected number of VACATION days has expired. -
Page 16: Accessory Status (Left Button)
NORMAL OPERATION Accessory Status The accessory status screen allows you to check the approximate usage of your mechanical or electronic air cleaner, humidifier pad, and UV lamps before routine maintenance is required. The accessory status screen also shows your servicing dealer’s name and phone number. -
Page 17: Accessory Maintenance Pop-Up
NORMAL OPERATION Accessory Maintenance Pop-Up Messages Accessory Pop-Up messages remind you when it’s time for accessory maintenance. There can be up to five messages, depending on the accessories installed with your system: - Replace UV Lamps - Change Humidifier Pad - Clean Air Filter - EAC - Clean or Replace Air Filter - Clean Ventilator Filter... -
Page 18: Service Pop-Up Messages
NORMAL OPERATION Service Pop-Up Messages Service Pop-Up messages remind you when it’s time for routine equipment maintenance or if the system has malfunctioned. There can be up to three messages, depending on the level of service required: - Routine Maintenance Recommended - System Malfunction - Critical Malfunction ROUTINE MAINTENANCE RECOMMENDED: This pop-up appears... -
Page 19: Keyboard Lock-Out
NORMAL OPERATION Keyboard Lock-Out You can lock the Infinity Control buttons to help avoid inadvertent ™ changes to your settings. Keyboard lock-out can ONLY be activated from the main screen. To do so, simultaneously press the ZONE and FAN buttons for two seconds. -
Page 20: Programmable Features, Setup & Operation
PROGRAMMABLE FEATURES, SETUP & OPERATION Backlighting The Infinity ™ backlight feature makes the screen easy to read, even at night or in low light conditions. High-intensity backlighting is acti- vated when a button is pushed or the door at the base of the unit is opened. -
Page 21: Programming Your Comfort
PROGRAMMABLE FEATURES, SETUP & OPERATION WAKE EVENING SLEEP Time / HT˚ / CL˚ Time / HT˚ / CL˚ Time / HT˚ / CL˚ Time / HT˚ / CL˚ Monday Tuesday Wednesday / Thursday Friday Saturday Sunday Programming Your Comfort Schedule The Infinity Control allows you maximum flexibility in creating a comfort ™... - Page 22 PROGRAMMABLE FEATURES, SETUP & OPERATION 3 Press the ZONE button until the name of the zone you wish to program appears on the upper left screen. Selecting “ALL ZONES” allows you to create one schedule for the entire home. 4 If the text “ALLDAYS” appears at the top of the screen, you are ready to start.
-
Page 23: Weekdays Schedule
PROGRAMMABLE FEATURES, SETUP & OPERATION 13 To create an identical schedule for another zone, skip ahead to the Copying a Zone Schedule section in this manual, page 24. NOTE: A default set of heating and cooling setback tempera- tures, called UNOCCUPIED settings, may be activated by pressing the HOLD button. -
Page 24: Weekend Schedule
PROGRAMMABLE FEATURES, SETUP & OPERATION 10 Use the SCROLL button to highlight the next period, then repeat steps 5 – 9 to select settings for DAY, EVENING and SLEEP. 11 Exit by pressing the SCHEDULE button or closing the door. - OR - 12 To create a WEEKDAYS schedule for the remaining zones, press the ZONE button to select the next zone you wish to program. -
Page 25: Daily Schedule
PROGRAMMABLE FEATURES, SETUP & OPERATION 7 Set the heating temperature using the TEMP (+\-) button. 8 Press the blue COOL button. Cooling temperature will begin flashing. 9 Set the cooling temperature using the TEMP (+\-) button. 10 Using the SCROLL button to highlight the next period, repeat steps 5 –... -
Page 26: Copy Day
PROGRAMMABLE FEATURES, SETUP & OPERATION 5 If not, press either the LEFT or RIGHT button repeatedly as necessary until the day of the week you want to select is dis- played. The WAKE period will be highlighted. 6 Using the TIME (+\-) button, set the start time for this time peri- 7 Press the red HEAT button. -
Page 27: Copying A Zone Schedule
PROGRAMMABLE FEATURES, SETUP & OPERATION 5 Repeat steps 2 & 3 until YES appears for each day to which you would like to copy. 6 Press the RIGHT button to copy or the LEFT button to cancel. 7 A confirmation screen will list the days you have selected. If the list is correct, press the RIGHT button to confirm and return back to the SCHEDULE function. -
Page 28: Programming Fan Speed
PROGRAMMABLE FEATURES, PROGRAMMABLE FEATURES, SETUP & OPERATION SETUP & OPERATION 6 Use the SCROLL button to highlight the first zone to which you would like to copy. 7 Use the TEMP (+\-) button to select YES to copy, or NO to not copy. - Page 29 PROGRAMMABLE FEATURES, SETUP & OPERATION 5 Press the LEFT or RIGHT button to select the days you wish to program – ALLDAYS, WEEKDAYS, WEEKEND, or choose a specific day (MON, TUES, WED, etc.). 6 Using the TIME (+\-) button, select your desired fan speed – LOW, MED, HIGH or AUTO.
-
Page 30: Zone Features, Setup & Operation
Checking Zone Status The zone status may be observed from optional Smart Sensors or the Infinity Control. To check zone status from the Infinity Control, press the ZONE button on the upper left side of the control until the zone you want to check appears. -
Page 31: Fresh Air Ventilation
ZONING FEATURES, SETUP & OPERATION VENTILATION FEATURES, SETUP & OPERATION 28 Fresh Air Ventilation A fresh air ventilator is used to exchange stale indoor air for fresh outdoor air. Fresh air ventilation can be customized with up to four settings. The setting you choose for heating operation can be differ- ent from the setting you choose for cooling. -
Page 32: Advanced Setup
1 Flip down the door near the base of the Infinity Control. 2 Press the ADVANCED setup button. 3 Use the SCROLL button to select the accessory service reminder you would like to turn ON or OFF. -
Page 33: Lighting
ADVANCED SETUP ADVANCED SETUP Lighting You can adjust the backlighting contrast, turn off backlighting alto- gether, or turn off the HEAT and COOL status lights (LED)s. 1 Flip down the door near the base of the Infinity Control. ™ 2 Press the ADVANCED setup button. 3 Press the RIGHT button once to select the LIGHTING screen (2 of 7). -
Page 34: Heating Humidity
ADVANCED SETUP Heating Humidity If you have a whole house humidifier, heat recovery ventilator (HRV) or energy recovery ventilator (ERV) as a part of your system, you can select your desired heating humidity setting and change how your system controls the humidifier or fresh air ventilation. 1 Flip down the door near the base of the Infinity ™... -
Page 35: Cooling Humidity
ADVANCED SETUP Cooling Humidity 1 Flip down the door near the base of the Infinity Control. ™ 2 Press the ADVANCED setup button. 3 Press the LEFT button three times to view the COOLING HUMIDITY screen (4 of 7). 4 Use the TEMP (+\-) button to set your desired humidity level. 5 To exit, press ADVANCED or simply close the door. -
Page 36: Vacation
ADVANCED SETUP Vacation Settings You can pre-select temperature, humidity and fan settings for your VACATION function. These settings will take effect when you acti- vate VACATION operation as outlined on pages 11-12. 1 Flip down the door near the base of the Infinity Control. -
Page 37: Unoccupied
ADVANCED SETUP ADVANCED SETUP Unoccupied Settings UNOCCUPIED operation allows you to select maximum and mini- mum temperatures, humidity levels, fan speed and ventilator speed for times when your home will be unoccupied for a designated peri- od of time. These settings will apply to all zones when activated. 1 Flip down the door near the base of the Infinity Control. -
Page 38: Zone Names
Control and optional Smart ™ Sensor(s). 1 Flip down the door near the base of the Infinity Control. 2 Press the ADVANCED setup button to view 1st ADVANCED setup display (1 of 7). 3 Press the LEFT button to select the ZONE NAMES display (7 of 7). -
Page 39: Glossary
GLOSSARY Accessory Status…pg. 13 This function allows you to check the approximate usage of an air filter, humidifier pad, UV lamp(s) or ventilator pre-filter. All Days Schedule…pg. 4-5 One comfort schedule that stays the same every day of the week. Auxiliary Heat…pg. - Page 40 GLOSSARY Unoccupied…pg. 34 Unoccupied settings are maximum and minimum temperature and humidity levels you wish your home to remain within while it is unoccupied. When you select the Unoccupied Function, your system will automatically stay within the selected settings. Weekdays Schedule…pg. 20-21 One comfort schedule that is repeated every weekday, Monday through Friday.
- Page 41 A member of the United Technologies Corporation family. Stock Symbol UTX. © Carrier Corporation 2004 OMUIZ01-1 809-50026 Manufacturer reserves the right to discontinue, or change at any time, specifications or designs without notice or without incurring obligations.