
Related Manuals for The Singing Machine STVG-718


Summary of Contents for The Singing Machine STVG-718
- Page 1 Instruction Manual STVG-718 Please read before using this unit. Semi-Pro Compact Disc + Graphics with Built-In TV, Video Camera Karaoke Center...
-
Page 2: Ventilation Warning
WARNINGS This CD player is made and tested to meet WARNING: TO REDUCE THE RISK OF exacting safety standards. It meets FCC FIRE OR SHOCK HAZARD, DO NOT EXPOSE requirements and complies with safety THIS PRODUCT TO RAIN OR MOISTURE. performance standards of the U.S. -
Page 3: Important Safety Instructions
IMPORTANT SAFETY INSTRUCTIONS Read Instructions - All the safety and operating instructions should be read before the product is operated. Retain Instructions - The safety and operating instructions should be retained for future reference. Heed Warnings - All warnings on the product and in the operating instructions should be adhered to. Follow Instructions - All operating and use instructions should be followed. - Page 4 IMPORTANT SAFETY INSTRUCTIONS 15. Outdoor Antenna Grounding - If an outside antenna is connected to the receiver, be sure the antenna system is grounded so as to provide some protection against voltage surges and built-up static charges. Article 810 of the National Electrical Code, ANSI/NFPA 70, provides information with regard to proper grounding of the mast and supporting structure, grounding of the lead-in wire to an antenna-discharge unit, size of grounding conductors, location of antenna-discharge unit, connection to grounding electrodes, and requirements for the...
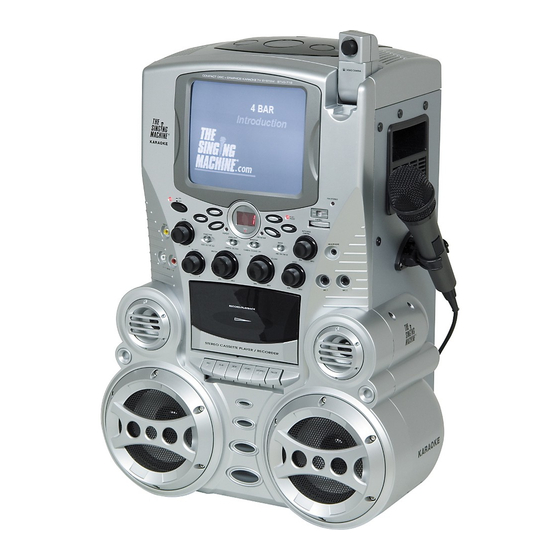
- Page 5 Multiple Karaoke music center - it plays audio Compact Discs, CD+Graphics discs and Cassette tapes in its cassette deck. - lift up camera lens to display your image on the Singing Machine’s monitor. Built-In Speaker - lets you share the music with your family or friends.
-
Page 6: Control Locations
CONTROL LOCATIONS FRONT VIEW STVG-718... - Page 7 CONTROL LOCATIONS REAR VIEW FRONT VIEW Monitor 16. AUX INPUT Jack (L) 31. PLAY/PAUSE Button Model Number 17. AUX INPUT Jack (R) 32. BAND Selector CD Door Open Lid 18. BALANCE Control 33. FM (ST.) Indicator CAMERA Lens 19. MASTER VOLUME Control 34. Dial Pointer CDG LED 20.
-
Page 8: Making The Connections
If the plug does not fit properly, turn it over and try again. Do not force it. CONNECTING TO YOUR TV The Singing Machine provides a patch cord to give you the option of connecting your unit to an external audio/sound system and video device. The patch cord has three RCA jacks at each end. - Page 9 An RF Modulator can be purchased at almost any consumer electronics retailer. If you are connecting the video from the Singing Machine to either a television or a VCR video input jack, you must specify the source the TV or VCR is to display. Your TV or VCR user guide can tell you how to display the video signal from the ‘Video In’...
- Page 10 (1) Locate the multicolored patch cords. (2) Connect video cable (yellow) to the Video In of the front of the Singing Machine. (3) Connect the other end of the Video Cable (yellow) to the Video Output on another video source such as a VCR.
- Page 11 MAKING THE CONNECTIONS CONNECTING AN AUDIO COMPONENT FOR INPUT To connect another audio source (such as a Tuner, an AV Receiver or a VCR) so you can sing along with its music, simply connect the Audio Output jacks (Red & White RCA jacks) to the Singing Machine’s AUX IN L &...
- Page 12 To display your image on the Singing Machine’s monitor, set the MONITOR Selector to CAMERA mode. To turn off the monitor on the Singing Machine, set the MONITOR Selector to OFF mode. Adjust the BRIGHTNESS, CONTRAST and VERTICAL HOLD controls at the back of the Singing Machine to have the best picture quality.
-
Page 13: Cd Or Cd+G Operation
CD OR CD+G OPERATION PREPARATION This unit is designed to play CD’s bearing the identification logo " " . If CD’s do not conform to the CD standard, they may not play properly. Fingerprints and dust should be carefully wiped off with a soft cloth. Wipe in a straight motion from the center of the disc to the outside edge. -
Page 14: Play/Pause Mode
CD OR CD+G OPERATION PLAY/PAUSE MODE To start playing, press the PLAY/PAUSE button. The first track [ ] and the PLAY/PAUSE LED will be lit. To temporarily stop playing, press the PLAY/PAUSE button. The PLAY/PAUSE LED Indicator will flash. To resume play, press this button again. STOP MODE If the STOP button is pressed in the course of playing, the disc will cease to play. -
Page 15: Cassette Operations
CASSETTE OPERATIONS LOADING AND UNLOADING CASSETTES Follow these steps to load and unload cassette: 1. Press STOP/EJECT button (13). 2. Insert cassette with desired side facing you, tape surface down. Avoid touching tape. 3. Close cassette holder/tape deck cover. To ensure firm locking of cassette holder/tape covers, please press the cassette door(s) at the center point (or the rightmost positions) until a 'click'... - Page 16 RADIO AND OTHER OPERATIONS AM/FM RADIO P U B L I C A D D R E S S - U S I N G A Press the ON/OFF button (1). MICROPHONE 2. Switch FUNCTION Selector (3) to T h e u n i t c a n b e u s e d a s a PA RADIO position.
-
Page 17: Care And Maintenance
CARE AND MAINTENANCE POWER SWITCH NOTE After using the unit, turn off the power by Screwdrivers and other metal objects pressing the ON/OFF button. should never be allowed to come in contact with tape heads. These will CLEANING THE UNIT scratch the sensitive surface causing To clean the exterior of the unit, simply wipe damage to your tapes. -
Page 18: Troubleshooting Guide
TROUBLE SHOOTING GUIDE If you have followed the instructions and are having difficulty operating the unit, locate the PROBLEM in the left column below. Check the corresponding POSSIBLE CAUSE column to locate and remedy the problem. PROBLEM POSSIBLE CAUSE SOLUTION No power when POWER No power plug connection at Insert the power plug into the AC... - Page 19 TROUBLE SHOOTING GUIDE PROBLEM POSSIBLE CAUSE SOLUTION No sound - If audio is Source Selection on TV or Follow directions on page E7 for going through TV or VCR is not correct. “Making the Connections”. VCR. Dirty capstan. Clean capstan. Irregular cassette tape CASSETTE unsteady Replace tape.
- Page 20 TROUBLE SHOOTING GUIDE PROBLEM POSSIBLE CAUSE SOLUTION The Camera Lens is down. Lift up a Camera Lens. No image display on Singing Machine’s MONITOR Selector is not Set MONITOR Selector to monitor. set properly. CAMERA mode. Wait a minute for the camera to Camera has not warmed up.
-
Page 21: Specifications
SPECIFICATIONS AUDIO SECTION: OUTPUT POWER (MAXIMUM) 4 WATTS + 4 WATTS (RMS) OUTPUT IMPEDANCE 4 OHMS CD PLAYER SECTION: FREQUENCY RESPONSE 100 Hz - 20 kHz (+/-3 dB) SIGNAL - TO - NOISE RATIO 50 dB (A-WTD) WOW AND FLUTTER IMMEASURABLE D - A CONVERSION 1-BIT DAC... -
Page 22: The Singing Machine Karaoke Glossary Of Terms
THE SINGING MACHINE KARAOKE GLOSSARY OF TERMS In addition to all of the terminology associated with consumer electronics products, a few additional terms are used almost exclusively in karaoke. These terms are meant to familiarize you with the world of Karaoke. The features listed below may not necessarily pertain to the particular model Singing Machine that you have. - Page 24 The Singing Machine Company, Inc. 718-0411-ENG01 6601 Lyons Road, Bldg. A7, Coconut Creek, FL33073-9902, USA. PRINTED IN CHINA TEL: (954) 596-1000 FAX: (954) 596-2000 VISIT OUR WEBSITE www.singingmachine.com...