Table of Contents
Advertisement
Available languages
Available languages
Advertisement
Table of Contents

Related Manuals for JUKI HZL-35Z


Summary of Contents for JUKI HZL-35Z
- Page 1 INSTRUCTION MANUAL MANUAL DE INSTRUCCION...
-
Page 2: Important Safety Instructions
“IMPORTANT SAFETY INSTRUCTIONS” “ When using an electrical appliance, basic safety precautions should always be followed, including the following.” “ Read all instructions before using this sewing machine.” “DANGER- To reduce the risk of electric shock:” 1. “This sewing machine should never be left unattended when plugged in. Always unplug this sewing machine from the electric outlet immediately after using and before cleaning.”... - Page 3 IMPORTANTES INSTRUCCIONES DE SEGURIDAD Cuando se usa un aparato eléctrico, debe seguirse unas precauciones básicas y que vienen incluidas a continuación. "Leer las instrucciones antes de usar la máquina de coser." PELIGRO- Para reducir el riesgo de una descarga eléctrica. 1.
-
Page 5: Table Of Contents
TABLE OF CONTENTS 1. KNOWING YOUR SEWING MACHINE Changing presser feet ......... 44 - 45 Machine identification ..........6 - 9 Zigzag stitch ............46 - 47 Accessories ............10 - 11 Satin stitch Setting up your machine ........12 - 13 Blind stitch ............ - Page 6 CONTENIDO 1. PRINCIPALES PARTES DE LA MAQUINA Cambio del pie prensatelas ........ 44 - 45 Identificación de la máquina ........6 - 9 Puntada zig-zag ..........46 - 47 Accesorios ............10 - 11 Puntada de relleno Preparación de la máquina ......... 12 - 13 Puntada invisible ..........
- Page 7 ........44 - 45 6 - 9 ............ 46 - 47 10 - 11 12 - 13 48 - 49 50 - 51 14 - 15 ......... 50 - 51 52 - 53 14 - 15 ..........52 - 53 16 - 17 ..........
-
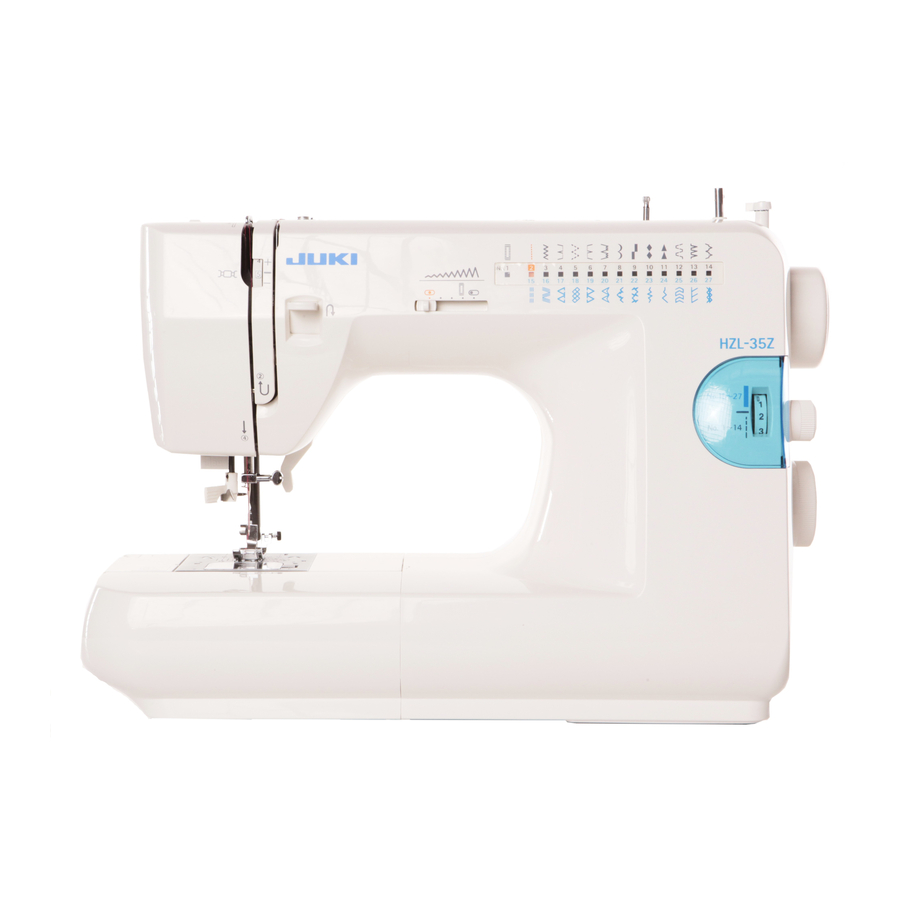
Page 8: Machine Identification
1. KNOWING YOUR SEWING MACHINE MACHINE IDENTIFICATION 1. Reverse stitch lever 2. Thread guide 3. Pressure regulator 4. Thread take-up 5. Thread tension dial 6. Face cover 7. Thread cutter 8. Auxiliary bed (Accessory box) 9. Drop feed lever 10. Bobbin winder 11. - Page 9 1. PRINCIPALES PARTES DE LA MAQUINA IDENTIFICATION DE LA MAQUINA 1. Palanca puntada de retroceso 2. Guía hilo 3. Regulador de presión 4. Tria-hilos 5. Control tensión hilo 6. Cubierta frontal 7. Cortador de hilo 8. Base de extensión (caja de accesorios) 9.
- Page 10 26. Automatic needle threader 27. Presser foot screw 28. Needle 29. Hook cover 30. Needle bar 31. Needle clamp screw 32. Presser foot release lever 33. Presser foot 34. Feed dogs 35. Needle plate 36. Hook cover release button 37. Foot controller 38.
- Page 11 26. Enhebrador automatico aguja 27. Tornillo pie prensatelas 28. Aguja 29. Tapa de canilla 30. Barra de aguja 31. Tornillo de sujeción aguja 32. Palanca de desprendimiento prensatelas 33. Pie prensatelas 34. Transporte de dientes 35. Plancha aguja 36. Botón de apertura tapacanilla 37.
-
Page 12: Accessories
ACCESSORIES 1. Needles 2. Bobbins 3. Spool pin cap (large) 4. Spool pin cap (small) 5. Seam ripper/Brush 6. Screwdriver (large) 7. Screwdriver (small) 8. Oiler 9. Blind stitch presser foot 10. Zipper foot 11. Overcasting foot 12. Buttonhole foot 13. - Page 13 ACCESORIOS 1. Agujas 2. Canillas 3. Tapa del pasador carrete 4. Tapa del pasador carrete 5. Abridor de ojales/Cepillo 6. Destornillador (grande) 7. Destornillador (pequeño) 8. Lubrificador (Aceitera) 9. Prensatelas de puntada invisible 10. Pata para cremalleras 11. Pata para overlocado 12.
-
Page 14: Setting Up Your Machine
SETTING UP YOUR MACHINE Be sure to wipe off any surplus oil from needle plate area before using your machine the first time. Set light switch at “OFF” FOOT CONTROLLER Poner el Interruptor de corriente/ Connect the plug of the foot controller into the luz de velocidad en “OFF”... - Page 15 PREPARACION DE LA MAQUINA Asegurarse de limpiar cualquier aceite sobrante del área de la plancha de aguja, antes de usar, por primera vez, la máquina. CONTROL POR PEDAL Conecte el pedal a la máquina (1) y el enchufe a la alimentación de corriente (2) tal como se ve en el dibujo.
-
Page 16: Spool Pins
SPOOL PINS Place a spool of thread on the spool pin. Secure it with the spool cap (A) leaving a gap between the spool cap and the reel of thread to allow the reel to rotate freely. Pull up the spool pin (B) . This is used for bobbin winding when the machine is already threaded. -
Page 17: Porta Carretes
PORTA CARRETES Coloque un carrete de hilo en el porta-carretes. Fijelo con la tapa (A) asegurándose una salida fluida del hilo. Tire de la barrita (B). Esta se utiliza para el llenado de canilla cuando la máquina ya está enhebrada. PALANCA PIE PRENSATELAS Su prensatelas tiene tres posiciones. -
Page 18: Drop Feed Lever
DROP FEED LEVER The drop feed lever the movement of the fabric that is being sewn. They should be raised for all general sewing purposes and lowered for darning, freehand embroidery and monogramming so that you, and not the feed dogs, are moving the fabric. -
Page 19: Control De Dientes
CONTROL DE DIENTES Los dientes controlan el movimiento del género que se esta cosiendo. deben estar elevados durante las operaciones de costura y bajados durante el remendado, bordado con bastidor y colocación de anagramas de modo que sea Vd. y no los dientes quien mueva el género. CONVERSION PARA LA COSTURA CON BRAZO La máquina tanto se puede utilizar como base plana o... -
Page 20: Stitch Pattern Dial And Indicator
STITCH PATTERN DIAL AND INDICATOR 1. To select a stitch, be sure needle is out of fabric at its highest position. 2. Then turn the dial until the required stitch is indicated by the red symbol on the indicator panel. Stitch indicator Indicador de puntadas Stitch pattern dial... -
Page 21: Selector E Indicador De Puntadas
SELECTOR E INDICADOR DE PUNTADAS 1. Para seleccionar una puntada asegurarse que la aguja está fuera del tejido y en su posición más alta. 2. Entonces girar el selector hasta que el indicador rojo aparezca en la puntada requerida. CONTROL LARGO DE PUNTADA Y PUNTADA SUPER (ELASTICA) El largo de puntada puede ser seleccionado fácilmente de acuerdo con el tipo de material y su grosor. -
Page 22: Winding The Bobbin
WINDING THE BOBBIN 1. Pass thread from spool through thread guides as shown. 2. Pull end of thread through hole in bobbin as shown. 3. Push bobbin winder to far left position, if it is not already there. Place bobbin onto shaft with end of thread coming from top of bobbin. -
Page 23: Devanado De La Canilla
DEVANADO DE LA CANILLA 1. Pasar el hilo desde el carrete, a través del guía hilo, tal como está mostrado. 2. Estirar el extremo del hilo, a través del agujero en la canilla, tal como está mostrado. 3. Empujar el eje del devanador canilla hacia la posición maxima izquierda, si no está... -
Page 24: Threading The Bobbin Thread
THREADING THE BOBBIN THREAD 1. Raise the needle to its highest position by rotating the hand wheel towards you. 2. Remove the hook cover by pushing the release button to the right while pushing the left corner of plate. 3. Insert the bobbin making sure the bobbin rotates anti- clockwise. -
Page 25: Enhebrado Del Hilo De La Canilla
ENHEBRADO DEL HILO DE LA CANILLA 1. Eleve la aguja hasta su posición más alta girando el volante hacia Vd. 2. Desmontar la tapa de canilla empujando el botón de liberación hacia la derecha mientras se empuja la esquina izquierda de la placa. 3. -
Page 26: Needle, Thread And Fabric Chart
NEEDLE, THREAD AND FABRIC CHART Use the standard needles. The size of your needle should match the size of the thread and both should match the fabric. For normal sewing, the same size and type of thread should be used in the bobbin as on the upper part of the machine. -
Page 27: Tabla De Hilo, Aguja Ymaterial
TABLA DE HILO, AGUJA Y MATERIAL Usar las agujas normales. El tamaño de su aguja y el del hilo deben armonizar con el material. Ver la tabla siguiente. Para coser normalmente, usar el mismo tamaño y el mismo tipo de hilo tanto en la aguja como en la bobina. Nunca usar una aguja torcida o obtusa. -
Page 28: Threading The Top Thread
THREADING THE TOP THREAD 1. Raise the presser foot lever. 2. Raise the needle to its highest position by rotating the hand wheel towards you. 3. Thread the machine in the following order as illustrated. -
Page 29: Enhebrado Del Hilo Superior
ENHEBRADO DEL HILO SUPERIOR 1. Levantar la palanca prensatelas. 2. Levantar la aguja a la posición más elevada girando el volante de la máquina hacia usted. 3. Enhebrar la máquina siguiendo el orden de la ilustración. -
Page 30: Using Automatic Needle Threader
USING AUTOMATIC NEEDLE THREADER Raise the needle to its highest position by rotating the hand wheel towards you. 1. Hook thread to thread guide as illustrated. 2. Pull down lever holding the end of thread. 3. Turn the lever as far as it will go. 4. -
Page 31: Empleo Del Enhebrador Aguja
EMPLEO DEL ENHEBRADOR AGUJA Levantar la aguja a la posición más elevada girando el volante de la máquina hacia uated. 1. Enhebrar el hilo en el guía hilo como indica la ilustración. 2. Bajar la palanca sujetando el extremo del hilo. 3. -
Page 32: Picking Up Bobbin Thread
PICKING UP BOBBIN THREAD 1. Raise the presser foot lever. 2. Holding needle thread loosely with your left hand, turn hand wheel towards you one revolution with your right hand until the needle comes to its highest position. 3. Lightly pull up the top thread, and pick up bobbin thread, which will appear through the needle plate slot. -
Page 33: Recogida Del Hilo De La Canilla
RECOGIDA DEL HILO DE LA CANILLA 1. Alzar la palanca del pie prensatelas. 2. Manteniendo flojo el hilo de la aguja con la mano izquierda, girar hacia Vd. el volante con la mano derecha, hasta que la aguja alcance su posición más alta. -
Page 34: Empezer Acoser
2. STARTING TO 2. EMPEZER A COSER MACHINE ESQUEMA DE SETTING CHART AJUSTE DE LA MAQUINA 1. STITCH INDICATOR 2. STITCH LENGTH/SUPER STITCH CONTROL INDICADOR CONTROL LONGITUD PUNTADA 3. ZIG ZAG WIDTH ADJUSTING LEVER CONTROL ANCHO PUNTADA 4. PRESSER FOOT PRENSATELAS A. - Page 35 STITCH PRESSER DROP FEED ZIG ZAG WIDTH STITCH LENGTH/ STITCH INDICATOR FOOT LEVER ADJUSTING SUPER STITCH LEVER CONTROL BUTTONHOLE (Center position) STRAIGHT 1 - 4 (Left position) ZIGZAG MIN. - MAX. 0.5 - 4 BLIND 1 - 4 MID. - MAX. THREE-STEP ZIGZAG MID.
- Page 36 CONTROL CONTROL CONTROL INDICADOR PRENSATELAS PUNTADA LONGITUD ANCHO DIENTES PUNTADA PUNTADA OJALES (al centro) RECTA 1 - 4 (a la izquierda) ZIG-ZAG MIN. - MAX. 0.5 - 4 INVISIBLE 1 - 4 MED. - MAX. ZIG ZAG TRES PUNTADAS MED. - MAX. 1 - 4 LENCERIA CUATRO PUNTOS INVISIBLE SUPER ELASTICO...
- Page 37 1 - 4 0.5 - 4 1 - 4 1 - 4 1 - 4 1 - 4 1 - 4...
-
Page 38: Straight Stitch
STRAIGHT STITCH Straight stitch at center needle position with following settings ; Stitch pattern dial - Zig zag width adjusting lever - Straight stitch at left needle position with following settings ; Stitch pattern dial - Zig zag width adjusting lever - STARTING TO SEW Before placing the material on the ma chine, see that the ends of the threads have been drawn about 15 cm to the... -
Page 39: Puntada Recta
PUNTADA RECTA Puntada recta posición aguja en el centro realizar los siguientes ajustes : Selector puntada - Selector ancho puntada - Puntada recta en posición aguja en la izquierda realizar los ajustes siguientes : Selector puntada - Selector ancho puntada - INICIO DE LA COSTURA Antes de colocar el tejido en la máquina, asegurarse de que los extremos de los hilos se hayan estirado unos 15... -
Page 40: Turning A Square Corner
TURNING A SQUARE CORNER To turn a square corner 5/8" (16 mm) from the fabric edge, Cornering guide stop stitching with the needle tip piercing the fabric, when Guía de esquinas reaching the cornering guide as shown. Raise the presser foot, turn fabric. - Page 41 GIRO EN ESQUINAS EN ANGULO RECTO Para girar en una esquina en ángulo recto a 16 mm. del borde del tejido, parar la costura con la punta de la aguja atravesando el tejido, cuando se está alcanzando la guía de esquinas, tal como está mostrado. Alzar el pie prensatelas y girar el tejido.
- Page 42 INSERTING ZIPS AND PIPING SETTING Use zipper foot which allows you to sew to the right or left of the zipper or close to the cord. Needle to left of foot Needle to right of foot Aguja a la izquierda del Aguja a la derecha del INSERTING ZIPS prensatelas...
-
Page 43: Inserción De Cremalleras Y Vivo
INSERCION DE CREMALLERAS Y VIVO Utilizar el prensatelas de cremalleras que permite coser a la derecha o la izquierda de la cremallera o cerca del cordón vivo. INSERCION DE CREMALLERAS Para coser el lado derecho, aplicar el lado izquierdo del prensatelas de cremalleras al sujetador pie prensatelas, de manera que la aguja pase a través de la abertura en el lado izquierdo del prensatelas. -
Page 44: Sewing On Heavy Fabric
SEWING ON HEAVY FABRIC When sewing on heavy fabric, toe of presser foot tend to lift up and fabric feeding may not be done smoothly. 1. Raise presser foot. 2. Pushing the button on the right side of presser foot, lower presser foot. -
Page 45: Cosiendo Materiales Pesados
COSIENDO MATERIALES PESADOS Al coser materiales pesados, la punta del pie prensatelas se tiende a levantar y el material puede no alimentarse suavemente. 1. Levantar el pie prensatelas. 2. Presionando el botón del lado derecho del pie prensatelas, se baja el pie prensatelas. 3. -
Page 46: Adjusting Top Thread Tension
ADJUSTING TOP THREAD TENSION Under side STRAIGHT STITCHING Reverso The good looking appearance of your stitching is largely determined by the balanced tension of both top and Well balanced bobbin threads. The tension is well balanced when these Bien equilibrada two threads 'lock' in the middle of layers of fabric you are sewing. -
Page 47: Ajuste De La Tensión Del Hilo Superior
AJUSTE DE LA TENSION DEL HILO SUPERIOR COSTURA RECTA El buen aspecto de la costura generalmente está determinado por la tensión equilibrada de ambos hilos superior e inferior. Ponga el control de tensión en la posición "5" para costura normal. Si se encuentra que la costura es irregular, se necesitará... -
Page 48: Zigzag Stitch
ZIGZAG STITCH ZIGZAG STITCHING Under side Reverso The top thread may appear on the bottom depending on the thread, fabric, type of stitch and sewing speed, but the bobbin thread must never appear on the top of the fabric. Top side Cara SATIN STITCH This is a closely spaced attractive stitches use for... -
Page 49: Puntada Zig-Zag
PUNTADA ZIG-ZAG COSTURA ZIG-ZAG El hilo superior puede aparecer en la parte inferior, según el hilo, tejido, tipo de puntada y velocidad de costura, pero el hilo de la canilla nunca deberá aparecer en la parte superior del tejido. PUNTADA DE RELLENO Esta es una puntada atractiva compactamente espaciada, usada para aplicaciones, atacados, etc.. -
Page 50: Blind Stitch
BLIND STITCH Regular blind stitch for normal fabrics Medium to heavyweight fabric Tissus moyens et lourds Elastic blind stitch for soft, stretchable fabrics Under side Reverso 1. First neaten the edge. For lightweights turn up and baste about 10 mm. For heavyweights overcast. 2. -
Page 51: Puntada Invisible
PUNTADA INVISIBLE Puntada invisible regular para las telas normales. Puntada invisible super elástico para las telas suves, elástico. 1. Primero pulir el borde. Los tejidos ligeros se doblan e hilvanan alrededor de 10 mm. Los tejidos gruesos se sobrehilan. 2. Doblar la prenda hacia fuera del dobladillo, dejando que se extienda el borde del dobladillo alrededor de 6 mm. -
Page 52: Three-Step Zigzag
THREE-STEP ZIGZAG This is a strong stitch bec ause as its name implies, it makes three short stitches where the normal zig-zag makes only one. For this reason it is highly recommended for overcasting all types of fabrics. It is also ideal for mending tears, patching, sewing towelling, patch-work and attaching flat elastic. -
Page 53: Zig-Zag De Tres Puntadas
ZIG-ZAG DE TRES PUNTADAS Esta es una puntada fuerte, ya que como su nombre implica, realiza tres puntadas cortas donde el zig-zag normal sólo realiza una. Por esta razón es muy recomendada para el sobrehilado de todo tipo de tejidos. También es ideal para zurcir desgarrones, parches, coser toallas, remiendos y aplicación de elástico plano. -
Page 54: Shell Hem
SHELL HEM Four-point shell stitch If bigger size of shell pattern is desired, use four-point shell stitch. Regular shell stitch Regular shell stitch produces a tiny shell hem on lingerie and other fine garments. Turn under the raw edge and press. Place the fabric right side up so that the zig-zag part of the stitch sews just over the folded edge, pulling the fabric in to form a shell hem. -
Page 55: Dobladillo De Concha
DOBLADILLO DE CONCHA Puntada de concha de cuatro puntos Si quiere tamaño más grande, usar la puntada de concha de cuatro puntos. Puntada de concha normal La puntada de concha normal produce un dobladillo de concha diminuta en lencería y otras prendas finas. Girar hacia abajo el borde del tejido y planchar. -
Page 56: Stretch Stitches
STRETCH STITCHES Stretch stitches are mainly for use on knit, or stretchable fabrics, but can also be used on ordinary materials. ADJUSTING STRETCH STITCH BALANCE Stitch length/super (stretch) stitch control should be at mark for most materials. Depending upon the type of fabric used, you may need to adjust this Control to match forward stitches of stretch sewing with reverse motion Ric-rac Stitch... -
Page 57: Puntadas Elásticas
PUNTADAS ELASTICAS Las puntadas elásticas se utilizan principalmente en géneros de punto o materiales elásticos, pero también se puede usar en materiales corrientes. Utilizar la aguja de puntada elástica con tronco azul, cuando se cosan tejidos elásticos. Utilizar las agujas normales para los tejidos no elásticos. -
Page 58: Overlock Stitch
OVERLOCK STITCH This is the same type stitch used by the garment industry in making sportswear - it forms and finishes the seam in one operation. It's very effective for use in repairing raw or worn edges of older garments. SMOCKING STITCH 1. -
Page 59: Puntada Overlock Elástica
PUNTADA OVERLOCK Este es el mismo tipo de puntada usada por la industria de la confección en la fabricación de prendas. Se forma y acaba la costura en una operación. Es muy efectiva para el uso en la reparación de bordes gastados de prendas usadas. -
Page 60: Fishbone Stitch
FISHBONE STITCH Use to create decorative borders and for embroidery. STRETCH OVERLOCK STITCH Stretch overlock seams and overcasts in one to produce a narrow, supple seam, particularly suited to swimwear, sportswear, T-shirts, babywear in stretch nylon, stretch towelling, jersey and cotton jersey. STRETCH PATCHING STITCH Stretch patching stitch, as well as being a decorative stitch, is ideal for patching stretch fabrics such as jersey and... -
Page 61: Puntadas Elástica De Parches
PUNTADA RASPA Utilicela para crear dobladillos decorativos y para bordados. PUNTADA OVERLOCK ELASTICA Las costuras overlock elásticas producen una costura estrecha y elástica particularmente adecuada para prendas de baño, prendas de sport, camisetas T, prendas de niños de nilón elástico, toalla elástica, jersey y algodón. PUNTADA ELASTICA DE PARCHES La puntada elástica de parches, además de ser una... -
Page 62: Decorative Embroidery Designs
DECORATIVE EMBROIDERY DESIGNS Your Machine will produce a wide range of beautiful decorative embroidery patterns as illustrated on the Stitch indicator panel. Simply select the design of your choice and proceed to sew, the pattern will be produced automatically. The final effect of each design will depend on stitch length setting. -
Page 63: Diseños De Bordados Decorativos
DISEÑOS DE BORDADOS DECORATIVOS Su máquina producirá una amplia gama de hermosas puntadas decorativas, tal como se ilustran en el panel de puntadas. Simplemente selecione el diseño a su gusto y proceda a coser, el dibujo se reproducirá automáticamente. TIPOS DE PUNTADAS DECORATIVAS 1. -
Page 64: Buttonhole Making
BUTTONHOLE MAKING 1. Slide the button carrier and insert the button. Tab A Lengüeta A Tab B Lengüeta B 2. Set the zig zag width adjusting lever at buttonhole position. Zig zag width adjusting lever Selector ancho puntada 3, 4 3. - Page 65 CONFECCION DE OJALES 1. Deslice el porta botones e inserte el botón. 2. Ajustar el selector ancho puntada a la posición de ojal. 3. Ponga la pata para ojales. 4. Coloque la prenda debajo de la pata de forma que la aguja traspase el género al inicio del ojal.
- Page 66 5. Lower the buttonhole lever and the presser foot lever. 6. Push the buttonhole lever away from you. 7. Start machine to complete entire buttonhole. 8. Remove the garment and cut open the buttonhole, using the cutter in the accessories. Be careful not to cut any of the seam thread.
- Page 67 5. Baje la palanca para ojales y la de la pata prensatelas. 6. Suba la palanca para ojales. 7. Arranque la máquina para completar el ojal. 8. Cuando se termina la costura, use un abridor de ojales para abrir el material en el centro del ojal. Tenga cuidado de no cortar el hilo de la costura.
-
Page 68: Corded Buttonholes
CORDED BUTTONHOLES Hook filler cord (crochet thread or buttonhole twist) to the spur and pull both ends of the cord forward under the guide. Sew buttonhole in the way that zig-zag stitches cover the cord. When completed, release the cord from foot, pull ends of cord forward and snip off extra length. -
Page 69: Ojales Con Cordón
OJALES CON CORDON Enganchar el cordón de relleno al saliente de la guía y estirar ambos extremos del cordón hacia adelante, por debajo de la guía. Coser el ojal de forma que las puntadas de zig-zag cubran el cordón. Cuando se haya terminado, soltar el cordón, tirar hacia adelante de los extremos y cortar el sobrante. -
Page 70: Cleaning The Feed Dogs And Shuttle Area
3. CARING FOR YOUR MACHINE CLEANING THE FEED DOGS AND SHUTTLE AREA Always disconnect the machine from power supply by removing the plug from the socket-outlet. CAUTION To ensure the best possible operation of your machine, it is necessary to keep the essential parts clean at all times. 1. -
Page 71: Cuide Su Maquina
3. CUIDE SU MAQUINA LIMPIAR EL AREA DEL TRANSPORTADOR Y LA LANZADERA Siempre desconectar desenchufando el PRECAUCION cordón de la corriente eléctrica. Es necesario que mantenga las piezas esenciales limpias siempre, para obtener un funcionamiento eficáz de su máquina. 1. Levanter la aguja a la posición más alta. 2. -
Page 72: Changing Light Bulb
CHANGING LIGHT BULB In USA In Europe 1. Remove the face cover. Push up the bulb slightly and 1. Remove the face cover and unscre the bulb. turn clockwise. 2. Firmly screw in a new bulb. Replace the face cover. 2. -
Page 73: Cambio De La Bombilla
CAMBIO DE LA BOMBILLA En los E. E. U. U. 1. Quite la cubierta frontal. Empuje hacia arriba la bombilla levemente y de vuelta a la derecha. 2. Inserte la bombilla nuevo, empuje hacia arriba y de vuelta a la izquierda. Substituya la cubierta frontal. En Europa 1. - Page 74 4. CHECK CHART FOR PERFORMANCE PROBLEMS GENERAL PROBLEMS Machine does not sew. * Foot controller is not connected. - See page 12 - 13. * Power switch is turned off. - Turn on the switch. Machine jams/knocks. * Thread is caught in shuttle. - Clean shuttle (see page 68 - 69).
-
Page 75: Cuadro De Examen Para
4. CUADRO DE EXAMEN PARA LOS PROBLEMAS DE EJECUCION PROBLEMAS GENERALES Máquina no cose. * El cordón eléctrico no está conectado (vea página 12 - 13). * El interruptor de potencia está desconectado. – Conectelo. Máquina se atasca/rechina. * El hilo está enredado en la lanzadera. – Limpiar la lanzadera (vea página 68 - 69). - Page 76 8-2-1, KOKURYO-CHO, CHOFU-SHI, TOKYO 182-8655, JAPAN PHONE: 03(3480)5034 FAX: 03(3480)5037 http: //www.juki.co.jp E-mail: hsm@juki.co.jp Copyright © 2006 JUKI CORPORATlON Printed in China © 40053206 10/06 All right reserved throughout the world.