
Related Manuals for Sony CECH-2506B


Summary of Contents for Sony CECH-2506B
- Page 1 Instruction Manual Before using this product, carefully read all product documentation and retain it for future reference. CECH-2506B CECH-2507B 4-199-233-81(1) CECH-2512B...
-
Page 2: Warning
WARNING To avoid electrical shock, do not open the cabinet. Refer Photosensitivity/Epilepsy/Seizures servicing to qualified personnel only. A very small percentage of individuals may experience epileptic seizures or blackouts when exposed to certain light patterns or flashing lights. Exposure to Caution certain patterns or backgrounds on a television screen or when playing video Use of controls or adjustments or performance of... - Page 3 The System Software included within this product is subject to a limited license pacemakers), which may cause malfunctions and possible injuries. from Sony Computer Entertainment Inc. Refer to http://www.scei.co.jp/ps3-eula for further details. If you use a pacemaker or other medical device, consult your physician or the...
-
Page 4: Table Of Contents
Table of contents Connecting to the Internet ............32 WARNING ..................2 Using the Internet browser .............32 Precautions ..................5 Viewing the user's guide ..............32 Online information about the PS3™ system ........10 Creating a PlayStation Network account ........32 XMB ™ (XrossMediaBar) menu ............11 ®... -
Page 5: Precautions
Precautions Before using this product, carefully read all the precautions. Do not connect cables other than a USB cable while the AC power cord is plugged into the electrical outlet. Do not touch the system or connected cables or accessories during an Safety electrical storm. - Page 6 Precautions – Before use, check that there is plenty of space around you. Do not stand on or put objects on the system, and do not stack the system with other devices. – When using the controller, grip it firmly and make sure it cannot slip out of your hand.
- Page 7 Do not allow dust or foreign matter to build up around the AC IN connector. Wireless networking feature Before connecting or plugging in the AC power cord, check that there is no dust or foreign matter in or on the power plug or connecting end of the cord, The 2.4 GHz range of radio waves used by the wireless networking feature of the electrical outlet or the AC IN connector on the system rear.
- Page 8 Precautions Do not apply insecticides or other volatile substances. When discs will not be used for an extended period of time, store them in their cases. Stacking uncased discs or storing them at an angle can cause them to Do not place any rubber or vinyl materials on the product exterior for an warp.
-
Page 10: Online Information About The Ps3™ System
Online information about the PS3™ system Friends This manual explains hardware features and provides basic information about how to Chatting and exchanging messages set up and operate the PS3™ system, including warnings and precautions for the safe and proper use of the system. You can also access the following information available PlayStation Network ®... -
Page 11: Xmb ™ (Xrossmediabar) Menu
XMB ™ (XrossMediaBar) menu The PS3™ system includes a user interface called XMB ™ (XrossMediaBar). PS button button: Displays the XMB ™ menu Displays the options Turns the system on/off menu/control panel Quits a game button: Category Confirm the selected item Directional buttons: button:... -
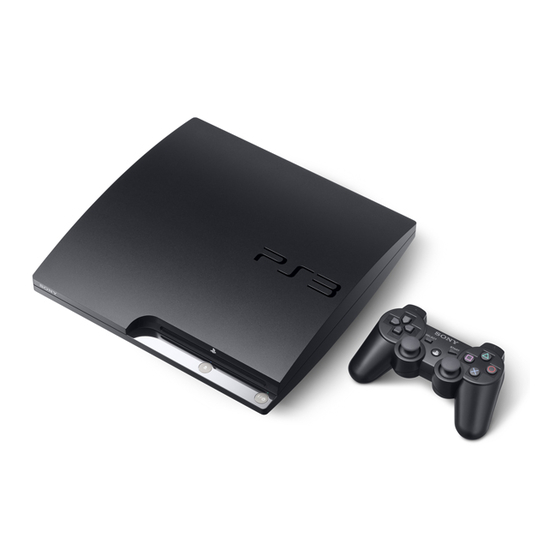
Page 12: Part Names
Part names System front / rear DUALSHOCK 3 Wireless Controller ® Port indicators USB connector L2 button R2 button Disc slot L1 button R1 button Power button button Eject button Directional button WLAN access indicator buttons button HDD access indicator button USB connectors Left stick/... -
Page 13: Getting Started
Getting started Connection methods Connect your system to a TV You can use any of the following methods to connect your system to a TV. Video output in SD (Standard Definition) resolution HDMI OUT AV MULTI OUT AV MULTI OUT AV Cable connector connector... - Page 14 Removing the 3-pin converting adaptor Connect the AC power cord (CECH-2506B only) After plugging the AC power cord into the electrical outlet, the power indicator on the Electrical outlet configuration may vary PS3™ system will light up in solid red ( page 21).
-
Page 15: Performing Initial Setup Of The System Software
Perform initial setup. Performing initial setup of the system software After turning on the system, perform initial setup. Turn on the TV, and then switch the video input of the TV to match the input connector used by the PS3™ system. Press the power button. -
Page 16: Video Output On The Ps3™ System
Getting started Video output on the PS3™ system The PS3™ system can output two types of resolution: HD and SD. Refer to the instruction manual for the TV in use to check which video mode is supported. (High Definition) (Standard Definition) 480p 480i * Video mode *... - Page 17 Video output cable types The resolution displayed on the TV varies depending on the input connectors on the TV and the type of cable in use. Select a cable to match the TV in use. Cable type Input connector on the TV Supported video modes*¹...
- Page 18 Getting started Adjusting video output settings Confirm the screen, and then press the button. If you changed the connector in step 2, a screen for confirming the change Depending on the type of cables and the connectors used, you may will be displayed.
- Page 19 Confirm the settings, select [Yes], and then press the Adjust audio output settings. button. Continue on to adjust audio output settings. Adjust settings to match the TV or audio device in use. Depending on the connector selected in step 2 and the resolutions selected in step 5, this screen may not be displayed.
-
Page 20: Connecting Digital Audio Devices
Getting started Connecting digital audio devices Examples when connecting an audio device You can connect audio devices that support digital audio playback, An HDMI cable or optical digital cable can be used to connect an such as an AV receiver for home entertainment use. audio device to the PS3™... -
Page 21: Turning The Ps3™ System On And Off
Turning the PS3™ system on and off Turning on the system Turning off the system Press the power button. Press the power button. The power indicator lights up in solid green to indicate that the system is The power indicator lights up in solid red. turned on. -
Page 22: Using The Wireless Controller
Using the wireless controller Step 2: Assign a controller number Preparing for use Each time you turn on the system, a number must be assigned to the To use a wireless controller, you must first register or "pair" the controller controller. - Page 23 Battery charge level Using the controller wirelessly If you press and hold down the PS button for more than one second, If you disconnect the USB cable, you can use the controller wirelessly. you can check the battery charge level on the screen. To use it wirelessly, the controller's battery must be charged.
-
Page 24: Playing Content
Playing content Blu-ray Disc (BD)/DVD/CD Insert the disc. An icon is displayed in the XMB ™ menu, and playback of the disc begins. If the disc does not automatically start, select the icon for the disc from the XMB ™ menu, and then press the button. -
Page 25: Playing Content On Usb Devices
Note that Sony Computer Entertainment Inc. and its subsidiaries and affiliates will not be liable for any loss or corruption of data, files or software. -
Page 26: Playing Games
Playing games Game compatibility Notice Do not insert multiple discs or foreign objects into the disc slot, because this may cause the system to malfunction. PlayStation 3 format software ® Can be played on this system* PlayStation format software ® Quitting a game PlayStation 2 format software... -
Page 27: Saved Data For Playstation ® 3 Format Software
Saved data for PlayStation 3 format software Assigning slots ® Saved data for PlayStation 3 format software is saved on the system's ® Select (Game) (Memory Card Utility (PS/PS2)), and hard disk. The data is displayed under (Game) (Saved Data then press the button. -
Page 28: Adjusting Network Settings
Adjusting network settings Example of a network configuration (wired) Example of a network configuration (wireless) A wired network configuration requires items , and . A wireless network configuration requires items and . Network gateway device Network gateway device ... -
Page 29: Adjusting Network Settings (Wired)
Adjusting network settings (wired) Adjusting network settings (wireless) Connect an Ethernet cable (sold separately) to the system. Check that an Ethernet cable is not connected to the system. Select (Settings) (Network Settings) [Internet Select (Settings) (Network Settings) [Internet Connection Settings], and then press the button. - Page 30 Adjusting network settings Adjust wireless LAN settings. Hints SSID and WEP/WPA keys are types of security information that are required Select the access point that you want to use. You can usually select [Scan] when connecting to an access point. If you do not have this information, and choose an access point within range of your system.
-
Page 31: Adjusting Custom Settings
Adjusting custom settings Specify the MTU value used when transmitting data. You can usually In certain network environments, some settings may not be adjusted select [Automatic]. automatically by selecting [Easy]. Refer to the information below and also follow the on-screen instructions to adjust custom settings. Proxy Server Specify the proxy server to be used. -
Page 32: Connecting To The Internet
Connecting to the Internet If network settings are already completed, the PS3™ system will Viewing the user's guide automatically connect to the Internet when the system is turned on. The connection will remain active as long as the system is on. You can use the Internet browser to view the online user's guide for the PS3™... -
Page 33: Ps3™ System Updates
PS3™ system updates By updating the PS3™ system software, you can add features and/or Update methods security patches. Frequently update your system to use the latest version of the system software. You can perform an update in any of the ways described below. System software updates http://asia.playstation.com Network update... -
Page 34: Using The On-Screen Keyboard
Using the on-screen keyboard Cursor Text entry field Displays predictive options Hints For details about using the on-screen keyboard, refer to the online user's guide (http://manuals.playstation.net/document/). You can also enter text using a USB keyboard or Bluetooth -compatible ®... -
Page 35: Parental Control
Parental control The PS3™ system includes a parental control feature. You can use this Other security settings feature to set a password and limit the playback of content restricted by a parental control level (games, videos and other content). By setting You can set parental control limitations on content other than games the parental control level on the system, you can prevent the playback under... -
Page 36: Replacing The Hard Disk
The inside of the system is hot directly after use. Allow time for the system to possible to restore or repair the software or data. Sony Computer Entertainment Inc. and its subsidiaries and affiliates will not be liable for cool down before starting to remove the hard disk. -
Page 37: Removing The Hard Disk
Stick™ or an SD Memory Card. during authorized service, it may not be possible to restore or repair the software or data. Note that Sony Computer Entertainment Inc. and its subsidiaries and affiliates will not be liable for any loss or corruption of data, files or software. - Page 38 Replacing the hard disk Place the system upside down on a soft, dry cloth, and then Remove the hard disk. open the screw cover. Pull the handle upwards, and then pull out the hard disk from the system. Use the notch located above the screw cover to slightly pull up the cover. Then rotate the cover as shown in the diagram.
-
Page 39: Replacing The Hard Disk
Remove the hard disk from the metal frame. Replacing the hard disk Caution For safety reasons, be sure to turn off and unplug the system before attempting to replace the hard disk. When replacing the hard disk, follow the procedure below to remove the metal frame. -
Page 40: Reinstalling The System Software
The system software included within this product is subject to a limited license from Sony Computer Entertainment Inc. Refer to http://www.scei.co.jp/ps3-eula for further details. Installing the system software Turn on the PS3™... -
Page 41: Restoring Data That Has Been Backed Up
Restoring data that has been backed up You can restore data that you backed up using either of the following methods. Restoring data in a single operation You can restore data that you backed up in a single operation by selecting (Settings) (System Settings) -
Page 42: Transferring Data To Another Ps3™ System / Restoring The System
Transferring data to another PS3™ system / restoring the system Transferring data to another PS3™ system Restoring default settings You can transfer data that is saved on the hard disk of one PS3™ You can restore from the current settings under (Settings) to the system (the source system) to the hard disk of another PS3™... -
Page 43: Before Requesting Service
Before requesting service Go through this section if you experience difficulty in operating the If the video output settings on the system do not match those of the cable or TV in use, there may be no picture. If the screen goes PS3™... - Page 44 Before requesting service The BD may be disc-locked. Enter the password that was set when Some software do not support digital audio output. the disc was created. If the system's audio output settings do not match the cable or ...
- Page 45 If you connect your system to a router, complete initial settings on If the disc has a label, insert it with the label side up. the router first. After completing the settings on the router, try to Check whether the disc is scratched or dirty.
- Page 46 Before requesting service Select (Settings) (Accessory Settings) [Controller Wireless controller Vibration Function], and then try setting [Vibration Function] to [On]. The software may not support the vibration function. Refer to the The wireless controller does not function. instruction manual for the software. For software downloaded from ...
- Page 47 The screen is frozen. The system does not operate. Other issues Disconnect all accessories such as USB devices from the system, and then restart the system. Pressing the power button for 15 The system makes noise. seconds or longer will force the system to turn off (enter standby ...
-
Page 48: Specifications
Specifications Design and specifications are subject to change without notice. Information about Type: Semiconductor, continuous system functionality and images published in this document may vary from those Wavelength: 400 - 410 nm for your PS3™ system, depending on the system software version in use. Power: Max. - Page 49 Playback of BD-RE ver. 1.0 discs is not supported. PlayStation 2 format software titles do not perform on this system. ® "BRAVIA™ Sync" is a Sony product feature that allows you to use the This product has limited backward compatibility with PlayStation format ®...
- Page 50 Specifications When playing PlayStation 3 format software in HD resolution, a TV that supports When playing discs with content that was copied fraudulently, abnormal sounds ® video playback at 59.94 Hz is required. may be produced or the content may not play correctly. To continuously enjoy playback of copyright-protected BDs, in some cases the DVD-R/DVD-RW/DVD+R/DVD+RW discs encryption key for AACS (Advanced Access Control System) may need to be...
- Page 51 Storage Using a crosshead screwdriver, remove the screws (5 places). When the wireless controller is not used for an extended period of time, it is recommended that you fully charge it at least once a year in order to maintain battery functionality.
-
Page 52: Warranty
WARRANTY For warranty terms and conditions of respective regions, please refer to following official websites: Hong Kong: http://asia.playstation.com/hk/warranty Singapore: http://asia.playstation.com/sg/warranty Taiwan: http://asia.playstation.com/tw/warranty Other regions: http://asia.playstation.com... -
Page 53: Copyright And Trademarks
Copyright © 2004-2006 Cambridge Silicon Radio Ltd. The Bluetooth word mark and logos are owned by the Bluetooth SIG, Inc. and ® any use of such marks by Sony Computer Entertainment Inc. is under license. Other trademarks and trade names are those of their respective owners. - Page 54 Copyright and trademarks DivX, DivX Certified, and associated logos are trademarks of DivX, Inc. and are Manufactured under licence from Dolby Laboratories. Dolby and the double-D used under license. symbol are trademarks of Dolby Laboratories. U.S. and foreign patents licensed from Dolby Laboratories. DLNA and DLNA CERTIFIED are trademarks and/or service marks of Digital Living Network Alliance.
- Page 55 Anti-Grain Geometry - Version 2.0 Java and all Java based trademarks and logos are trademarks or registered Copyright © 2002-2004 Maxim Shemanarev (McSeem) trademarks of Sun Microsystems, Inc. in the U.S. and other countries. Permission to copy, use, modify, sell and distribute this software is granted provided this copyright notice appears in all copies.
- Page 56 Copyright and trademarks eZiText and Zi are registered trademarks of Zi Corporation. ® ® Portions of this software are copyright © 1996-2008 The FreeType Project (www.freetype.org). All rights reserved. This software is based in part on the work of the Independent JPEG Group. Visit http://www.scei.co.jp/ps3-license/index.html for other licensees and trademarks.
- Page 58 警告 為避免觸電,請勿打開外殼擅自分解。維修僅能由專業 光敏感/癲癇/突發性疾病 的維修人員進行。 有極少數人,當看到某些亮光或閃光時,可能會有癲癇發作或暫時性眩暈的情形。 如果這些人看到電視螢幕上的某些圖案或背景,或者在遊玩遊戲時,可能會引發癲 注意 癇或暫時性眩暈。某些從未有過癲癇的人,也可能在這些情況下被引發出來。如果 非依指定方式而進行的操作、調整以及執行動作可能會 您或您的家人有癲癇狀況或任何突發性疾病,在遊玩遊戲前請先洽詢醫生。 導致放射線洩漏。 如果您或您的孩子有以下任何一種健康問題或症狀,請立即停止使用,必須先洽詢 醫生,才能繼續遊玩遊戲: 使用本產品時若搭配光纖,可能會增加眼睛受損的危 險。 頭暈, 視覺障礙, 眼睛或肌肉抽動, 意識不清, CLASS 1 LASER PRODUCT LASER KLASSE 1 PRODUKT 精神恍惚, 突發性疾病,或者 不自主的動作或肌肉抽動。 依據 IEC60825-1:2007,本家電用品隸屬 CLASS 1 LASER 產品分類。 必須經醫生許可才能繼續遊玩遊戲。...
- Page 59 家。同時,亦禁止將本產品出口或再出口至美國禁止交易的個人或團體。 若您有使用心律調整器或其他醫療裝置,請在使用無線網路機能(Bluetooth 與 ® 告 無線 LAN)前,先詢問您的主治醫生或您身上之醫療裝置的製造廠商。 請勿在下列場所使用無線網路功能: – 禁止使用無線網路的場所,如:醫院。在醫院中使用主機時,請遵守其規定。 – 接近火災警報器、自動門或其他類型之自動化設備的場所。 廢電池請回收 3D影像 (僅適用於台灣) 有些人在使用3D電視機觀看3D影像或遊玩3D立體遊戲時,可能會感到不舒服(例如 眼睛疲勞、噁心等)。若您感到不舒服,請立即停止使用您的電視機,直至不舒服 的症狀消退。 SCE建議所有使用者在觀看3D影像或遊玩3D立體遊戲時,應該定時休息。休息的時間 和次數因人而異,請休息足夠時間,直至不舒服的症狀消退。如果症狀持續存在, 請立即就醫。 幼童(特別是六歲以下者)的視力仍在發育階段。在讓幼童觀看3D影像或遊玩3D立 體遊戲前,應先洽詢醫生(例如小兒科醫生或眼科醫生)。使用PlayStation 3主機 ® 時若同時使用任何支援3D的裝置,請先閱讀該裝置的使用說明書。 系統軟件 本產品中內建的系統軟件乃受 Sony Computer Entertainment Inc. 限制授權。詳 情請閱覽以下網站:http://www.scei.co.jp/ps3-eula 關於國家出口控制 本產品可能因各國立法之規定而被列爲限制出口商品。請嚴格遵守相關法條及任何 與本產品之管轄權有關之法律規定。...
- Page 60 目錄 連接網際網路(互聯網).........88 警告 ............. 58 使用網路瀏覽介⾯ .........88 使用前須知事項 ........... 61 閱覽用⼾指南 ..........88 關於 PS3™ 主機的線上資訊 ........ 66 新建一個 PlayStation Network 帳⼾ ......88 ® (XrossMediaBar) 選單 ........ 67 PS3™ 主機更新.........89 零件名稱..........68 使用螢幕鍵盤...........90 ⼊門指南..........69 視聽年齡限制...........91 連接方式 ..........69 執行系統軟件的初始設定 ........71 更換硬碟..........92 PS3 ™ 主機的影像輸出 ........72 備份資料...
-
Page 61: 使用前須知事項
使用前須知事項 使用本產品之前,請先仔細閱讀所有使用前須知事項。 與主機連接的任何電視機或配件,必須為操作正常且沒有任何損壞。若與主機連 接的電視機或配件有任何問題或損壞,可能會損壞電視機或配件、或主機本身。 所有的電子產品,若與任何有問題或損壞的配件連接,或所連接之電源插頭未有 關於安全 正確連接線路,皆可能會導致出現火花,引起火災。 切勿在靠近水的場所使用主機或附屬品。 使 本產品是在充分重視安全性能的情況下設計的。但如果使用不當,任何電器產品都 用 有可能引起火災觸電或人身傷害的潛在危險。爲確保安全操作,請遵循以下各項規 請勿讓液體、小零件或其他異物掉⼊主機或附屬品中。 前 則: 請勿觸摸主機或附屬品的端子部分。 須 遵守所有警告條文、注意事項及使用說明。 請勿將主機或附屬品暴露在灰塵、煙霧或蒸氣中。此外,請勿將主機放置在有很 知 定期檢查交流電源線是否有損壞,以及電源插頭或電源插座周圍是否有堆積灰 多灰塵或香煙煙霧的場所。在內部零件(例如透鏡)中堆積的灰塵或香煙煙霧, 事 塵。 可能會導致主機故障。 項 如果裝置出現動作不正常,或者發出異常聲⾳或氣味,或因過熱而無法觸碰時, 請勿將主機或附屬品放在高溫、濕氣極重或受日光直射的地方。 請立即停止使用,並從電源插座中拔掉交流電源線插頭及所有的其他連接線。... - Page 62 使用前須知事項 使用 DUALSHOCK 3 無線控制器時的注意事項* 使用交流電源線 ® 若您在操作 DUALSHOCK 請定期檢查交流電源線,以確保操作安全。若有損壞,請立即停止使用,並連絡 3 無線控制器時忽然開始感覺疲勞,或手臂、手腕感覺不 ® 舒服或疼痛時,請立即停止使用主機。如果不良症狀持續存在,請立即就醫。 包裝盒上記載的的 PS3™ 消費者服務中心。 DUALSHOCK 請勿使用隨附之交流電源線以外的其他電源線。且切勿改造該電源線。 3 無線控制器的震動功能可能會令傷勢惡化。當您手臂、手腕的骨 ® 骼、關節或肌肉有任何不適或受傷時,請勿使用震動機能。若您有任何不適或受 請勿用濕手觸摸交流電源線的端子。 傷,請勿遊玩需使用 DUALSHOCK 3 無線控制器的遊戲,否則請先將震動機能設定 ® 請避免誤踩或掐擠交流電源線,尤其是插頭、轉接用的插座與電源線等自主機延 為[關]。 伸出來的組件更需注意。 避免長時間使用 DUALSHOCK 3 無線控制器。請每...
- Page 63 網路 清潔 連接網路需先連接寬頻網際網路(互聯網)。 為了安全著想,請在開始清潔主機或已連接之附屬品前,先自電源插座中拔出交流 電源線。 用⼾需支付與網路連線時的必要費用。詳細請參閱服務契約之提供內容或聯絡您 使 的網路服務商。 用 外殼表⾯(主機和無線控制器的塑膠蓋) 切勿使用一般家庭的標準電話線或本說明書內所述類型以外的連接線。使用類型 前 錯誤之連接線連接,可能會造成超過 LAN 連接時需要量的電流通過,並可能會導 須 請遵循以下使用說明,以免產品外殼變形或變色。 致過熱、火災或是故障。 知 使用軟布輕柔擦拭。 事 切勿使用殺蟲劑或其他具揮發性的物質。 項 無線網路功能 切勿在產品外殼上長時間放置任何橡膠或乙烯基材質。 切勿使用溶劑或其他化學藥劑。切勿使用經化學處理的擦布擦拭。 本產品之無線網路功能使用的 2.4 GHz 無線電波範圍乃屬各種裝置共用分享。本 產品的設計會降低使用相同範圍之其他裝置的作用。然而,來自其他裝置的干擾 仍可能會降低連線速度、縮短訊號範圍,或導致連線忽然意外中止。 通風孔...
- Page 64 使用前須知事項 光碟 相容性的注意事項 部分媒體可能因地區或區域的限制而無法使用您的主機啟動。詳細請參閱媒體上的 包裝。 保養 請勿觸摸光碟光亮的讀寫⾯,持拿光碟時,請持其邊緣。 請勿在光碟上粘貼紙張或膠帶,以及在光碟上寫字。 光碟上的指印、灰塵、污垢或刮痕可能使圖像失真,或降低聲⾳品質。必須小心 保養,並且在使用前檢查光碟是否乾淨。 保管 請勿將光碟放在高溫、濕氣極重或受日光直射的地方。 若長時間不使用光碟,請將它們保管在光碟盒中。堆放未收納的光碟或傾斜放置 保管可能造成光碟彎曲。 清潔方式 用軟布清潔光碟,從中間往外輕輕地擦拭。 請勿使用溶劑、唱片清潔劑、防靜電噴霧劑或其他化學藥劑,否 則可能會損壞光碟。...
- Page 65 使 用 前 須 知 事 項...
-
Page 66: 關於 Ps3™ 主機的線上資訊
關於 PS3™ 主機的線上資訊 好友 本使用說明書包含硬件機能的說明,並提供如何設置及操作 PS3™™主機的基本資訊,包 聊天與交換訊息 括關於安全和正確使用主機的警告條文和使用前須知事項。您亦可透過網際網路(互聯 網)取得以下資訊。 PlayStation Network ® 線上用⼾指南 http://manuals.playstation.net/document/ 此用⼾指南包含了使用 PS3™ 主機時的相關詳細資訊。 使用 PlayStation Network 服務 ® PlayStation 官方網站 http://asia.playstation.com ® 網路 可取得關於以下各項的最新資訊: 系統軟件更新 連接網際網路(互聯網) PlayStation 3 產品,例如遊戲軟件及硬件周邊產品 ® 遊戲 PlayStation 產品支援,包括產品的最新常見問題及解答 ®... -
Page 67: Xmb Tm
(XrossMediaBar) 選單 PS3™ 主機含有稱為 XMB (交叉媒體廊)的使用者介⾯。 PS 按鈕 : 按鈕: 顯示選項選單/操作介⾯ 顯示 XMB 選單 按鈕: 開啟/關閉主機電源 確認選擇的項目 分類 離開遊戲 按鈕: 取消操作 方向按鈕: 用於選擇畫⾯上的分類/項目 選項選單 操作介⾯ 選擇圖示後按下 按鈕會顯示選項選單 播放內容時按下 按鈕會顯示操作介⾯... -
Page 68: 零件名稱
零件名稱 主機前⾯/背⾯ DUALSHOCK 3 無線控制器 ® 埠指示燈 USB 連接埠 L2 按鈕 R2 按鈕 光碟槽 L1 按鈕 R1 按鈕 電源按鈕 按鈕 退出按鈕 方向按鈕 按鈕 無線 LAN 讀取燈 按鈕 HDD 讀取燈 按鈕 USB 連接埠 左操作桿/ 右操作桿/ LAN 連接埠 L3 按鈕* R3 按鈕* HDMI 輸出端子... -
Page 69: 門指南
⼊門指南 連接方式 連接主機與電視 ⼊ 您可使用以下任何一個方法,連接主機與電視。 門 指 南 以 SD(標準解析度)輸出影像 AV 連接線 AV 多重輸出端子 HDMI AV 多重 電視 輸出端子 輸出端子 影像輸⼊端子 以 HD(高解析度)輸出影像 - 影像色差 影像色差連接線(另售) AV 多重輸出端子 電視 影像色差輸⼊端子 以 HD(高解析度)輸出影像 - HDMI™ HDMI 連接線(另售) HDMI 電視 輸出端子... - Page 70 使用 LAN 連接線讓主機與網際網路(互聯網)連線。 提示 交流電源 LAN 連接埠 輸⼊端子 使用無線網路連接,即可不使用 LAN 連接線即直接與網路連線。相關的詳細資訊,請參閱 "調整網路設 定"( 第 84 ⾴)。 注意 切勿使用一般家庭的標準電話線或主機不支援的其他類型連接線直接插⼊主機的 LAN 連接埠,否則 可能會導致過熱、火災或是故障。 拆除3插針電源插頭轉換器(僅限 連接交流電源線 CECH-2506B) 將交流電源線插⼊電源插座,PS3™ 的電源指示燈即會亮紅燈( 第 77 ⾴)。 牆壁電源插座形狀依區域而異。若插座形狀與您 居住之區域的電源插座不相容時,請鬆開螺絲並 插掉電源插頭轉換器。 部份地區及國家可能會使 用與圖示不同之電源插頭。 主電源插頭 3 插針電源插頭轉換器 注意 請先進行所有其他連接後,再將主機的交流電源線插⼊電源插座。...
-
Page 71: 執行系統軟件的初始設定
執行初始設定。 執行系統軟件的初始設定 啟動主機電源後,執行初始設定。 ⼊ 門 啟動電視機,並配合 PS3™ 主機使用之連接端,調整電視機的影像 指 輸⼊設定。 南 按下電源按鈕。 電源指示燈亮起綠燈,且電視螢幕上會顯示圖像。 電源指示燈 遵循畫⾯上的指示輸⼊「系統語⾔」、「時區」、「日期與時間」和「使用者 電源按鈕 名稱」。 螢幕會顯示設定網路的畫⾯。當使用 LAN 連接線,若您遵循畫⾯指示正確設 定,初始設定會被自動選擇。若使用無線 LAN,請遵循 "調整網路設定(無 使用 USB 連接線將無線控制器連接至主機。 線)"( 第 85 ⾴)調整必需之設定。 設定完成後,電視螢幕上會顯示 XMB 選單( 第 67 ⾴)。 按下控制器的 PS 按鈕。 主機將會開始辨識無線控制器。辨識控制器後,即會顯示初始設定畫⾯。 提示... -
Page 72: Ps3™ 主機的影像輸出
⼊門指南 PS3™ 主機的影像輸出 PS3™ 主機可以輸出「HD」和「SD」兩種解析度。請參閱電視的使用說明書,以確認支援何種影像模式。 (高解析度) (標準解析度) 480p 480i* 影像模式* 1080p 1080i 720p 576p 576i* 16:9 16:9 縱橫⽐ 16:9 16:9 16:9 數字代表掃描線的數目。請注意,"i" 代表 "隔行",而 "p" 代表 "逐行"。使用逐行掃描可隨著最低程度的閃爍,呈現高水準的影像品質。 SD 解析度的變換可能因您使用之 PS3™ 機型和播放之內容而異。 主機的影像輸出設定會顯示為[標準(NTSC)]。 主機的影像輸出設定會顯示為[標準(PAL)]。 顯示解析度差異的畫⾯ HD 畫⾯ SD 畫⾯... - Page 73 影像輸出連接線的種類 電視顯示之解析度會因電視的輸⼊端子與使用之連接線種類而異。請選擇與您使用之電視相容的連接線。 ⼊ 連接線種類 電視的輸⼊端子 支援的影像模式* 門 指 HDMI 連接線* (另售) HDMI 輸⼊端子 1080p, 1080i, 720p, 480p / 576p 南 COMPONENT VIDEO IN AUDIO IN 1080p, 1080i, 720p, 480p / 影像色差連接線(另售) 影像色差輸⼊端子 576p, 480i* / 576i* S VIDEO L-AUDIO-R S 視頻連接線(另售) S 影像輸⼊端子...
- Page 74 ⼊門指南 確認畫⾯後,按下 按鈕。 調整影像輸出設定 若於步驟 2 時改變了電視機的連接端,則此時會顯示確認變更的畫⾯。 您可能需要配合您連接的連接線和連接端類型,調整 PS3™ 主機的影像 輸出設定,才能讓電視機以 HD 解析度顯示影像( 第 72 ⾴)。 確定設定後,選擇[是]並按下 按鈕。 若於步驟 2 時改變了電視機的連接端,則此時會顯示確認設定的畫⾯。 螢幕上未顯示任何影像時 配合跟主機連接之連接端,調整電視機的影像輸⼊設定。 關閉主機電源後,按下電源按鈕超過 5 秒鐘以上(直到主機發出兩次嗶 聲),以重新啓動電源。影像輸出設定隨後會恢復爲標準(SD)解析度。 選擇 (設定) (顯示器設定) [影像輸出設定]後,按 下 按鈕。 選擇電視機目前使用的輸⼊端子( 第 73 ⾴)後,按下 按 鈕。...
- Page 75 調整聲⾳輸出設定。 確認設定內容後,選擇[是]並按下 按鈕。 接著能調整聲⾳輸出設定。請配合您使用的電視機或⾳響裝置調整設定。 於步驟 2 選擇某些端子或於步驟 5 選擇特定解析度後,可能不會顯示此畫 ⾯。 ⼊ 門 指 南 選擇[HDMI]後,您可進⼊下一個畫⾯選擇[自動]或[手動]選項。通常請 選擇[自動]。 選擇電視機類型後按下 按鈕。 要使用 HDMI 連接線以外的連接線從電視機輸出聲⾳時,請選擇[聲⾳輸出端 子 / SCART / AV MULTI]。使用光纖數碼線輸出聲⾳時,請選擇[光纖]並進 於步驟 5 選擇 SD 解析度( 第 72 ⾴)後,畫⾯上會顯示選擇電視機螢幕 ⼊下一個畫⾯選擇輸出格式。 尺寸的畫⾯。請配合您使用的電視機調整設定。 於步驟 5 選擇[720p]或更高解析度後,電視機類型將會自動設定為 16:9, 確...
-
Page 76: 連接數位⾳響裝置
⼊門指南 連接數位⾳響裝置 ⾳響裝置連接範例 您可利用家庭娛樂用途之 AV 接收器(擴大機)等支援數碼(數位)聲⾳ 您可使用 HDMI 連接線或光纖數碼線連接⾳響裝置與 PS3™ 主機。 播放的⾳響裝置連接。 HDMI 連接線 光纖數碼線 PS3™ 主機的聲⾳輸出 支援聲道可能因使用之輸出端子而異。 可使用之聲道輸出 PS3™ 主機的輸出端子 2 Ch. 5.1 Ch. 7.1 Ch. AV 多重輸出端子 光纖數碼輸出端子 HDMI 連接線 光纖數碼聲⾳輸出 ... -
Page 77: 啟動和關閉 Ps3™ 主機電源
啟動和關閉 PS3™ 主機電源 啟動主機電源 關閉主機電源 按下電源按鈕。 按下電源按鈕。 啟 電源指示燈持續亮綠燈,主機啟動電源。 電源指示燈持續亮紅燈。 動 和 電源指示燈: 電源指示燈: 關 持續亮綠燈 持續亮紅燈 閉 電源按鈕 電源按鈕 主 按下控制器的 PS 按鈕。 機 自動指定控制器的編號後,即可開始操作。 電 源 重要 PS 按鈕 電源指示燈亮綠燈/閃爍綠燈時,請遵守以下注意事項,否則可能會導致資料毀 損/流失或主機故障: 請勿從電源插座拔掉交流電源線。 請勿移動主機或變換主機的放置方式。 提示 電源指示燈狀態 開始使用前,需先配置控制器( 第... -
Page 78: 使用無線控制器
使用無線控制器 步驟 2:指定一組控制器編號 使用前的準備 每次啓動主機,都需替控制器指定一組編號。 使用無線控制器前,您必須先登錄或 "配置" 控制器至 PS3™ 主機上, 並替控制器設定一組編號。 所有埠指示燈不斷閃爍。 按下 PS 按鈕。 1 2 3 4 步驟 1:配置主機與控制器。 第一次使用時 使用另一台 PS3™ 主機時 控制器已指定編號時,唯有該指定 編號之埠指示燈會持續亮紅燈。 1 2 3 4 步驟 2:指定一組控制器編號。 每次啓動主機時 您一次最多可連接 7 個控制器。控制器之編號將如埠指示燈顯示的編 號。編號爲... - Page 79 電池充電量 使用無線控制器 PS 按鈕持續按住一秒鐘以上後,即可從螢幕上確認電池的剩餘充電量。 您需先拔取 USB 連接線,才能使用無線控制器。且無線使用前,必先替 控制器的電池充飽電。 使 提示 用 無 控制器與主機的電源皆啓動時,亦可連接或拔取 USB 連接線。 線 控制器無法正常動作時,請按下 PS 按鈕並指定控制器編號。 控 制 替控制器充電 器 剩餘充電量 啟動主機電源(電源指示燈持續亮綠燈)時,始可使用 USB 連接線將控 制器連接至主機上。此時控制器上的埠指示燈會緩慢閃爍紅燈並逐漸充 電。充電結束後,埠指示燈即會停止閃爍。 電池電力充足。 提示 充電時亦可使用該控制器。 電池的保有充電量開始逐漸減低。 僅能於 10℃~30℃ 的溫度範圍內替電池充電。若在其他環境中進行,可能會出 電池殘餘充電量低。...
-
Page 80: 播放內容
播放內容 Blu-ray Disc (BD)/DVD/CD 插⼊光碟。 選單上顯示圖示後,即能開始播放該光碟。 光碟無法自動啟動時,請選擇 XMB 選單上的光碟圖示,並按下 按鈕。 已插⼊光碟時,指示燈會持續亮藍燈。 插⼊光碟時需標籤⾯朝上。 退出光碟 重要 請勿將複數片光碟或異物插⼊光碟槽,否則可能導致主機 停止播放後,按下退出按鈕。 故障。 本主機無法播放不相容支援的光碟。 要播放市⾯上銷售的 BD Video 時,可能需要更新加密 鍵*。加密鍵會透過系統軟件的昇級而不斷更新。 ( 第 89 ⾴)。 * AACS(Advanced Access Control System)鍵 退出按鈕... -
Page 81: 播放 Usb 裝置的內容
可播放或閱覽之檔案規格包括 ATRAC ™ 、MP3、AAC、JPEG 和 MPEG-4。若 您想確認最新資訊,請參閱線上用⼾指南 ( )。 http://manuals.playstation.net/document/ 提示 唯有能在 PS3™ 主機上播放或閱覽之檔案始會顯示於相容類別之行列中(例:圖 數碼(數位)相機等外接裝置 像資料會顯示於 (相片)中)。 部分儲存媒體僅會顯示媒體資料夾下的子集。若您進⼊選項選單 選擇圖示後,按下 按鈕。 ( 第 67 ⾴)並選擇了[全部顯示],則會顯示所有保存於媒體中的資料 夾。 顯示可播放內容的目錄。 重要 建議您定期替儲存至硬碟內的資料預留備份,以預防資料遺失或毀損。無論理 由為何,遊戲或資料一旦遺失或毀損,即已無法復原或修理。Sony Computer Entertainment Inc. 與其子公司、關係企業對於資料、檔案或遊戲的遺失、毀 損,概不承擔任何責任。有關替保存在硬碟的檔案預留備份的詳細資訊,請參 閱 "備份資料"( 第 92 ⾴)。... -
Page 82: 玩遊戲
玩遊戲 支援的遊戲 重要 請勿將複數片光碟或異物插⼊光碟槽,否則可能導致主機故障。 PlayStation 3 規格軟件 ® 能於本主機上遊玩* PlayStation 規格軟件 ® 退出遊戲 PlayStation 2 規格軟件 不能於本主機上遊玩 於遊玩途中,按下無線控制器的 PS 按鈕,再選擇 (遊戲) ® (離開遊戲)結束遊玩。 * 不保證所有 PlayStation 規格軟件皆能正確動作。若想確認本主機目前支援的 ® 最新情形,請瀏覽以下網站:http://asia.playstation.com/status 提示 PlayStation 規格軟件等某些軟件,可能即使按下 PS 按鈕亦不會顯示 (離開 ® 玩遊戲 遊戲)。此時請選擇畫⾯上顯示的[離開遊戲]。 PlayStation 2 規格的軟件無法在本主機上執行。 ®... -
Page 83: Playstation ® 3 規格軟件的保存資料
提示 PlayStation 規格軟件的保存資料 ® 部分軟件可能會預先指定插口。詳細請參閱軟件隨附之使用說明書。 若要保存 PlayStation 規格軟件的進度資料,您必須於硬碟中新建 "內 您可於遊玩時指定插口。按下無線控制器的 PS 按鈕,再選擇畫⾯上顯示的[指 ® 置記憶卡" 並為該虛擬記憶卡指定插口。 定插口]。 玩 遊 重要 戲 本主機不支援或兼容 PlayStation 2 規格軟件。即使您已建立 PlayStation ® ® 規格軟件的內置記憶卡,仍無法使用它遊玩遊戲。 建立 "內置記憶卡" 選擇 (遊戲) (記憶卡管理(PS/PS2))後,按下 按 鈕。 選擇 (新建內置記憶卡)後,按下 按鈕。 選擇[內置認記憶卡(PS)]後,按下... -
Page 84: 調整網路設定
調整網路設定 網路設置範例(有線) 網路設置範例(無線) 設置有線網路前,需準備物品 、 及 。 設置無線網路前,需準備物品 及 。 ADSL 數據機等網路裝置* ADSL 數據機等網路裝置* 路由器* 無線路由器 (機地台)* 連接網路線 連接網路線 LAN 連接線 個人電腦 個人電腦 連線方法可能因使用的網路環境而有所不同。例如在已預先安裝 LAN 埠的複合式大廈單位,您可將 LAN 連接線直接連接至牆壁的插座。如您正使用這種連線環境,則無 需準備網路裝置。 路由器(Router)乃是能讓數種裝置同時與同一條網路線連線的裝置。當電腦與 PS3™ 主機需要同時使用同一條網路線與網際網路(互聯網)連線時,即需要準備路由 器。 無線路由器是一種讓無線基地台搭載路由器機能的裝置。... -
Page 85: 調整網路設定(有線
調整網路設定(有線) 調整網路設定(無線) 將 LAN 連接線(另售)與主機連接。 確認主機並無連接 LAN 連接線。 調 整 選擇 (設定) (網路設定) [網路連線設定],再按下 選擇 (設定) (網路設定) [網路連線設定],再按下 網 按鈕。 按鈕。 路 顯示有關LAN連接線的確認訊息。 顯示有關LAN連接線的確認訊息。 設 定 選擇[OK],再按下 按鈕。 選擇[OK],再按下 按鈕。 選擇[簡易],再按下 按鈕。 選擇[簡易],再按下 按鈕。 自動調整基本設定,並顯示設定清單。若未顯示清單,需手動調整自訂設定。 自動調整基本設定。 有關調整自訂設定的詳情,請參閱您的網路服務商提供的使用說明書 ( 第 87 ⾴)。 選擇[無線],再按下... - Page 86 調整網路設定 調整無線 LAN 設定。 提示 SSID 及 WEP/WPA 鍵皆為與無線基地台連線時必需之加密資料。若您不清楚該等 選擇您要使用之無線基地台。您可選擇[掃描]來選擇主機的電波範圍內的無 資訊,請聯絡設置或維修無線基地台之人員。 線基地台。 您可能會需配合使用之無線基地台,於每次與網路連線時,輸⼊ PS3™ 主機的 掃描 系統會掃描附近可利用之基地台。選擇您想使用之基地台。 MAC 位址。進⼊ (設定) (主機設定) [系統資訊],即可確認 PS3™ 主機的 MAC 位址。 手動輸⼊ 手動輸⼊無線基地台之 SSID,以使用特定的基地台。 與網路無線連線時,訊號干擾情形之強弱可能會因無線網路裝置之使用狀況而 使用基地台的自動設定機能。 異。網路資料之傳輸速度逐漸降低或無線控制器無法正常動作時,請嘗試使用有 請遵循畫⾯指示,正確完成自動設定。 基地台個別自動 線的網路連線。 AOSS™ 設定 Buffalo, Inc. 調整無線網路的加密設定。...
-
Page 87: 調整自訂設定
調整自訂設定 設定使用資料通訊時的 MTU 數值。通常選擇[自動]。 部份網路環境可能無法選擇[簡易]來自動調整網路設定。請參閱以下資 訊並遵循畫⾯指示,手動調整自訂設定。 Proxy 伺服器 調 整 設定要使用的 Proxy 伺服器。通常選擇[不使用]。 乙太網路啟動模式 網 路 設定乙太網路的通訊速度與啟動模式。通常選擇[自動檢測]。 UPnP 設 定 設定 UPnP(Universal Plug and Play)的啟用/停用。通常選擇[有 IP 位址設定 效]。 設定與網路連線之 IP 位址的取得方式。取得方式因您使用之網路服務商 提示 而異。 若[UPnP]設定為[停用],使用 AV 聊天或遊戲的通訊機能時,線上通訊機能可 自動 使用 DHCP 伺服器分配的 IP 位址。 能受限。... -
Page 88: 連接網際網路(互聯網
連接網際網路(互聯網) 網路設定已正確完成後,PS3™ 主機即會於主機電源啓動後,自動與網際 閱覽用⼾指南 網路(互聯網)連線。此項連線僅會於主機電源啓動時有效。 您可使用 "網路瀏覽介⾯",閱覽 PS3™ 主機的線上用⼾指南。選擇 (網路) (網上說明)後,按下 按鈕。 使用網路瀏覽介⾯ 線上用⼾指南 http://manuals.playstation.net/document/ 選擇 (網路) (網路瀏覽介⾯),按下 按鈕。 此指南包含了使用 PS3™ 主機時的相關詳細資訊。 開啓網路瀏覽介⾯。載⼊網⾴時會顯示忙碌圖示。 忙碌圖示 新建一個 PlayStation Network 帳⼾ ® 新建 PlayStation Network 帳⼾後,您可進⼊ (好友)享受聊天樂趣 ® 或自 (PlayStation Store)下載遊戲或影像。 ® 選擇 (PlayStation Network)... -
Page 89: Ps3™ 主機更新
PS3™ 主機更新 更新 PS3™ 的系統軟件,您可追加機能或彌補安全性漏洞。建議經常替 更新方法 主機的系統軟件更新為最新版本。 您可透過以下任何一種方法執行更新。 系統軟件更新 http://asia.playstation.com 網路更新 此網站提供系統軟件更新的最新資訊。 從網際網路(互聯網)下載更新資料後您即可執行更新。 主 如下述選擇項目後,即能自動下載最新的更新資料。 機 更 (設定) (系統更新) [ 透過網際網路更新]。 新 使用儲存媒體執行更新 如下述選擇項目後,您即能使用保存於 USB 快閃記憶體或其他儲存媒體 使用更新資料覆寫已存在的主機軟件。 主機軟件完成更新。 的更新資料執行更新。 (設定) (系統更新) [ 透過儲存媒體更新]。 重要 經由光碟媒體更新 進行更新時,請勿關閉主機電源或移除媒體。更新若遭到中斷,可能會導致 系統軟件毀損,且可能需維修或更換主機。 部份遊戲光碟以及其他種類的光碟媒體可能內建更新資料。當您要開始遊 進行更新時,主機的電源按鈕和控制器的 PS 按鈕會暫時失效。 玩內建更新資料的光碟時,螢幕上可能會顯示更新的相關導引資訊。... -
Page 90: 使用螢幕鍵盤
使用螢幕鍵盤 游標 文字輸⼊欄位 顯示預測選項 提示 若您想了解螢幕鍵盤的詳細使用方法,請參閱線上用⼾指南 (http://manuals.playstation.net/document/)。 您亦可使用 USB 鍵盤或支援 Bluetooth (藍芽)的鍵盤(兩者皆為另售)輸⼊ ® 文字。顯示螢幕鍵盤時,只要按下已連接之鍵盤的任何按鈕,即可開始輸⼊文 字。 按鍵一覽 各鍵之顯示與否會因輸⼊模式或其他狀況而異。 按鍵 說明 插⼊一行 操作按鍵 僅於啟動預測 移動游標 顯示輸⼊模式 模式時顯示 刪除游標左邊的字元 插⼊空格 輸⼊文字 更換輸⼊模式 以下將以單字 "fun" 為例子,說明輸⼊文字的步驟。 確認已鍵⼊但尚未輸⼊的字元後,關閉鍵盤 選擇鍵盤上的[f],並按下 按鈕。 更換為迷你小鍵盤 重複此步驟以輸⼊[u]和[n]。 插⼊記號或表情符號 選擇[確定],並按下... -
Page 91: 視聽年齡限制
視聽年齡限制 PS3™ 主機具備視聽年齡限制機能。您可使用此機能設定密碼,並透過 其他加密設定 (遊戲、影像與其他內容的)視聽年齡限制等級,限制內容的播放。經由 主機的視聽年齡限制設定,您可避免孩童擅自播放不適當的內容。 選擇 (加密設定),您可如下述般,設定遊戲以外其他內容的視聽年 齡限制。 視 改變加密設定 聽 播放內建視聽年齡限制的 BD 時,會隨您設定之年齡而限制 BD 視聽年齡限制 年 播放。數字愈小,代表限制愈嚴格。 選擇 (設定) (加密設定),您即可設定遊戲、BD 光碟或其他 齡 播放內建視聽年齡限制的 DVD 時,會隨您設定之年齡而限 內容的視聽年齡限制等級。 限 DVD 視聽年齡限制 制播放。請從[關]或 8 種等級中選擇。 制 要變更視聽年齡限制前,需先輸⼊密碼。選擇 (加密設定) [ 變更 數字愈小,代表限制愈嚴格。 密碼],您即可設定一組密碼。最初設定的密碼為... -
Page 92: 更換硬碟
可能會出現無法使用備份工具機能替系統正確預留備份的情形。建議您替可以個 您亦可將保存於硬碟的資料備份至 USB 大容量儲存裝置,並還原備份資料。 別移動或複製的檔案預留備份。相關的詳細資訊,請參閱 "替特定資料預留備 詳情請參閱 "備份資料"( 第 92 ⾴)。 份"。 不正確移除或安裝硬碟,可能會導致主機故障或資料遺失,亦可能導致喪失 若您想了解備份工具的詳細資料,請參閱線上用⼾指南 所有 PS3™ 硬件的保證權益。Sony Computer Entertainment Inc. 與其子公 (http://manuals.playstation.net/document/)。 司、關係企業對於因此而造成的任何損壞,包括對您的硬碟造成的任何損 壞,概不承擔任何責任。使用者需自行承擔使用替換硬碟所引起的一切風險 替特定資料預留備份 和責任,包括無法對應支援 PS3™ 主機或無法在 PS3™ 主機上操作的問題。 本公司概不對非 PS3™ 的硬碟提供維修服務。 保存於主機硬碟的下列檔案類型能複製或移動至 USB 裝置。選擇檔案並... -
Page 93: 移除硬碟
提示 將主機上下倒轉放置在乾淨的軟布上,再打開螺絲蓋。 部份資料可能無法複製、移動或備份。 使用螺絲蓋上的溝槽輕輕拉開螺絲蓋。然後按圖示轉動螺絲蓋。難以拉開螺絲 蓋時,可將平頭螺絲起子等工具插⼊溝槽,再輕輕拉開螺絲蓋。 使用讀卡機(USB 連接埠類型,另售),您即可將保存於硬碟的檔案備份至 Memory Stick™ 或 SD Memory Card 等儲存媒體。 更 換 硬 碟 螺絲蓋 移除硬碟 拔除固定硬碟位置的螺絲,再移除 HDD 插槽蓋。 注意 使用適宜的十字頭螺絲起子,拔除藍色螺絲。 向左推動 HDD 插槽蓋,再移除插槽蓋。 為您安全著想,請務必在嘗試移除硬碟前關閉電源並拔掉主機插頭。 主機在上下倒轉放置時可能會不穩定。拔除螺絲時請小心以免受傷。 按下電源按鈕,關閉主機電源。 電源指示燈持續亮紅燈,主機進⼊待機模式。 拔掉交流電源線之後,拔除插在主機上的其他連接線。 為您安全著想,請先將交流電源線從電源插座中拔出,再拔除其他連接線。 HDD 插槽蓋... -
Page 94: 更換硬碟
更換硬碟 拿出硬碟 更換硬碟 向上拉起把手,再從主機拉出硬碟。 注意 為您安全著想,請務必在嘗試更換硬碟前關閉電源並拔掉主機插頭。 更換硬碟時,請先遵循以下步驟,卸除金屬外盒。 使用十字頭螺絲起子,取出螺絲(共 4 顆)。 重要 硬碟是架構非常靈敏的裝置,進行上述類似處理時務必隨時小心注意。為避免 遊戲或資料的遺失、毀損,且避免損傷硬碟,請務必遵守以下所列的注意事 項。 請勿投擲或掉落主機或硬碟,或使其受到強烈的震動或強烈的外力撞擊。 請勿讓液體或小零件掉⼊主機或硬碟中。 握住硬碟的邊緣部份,再將硬碟反轉。 請勿觸摸或將異物插⼊連接線的連接端子部分。 請勿將主機或硬碟放置在磁鐵或喇叭(揚聲器)產生的磁場附近。且勿將對 磁力敏感的裝置(手錶或磁卡等)放置在硬碟附近。 請勿於硬碟上堆放沉重物品。 持拿硬碟時應僅小心握住金屬外盒的邊緣部份。 硬碟對靜電十分敏感。安裝硬碟時請務必確認處理方法等是否正確。 請放置在涼爽且乾燥的場所保管。 緊握住兩邊的凹位, 以防不慎滑落。... -
Page 95: 重新安裝系統軟件
從金屬外盒取出硬碟。 提示 若您遺失了 HDD 插槽蓋、螺絲蓋、螺絲或金屬外盒等必要零件,請聯絡包裝盒上記 載的 PS3™ 消費者服務中心。 更 重新安裝系統軟件 換 硬 當啟動主機後未開始執行系統軟件時(如硬碟已被更換時),螢幕將會出 碟 現如下顯示。如遇此情況,您必須使用已下載資料重新安裝系統軟件。 將硬碟放置在 PS3™ 主機硬碟的金屬外盒上,並轉動螺絲 (共 4 顆)。 注意螺絲切勿轉動過緊。 將硬碟安裝至主機中。 請參閱 "移除硬碟"( 第 93 ⾴)的詳細說明,按相反程序安裝硬碟。請務 必將硬碟完全插⼊ HDD 插槽。 重新安裝系統軟件。 硬碟被更換後,系統軟件必須重新安裝( 第 95 ⾴)。 下載系統軟件更新資料 使用能與網路連線的個人電腦,從以下網站下載系統軟件的更新資料。請 替換硬碟 遵循網站內指示,使用個人電腦將更新資料複製至儲存媒體。 您可在... -
Page 96: 還原已備份的資料
所有備份資料。請連接儲存了備份資料的 USB 大容量儲存裝置,再遵循 若您持有的遊戲光碟或其他光碟內含更新資料,您可使用其光碟重新安裝系統軟 畫⾯指示正確執行操作。 件。若將光碟插⼊ PS3™ 主機並遵循畫⾯上的指示,將可判別是否可使用更新資 料。 提示 若您沒有能與網路連線的個人電腦,請聯絡包裝盒上記載的 PS3™ 消費者服務中 部份資料可能無法使用備份工具正確還原。 心。 若您想了解備份工具的詳細機能,請參閱線上用⼾指南 本產品中內建的系統軟件乃受 Sony Computer Entertainment Inc. 限制授權。 (http://manuals.playstation.net/document/)。 詳情請閱覽以下網站:http://www.scei.co.jp/ps3-eula 還原特定資料 安裝系統軟件 您可使用檔案的選項選單,手動還原檔案。請連接儲存了備份資料的 USB 啟動 PS3™ 主機,插⼊儲存了更新資料的儲存媒體。請遵循畫⾯指示, 大容量儲存裝置,選擇您想還原的檔案並按下 按鈕。在選項選單選擇 正確執行更新系統軟件。 [複製]或[移動]。... -
Page 97: 將資料傳送至其他 Ps3™ 主機/重設主機
將資料傳送至其他 PS3™ 主機/重設主機 將資料傳送至其他 PS3™ 主機 刪除硬碟機上的資料 選擇 (設定) (主機設定) [資料傳送工具],即可將 您可選擇 (設定) (系統設定) [PS3™ 格式化],刪除系 PS3™ 主機(來源主機)的硬碟保存的資料傳送至另一台 PS3™ 主機 統硬碟內的所有資料並將 (設定)下的目前設定恢復為初期設定。 將 (目的地主機)。 您可在設定硬碟格式化選項時,選擇[快速格式化]來縮短格式化需要的 資 時間。建選您選擇[完整格式化],替內含重要或敏感資料的硬碟進行格 料 重要 式化。 傳 送 使用此機能時,接收資料的 PS3™ 主機(目的地主機)所保存的資料會被全部 當您完成操作並重新啟動主機後,螢幕將顯示初期設定畫⾯。請遵循畫⾯ 至 刪除。 指示,進行系統軟件的初期設定( 第 71 ⾴)。 其... -
Page 98: 送修前
送修前 送修前 在使用 PS3™ 主機時,如果操作上遭遇到困難,請閱讀下⾯的文章,以 圖像失真。 便找到問題的可能原因。如果仍無法解決問題,請聯絡包裝盒上記載的 確認連接線是否已確實插⼊。請試著拔除插⼊ PS3™ 主機或電視機的 PS3™ 消費者服務中心。 連接線並重新插⼊。 電源 無法播放 Blu-ray Disc(BD)、DVD,或圖像失真。 輸出標準(SD)解析度的 DVD 內容或 PlayStation 3 規格軟件時, ® 只能播放以 NTSC 標準錄製的光碟(僅限台灣/香港機型)。 主機無法接通電源。 當主機乃是透過錄放影機連接時,部分 BD 或 DVD 的防複製技術可 確認交流電源線是否已確實插⼊主機和電源插座。 能會導致圖像失真,或導致圖像出現過亮或過暗的情形。遇此現象 時,需讓主機直接連接電視。使用電視/錄放影機一體型等器材時, 按下電源按鈕時,主機不斷發出嗶聲然後電源指示燈熄滅。 亦可能出現類似現象。... - Page 99 影像尺寸與電視螢幕不符。 無法播放⾳樂檔案。 與主機連接的電視之設定可能與主機的影像輸出設定不相符。請確認 部份在網路上公開的⾳樂檔案可能有播放限制。遇此情形時,可能無 以下事項: 法使用 PS3™ 主機播放該內容。 確認主機的 (設定) (顯示器設定) [影像輸出設定] 送 之設定是否正確。 修 網路 確認與主機連接之電視的設定是否正確。詳細請參閱您府上電視機 前 的使用說明書。 無法建立連線。 部分影像內容可能無法調整螢幕尺寸。 若正使用有線連接,請確認 LAN 連接線是否已經正確連接。 螢幕顏色似乎出現問題。 確認網路設定是否正確。請參考您的網路服務商或軟件說明書提供之 使用說明,建立正確的網路設定。 若設定為初始設定,背景顏色會隨著時間及日期的變更而自動改變。 在進行網路連線測試時,畫⾯顯示[與伺服器間的通訊失敗。發 聲⾳ 生 DNS 錯誤。(80710102)]的錯誤訊息。 ...
- Page 100 送修前 在進行網路連線測試時,畫⾯顯示[IP 位址之取得已逾時。]的 無法取出光碟。 錯誤訊息。 持續按住取出按鈕超過 10 秒鐘,即可強制取出光碟。強制取出並再 度將光碟插⼊主機前,請關閉主機電源,並於準備再度使用時重新啟 若您拔除原本用於連接如個人電腦等裝置的 LAN 連接線,再使用該 動電源。 連接線連接主機,您必須重新啟動主機及數據機。重新啟動後,請選 擇 (設定) (網路設定) [網路連線設定] [簡易], 主機無法辨識 USB 裝置或 USB 裝置無法正確動作。 更新網路設定。有關重新啟動數據機的詳情,請參閱您的數據機隨附 的使用說明書。 檢查該裝置是否已正確插⼊。 若您正使用無線連接,則 WEP 鍵可能錯誤。請確認 WEP 鍵是否正 確認您連接的裝置是否與主機不相容。 確,再重新輸⼊。 嘗試使用...
- Page 101 請選擇 (設定) (設定周邊機器) [控制器震動機能], 無線控制器 並將[震動機能]設定為[開]。 軟件可能不支援震動機能。請參閱軟件的說明書。若為於 無線控制器無法正確動作。 (PlayStation Store)下載之軟件,請參閱軟件網上說明的支援機 ® 送 使用無線控制器前,您必須先登錄或 "配置" 控制器至 PS3™ 主機 能資訊。 修 上,並替控制器設定一組編號。請於啟動主機電源(電源指示燈持續 前 亮綠燈)時,使用 USB 連接線連接主機與控制器,並按下控制器的 操作按鈕的反應較慢。 PS 按鈕。 當使用液晶顯示器或電腦螢幕時,可能有速度反應較慢的情形。此現 控制器編號可能已遭移除。請按下控制器的 PS 按鈕以重新指定編 象並非故障。 號。 部份軟件可能需要使用特定的控制器編號。詳情請參閱您所使用之軟 無法替電池充電,或無法充飽電。...
- Page 102 送修前 因光碟的使用方法而異,將⾳樂 CD 複製至硬碟或自光碟啟動軟件等 主機無法辨識內容。 時,會製造出⽐平常更吵雜的噪⾳。 內容可能爲主機不支援的格式。主機無法辨識不支援類型的內容。若 此外,某些軟件可能會製造出較吵雜的讀碟噪⾳。 您想了解支援格式之詳細資訊,請參閱線上用⼾指南 (http://manuals.playstation.net/document/)。 您忘記了加密設定時需要的密碼。 只要選擇 (設定) (系統設定) [恢復預設],將主機回 復至初期設定,您的密碼即會恢復為 "0000"。然而需注意的是,密 碼以外的所有設定亦會被重設。這些設定一旦被重設,即無法自動恢 復。 主機溫熱。 使用主機或啟動主機時,主機可能變熱。此是正常現象。 遊玩遊戲時畫⾯靜止不動。 確認光碟是否有刮傷或是否乾淨。若出現污痕,請使用軟布輕柔擦 拭。 若您安裝了 PlayStation 3 規格軟件的遊戲資料,請嘗試刪除遊戲資 ® 料,再重新安裝。選擇 (遊戲) (遊戲資料管理),再按 下 按鈕,在選項選單選擇刪除遊戲資料。然後,請重新安裝該 PlayStation 3 規格軟件。請注意不要刪除遊戲的保存資料。...
- Page 103 規格 本公司保留在沒有事先通知情況下,變更設計或規格之權利。本文書中介紹的系統 電源 AC 110V/220-240V、50/60 Hz* 機能和使用的圖像可能因使用之系統軟件的版本先後,而與您持有之 PS3™ 主機不 耗電量 約 230 W 同。 約 290 × 65 × 290 mm 外殼尺寸(不包括最大突出部 (11.5 × 2.6 × 11.5 in) 分) PlayStation 3 主機 (寬×高×長) 規 ® 重量 約 3.0 kg (6.6 lb) 格...
- Page 104 2 規格軟件。 ® 本產品跟 PlayStation 規格軟件之相容機能可能受限。某些 PlayStation 規 ® ® 格軟件雖能執行,但不保證完全相容。 無法支援播放 Super Audio CD。 "BRAVIA™ Sync" 是 Sony 產品的一項機能,讓您透過 BRAVIA™ 電視 (Sony Corporation 產品)的遙控器,操作以 HDMI 連接線彼此連接的不 區碼 同裝置。BRAVIA™ Sync 的操作訊號乃透過 HDMI 連接傳送。 光碟之區域碼皆隨光碟之可能銷售區域而制定。本主機能播放標有以下區域碼的光 若要啟用 BRAVIA™ Sync 機能,需先選擇 (設定) (系統設定) 碟。...
- Page 105 提示 無線控制器的電池 本主機僅可使用圓形光碟。請勿使用心形或星形等不規則形狀的光碟。使用不規 則形狀的光碟可能會導致故障。 請勿使用已損壞、重新塑形或曾經修復的光碟。使用此類光碟可能會導致故障。 注意 規 使用 8 cm CD 時,不需使用轉接器且可直接插⼊主機。 假如您不慎碰觸了電解液外洩的電池排出的有毒物質,請即刻採取以下行動。 格 本主機之⾳樂 CD 播放功能乃依據 Compact Disc (CD) 標準設計。部分唱片公司 當有毒物質進⼊眼睛時,勿用手揉眼睛。應立即用乾淨清水沖洗眼睛並接受 已開始銷售具有著作權保護技術之⾳樂光碟。由於這些光碟中有一部分與 CD 標 醫生的診療。 準不符,因此無法使用本主機播放。 當有毒物質滲⼊皮膚或衣服時,應立即用乾淨清水沖洗遭滲⼊部位。若引起 DualDisc(雙層光碟)是結合 DVD ⾯與⾳樂⾯,有兩層記錄層的光碟。由於此類 發炎或疼痛,請迅速詢問您的家庭醫生。 光碟並未符合⾳樂...
- Page 106 規格 拆卸外殼。 丟棄無線控制器時 朝箭頭方向推動。 無線控制器的鋰電池是可回收的。要丟棄無線控制器時,請先將電池取 拉開外殼。 出,並遵循當地法規,正確處理廢棄電池。 取出電池 注意 請在兒童無法靠近的場所移除電池,以避免誤吞螺絲等小零件。 拆卸控制器的外殼時,請小心不要弄傷您的指甲或手指。 為了安全著想,請在丟棄前先於電池的金屬零件部位貼上膠帶或貼紙。 請勿處理已損壞或電解液外洩的鋰電池。 拔掉端子後,再取出電池。 重要 端子 除準備丟棄無線控制器外,絕對不要從無線控制器中取出螺絲或電池。 拔掉無線控制器上的 USB 連接線。 使用十字頭螺絲起子,取出螺絲(共 5 顆)。 電池...
- Page 107 保用 有關各地區的保用條款及細則,請瀏覽以下官方網站: 香港:http://asia.playstation.com/hk/warranty 保 新加坡:http://asia.playstation.com/sg/warranty 用 台灣:http://asia.playstation.com/tw/warranty 其他地區:http://asia.playstation.com...
-
Page 108: 版權與商標
Copyright © 2004-2006 Cambridge Silicon Radio Ltd. The Bluetooth word mark and logos are owned by the Bluetooth SIG, Inc. ® and any use of such marks by Sony Computer Entertainment Inc. is under license. Other trademarks and trade names are those of their respective owners. - Page 109 DivX, DivX Certified, and associated logos are trademarks of DivX, Inc. Manufactured under licence from Dolby Laboratories. Dolby and the double- and are used under license. D symbol are trademarks of Dolby Laboratories. 版 權 與 U.S. and foreign patents licensed from Dolby Laboratories. 商...
- Page 110 版權與商標 Anti-Grain Geometry - Version 2.0 Java and all Java based trademarks and logos are trademarks or registered Copyright © 2002-2004 Maxim Shemanarev (McSeem) trademarks of Sun Microsystems, Inc. in the U.S. and other countries. Permission to copy, use, modify, sell and distribute this software is granted provided this copyright notice appears in all copies.
- Page 111 eZiText and Zi are registered trademarks of Zi Corporation. ® ® 版 權 與 商 標 Portions of this software are copyright © 1996-2008 The FreeType Project (www.freetype.org). All rights reserved. This software is based in part on the work of the Independent JPEG Group. 有關其他授權和商標,請瀏覽...
- Page 112 線上用⼾指南 http://manuals.playstation.net/document/ http://manuals.playstation.net/document/ This guide contains detailed information about using the PS3™ system. 此用⼾指南包含了使用 PS3™ 主機時的相關詳細資訊。 PlayStation official website PlayStation 官方網站 http://asia.playstation.com http://asia.playstation.com ® ® For the latest information of: 可取得關於以下各項的最新資訊: • 系統軟件更新 • System software updates • PlayStation 3 產品,例如遊戲軟件及硬件周邊產品 • PlayStation 3 products such as software titles and hardware accessories ® ® • PlayStation 產品支援,包括產品的最新常見問題及解答 • P layStation product support including latest questions and answers about your product ® ® Printed in China © 2010 Sony Computer Entertainment Inc. All rights reserved.