Advertisement
Quick Links
MO0601-EA
Getting Acquainted
Congratulations upon your selection of this CASIO watch. To get the most out of your
purchase, be sure to read this manual carefully and keep it on hand for later reference
when necessary.
Keep the watch exposed to bright light
Bright light
Solar cell
• The watch continues to operate, even when it is not exposed to light. Leaving the
watch in the dark can cause the battery to run down, which will cause some watch
functions to be disabled. If the battery goes dead, you will have to re-configure watch
settings after recharging. To ensure normal watch operation, be sure to keep it
exposed to light as much as possible.
Battery charges in the light.
Bright light
Solar cell
(Converts light to
electrical power.)
LEVEL 1
LEVEL 2
Charge
LEVEL 3
Rechargeable battery
• The actual level at which some functions are disabled depends on the watch model.
• Be sure to read "Power Supply" for important information you need to know
when exposing the watch to bright light.
General Guide
Manual Receive
Transmitter Change
Press any button.
Time/Date Adjustment
Radio-controlled Timekeeping
This watch receives a time calibration signal and updates its time setting accordingly.
The time calibration signal includes both Standard Time and Daylight Saving Time
(summer time) data.
• This watch is designed to pick up the time calibration signal transmitted from
Mainflingen, Germany and the signal from Rugby, England.
Current Time Setting
This watch adjusts its time setting automatically in accordance with a time calibration
signal. You can also perform a manual procedure to set the time and date, when
necessary.
• The first thing you should do after purchasing this watch is to specify your Home
City, which is the city where you will normally use the watch. For more information,
see "To specify your Home City" below.
• When using the watch outside the range of the time signal transmitter, you have to
adjust the current time setting manually as required. See "Timekeeping" for more
information about manual time settings.
To specify your Home City
City
City
Other major cities in same time zone
Code
Dublin, Lisbon, Casablanca, Dakar,
LON
London
Abidjan
Milan, Rome, Madrid, Amsterdam,
PAR
Paris
Algiers, Hamburg, Frankfurt, Vienna,
Stockholm, Berlin
Cairo, Jerusalem, Helsinki, Istanbul,
ATH
Athens
Beirut, Damascus, Cape Town
Operation Guide 4351
The electricity generated by the solar cell of the watch is
stored by a built-in battery. Leaving or using the watch
where it is not exposed to light causes the battery to run
down. Make sure the watch is exposed to light as much as
possible.
• When you are not wearing the watch on your wrist,
position the face so it is pointed at a source of bright
light.
• You should try to keep the watch outside of your sleeve
as much as possible. Even if the face of the watch is
only partially blocked from light, charging will be reduced
significantly.
Battery discharges in the dark.
All functions disabled,
Electrical
except for analog timekeeping
energy
and stopwatch.
All
LEVEL 1
functions
Dis-
LEVEL 2
enabled.
charge
LEVEL 3
Receive Status Check
Hold down A
for about two seconds.
Press A.
Press A.
Timekeeping Mode
Hold down A
for about five seconds.
Press A.
1. In the Timekeeping Mode, hold down A for about five
seconds until the stopwatch second hand moves to the
currently selected GMT differential value and stops.
This is the setting mode.
• The GMT differential value indicates the time
difference in hours between Greenwich Mean Time
and the currently selected city code.
2. Press D to select the city codes you want to use as
your Home City.
• The following are the city codes for major cities in the
Western Europe time zones.
If the analog hands aren't moving...
If the analog hands aren't moving, it means that the power saving mode has stopped
them to save battery power.
• See "Power Saving" for more information.
• The hands also stop whenever the battery level reaches Level 3.
Your watch switches automatically between Standard Time and Daylight
Saving Time (summer time).
Note, however, that switching cannot be performed correctly if the watch is
not able to receive the time calibration signal.
If you notice that the current time is not displayed properly, use the
procedure under
"To perform manual receive" or
"To set the time and date manually" to correct it.
About This Manual
Minute hand
Stopwatch second hand
Hour hand
24-Hour hand
All
Second hand
functions
disabled.
Press C.
Alarm Mode
3. Press A to return to the Timekeeping Mode.
• The watch will also return to the Timekeeping Mode if you do not perform any
operation for about two or three minutes.
• Normally, your watch should show the correct time as soon as you specify your
Home City code. If it does not, it should adjust automatically after the next auto
receive operation (in the middle of the night). You can also perform manual receive
or you can set the time manually.
• Even if the time calibration signal is received correctly, there are some times when
the analog hands may not indicate the correct time. If this happens, use the
procedures under "Adjusting the Home Positions" to check the home positions of the
hands, and make adjustments as required.
Time Calibration Signal Reception
There are two different methods you can use to receive the time calibration signal:
auto receive and manual receive.
• Auto Receive
With auto receive, the watch receives the time calibration signal automatically up to six
times a day. When any auto receive is successful, the remaining auto receive
operations are not performed. For more information, see "About Auto Receive".
• Manual Receive
Manual receive lets you start a time calibration receive operation with the press of a
button. For more information, see "To perform manual receive".
Important!
• When getting ready to receive the time calibration signal, position the watch as
shown in the nearby illustration, with its 12 o'clock side facing towards a window.
Make sure there are no metal objects nearby.
• The watch should not be facing the wrong way.
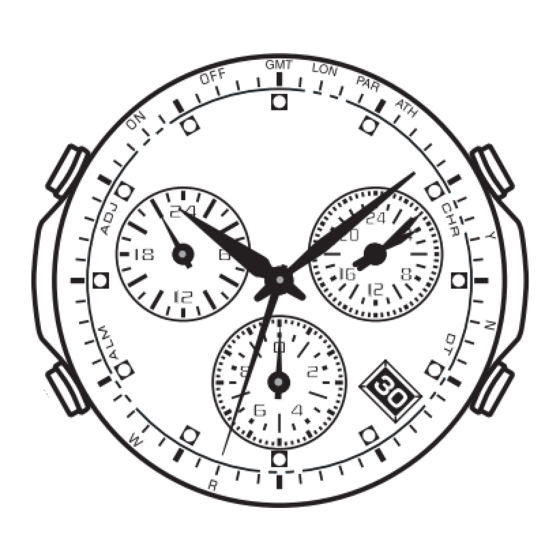
• Button operations are indicated using the letters shown
in the illustration.
• Each section of this manual provides you with the
information you need to perform operations in each
mode. Further details and technical information can be
found in the "Reference" section.
Date
Press C.
Press A.
Timekeeping Mode
Press B.
Press B.
• Each press of D advances
Dual Time 30 minutes.
12 o'clock
or
Stopwatch Mode
1
Advertisement

Related Manuals for Casio 4351


Summary of Contents for Casio 4351
- Page 1 Operation Guide 4351 Getting Acquainted Congratulations upon your selection of this CASIO watch. To get the most out of your If the analog hands aren’t moving... purchase, be sure to read this manual carefully and keep it on hand for later reference If the analog hands aren’t moving, it means that the power saving mode has stopped...
- Page 2 Operation Guide 4351 • Proper signal reception can be difficult or even impossible under the conditions listed Note • To interrupt a receive operation and return to the Timekeeping Mode, press any below. button. • If reception is not successful, the stopwatch second hand will move to N (NO).
- Page 3 24-hour or CASIO distributor about having it replaced. 3. After confirming that the hour hand and minute hand • Never try to remove or replace the watch’s special battery yourself. Use of the wrong hand are both at their proper home positions, press C.
- Page 4 Operation Guide 4351 Charging Guide Timekeeping • The year can be set in the range of 2001 to 2099. After a full charge, timekeeping remains enabled for up to about four months. • The following table shows the amount of time the watch needs to be exposed to light •...