
Related Manuals for Meade ETX-90AT Astro


Summary of Contents for Meade ETX-90AT Astro
- Page 1 Instruction Manual ETX-90AT Astro Telescope ETX-105AT Astro Telescope ETX-125AT Astro Telescope...
-
Page 3: Table Of Contents
Troubleshooting ............46 Specifications ..............48 Appendix A: Equatorial (Polar) Alignment ......51 ® The name "Meade," “ETX,” “Autostar” and the Meade logo Equatorial Alignment, Celestial Coordinates ....51 are trademarks registered with the U.S. Patent Office and in Polar Mounting with #884 Deluxe Field Tripod ..51 principal countries throughout the world. -
Page 4: Quick-Start Guide
QUICK-START GUIDE This Quick Start Guide demonstrates how to install the batteries and eyepiece, and how to observe using the Autostar Arrow keys. If you wish to try out Autostar’s “Go To” capabilities, check out the list of page references at the bottom of the following page. Remove the ETX ®... - Page 5 Enter Scroll Scroll Up Down Make sure that the flip mirror control (K) is in the “Up” position, Keep pressing the ENTER key until "Country/State" appears as shown the diagram above. on the display. (Ignore the prompts requesting "Date" and "Time"...
-
Page 6: Telescope Features
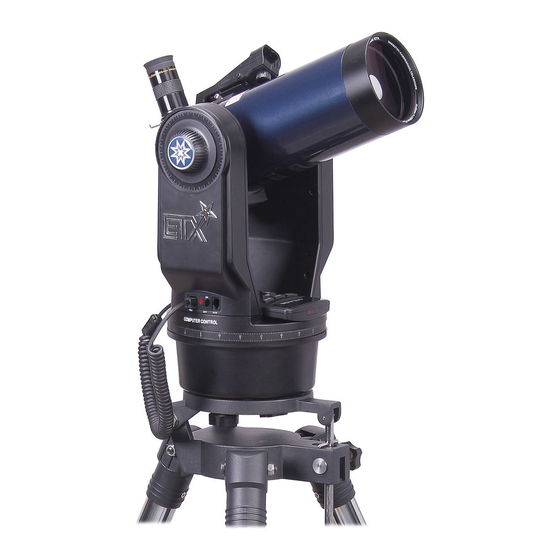
TELESCOPE FEATURES Features of the ETX-90AT, ETX-105AT, and ETX-125AT are identical, with the exception of the size of optical tube and the type of viewfinder. (on left fork arm) Fig. 1: The ETX-90AT Telescope. Eyepiece Base Housing Viewfinder Battery Compartment (bottom of base) Holder Thumbscrew Right Ascension (R.A.)/... - Page 7 MEADE ETX: YOUR PERSONAL WINDOW TO THE UNIVERSE Caution: The Meade ETX-90AT, ETX-105AT and the ETX-125AT are extremely versatile, high- Using products other than resolution telescopes. With pushbutton controls, automatic tracking of celestial standard Meade accessories objects and diffraction-limited imaging, an ETX telescope may be all the telescope may cause damage to the ever required by many terrestrial and astronomical observers.
- Page 8 Ascension (the side-to-side B. Auxiliary (AUX) Ports (2): Provide connection for current and future horizontal movement of the Meade accessories. See OPTIONAL ACCESSORIES, page 43. telescope). Right Ascension is abbreviated as "R.A." C. Handbox (HBX) Port: Plug the Autostar handbox into this port.
-
Page 9: Autostar Features
Take a guided tour of the best celestial objects to view on any given night of the year. • Download the latest satellite data, guided tours and software revisions directly from the Meade website (www.meade.com) and share software with other Autostar enthusiasts. (Requires optional #505 AstroFinder™ Cable Connector Kit. See , page 43.) OPTIONAL ACCESSORIES •... - Page 10 2-Line LCD Display: This screen displays Autostar's menus and information about the telescope. • Top line: Lists the primary menu. • Bottom line: Displays other menus that may be chosen, menu options, telescope status or information about a function that is being performed.
- Page 11 RS232 Port: Plug in optional cable to download the latest satellite data and software revisions directly from the Meade website (www.meade.com). You can also share software with other Autostar enthusiasts or control your telescope remotely from your PC.
-
Page 12: Getting Started
Do not mix battery types. If these precautions are not followed, batteries may explode, catch fire or leak. Improperly installed batteries void your Meade Fig. 6: Spread tripod legs. warranty. Always remove the batteries if they are not to be used for a long period of time. -
Page 13: Attaching And Using The Viewfinder
¹ Fig. 15: Insert eyepiece. Fig. 16: Tighten vertical Fig. 17: Tighten horizontal Fig. 10: Loosen control latch . lock. lock. Place the 26mm eyepiece (12, Fig. 15) into the eyepiece holder on the telescope and tighten the attachment thumbscrew (13, Fig. 15) to a "firm feel" only. Make sure that the flip-mirror control (14, Fig. -
Page 14: Focusing And Aligning The Viewfinder
Focusing the Viewfinder The ETX model viewfinders are pre-focused at the factory. Individual eye variations may require that the viewfinder be re-focused. To check the focus, point the viewfinder at a distant terrestrial (land) object such as a telephone pole or light pole and look through the viewfinder. -
Page 15: Choosing An Eyepiece
Eyepiece Focal Length is the distance light travels inside the eyepiece before reaching focus. Focal length is usually printed on the side of the eyepiece, for example, Fig. 22 : Meade Super 26mm. Low-power eyepieces are typically available in 26mm, 32mm and 40mm sizes eyepieces. -
Page 16: Observing
OBSERVING Observing by Moving the Telescope Manually If you wish to observe a distant land object, such as a mountain top or a bird, you can observe by merely pointing the telescope and looking through the eyepiece. Loosen the telescope’s horizontal lock (9, Fig. 1) and vertical lock (6, Fig. 1). Move your telescope to observe distant street signs, mountains, trees and other structures. -
Page 17: Slew Speeds
Slew Speeds Autostar has nine slew speeds that move the optical tube at rates that are directly proportional to the sidereal rate and have been calculated to accomplish specific functions. Press the Number key to change the slew speed. The nine available speeds are: Number Key 1 = 1x = 1 x sidereal (0.25 arc-min/sec or 0.004°/sec) -
Page 18: Initializing Autostar
Initializing Autostar This section describes how to initialize Autostar. Perform this procedure the first time Definition: you use Autostar or after performing a Reset (see , page 30). Autostar will ask RESET Initialization is a you to enter the current time and date and to choose your observing location and your procedure that makes sure telescope’s model number from the list it displays. - Page 19 Important Note: Before aligning the telescope, you MUST first initialize Autostar, as described in page 18. See INITIALIZING AUTOSTAR, MOVING THROUGH AUTOSTAR’S MENUS , page 17, for a description of how Autostar’s keys operate. How to perform the Easy Align Procedure If you have just performed the initialization procedure, go to step 6.
-
Page 20: Observe A Star Using Automatic Tracking
When the procedure is performed correctly, "Alignment Successful" displays. If Autostar does not display this message, perform this procedure again. Important Note: While performing the NOTE: Autostar locates alignment stars based on the date, time and loca- automatic tracking tion entered. The alignment stars may change from night to night. All that procedure, only use the is required is for the observer to center the selected stars in the eyepiece Arrow keys to move the... -
Page 21: Using The Guided Tour
A wide variety of star charts are available in books, in magazines, on the inter- ™ net and on CD Roms. Meade offers Autostar Suite and other star locator software. Contact your Meade dealer or Meade's Customer Service department for more information. -
Page 22: Basic Autostar Operation
AUTOSTAR OPERATION SETUP MENU OBJECT MENU Select Item: Automatic alignment Want to see Mars? The Orion nebula? Object permits all telescope The Andromeda galaxy? Select from over 30,000 objects and press operations with only GO TO to move the telescope minimal setup. -
Page 23: Entering Data, Navigating Autostar
Press the ENTER key to choose the "Event" option and move down a level. "Event: Sunrise" is displayed. Press the Scroll Down key once to display the "Sunset" option in the Event menu. Press the ENTER key to choose the "Sunset" option and move down another level. -
Page 24: Autostar Menus
AUTOSTAR's MENUS... -
Page 25: Objects Menu
Object Menu Use the OBJECT menu Almost all observing with Autostar is performed using the Object menu category. (The to select an object from the two exceptions are the Guided Tours and Landmark Survey.) See , page GO TO SATURN database. -
Page 26: Event Menu, Glossary Menu
IMPORTANT NOTE FOR ALL ALIGNMENT-BASED OPERATIONS: Only use the Arrow keys to move the telescope during the Identify procedure. Do not loosen the telescope locks or move the base or the alignment will be lost. When a desired object is visible in the eyepiece, keep pressing MODE until the “Select Item: Object”... -
Page 27: Utilities Menu
Glossary menu or through hypertext words embedded in Autostar. A hypertext word is any word in [brackets], usually found when using the Autostar Help function or when reading a scrolling message such as a description of a planet or star. Press ENTER whenever a hypertext word is on screen and Autostar goes to the glossary entry for that word. -
Page 28: Setup Menu
Sleep Scope is a power saving option that shuts down Autostar and the telescope without forgetting its alignment. With "Sleep Scope" selected, press ENTER to activate the Sleep function. Autostar goes dark, but the internal clock keeps running. Press any key, except ENTER, to re-activate Autostar and the telescope. Park Scope is designed for a telescope that is not moved between observing ses- sions. - Page 29 Tracking Rate: Changes the speed at which the telescope tracks targets in the sky. Sidereal: The default setting for Autostar; sidereal rate is the standard rate at which stars move from East to West across the sky due to the rotation of the Earth.
- Page 30 NASA, Hubble, HST, astronomy, Messier, satellite, nebula, black hole, variable stars, etc. Check Meade’s website for the latest product and technical information. You can download the latest software revisions, links to other astronomical sites, coordinates of celestial objects and the latest satellite tracking information for your Autostar handbox.
-
Page 31: Advanced Autostar Features
ADVANCED AUTOSTAR OPERATION Before trying out the examples in this section, familiarize yourself with the basic operations of Autostar described earlier in this manual. The following examples assume that you have a basic knowledge of Autostar and understand how to scroll to a desired menu or menu option and how to enter numbers and text. -
Page 32: Finding Objects Not In The Database
Using Autostar to Find Objects Not in the Database In this procedure, you will enter coordinates of celestial objects that do not appear in any of the Autostar database lists. You will enter the object's name and R.A. and Dec. coordinates (required information). -
Page 33: Create Your Own Guided Tour
"text only" or as a "MS-DOS text" file). • The Meade #505 Cable Connector Kit to download tour information to the Autostar handbox. Tour Modes The objects chosen for a tour list are selected from Autostar's database or by entering the object's RA and Dec coordinates. - Page 34 All comments begin with a "/" character in column 1 of the line. For example: / Extreme Objects / (c) 2000 Meade Instruments Corporation Command Line This line contains programming commands, including: R.A. and DEC. coordinates, a title string, a description string and a keyword.
- Page 35 The following commands specify objects that are already in the Autostar database. If these commands follow the command AUTO SELECT, the object's title displays on line 1 and its description scrolls across line 2. Do not add a description string after the following command lines; these commands access objects with existing description in the Autostar database.
-
Page 36: Landmarks
STAR "name" Enter STAR followed by the name of the desired star in quotes. For example: STAR "Vega" LANDMARK az alt "title" "description" Enter the azimuth (az) for the desired object in the following format: xxxdxxmxxs. For example: 123d27m00s. Then enter the altitude of the desired object in the following format: xxdxxmxxs. -
Page 37: Identify
To Add a landmark to the database: In this procedure, you will store the location of terrestrial landmarks in Autostar's memory. Set the telescope in the home position, if necessary. Note for future reference where the telescope is located and if you have aligned the telescope, which alignment method is used. -
Page 38: Advanced Alt/Az Alignment Methods
plays information about an object in its database that is closest to the one you queried about. IMPORTANT NOTE: For this function to operate properly, you must first set the telescope in the home position and initialize Autostar. If you physically move the telescope after initialization, this function will fail to operate properly. -
Page 39: Browse
Browse This menu allows you to search the database for objects with certain parameters, much like a search engine. The "Edit Parameters" option lets you set various parameters for the search and "Start Search" activates the search. A typical search might be performed as follows: Select "Browse"... -
Page 40: Photography
PHOTOGRAPHY Fig. 28: Example of photography through the ETX using the #64 T-Adapter: (1) Short section of #64 T-Adapter; (2) Extension section of #64 T-Adapter; (3) Knurled attachment ring; (4) T-mount; (5) Flip-mirror control in “down” position; (6) 35mm camera body; (7) Format 1. Photography with a 35mm Camera Photography through your ETX model requires the addition of the optional #64 Fig. - Page 41 Photography through a long lens, such as the ETX, requires special technique for good results. The photographer should expect to use several rolls film in acquiring this technique. Long-lens photography has its own rewards, however, which short-focus lenses cannot duplicate. A Few Tips on Photography 1.Use the standard tripod or the optional table tripod ( see OPTIONAL ACCESSORIES...
-
Page 42: Photography With Autostar Suite
Photography with Meade’s Autostar Suite The Autostar Suite with Meade LPI (Lunar Planetary Imager) and Planetarium software turns your Meade ETX telescope, Autostar and PC into even more powerful and easy- to-use astronomical instrument. LPI (Lunar Planetary Imager, Fig. 32) combines the power of an electronic astronomical imager with the simplicity of a web cam. -
Page 43: Optional Accessories
3,000 dealer locations in the U.S. and Canada and through Meade international distributors worldwide. Once you have identified the accessories you wish to order, contact your local Meade authorized dealer. To find a dealer near you call (949) 451-1450 or visit the Meade website at www.meade.com. - Page 44 38) are fully lined with fitted foam inserts. They accept the complete ETX Astro Telescope plus optional accessories. #765 Soft Carry Bag: The Meade soft-padded carry bag (Fig. 39) is well suited to travel with the ETX-90AT Astro Telescope. Each carry bag includes a shoulder strap and permits ready transport of the complete telescope, including accessories.
-
Page 45: Maintenance
Do not remove the lens from its metal housing or optical alignment of the lens will be lost, necessitating a return of the telescope to the Meade factory. 5. If your ETX model is used outdoors on a humid night, telescope surfaces may accumulate water condensation. -
Page 46: Troubleshooting
Storage and Transport When the telescope is not in use, store it in a cool, dry place. Do not expose the instrument to excessive heat or moisture. It is best to store the telescope in its original box with the vertical and horizontal locks (6 and 9, Fig. 1) in the unlocked positions. - Page 47 OPTIONAL ACCESSORIES Meade Customer Service If you have a question concerning your ETX model, call the Meade Instruments Customer Service Department at (949) 451-1450. Customer Service hours are 7:00 AM to 6:00 PM, Pacific Time, Monday through Friday. In the unlikely event that the...
-
Page 48: Specifications
SPECIFICATIONS Specifications: ETX-90AT Astro Telescope Optical design ....Maksutov-Cassegrain Primary mirror diameter ....96mm (3.78”) Clear aperture . - Page 49 Bearings: Altitude ......ball bearings Azimuth ..PTFE thrust bearing and radial ball bearing Materials: Tube body .
- Page 50 Autostar Specifications Processor 68HC11, 8MHz ................Flash Memory ............1MB, reloadable Keypad ................20 key alphanumeric Display ................2 line, 16 character LCD Backlight..............Red LED Utility Light ..............Yes RS-232 ................Yes Coil Cord ..............24" Database ..............30,223 objects Autostar Dimensions Length ................6.56" (16.6cm) Width (LCD end) ............3.19" (80cm) Width (Connector end) ..........2.25"...
-
Page 51: Appendix A: Equatorial (Polar) Alignment
APPENDIX A: EQUATORIAL (POLAR) ALIGNMENT Equatorial Alignment In equatorial (or "polar") Alignment, the telescope is oriented so that the horizontal and Important Note: vertical axes of the telescope are lined up with the celestial coordinate system. The "Telescope: Mount" option of the Setup menu is In order to equatorial align your telescope, it is essential to have an understanding of how set to "Alt/Az"... -
Page 52: Equatorial Mounting Procedure
However, owners who wish to perform astrophotography or use the Meade LPI (see , page 42, for more information) will find PHOTOGRAPHY WITH MEADE’S AUTOSTAR SUITE equatorial mounting indispensible to their needs. Equatorial Mount Equatorial mounting lines up the telescope’s polar axis with the North Celestial Pole (or the South Celestial Pole if observing in the southern hemisphere). -
Page 53: Autostar Polar Alignment Modes
5. Press ENTER repeatedly until “Setup: Align” displays. 6. Press the Scroll Down key repeatedly until "Setup: Telescope" displays. Press ENTER. “Telescope: Telescope Model” displays. 7. Press the Scroll Down key repeatedly until "Telescope: Mount" displays. Press ENTER. “Scope Mounting: Alt/az” displays. 8. -
Page 54: Setting Circles
Setting Circles The ETX models are equipped with R.A. and Dec. setting circles (13 and 16, Fig. 1) to aid in locating faint celestial objects when the telescope has been polar aligned. Setting circles emulate the celestial coordinates found on star charts or in sky catalogs. Any charted object Little Dipper Polaris is easily located by coordinates in R.A. -
Page 55: Appendix B: Latitude Chart
APPENDIX B: LATITUDE CHART Latitude Chart for Major Cities of the World To aid in the polar alignment procedure (see page 52), latitudes of major cities around the world are listed below. To determine the latitude of an observing site not listed on the chart, locate the city closest to your site. Then follow the procedure below: Northern hemisphere observers (N): If the site is over 70 miles (110 km) North of the listed city, add one degree for every 70 miles. -
Page 56: Appendix C: Training The Drive
APPENDIX C: TRAINING THE DRIVE Train the telescope motors using Autostar. Perform this procedure if you are experiencing any pointing accuracy problems. Fig. 52 depicts the complete Drive Training procedure. Note: Use a terrestrial object, such as a telephone pole or lamp post, to train the drive. Complete this exercise once every 3 to 6 months to maintain the highest level of telescope pointing accuracy. -
Page 57: Appendix D:basic Astronomy
Note: Except during its early or late crescent phases, the Moon can be an exceptionally bright object to view through the telescope. To reduce the brightness and glare, use the #905 Variable Polarizing Filter (see the MEADE GENERAL CATALOG for more information). - Page 58 Planets Planets change positions in the sky as they orbit around the Sun. To locate the Tip: planets on a given day or month, consult a monthly astronomy magazine, such as Sky Enter a date in the Date and Telescope or Astronomy. Listed below are the best planets for viewing through menu and you can determine if a planet(s)—...
- Page 60 ONE YEAR from the date of original purchase in the U.S.A. and Canada. Meade will repair or replace a product or part thereof, found by Meade to be defective, provided the defective part is returned to Meade, freight-prepaid, with proof of purchase.