Table of Contents
Advertisement
Advertisement
Table of Contents

Related Manuals for Minolta Dimage 7i


Summary of Contents for Minolta Dimage 7i
- Page 1 INSTRUCTION MANUAL...
- Page 2 EFORE YOU BEGIN COLOR MODE Thank you for purchasing this Minolta digital camera. Please take the time to read through this instruction manual so you can enjoy all the features of your new camera. The color mode controls whether a still image is color or black and white. The color mode is set in the custom 2 section of the recording-mode menu (p.
-
Page 3: Remove
The continued use of a damaged product or part may cause injuries or fire. • Do not disassemble this product. Electric shock may cause injury if a high voltage circuit • Take the product to a Minolta Service Facility when repairs are required inside the product is touched. -
Page 4: Table Of Contents
ABLE OF CONTENTS OR PROPER AND SAFE USE Names of parts ............................12 CAUTION Camera body ...........................12 Data panel ..........................15 • Do not use or store the product in a hot or humid environment such as the glove EVF and LCD monitor display ....................16 compartment or trunk of a car. - Page 5 Camera sensitivity - ISO......................65 Navigating the movie menu....................104 Flash range and camera sensitivity..................66 Playback mode - viewing and editing images ..................105 Attaching a Minolta accessory flash unit .................66 Single-frame playback and histogram display...............105 Digital Effects Control ......................67 Viewing images ........................106 Exposure and flash compensation ................68...
- Page 6 ABLE OF CONTENTS Changing the index playback format ..................115 Windows 98 / 98 second edition................146 Slide Show ..........................116 Windows ME, 2000 Professional, and XP..............146 About DPOF ..........................118 Macintosh........................147 Creating a DPOF print order....................118 Changing the CompactFlash card (data-transfer mode)............148 Ordering an index print ......................119 Appendix ..........................149 Canceling a DPOF print order ....................119...
-
Page 7: Names Of Parts
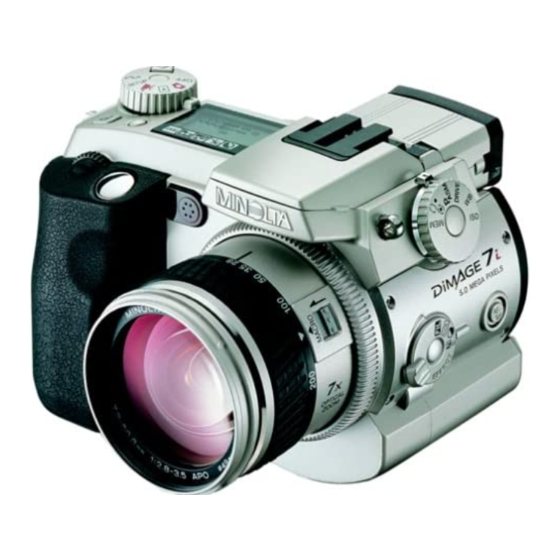
AMES OF PARTS CAMERA BODY Playback mode (p. 105) Movie mode (p. 102) * This camera is a sophisticated optical instrument. Care should be taken to keep these Recording mode (p. 40) Setup mode (p. 123) surfaces clean. Please read the care and storage instructions in the back of this manual (p. -
Page 8: Data Panel
AMES OF PARTS Exposure modes (p. 48) Drive modes (p. 54) DATA PANEL Located on the top of the camera body, Metering modes (p. 47) White balance (p. 62) the data panel shows the status of the camera. All icons have been shown for Memory (p. -
Page 9: Evf And Lcd Monitor Display
AMES OF PARTS EVF AND LCD MONITOR DISPLAY 10. Exposure-compensation display (p. 68) GETTING UP AND 11. White-balance indicator (p. 62) 12. Exposure-mode/Digital-subject-program indicator (p. 48, 42) 13. Metering-mode indicator (p. 47) RUNNING 14. Shutter-speed display 15. Aperture display 16. Camera-shake warning (p. 17) 17. -
Page 10: Attaching The Camera Strap
ETTING UP AND RUNNING ATTACHING THE CAMERA STRAP ATTACHING THE LENS HOOD The lens hood is used to control stray light from entering the lens and causing flare. When using the camera under bright light, the use of the lens hood is recommended. Attach the camera strap to the strap eyelets as The lens hood should not be used with the built-in flash as it can cause a shadow. -
Page 11: Inserting Batteries
ETTING UP AND RUNNING INSERTING BATTERIES HANDLING THE CAMERA The AA nickel-metal hydride batteries supplied with the camera must be charged before While using the electronic viewfinder (EVF) or LCD their initial use. Refer to the charger manual for instructions on safe use and handling. monitor, grip the camera firmly with your right hand while supporting the body with the palm of your left hand. -
Page 12: Taking Pictures
ETTING UP AND RUNNING TAKING PICTURES USING THE BUILT-IN FLASH In low-light conditions or indoors, the flash is needed to illuminate the subject and reduce blurring through camera shake. The flash can also be used as a fill light in With the mode dial set to still-image recording, the direct sunlight to soften harsh shadows. -
Page 13: Basic Operation
ETTING UP AND RUNNING VIEWING AND DELETING PICTURES IN QUICK VIEW Captured images can be viewed in recording mode. Simply press the QV/delete button to access the images, and use the controller to scroll through the pictures on the CompactFlash card. In quick view, images can also be Press the QV/delete button to deleted. -
Page 14: Changing Batteries
Although alkaline batteries can be used with this product, their performance will be panel can be changed in the custom 2 section of the setup menu (p. 124). limited. Only use alkaline batteries for test photographs or when Ni-MH batteries, the Minolta External High-power Battery Pack, or AC adapter are not available. -
Page 15: Changing The Compactflash Card
If the card-error message appears, press the cen- Microdrives are compatible with this camera. For recording media care and storage, tral button of the controller to close the window; check the Minolta web site for the lat- see page 157. -
Page 16: Setting The Camera To Record Images Automatically
ASIC OPERATION SETTING THE CAMERA TO RECORD IMAGES AUTOMATICALLY BASIC RECORDING OPERATION With the mode dial set to still-image recording, the camera will be on and the electronic viewfinder (EVF) and LCD monitor will activate. While holding in the dial release (1), turn the mode dial to still-image recording. -
Page 17: Focus Lock
ASIC OPERATION FOCUS LOCK FOCUS SIGNALS The focus-lock function is used when the subject is off-center and outside the focus This digital camera has a quick, accurate autofocusing system. The focus signals in frame. Focus lock may also be used when a special focusing situation prevents the the lower right corner of the EVF and LCD monitor indicate the focus status. -
Page 18: Display Controls - Recording Mode
This histogram will not be accurate when the monitor image is amplified (p. 52, 73), or the built-in or a compatible Minolta flash unit is used. The histogram of a recorded image may not have the same distribution as the real-time histogram. -
Page 19: Quick View
ASIC OPERATION QUICK VIEW QUICK-VIEW DISPLAY Mode indicator Still images can be viewed in recording mode. Simply press the QV/delete Image size (p. 82) To view the histogram, button to access the images, and use the controller to scroll through the Image quality (p. -
Page 20: Changing The Quick View Display
ASIC OPERATION CHANGING THE QUICK VIEW DISPLAY ENLARGED PLAYBACK In the center of the display switch, the display-information button controls the display In single-frame playback, a still image can be format. Each time the button is pressed, the display cycles through to the next format: enlarged for closer examination. -
Page 21: Spot-Ae Lock Button
PRO-AUTO BUTTON Simply pressing the pro-auto button (1) resets the camera RECORDING MODE to programmed and automatic functions in the still-image recording mode. The camera’s systems work together to bring professional results leaving the operator free to concentrate on aesthetic decisions. ADVANCED OPERATION The pro-auto button only affects functions in the recording mode. -
Page 22: Digital-Subject-Program Button
ECORDING MODE DIGITAL-SUBJECT-PROGRAM BUTTON While camera performance is optimized for each shooting condition, some changes can be made to camera settings with subject programs. The autofocus mode can be The subject-program button (1) optimizes the changed (p. 81). The sports action mode uses continuous AF, the other modes use camera’s performance for various conditions and single AF. -
Page 23: Setting The Function Dial
ECORDING MODE SETTING THE FUNCTION DIAL Function Dial Display Setting Page EVF & Monitor Display The memory function, metering mode, exposure mode, drive mode, white balance, and Memory resisters or the camera sensitivity are controlled by the function dial. Making changes with the function setting function are select- dial is simple. -
Page 24: Memory - Storing Camera Settings
ECORDING MODE MEMORY - STORING CAMERA SETTINGS To recall a setting, press the function button and highlight the memory register using the control dial. Release the function button to apply the memory settings. Three sets of camera settings can be saved. This saves time under frequently repeating conditions by eliminating the need to set the Camera settings cannot be deleted from memory by turning the camera off, using the camera. -
Page 25: Exposure Modes
ECORDING MODE EXPOSURE MODES PROGRAM - P The programmed AE exposure control uses luminance and focal-length information to The four exposure modes allow extensive control over image ensure perfect exposures. The sophisticated exposure system allows the photographer making. Programmed AE gives carefree operation, aperture and the freedom to shoot without having to worry about the technical details of exposure shutter priority allow photographers to maximize exposures in settings. -
Page 26: Aperture Priority - A
ECORDING MODE APERTURE PRIORITY - A SHUTTER PRIORITY - S The photographer selects the shutter speed and the camera The photographer selects the aperture and the camera sets sets the appropriate aperture to ensure correct exposure. the appropriate shutter speed to ensure correct exposure. When S mode is selected, the shutter speed on the When A mode is selected, the aperture value on the monitors turns blue. -
Page 27: Manual Exposure - M
ECORDING MODE MANUAL EXPOSURE - M BULB EXPOSURES Manual exposure mode allows individual selection of Bulb photographs can be taken in the manual-exposure mode (M). Exposures up to shutter speeds and apertures. This mode overrides the thirty seconds can be made by pressing and holding the shutter-release button. The exposure system giving the photographer total control over use of a tripod and a remote cord is recommended for bulb exposures. -
Page 28: Drive Modes
ECORDING MODE DRIVE MODES CONTINUOUS ADVANCE Continuous-advance mode allows a series of images to be captured while holding The drive modes control the rate and method images are captured. Icons indicating the selected drive mode appear on the data panel down the shutter-release button. -
Page 29: Uhs Continuous Advance
ECORDING MODE UHS CONTINUOUS ADVANCE SELF-TIMER UHS continuous-advance mode allows a series of 1280 X 960 images to be captured Used for self-portraits, the self-timer will delay the release of the shutter for at a rate of approximately 7 frames per second; image size is changed to 640 X 480 approximately ten seconds after the shutter is released. -
Page 30: Bracketing
ECORDING MODE BRACKETING Compose the picture as described in the basic-operation section (p. 31). Press the shutter-release button partway down (1) to lock the exposure This mode makes a three image bracket of a scene. Bracketing is a method of taking a and focus for the series;... -
Page 31: White Balance
ECORDING MODE INTERVAL Confirm the CompactFlash card has enough storage capacity for the series by compar- ing the number of frames in the interval series with the number of recordable images The interval mode makes a series of still or moving images over a period of time. displayed on the frame counter. -
Page 32: Automatic White Balance
ECORDING MODE WHITE BALANCE AUTOMATIC WHITE BALANCE White Balance is the camera’s ability to make different types of The automatic white balance compensates for the color temperature of a scene. In most cases, the AUTO setting will balance the ambient light and create beautiful lighting appear neutral. -
Page 33: Custom White Balance
ECORDING MODE CUSTOM WHITE BALANCE CAMERA SENSITIVITY - ISO Custom-white-balance function allows a photographer to calibrate the camera to a Five settings can be selected for camera sensitivity: Auto, 100, 200, specific lighting condition. The setting can be used repeatedly until reset. Custom white 400, and 800;... -
Page 34: Flash Range And Camera Sensitivity
(2) next to the shutter-release button. Release the digital-effects button to set the adjustment. ATTACHING A MINOLTA ACCESSORY FLASH UNIT Adjustments can be made repeatedly and in To extend the versatility of the camera, an accessory flash unit (sold separately) can be combination. -
Page 35: Exposure And Flash Compensation
ECORDING MODE EXPOSURE AND FLASH COMPENSATION Shooting tips The ambient light and flash exposure can be adjusted before the Sometimes the camera’s exposure meter is deceived by certain image is captured to make the final picture lighter or darker. conditions. Changing the exposure value can compensate for these Exposure can be adjusted by as much as ±2Ev in 1/3 increments situations. -
Page 36: Contrast Compensation
ECORDING MODE CONTRAST COMPENSATION COLOR-SATURATION COMPENSATION The contrast of a scene can be adjusted within seven levels (±3) The color saturation of a scene can be adjusted within seven with the digital effects controller. If a scene is too contrasty, levels (±3) with the digital effects controller. -
Page 37: Electronic Viewfinder
ECORDING MODE ELECTRONIC VIEWFINDER Filter levels See color examples The EVF displays 100% field of view. When using the camera outdoors or under strong with color images on page 163. lighting conditions, the viewfinder image is not affected by the ambient light and remains bright and clear. -
Page 38: Autofocus Areas And Control
ECORDING MODE AUTOFOCUS AREAS AND CONTROL FLEX FOCUS POINT In still-image recording mode, the controller selects the focus area used and moves the Once displayed, the spot focus area can be moved to any point in the image area. This spot-focus area within the image. -
Page 39: Digital Zoom
ECORDING MODE DIGITAL ZOOM MACRO MODE The digital zoom doubles the lens magnification. The The macro mode is used for close-up photographs of small objects. The marco mode digital zoom cannot be used with RAW image quality or can be used with the digital zoom to increase the close-up effect. Subject programs in movie recording. - Page 40 ECORDING MODE Basic Custom 1 NAVIGATING THE RECORDING-MODE MENU AF mode Single Spot AF/AEL AF/AE hold Continuous AF/AE toggle In recording mode, press the menu button (1) to activate the menu. The menu button Image size 2560 X 1920 AE hold also turns off the recording-mode menu after making settings.
-
Page 41: New Folder
ECORDING MODE ELECTRONIC KEYBOARD AUTOFOCUS MODES This digital camera has two autofocusing modes. The single and continuous AF are The electronic keyboard is used to enter text for imprinting data or for naming new selected in the basic section of the recording-mode menu (p. 78). folders.