Table of Contents
Advertisement
Quick Links
Download this manual
See also:
User Manual
Advertisement
Table of Contents
Troubleshooting

Related Manuals for Mitsubishi Electric DX-TL5716E


Summary of Contents for Mitsubishi Electric DX-TL5716E
- Page 1 DIGITAL RECORDER INSTALLATION MANUAL MODEL DX-TL5716E THIS INSTRUCTION MANUAL IS IMPORTANT TO YOU. PLEASE READ IT BEFORE USING YOUR DIGITAL RECORDER.
-
Page 2: Before Use
Before use How to use this manual How to locate information in this manual You can fi nd desired information in this manual using the About this manual following methods. Table of contents Pages 5 to 7 The manual of this recorder consists of the following two manuals. -
Page 3: Setup Procedure
Setup procedure Start here when you first set up the recorder. Connect the recorder. Connect the cameras, monitors, and sensors to the recorder. Configure the settings of the connected devices referring to the reference pages shown in the descriptions of the devices in "Connections" on page 24. -
Page 4: Major Features
Major features This digital recorder is able to record images captured by up to 16 surveillance cameras and audio received by up to 2 microphones to its hard disk. The recorder is equipped with the function to search for desired scenes by specifying the recording dates as well as the simultaneous recording/playback function that allows playback even during recording. -
Page 5: Table Of Contents
Contents Beginning Registering the internal HDDs .......37 Mirroring ............37 Before use ..............2 Registering external HDDs ........38 How to use this manual ..........2 Checking the registered devices ......39 About this manual ............2 Setting the repeat recording and partition of Main Symbols ..............2 device ........40... - Page 6 Contents (continued) Emergency recording settings ....60 Archiving data ............83 <EMR recording> Supplementary explanations on emergency Copying data from the recorder to videotape ..84 recording .............61 Communication Motion detection settings ....62 <Motion detection> Using the communication functions ......85 Cautions on motion detection setting ....63 Communication functions of this recorder .....85 Audio recording settings ....64...
- Page 7 Mode-out • Remaining capacity ......107 Changing the lock mode from the password lock Mode-out 1 to 4 ..........107 to simple lock ..........120 Remain 1 and 2 ..........107 Changing the operation restriction level ....120 Event terminal ..........108 Protecting recorded data .......... 121 On-screen display settings <Information display setting>...
-
Page 8: Caution And Care
Caution and care HEAVY OBJECTS SHOULD NEVER BE PLACED ON THE UNIT (E.G., MONITOR) NEVER TOUCH OR INSERT ANY OBJECT INSIDE THE UNIT Touching the inside of the cabinet or inserting foreign objects of any kind through the disc loading slot or ventilation holes not only creates a safety hazard but can also cause extensive damage. - Page 9 This symbol mark is according to the directive 2002/96/EC Article 10 Information for users and Annex IV, and/or to the directive 2006/66/EC Article 20 Information for end-users and Annex II. Your MITSUBISHI ELECTRIC product is designed and manufactured with high quality materials and components which can be recycled and/or reused.
- Page 10 Caution and care (continued) Installation location and handling • Before you fi rst use this unit, supply power to it for at least 48 hours to charge the built-in backup battery so that the built-in power compensator circuit can be activated. When the battery isn't charged suffi ciently, the built-in clock may go wrong or the unit may not able to recover in case of a power failure.
- Page 11 Changing installation location • When moving this unit, be sure to turn off the MAIN switch, make sure that the unit is completely stopped, and then unplug the power cord. When this unit is exposed to excessive shock while being energized, the internal electronic parts or HDD may be damaged.
- Page 12 Caution and care (continued) For important recordings • Be sure to perform test recording before starting the practical operation of this unit, and also check regularly that the recording is performed correctly according to the settings during the practical operation. •...
- Page 13 Maintenance of DVD/CD drive (laser pickup) • Dust or dirt on the recording/playback lens causes image disturbance and sound skipping, making it impossible to perform recording or playback correctly. Ask your Mitsubishi dealer for cleaning. Don't use commercially available lens cleaning discs because they may damage the lens. •...
- Page 14 Caution and care (continued) Network • It is recommended to confi rm with your network administrator about the network settings in advance. • As this unit is operated through network, you may suffer from damage as follows. (1) Leakage or drain of information through this unit. (2) Unauthorized operation of this unit by malicious third parties.
-
Page 15: Note
Open source software Thank you for purchasing Mitsubishi digital recorder DX-TL5716E (hereinafter referred to as “ Product ” ). Before using this Product, please be sure to read the Software License Agreement on page 11 of the user's manual with regard to the soft- ware contained in this Product (hereinafter referred to as “... -
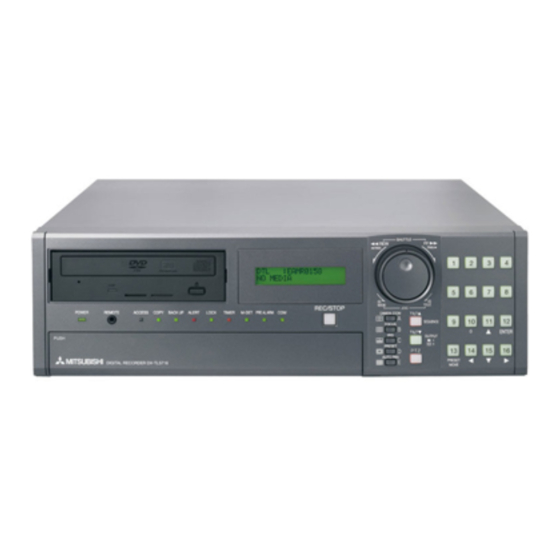
Page 16: Major Operations And Their Functions
Major operations and their functions Front view 9 10 11 POWER indicator TIMER indicator When the POWER button is pressed while the MAIN This indicator illuminates while this recorder is in the switch on the rear of this recorder is ON, this indicator timer recording mode or timer recording standby mode. - Page 17 Camera control buttons 17 Disc tray When this recorder is in the PTZ mode during single Insert a DVD/CD to copy recorded data. screen display, you can control the cameras by press- Supported discs are DVD-RW, DVD-R, CD-R, and CD- ing the following buttons.
-
Page 18: Front View (Inside Of Door)
Major operations and their functions (continued) Front view (inside of door) 25 26 27 28 29 30 31 32 22 POWER button 26 SET UP button The power is turned on when this button is pressed When this button is pressed, <Main menu> is dis- while the MAIN switch on the rear is ON. -
Page 19: Inserting Or Removing Dvd/Cd Disc
31 TRIPLEX PB button Inserting or removing DVD/CD disc When this button is pressed while live images from cameras are being displayed in the split display mode, 1 Press the OPEN/CLOSE button. Step the playback image of your desired camera can be dis- The disc tray opens. -
Page 20: Rear View
Major operations and their functions (continued) Rear view 10 11 13 14 15 MAIN switch ALARM IN terminals This is the main power switch. To use this recorder, set Terminals to input alarm signals. These terminals ac- this switch to ON. Otherwise, the POWER button on cept alarm signals once a second. - Page 21 CLOCK ADJ OUT terminal 10 CONT OUT connector Terminal to output the signal to set the clocks of other Connector to connect optionally available HDD exten- recorders to the nearest hour (00 minute 00 second) in sion unit DX-ZD6UE. This terminal is used to link the sync with input of CLOCK ADJ.
-
Page 22: Screen Display
Major operations and their functions (continued) Screen display ALARM INTERRUPT 19-01-2008 Sat 15:00:45 HDD (EMR) CIF • L3 Please push the [HELP] button Recorder title [SBM16] [SBM16] SYNC COPY ARCHIVE Camera title Playback information Notice The playback device, picture size, and picture quality •... -
Page 23: Recorder Title
Recorder title The designated recorder title is displayed. For setting the recorder title and displaying/hiding the title, see page 108. Warning Warning is displayed when a failure or error occurs in this recorder. Press the HELP button to check the de- tails. -
Page 24: Connections
Connections Connecting CCTV cameras, monitors, and sensors Camera (up to 16 cameras) Monitor To VIDEO IN or S(Y/C) IN connector RS232C integral camera To OUTPUT A VIDEO or Connect either. OUTPUT A S (Y/C) connector To VIDEO IN connector RS422 integral camera To OUTPUT B VIDEO Secure the power cord using the... -
Page 25: Connection For Alarm Recording
Notice • Before connecting, remove the protection tape from both sides of the recorder. • By connecting various devices, you can control this recorder by external devices and control external devices by this recorder. However, depending on the operating condition of the recorder, its operation and control of external devices may become slow or unstable. -
Page 26: Cascade Connection
Connections (continued) Cascade connection Master monitor Images output from the VIDEO OUTPUT A connectors of the connected recorders are displayed. Phone divider, etc. Keyboard DX-KB5UE Camera (up to 16 cameras) To VIDEO CASCADE OUT connector Local monitor RS232C integral camera To CAMERA To OUTPUT IN connectors... -
Page 27: Cable Clamping
Cable clamping 1 Insert the supplied clamp bands into the clamp 3 P u l l t h e e n d o f t h e c l a m p b a n d u n t i l i t i s Step Step holes in the rear of the recorder. -
Page 28: Optional Products
Connections (continued) Optional products Recommended products For recommended external devices, contact your dealer. DX-ZD6UE DX-ZD5UE(Z) External devices you want to use may not be suitable for the intended application of this recorder. For details, you are Additional hard disk unit (for serial bus connection) recommended to contact your dealer. -
Page 29: Caution For Connecting Additional Hard Disk Units
Caution for connecting additional hard disk units When you connect 5 or more additional hard disk units to this recorder, you are recommended to connect them by USB cables as shown below in order to prevent recognition failure caused by variation in their startup time. At the commencement of practical operation, check that they are recognized correctly even when a small number of units are connected. -
Page 30: How To Set The Menus
2. Copy the menu settings of other DX-TL5716E ( Page 113) You can set the recorder's menus by copying the menu settings of other DX-TL5716E to externally connected media and then loading those settings. Displaying the menus When you press the following buttons, the corresponding menus are displayed. (Check that no other menus or warnings are displayed.) -
Page 31: Operating The Menus
Operating the menus You can operate the displayed menu by pressing the buttons on the front panel of the recorder or clicking the buttons displayed on the menu screens. Notice Wheel • Use a general USB mouse having two buttons as shown by the fi gure. Certain types Left button Right button of mouse cannot be used with this recorder. -
Page 32: Using The Mouse Operation Screen
How to set the menus (continued) Using the mouse operation screen When you right-click the mouse, the mouse operation screen is displayed and you can control the recorder on the screen. Mouse operation screen 07-07-2008 Mon 13:35:17 Right-click Mouse 2 3 4 5 6 7 10 11 12 13 14 15 Camera number buttons... -
Page 33: Exit Button
16 Recording/Stop button 24 Output A/B button When you click this button, recording starts and the When you click this button, the multiplexer output is button illuminates. By clicking this button again, a con- switched between A and B. Each time you click this fi... -
Page 34: Using The Setup Wizard
Using the Setup Wizard Tips Making the minimum required settings • When you want to cancel the Setup Wizard in automatically midstream, cancel it according to the instructions <Setup Wizard> displayed on the screen. You can cancel the Setup Wizard in step 6. In this case, the settings you made in When you turn on the power of the recorder for the first steps 1 to 5 remain effective. - Page 35 8 Set the recording cycle and recording hours per Step day. After fi nishing the setting, select [Next]. • 9 Picture quality and FPS are automatically Step set for the cameras detected in step 7 and a confi rmation screen is displayed. The picture quality and FPS are same among all •...
-
Page 36: Registering The Devices
Registering the devices Setting Main, Copy, and Archive devices Cautions for using external devices <HDD registration> By connecting external HDDs to this recorder, you can expand the memory or use them as a copy device. You can assign the HDDs to Main, Copy, and Archive However, when you perform recording, playback, or copy devices. -
Page 37: Registering The Internal Hdds
Mirroring Registering the internal HDDs By recording the same data on 2 HDDs that have the same 1 Press the SET UP button on the front panel of Step capacity, you can reduce the risk of losing recorded data in the recorder or left-click the mouse. -
Page 38: Registering External Hdds
Registering the devices (continued) Notice Registering external HDDs • Data to be archived are transferred in 2 MB units. At 1 Press the SET UP button on the front panel of Step the end of archive, the data of the latest recording the recorder or left-click the mouse. -
Page 39: Checking The Registered Devices
Checking the registered devices 1 Press the SET UP button on the front panel of Step the recorder or left-click the mouse. <Main menu> is displayed. • 2 Select [HDD registration]. Step HDD registration <HDD registration> screen is displayed. • 3 Select [Setting] next to [HDD registration]. -
Page 40: Setting The Repeat Recording And Partition Of Main
Registering the devices (continued) Notice Setting the repeat recording and • The repeat recording in the partitioned areas can be partition of Main device enabled only when the corresponding areas are set in <Main HDD setting> the <Partition setting>. • When a warning is issued, "Please push the [HELP] Notice button"... -
Page 41: Setting The Partition
4 Select [Setting] next to [Change partition setting]. Step Setting the partition Setting You can partition the Main device. <Partition setting> screen is displayed. Partition setting Data to be recorded • 5 Create partitions in the Main device. Step Normal recording Set the capacities of the normal recording area, •... -
Page 42: Viewing Images Captured By The Cameras
Viewing images captured by the cameras Multiplexer function Notice You can display images captured by the connected cameras • When the camera images are displayed in the split on 4-split, 9-split, 10-split, 13-split or 16-split screen. In screen mode, thin black bars may appear at the top addition, you can arrange the positions of the displayed and bottom or right and left of respective images images on the screen. -
Page 43: Switching Output A And B
Tips Switching Output A and B • The magnifi cation function can be used even during You can display images captured by different cameras on playback. two monitors separately. • When you pause playback of images recorded by 1 Press the OUTPUT A/B button. Step multiple cameras in the single screen display mode When Output A is selected, the button goes out. -
Page 44: Triplex Playback
Viewing images captured by the cameras (continued) • When the data being played don’t contain images Triplex playback captured by the selected camera, the screen turns to black. In this case, the green frame does not appear. While displaying images captured by cameras, you can view playback image of the desired camera. -
Page 45: Controlling The Cameras
Controlling the cameras You can control the connected cameras using the PTZ Register the preset positions of the camera. Step function. To register viewing points, click the Preset memory • button and then click the Number buttons within 5 seconds. Up to 48 points can be registered. Controlling the cameras using the menus For example, to register the current camera position 1 Right-click the mouse. -
Page 46: Controlling The Cameras Using The Buttons On The Recorder
Controlling the cameras (continued) Register the preset positions of the camera. Step Controlling the cameras using the To register viewing points, press the PRESET button • buttons on the recorder and then press the camera number buttons within 10 seconds. Up to 48 points can be registered. Step Step For example, to register the current camera position... -
Page 47: Using Cascade Function
Using cascade function You can connect up to 16 DX-TL5716E, and using the Cautions about the cascade function optional keyboard, you can view images supplied from all the connected cameras on the master monitor that is • page 26 and the keyboard’s instruction connected to the fi... -
Page 48: Recording
Recording Emergency recording Recording methods When the EMERGENCY terminal receives a signal, the To record images, you can use any of three methods as recorder starts recording images from all the selected follows. cameras with the highest picture quality based on the FPS rate you preset for emergency recording. -
Page 49: Before Making Recording Settings
Before making recording settings Notice • Because the recorder copies or searches recorded data based on the date and time of recording, check that the recorder's clock is correct before you start recording. • You cannot change the recording settings during normal recording and alarm recording. -
Page 50: Procedure Of Confi Guration Of Recording Settings
Recording (continued) Procedure of confi guration of recording settings Display the Main menu. Page 54 Step Left-click the mouse or press the SET UP button on the front panel of the recorder to display the <Main menu>. Display the Recording setting screen. Page 54 Step Select [Recording setting] to display the <Recording setting>... - Page 51 Select the recording pattern Page 55 <Manual setting> Step Select the recording pattern from [Recording A] to [Recording D] that you want to set on the <Recording settings> screen. [Recording A]: Used for manual recording and timer recording. [Recording B] to [Recording D]: Used for timer recording. 5 to 8 Pages 55 and 56 <Manual setting>...
- Page 52 Recording (continued) Continued from the previous page. 10 to 12 Pages 57 and 58 <Manual setting> Recording A to D - Alarm camera setting/Alarm input/output Step Set the following items for each sensor. • Cameras for alarm recording ([Recording camera]) •...
- Page 53 Pages 62 and 63 Motion detection setting Set the items for motion detection. Sensitivity Ref. time Sensitivity Ref. time MD threshold MD threshold (0 to 506) (0 to 506) (The (The factory-default factory-default setting is 5.) setting is 5.) CAM 1 CAM 2 CAM 3 CAM 4...
-
Page 54: Making Recording Settings Automatically
Recording (continued) When the setting is completed, select [Next]. • Making recording settings automatically The <Confirm the recording settings> screen is <Auto setting> displayed. When you defi ne the normal recording cycle, the recorder Notice automatically sets the picture quality and FPS for normal •... -
Page 55: Making Recording Settings Manually
6 Select motion detection recording. Step Making recording settings manually Select whether to use the motion detection as a <Manual setting> trigger of normal recording or that of alarm recording. When recording scenes where there is constant You can make recording settings manually. motion, you can save the HDD storage capacity 1 Press the SET UP button on the front panel of Step... -
Page 56: Picture Quality And Fps
Recording (continued) 7 Set the pre-alarm recording time in [Pre-alarm 8 Set the alarm recording time in [Post-alarm time] Step Step time] under [Alarm recording]. under [Alarm recording]. [0 Sec]: Pre-alarm recording is not performed. [Manual]: Alarm recording continues until the grounding of the ALARM IN terminal ceases. -
Page 57: Alarm Camera Setting
Notice Alarm camera setting • When the total FPS of all the recordings being 10 Select recording cameras for each connected Step performed is around the following values, they may not sensor. be performed according to the specifi ed settings. Alarm recording is performed with selected cameras. -
Page 58: Alarm Input/Output
Recording (continued) Alarm input/output Supplementary explanations on recording settings Alarm recording 11 Select the trigger for starting alarm recording for Step each connected sensor. • When alarm recording or emergency recording is performed during timer recording, the end time of the [EXT&MD-A]: Alarm recording starts when Motion timer recording is put off till the completion of the alarm A is detected while the ALARM IN terminal is being... -
Page 59: Supplementary Explanations On Preliminary Recording
HDD used for recording Supplementary explanations on preliminary recording • Pre-recorded data of alarm recording and emergency Preliminary recording is a function to start recording recording are temporarily stored in the dedicated maximum 30 minutes before the start of alarm recording or areas in the built-in HDDs. -
Page 60: Emergency Recording Settings
Recording (continued) 5 Select the picture size for emergency recording Step Emergency recording settings and select [Execute]. <EMR recording> [4CIF]: 704x576. The maximum FPS rate is 100. You can make settings for emergency recording. When the [2CIF]: 704x288. The maximum FPS rate is 200. EMERGENCY terminal is grounded by the alarm sensor [CIF]: 352x288. -
Page 61: Supplementary Explanations On Emergency
Supplementary explanations on emergency recording Picture quality • The picture quality is fi xed to [L9]. Indications during emergency recording • " " is displayed on the screen in red. • is displayed in red next to the camera number on the screen (only when the camera number indication is enabled). -
Page 62: Motion Detection Settings
Recording (continued) 6 Set the detection sensitivity to variation in the Step Motion detection settings loaded image. <Motion detection> High Based on the motion detection conditions, the recorder starts alarm recording when it detects variation in motion The detection sensitivity has 5 levels according to •... -
Page 63: Cautions On Motion Detection Setting
Notice Cautions on motion detection setting • When you want to change the detection area setting • When variation is detected continuously, alarm of the camera already set, select [User A] or [User B]. recording is also continuously performed. Therefore, Otherwise, the detection area setting is reset to the you cannot change the recording settings, etc. -
Page 64: Audio Recording Settings
Recording (continued) • When you create an alarm recording area by partition Audio recording settings setting and set [Recording mode] to [Alarm], audio <Audio recording> is recorded to the alarm recording area together with images. ( Page 41) You can make settings for audio recording. You can record •... -
Page 65: Stopping Alarm Input
Stopping alarm input Manual recording You can stop alarm input manually. This section describes the method of normal recording by manual operation. You cannot change the settings on the <Recording setting> screen during recording. To make recording settings while Before starting manual recording alarm recording is performed continuously, use this function to prohibit alarm input temporarily and stop recording. -
Page 66: Timer Recording Settings
Recording (continued) 1 Press the SET UP button on the front panel of Step Timer recording settings the recorder or left-click the mouse. <Timer program> You can make settings for timer recording. By setting the recording cameras, FPS, and picture quality for normal recording/alarm recording individually for <Recording A>... - Page 67 7 [MD] ( page 56) • In the case that a normal day program and a holiday Step program are designed to continue beyond 00:00 (for [ON]: Alarm recording by motion detection is example, 20:00 to 07:00) and the end time of the performed during timer recording.
- Page 68 Recording (continued) Notice • When you set holidays using the holiday setting screen and select [Holiday] in the [Day] column, that program always takes priority. • When the timer recording is performed on the external HDD, the recording time may become several seconds shorter than the designated time.
-
Page 69: When Timer Programs Overlap
Example 2) When timer programs overlap Program 1: 14:00 to 17:00, 0.4 FPS for normal • When 2 or more programs overlap, one having the largest recording program number is executed. Program 2: [Skip] from 15:00 to 16:00 • Example 1) These programs overlap between 15:00 and 16:00. -
Page 70: Playback
Playback Selecting the playback device Playing back recorded data <Device selection> You can play back recorded data. This recorder is able to play back recorded images by various methods. The most You can select the device and audio for playback. basic playback method is described below. - Page 71 2 To pause playback, press the PAUSE button. (Still Step image playback) To resume playback, press the PAUSE or PLAY • button. When you press a camera number button during still • image display in the single screen display mode, the image from the camera corresponding to the button you pressed is displayed.
-
Page 72: Searching For Images You Want To View
Searching for images you want to view To search for images using <Search menu>, there are 5 ]: When you click this button, reverse frame-by- methods as follows: frame playback starts. Start point search ]: When you click this button, reverse playback starts. -
Page 73: Setting The Searching Conditions
• When you copy or search the data recorded on a DVD/ Tips CD or USB memory, it may take some time before the • When you press the PAUSE/JUMP TO END button media is completely recognized after inserted. Before while the playback is stopped, images around the end you perform copy or search, check whether the access of the latest recorded data are played back in the still... -
Page 74: Searching From The Alarm List
Searching for images you want to view (continued) Searching images based on the Searching from the alarm list designated date and time <Alarm list search> <Time date search> At the start of alarm recording or emergency recording, this recorder adds the recording start time to the alarm list. You can search for images by designating their recording You can search for the desired image from the start times date and time. -
Page 75: Searching Images Based On The Designated Date And Time
The data retrieved by the alarm list search are • Notice played repeatedly in both forward and reverse • When repeat recording to the normal recording area directions. In this repeat playback, a wider range of or alarm recording area ( page 40) is disabled and data than those designated by the Pre-alarm time alarm recording (or emergency recording) is started... -
Page 76: Searching For Images With Motion
Searching for images you want to view (continued) Searching for images with motion <MD search> By setting the motion detection conditions for playback, you can search for images with motion that meet the conditions you set. 1 Set the search conditions. Step According to "Setting the searching conditions"... -
Page 77: Searching For Images Using Various Playback Functions
Searching for images using various playback functions Shuttle viewing/direct shuttle viewing High-speed forward/rewind playback By turning the shuttle ring during still image playback or You can play back recorded images at a higher playback playback/reverse playback, you can change the playback speed than that of shuttle viewing or direct shuttle viewing. -
Page 78: Reverse Playback
Searching for images using various playback functions (continued) Notice Reverse playback • When you change the playback rate, audio is not 1 Press the REV.PLAY button while the recorder is Step played back. stopped. Once you change the playback rate, audio is not played back even when you reset the rate to the original value. -
Page 79: Searching For Bookmarked Images
Searching for bookmarked images • You can overwrite already registered bookmarks with Registering a bookmark the different scenes, but cannot delete them. 1 Play back the image stored in the main device • When the bookmarked data are overwritten, their Step to be bookmarked in the single screen display images are deleted but their information remains in the... -
Page 80: Copying Recorded Data
Copying recorded data To copy data, use any of three methods as follows. 4 When you select [Moving image] in step 3, Step designate the period of time of data to be copied. One-touch copy The still image being displayed is copied. In addition, you 5Min can copy moving images recorded in the designated period of time starting from the still image being displayed. -
Page 81: Copying Data By Specifying The Start Time And Data Size
[Camera and audio fi lter]: Select the cameras and 4 Check the copy conditions and copy range on Step audio you want to copy. When there are no images the <Check the settings> screen. or audio that were recorded from the selected When you select [Test], the recorder calculates the •... -
Page 82: Copying Data By Specifying The Start Time And End Time
Copying recorded data (continued) 5 Select [Execute copy]. Step Caution in copying data D:Execute copy • When the size of the data to be copied is larger than the remaining capacity of the copy destination device The recorder starts copying. •... -
Page 83: Archiving Data
5 After making settings, select [Return]. Step Archiving data The <Archive> screen is displayed. • 1 Press the COPY button on the front panel of the Step When you change the archive conditions, check • recorder. that the conditions are displayed properly on the <Archive>... -
Page 84: Copying Data From The Recorder To Videotape
Copying recorded data (continued) Copying data from the recorder to videotape You can copy data to a videotape using an analog video cassette recorder (VCR). You can copy data even while this recorder is in recording operation. For the recording procedure, see the instruction manual for the analog VCR you use. -
Page 85: Communication
Using the communication functions Communication functions of this recorder Cautions regarding the same setting items displayed on multiple screens You can use the following communication functions of this • As for the same setting items displayed on multiple recorder using the LAN port on the rear panel via TCP/IP. screens (for example, DNS server setting, retry •... -
Page 86: Connections
Using the communication functions (continued) Notice Connections • If you enter a wrong user ID or password, an [Caution] • To connect a PC to this recorder directly, use a cross screen appears. In this case, select [Login] to go back cable. -
Page 87: Viewing Live Images
Notice Viewing live images • When the total recording FPS is larger than the You can load live images and display them on the PC following values, images from cameras not recorded monitor. are not refreshed. 1 Display the [Main Menu] screen according to Step When the picture size is set to [4CIF] .. -
Page 88: Playing Back Recorded Images
Using the communication functions (continued) Searching for images by designating date and time Playing back recorded images You can load and play back images recorded by the 1 Stop playback in the single screen display mode Step recorder. on the [Playback] screen. 1 Display the [Main Menu] screen according to Step steps 1 to 3 of "Login"... - Page 89 4 Select the number of the alarm event you want to Step retrieve and select [Search]. When you click in the [Image Search] area, the • image of the next alarm event is displayed. When you click , the image of the previous alarm event is displayed.
-
Page 90: Setting The Main Menu
Using the communication functions (continued) 3 To change the settings, select [change]. Step Setting the Main Menu To cancel, select [cancel]. The [User Registration] • screen is displayed. Notice 4 Select [User Registration] on the [Completed] • The numbers in parentheses ( ) of the setting items on Step screen. -
Page 91: Setting The Titles Of The Recorder And Cameras
Setting the titles of the recorder and cameras You can set or change the titles of the recorder and cameras. 1 Display the [Main Menu] screen according to Step steps 1 to 3 of "Login" on page 86. 2 Select [Confi guration Menu]. Step The [Confi... -
Page 92: E-Mail Setup
Using the communication functions (continued) [POP User Password]: You can set the password of E-mail setup the POP server. For e-mail transmission, you can make settings related to DNS Settings the mail server, sender, and e-mail addresses of recipients. To determine the settings shown in a row, select [set] •... - Page 93 [ P i c t u r e ] : W i t h t h i s o p t i o n s e l e c t e d , e - m a i l notification is sent to the recipient together with an image captured at the start of alarm recording as attachment.
-
Page 94: Ftp Notifi Cation Setup
Using the communication functions (continued) 5 Set the trigger and camera number to issue Step FTP notifi cation setup FTP notification using [Transmitted Image CH You can make settings for FTP notifi cation. Settings]. To determine the settings shown in a row, select [set] •... -
Page 95: Connection Mode Setup
Notice Connection mode setup • When the communication fails, set the recorder's You can change the SSL settings. communication band according to the communication 1 Display the [Main Menu] screen according to Step band used. steps 1 to 3 of "Login" on page 86. -
Page 96: Clock Setup
Using the communication functions (continued) Synchronizing the recorder's clock with the PC's clock Clock setup 1 Select [Synchronize with PC's clock] on the Step You can set the clock of the recorder via the PC. [Clock Settings] screen. 1 Display the [Main Menu] screen according to Step The recorder's clock is synchronized with the PC's •... -
Page 97: E-Mail Notifi Cation
Notice E-mail notifi cation • The image data uploaded upon FTP notification is This recorder issues e-mail notification of operation slightly delayed from the actual start point of alarm errors and recording status. You can combine notified recording. events such as operation errors and recording status, and notifi... -
Page 98: Various Settings
Various settings Setup menu You can make basic settings using the <Setup> menu. How to display the Setup menu 1 Press the SET UP button on the front panel of the recorder or left-click the mouse. Step <Main menu> is displayed. •... - Page 99 Clock and language Page 105 You can set the date and time. This menu is also used for selecting the menu language. Language setting ENGLISH FRANÇAIS DEUTSCH ESPAÑOL ITALIANO POLSKI CZECH Português Warning display • Ext terminal setting Pages 105 to 108 You can make settings of the terminals on the rear panel and warning displays.
- Page 100 Various settings (continued) Setup menu Information display setting Pages 108 and 109 You can set the items to be displayed on the screen and their display position. You can also make the setting menus transparent. Use the transparent menu Enable Disable Page 108 Clock display mode and location...
- Page 101 Multiplexer setting Pages 110 and 111 You can set the split screen of Outputs A and B and sequential display. Output A Page 110 You can make settings for displaying Output A and the image switching interval in the sequential display mode. 4-split screen 9-split screen Split 4d...
- Page 102 Various settings (continued) Setup menu Multiplexer setting Continued. Page 110 Alarm display You can set the alarm display. Alarm display mode Output A Output B Output A/B Sensor 1 Sensor 2 Sensor 3 Sensor 4 Sensor 5 Sensor 6 Sensor 7 Sensor 8 Sensor 9 Sensor 10...
- Page 103 Setting the playback functions Pages 111 and 112 You can make settings related to playback. Display a Activate Image playback repeat originality Auto expiration on the image playback check play specified date in field 001 to 365 day (The factory-default setting is 001 day.) ] day Loading/saving/initializing the menu settings...
- Page 104 Various settings (continued) Setup menu Communication setting Continued. LAN setting Pages 114 and 115 You can set the IP address, subnet mask, and gateway. IP address 192.168.000.100 Subnet mask 255.255.255.000 Gateway 000.000.000.000 Page 114 LAN service port settings You can set the service port. COM port 00080 SSL port...
-
Page 105: Clock And Language
Settings of the present time and menu Settings related to the warning display language and rear terminals <Clock and language> <Warning display · EXT terminal setting> Clock setting Warning display · Buzzer · Call-out 1 You can adjust the present time. Remain 1 Set the day, month, year, hour, minute, and Step... -
Page 106: Button Sound
Various settings (continued) Setup menu Button sound You can select whether or not to sound a beep when the buttons, jog dial, or shuttle ring on the front panel of the recorder are operated. 1 Select to enable or disable the button beep. Step With the box checked, the button beep is heard. -
Page 107: Mode-Out • Remaining Capacity
Remain 1 and 2 Mode-out • Remaining capacity Warning is issued to notify that the remaining capacity runs Mode-out 1 to 4 short during recording. You can designate the device and threshold level of the remaining capacity. The recorder status is output from the MODE OUT terminals Warning is issued in the following ways when the remaining on the rear panel (by short-circuiting the contact). -
Page 108: Event Terminal
Various settings (continued) Setup menu On-screen display settings Event terminal <Information display setting> You can set the functions allocated to the EVENT terminals (1 to 3) on the rear panel. Clock display mode and location 1 Allocate a function to Event 1 to 3. Step [Event 1] corresponds to the EVENT 1 terminal, You can set the display mode and position of the clock. -
Page 109: Camera Number And Title Display
2 When you enable [Recorder title] in step 1, set Step Use the transparent menu the recorder title. You can make the screen menus transparent. When you select [Setting], the screen for setting the • recorder title is displayed. 1 S e l e c t w h e t h e r o r n o t t o m a k e t h e m e n u s Step transparent. -
Page 110: Multiplexer Settings
Various settings (continued) Setup menu Multiplexer settings Sequential display <Multiplexer setting> Example You can confi gure the multiplexer settings for Output A and 2 seconds Output B individually. When you make settings as later follows: Split 4a: Camera numbers 1 to 4 Output A/Output B Split 4b: Camera numbers 5 to 8 Split 4c: Camera numbers 9 to 12... -
Page 111: Covert Camera
]: Images from Outputs A and B are tiled Covert camera horizontally. You can hide the images from the selected cameras by ]: Images from Outputs A and B are arranged covering them with blue screens. During playback, images diagonally. from the selected cameras are covered with black screens. -
Page 112: Display A Playback Image In Fi Eld
Various settings (continued) Setup menu • Even when the recorder detects continuous or multiple Display a playback image in fi eld altered images, the warning display appears only Some images may appear shaking because this recorder once. To enable the warning display again, stop records images frame by frame. -
Page 113: Settings Related To The Menus
You can update the menu settings of this recorder by You can save the recorder's menu settings in external copying those of other DX-TL5716E to externally connected media or the recorder's internal memory. media and then loading them. Also, you can save the menu... -
Page 114: Settings Related To Communication
Various settings (continued) Setup menu Settings related to communication LAN setting <Communication setting> The recorder can communicate with a PC connected to its LAN port. RS-232C setting You can remotely control the recorder using a PC connected to the RS-232C terminal of the recorder. 1 Set the IP address, subnet mask, and gateway. -
Page 115: Ip Alarm Notifi Cation - Address Setting
3 Select [Next] next to [E-mail notifi cation - Details] 3 Select [Next] next to [IP alarm notification - Step Step to check the contents of the e-mail sent to the Details] to check the contents of the e-mail sent to the PC. -
Page 116: Ptz Camera Setting
Various settings (continued) Setup menu PTZ camera setting You can make settings for controlling each of connected cameras. PTZ camera RS232C integral camera RS422 integral camera 1 M a k e d e t a i l e d s e t t i n g s f o r t h e c o n n e c t e d Step cameras. -
Page 117: Restricting The Operations Of The Recorder
Restricting the operations of the recorder By setting passwords, you can restrict access to the Password lock recorder's functions. You can select from three operation lock levels and assign a unique password to each level, There are 2 types of password lock which makes it possible to restrict operations according to Password lock for restricting operations the authority given to respective users. -
Page 118: Registering A Password
Restricting the operations of the recorder (continued) Registering a password Enabling the password lock Use a 4-digit number as a password (consisting of numbers 1 Press the LOCK button while the MAIN switch is Step 0 to 9). set to ON. 1 Press the SET UP button on the front panel of T h e l o c k i s e n a b l e d a n d t h e L O C K i n d i c a t o r •... -
Page 119: Password Lock For Hdd Protection
3 Select [Password]. Notice Step • With the password locks for Levels 1 to 3 enabled, when you disable the lock for Level 1 only, the lock for Level 2 remains enabled. When the locks for Level 1 and Level 2 are disabled, the lock for Level 3 becomes Password enabled. -
Page 120: Changing The Lock Mode From The Password Lock To Simple Lock
Restricting the operations of the recorder (continued) Notice Changing the lock mode from the password lock to simple lock • The operation control level of Level 3 cannot be set higher than that of Level 2. The operation control level 1 Disable the password locks for restricting Step of Level 2 cannot be set higher than that of Level 1. -
Page 121: Protecting Recorded Data
Protecting recorded data Protecting recorded data Checking the protected data You can lock up to 500 designated areas to prevent 1 Select [Setting] next to [List and search] on the Step accidental deletion of important data. Only data in the Main <Data protect>... -
Page 122: Deleting Recorded Data
Deleting recorded data Deleting recorded data You can delete recorded data. 1 Press the SET UP button on the front panel of Step the recorder or left-click the mouse. <Main menu> is displayed. • 2 Select [HDD registration]. Step HDD registration The <HDD registration>... -
Page 123: Reducing The Load On The Hdd
Reducing the load on the HDD Stopping the rotation of HDD that is not in use for recording <HDD sleep mode> You can automatically stop the rotation of the HDD that is not in use during recording. Using the HDD sleep mode, you can reduce the load on the HDD. -
Page 124: Displaying The Device Information
Displaying the device information Notice Checking the registered devices and • Before displaying the latest information, check that the recorded data area devices are correctly confi gured while the recorder is stopped. ( Page 39) Displaying the <Device information> screen Displaying the Copy device information 1 Press the SET UP button on the front panel of Step... -
Page 125: Displaying The System Log
Displaying the system log Displaying the system log You can display the count, dates and times of occurrence of system log events. 1 Press the SET UP button on the front panel of Step the recorder or left-click the mouse. <Main menu>... -
Page 126: Function Against Power Failure
Function against power failure Power failure compensation circuit Record of turning-off of the MAIN switch on the rear panel This recorder is equipped with a power failure compensation The date and time when a power failure occurs or the MAIN circuit. -
Page 127: Operation Examples
Operation examples Operation example 1 00 : 00 06 : 00 12 : 00 18 : 00 24 : 00 • HDD operation setting Mirroring • Type of recording Timer recording All cameras, Motion detection recording (3 FPS/Picture quality: L6/Duration: 5 minutes) All cameras, Normal recording (1.5 FPS/Picture quality: L6) Cameras 1 to 4, Normal recording... -
Page 128: Operation Example 2
Operation examples (continued) Operation example 2 • HDD operation setting No mirroring Normal recording (3 FPS/Picture quality: L7) • Type of recording Manual recording Normal recording (3 FPS/Picture quality: L7) Press the REC/STOP button to start or stop recording. 1 Recording setting Step Confi... -
Page 129: Operation Example 3
Operation example 3 • HDD operation setting No mirroring Normal recording (1.5 FPS/Picture quality: L5) • Type of recording Manual recording Error occurs Normal recording Press the REC/STOP button (1.5 FPS/Picture quality: L5) to start or stop recording. Alarm recording Pre-alarm recording Alarm recording (3 FPS/ (Duration: 5 seconds) -
Page 130: Troubleshooting
Troubleshooting 3 Play back the recorded images. Step Checking the status of the recorder When you select [Execute], the latest image of the • <Self-check> selected playback device is displayed. To change the playback device, select the desired device in [Play This recorder uses many electronic parts and HDDs and device]. - Page 131 If the problem with the recorder persist even after you check it according to the following chart, disconnect the power cord and contact your dealer. Symptom Where to check Page The recorder does not Is the power cord properly plugged in? turn on.
- Page 132 Troubleshooting (continued) Symptom Where to check Page Playback does not start. Check that the LOCK indicator is not illuminating. 16,117 - 120 Are there data in the selected device? Is the correct playback device selected? Playback is interrupted Is the heavy load imposed on the recorder? momentarily.
- Page 133 Symptom Where to check Page D a t e a n d t i m e s e a r c h Are the current date and time set accurately? does not start. C a n n o t c o n t r o l t h e Are the cameras to be controlled connected correctly? cameras via the recorder.
-
Page 134: Error Indications
Error indications When an error occurs in the recorder, it indicates the error by 2 methods as described below. • Information ....When an error occurs, "Please push the [HELP] button" is displayed on the screen. When you press the HELP button, the information screen is displayed. To clear the information screen, press the HELP/WARNING RESET button on the front panel of the recorder or the [X] button on the information screen. - Page 135 *1 : Call-out signal output *8 : Selectable : You can select to enable or disable the call-out signal output , 14 : Recording 23 , 24 : Playback using the menu screen. , 34 : Copy , 74 : Archive Common : Call-out signal is output from the CALL OUT terminal (The following numbers are displayed in...
- Page 136 Error indications (continued) <Information> (continued) Call-out Warning Display Cause Code signal Remedy Page level*2 output*1 Copy stopped because the copy source · The data being copied · To continue copying/archiving, stop Normal 80-83 LOG3500*5 None data were overwritten. or archived are recording.
- Page 137 <Warning> (continued) Call-out Warning Cause Display Code signal Remedy Page level*2 output*1 Minor Camera image is lost or distorted. · The video signal from the · Press the WARNING RESET button on Selectable LOG54 Check the connections of cameras and specified camera (specified the front panel or click the [X] button on cables.
-
Page 138: Glossary
Glossary MPEG4 Serial bus A standard established by Moving Picture Experts Group Used to connect a mouse, USB memory device, and that specifies the technologies to encode (or to digitally external hard disk drive having a USB interface. Some convert) video and audio data. commercial USB devices don't have compatibility with this recorder. -
Page 139: Specifi Cations
Specifi cations Rated Power Supply ....100 to 240 V AC, 50/60 Hz Rated Input .......0.9- 0.4 A (100-240 V) Colour System ......PAL-type colour system Operating Temperature .....41 °F-104 °F (5 °C to 40 °C) Relative Humidity .....Max. 80 (%) Altitude ........Max. 2000 (m) Dimensions .......425 (Width) x 375 (Depth) x 133 (Height) (mm) Weight ........10.4 kg (when 1 HDD is attached) 11.1 kg (when 2 HDDs are attached) - Page 141 Others PORTUGÊS OBJETOS PESADOS NUNCA DEVEM SER COLOCADOS EM CIMA DO APARELHO (POR EX., TV) NÃO MEXA DENTRO DO APARELHO NEM INSIRA NELE QUALQUER OBJETO Tocar no interior do gabinete ou introduzir objetos estranhos através do slot de carregamento de disco para orifício de ventilação, além de causar perigos de seguranças poderão causar danos extensivos.
- Page 142 Este é um produto de classe A. Num ambiente doméstico, este produto poderá provocar interferência rádio e nesse caso o utilizador poderá ter de tomar as medidas apropriadas. O seu produto MITSUBISHI ELECTRIC foi concebido e produzido com materiais e componentes de alta qualidade que podem ser reciclados e/ou reutilizados.
- Page 143 Local de instalação e manuseamento • Antes de utilizar este aparelho pela primeira vez, carregue a bateria de reserva incorporada durante 48 horas, pelo menos, para que o circuito de compensação de energia incorporado possa ser activado. Se a bateria não tiver carga sufi...
- Page 144 Others (continued) Alterar o local de instalação • Quando transportar este aparelho, desligue o interruptor de corrente, verifi que se ele está totalmente parado e depois desligue o cabo de alimentação. Se este aparelho estiver exposto a choques excessivos enquanto recebe energia, as peças electrónicas internas ou o dispositivo HDD podem fi...
- Page 145 Para gravações importantes • Execute uma gravação de teste antes de dar início à utilização prática do aparelho e verifique também, com regularidade, se a gravação está a ser efectuada correctamente, de acordo com as definições durante o funcionamento. • A Mitsubishi não oferece qualquer compensação por dados não gravados ou não reproduzidos correctamente, devido a uma falha deste aparelho ou dos dispositivos ligados durante a utilização deste aparelho.
- Page 146 Others (continued) Manutenção da unidade de DVD (captador de laser) • A existência de pó ou sujidade na lente de gravação/reprodução provoca interferências na imagem e saltos na reprodução do som, o que impossibilita uma gravação ou reprodução correcta. Contacte o representante de vendas da Mitsubishi para efectuar a limpeza.
- Page 147 Rede • Recomendamos que confi rme, previamente, as defi nições da rede com o administrador de rede. • Como este aparelho funciona através da rede, pode sofrer os seguintes danos. (1) Fuga de informações através do aparelho. (2) Funcionamento não autorizado do aparelho por terceiros mal intencionados. (3) Interferência ou desactivação do aparelho por terceiros mal intencionados.
- Page 148 Others (continued) SVENSKA TUNGA FÖREMÅL (T EX EN TV) FÅR ABSOLUT INTE PLACERAS OVANPÅ ENHETEN RÖR INTE VID INSIDAN AV ENHETEN OCH STOPPA INTE IN NÅGRA FÖREMÅL I ENHETEN Vidröring inuti lådan eller införsel av främmande föremål av något slag genom diskinmatningsluckan eller ventilationshålen inte bara utgör en säkerhetsrisk utan kan även orsaka omfattande skada.
- Page 149 Detta är en klass A-produkt. Detta innebär att den vid användning i hushåll kan orsaka radiostörningar, i vilket fall användaren uppmanas att ta nödvändiga åtgärder. Denna produkt från MITSUBISHI ELECTRIC är designad och tillverkad av material och komponenter med hög kvalitet som kan återvinnas och/eller återanvändas.
- Page 150 Others (continued) Installationsplats och hantering • Innan du använder denna enhet för första gången måste du låta den vara ansluten till elnätet i minst 48 timmar för att ladda det inbyggda backup-batteriet. På detta sätt aktiveras också den inbyggda strömkompensatorkretsen. Om batteriet inte laddas tillräckligt länge kan den inbyggda klockan börja visa fel tid eller så...
- Page 151 Saker att tänka på om enheten ska fl yttas • Gör följande om enheten ska flyttas: slå av huvudströmbrytaren och se till att apparaten stannar. Dra sedan ur elsladden. Om denna enhet utsätts för slag eller stötar när den är påslagen kan de elektroniska delarna eller hårddisken inuti enheten skadas.
- Page 152 Others (continued) Råd vad gäller viktiga inspelningar • Gör alltid en provinspelning innan apparaten ska börja användas i en skarp situation. Genomför sedan regelbundna kontroller av inspelningskvaliteten med de inställningar som normalt används. • Mitsubishi ersätter inte för data som inte spelats in eller som inte spelas upp på rätt sätt på grund av att det uppstått ett fel i enheten eller i någon av de anslutna apparaterna under användningen.
- Page 153 Underhåll av DVD-enheten (laserpickup) • Damm eller smuts på inspelnings-/uppspelningslinsen kan orsaka bildstörningar och ljudproblem, vilket gör det omöjligt att utföra inspelningar eller uppspelningar korrekt. Be din Mitsubishi-återförsäljare om råd för rengöring. Använd inte kommersiellt tillgängliga linsrengöringsskivor, de kan skada linsen. •...
- Page 154 Others (continued) Nätverk • Vi rekommenderar att du ber din nätverksadministratör bekräfta nätverksinställningarna innan du börjar använda enheten. • Den här enheten används i ett nätverk och följande problem och skador kan därför uppstå: (1) Informationsläckor eller -stöld via denna enhet. (2) Obehörig användning av denna enhet i ont uppsåt av utomstående.
- Page 155 ČESKY NA JEDNOTKU BYSTE NIKDY NEMĚLI UMÍSŤOVAT TĚŽKÉ PŘEDMĚTY (NAPŘÍKLAD MONITOR) NIKDY SE NEDOTÝKEJTE ŽÁDNÉHO PŘEDMĚTU UVNITŘ JEDNOTKY, ANI DO JEDNOTKY ŽÁDNÝ PŘEDMĚT NEZASOUVEJTE Zasahování do skříňky nebo zasouvání cizích předmětů jakéhokoliv druhu štěrbinou na vkládání disku nebo ventilačními otvory představuje bezpečnostní riziko a navíc může způsobit rozsáhlé škody na přístroji. OCHRANA NAPÁJECÍHO KABELU Poškození...
- Page 156 Toto je zařízení třídy A. V domácím prostředí může toto zařízení způsobovat rušení rádiových frekvencí, v takovém případě je nutné podniknout odpovídající opatření. Tento produkt společnosti MITSUBISHI ELECTRIC byl zkonstruován a vyroben z vysoce kvalitních materiálů a komponentů, které mohou být recyklovány nebo opakovaně použity.
- Page 157 Místo instalace a manipulace • Před prvním použitím této jednotky ji nechte zapnutou alespoň 48 hodin, aby se nabila vestavěná záložní baterie a mohl se aktivovat obvod vestavěného napájecího kompenzátoru. Když baterie není dostatečně nabitá, vestavěné hodiny mohou pracovat nesprávně nebo jednotka nemusí být schopna provést obnovení funkce po výpadku napájení. •...
- Page 158 Others (continued) Změna umístění • Při přesouvání jednotky ji nezapomeňte nejprve hlavním spínačem vypnout, pak se ujistěte, že jednotka je zcela zastavena a odpojte napájecí kabel. Pokud bude jednotka za provozu pod napětím vystavena působení rázů, může dojít k poškození vnitřních elektronických součástí nebo pevného disku. Buďte opatrní obzvláště v případě, že problikává...
- Page 159 Pro důležité nahrávky • Před praktickým uvedením jednotky do provozu proto nezapomeňte provést testovací nahrávání a během praktického provozu také zkontrolujte, zda je nahrávka uložena správně podle nastavení. • Společnost Mitsubishi neposkytuje náhrady za data, která nebyla nahrána nebo přehrána správně v důsledku poruchy vzniklé...
- Page 160 Others (continued) Údržba DVD jednotky (laserová jednotka) • Prach nebo nečistoty na nahrávací/přehrávací čočce způsobují rušení obrazu a přeskakování zvuku. To indikuje nemožnost správně nahrávat nebo přehrávat. Požádejte svého prodejce Mitsubishi o vyčištění. Nepoužívejte komerčně dostupné čisticí disky, protože mohou čočku poškodit. •...
- Page 161 Síť • Doporučuje se ověřit si u správce sítě její nastavení předem. • Protože jednotka je provozována prostřednictvím sítě, může dojít k poškození následujícími způsoby. (1) Únik informací prostřednictvím této jednotky. (2) Neoprávněná obsluha této jednotky třetími stranami se škodlivými úmysly. (3) Narušení...
- Page 162 Others (continued) POLSKI NA URZĄDZENIU (NP. NA MONITORZE) NIGDY NIE NALEŻY UMIESZCZAĆ CIĘŻKICH PRZEDMIOTÓW NIGDY NIE NALEŻY DOTYKAĆ WNĘTRZA URZĄDZENIA ANI WKŁADAĆ TAM JAKICHKOLWIEK PRZEDMIOTÓW Dotykanie wnętrza szafki lub wkładanie obcych przedmiotów przez szczelinę do wkładania płyt albo do otworów wentylacyjnych nie tylko stwarza zagrożenie dla bezpieczeństwa, lecz może również...
- Page 163 Jest to produkt klasy A. W środowisku domowym produkt ten może wytwarzać zakłócenia o częstotliwości radiowej. W takim przypadku użytkownik ma obowiązek podjąć stosowne kroki. Niniejszy wyrób MITSUBISHI ELECTRIC został zaprojektowany i wykonany z wysokiej jakości materiałów i części, które można poddać recyklingowi i/lub ponownie wykorzystać.
- Page 164 Others (continued) Miejsce instalacji i obsługa • Przed pierwszym użyciem urządzenia należy zasilać je przez co najmniej 48 godzin w celu naładowania wbudowanego akumulatora podtrzymującego, aby mógł zostać uruchomiony obwód wbudowanego kompensatora zasilania. Jeśli akumulator nie jest w pełni naładowany, wbudowany zegar może wskazywać nieprawidłowy czas lub urządzenie może nie być...
- Page 165 Zmiana miejsca instalacji • Podczas przemieszczania urządzenia należy się upewnić, że został wyłączony włącznik główny oraz że całkowicie zakończyła się praca urządzenia, a następnie odłączyć przewód zasilający. Narażenie urządzenia na nadmierne wstrząsy podczas uruchamiania może spowodować uszkodzenie wewnętrznych elementów elektronicznych lub dysku twardego.
- Page 166 Others (continued) Ważne nagrania • Przed rozpoczęciem właściwej pracy urządzenia należy przeprowadzać nagrywanie testowe, a także sprawdzać regularnie, czy nagrywanie odbywa się prawidłowo według ustawień pracy. • Firma Mitsubishi nie pokrywa szkód za dane nienagrane lub nieprawidłowo odtwarzanie z powodu usterek urządzenia lub podłączonych urządzeniach podczas używania tego urządzenia.
- Page 167 Konserwacja napędu DVD (mechanizmu lasera) • Kurz i inne zanieczyszczenia soczewki lasera powodują zakłócenia obrazu oraz dźwięku, co sprawia, że nagrywanie oraz odtwarzanie przebiega nieprawidłowo. Należy zwrócić się do lokalnego dealera Mitsubishi z prośbą o wyczyszczenie soczewki. Nie należy używać dostępnych w handlu płyt do czyszczenia soczewki laserowej, ponieważ ich użycie może spowodować...
- Page 168 Others (continued) Sieć • Zaleca się wcześniejsze sprawdzenie ustawień sieciowych u administratora sieci. • Ponieważ urządzenie jest sterowane poprzez sieć, mogą wystąpić następujące uszkodzenia: (1) Wyciek lub odpływ danych poprzez urządzenie. (2) Nieautoryzowana obsługa urządzenia wskutek szkodliwego działania osób trzecich. (3) Zakłócenia pracy lub dezaktywacja urządzenia wskutek szkodliwego działania osób trzecich.
- Page 172 Mitsubishi Electric Europe B.V. The Netherlands German Branch Offi ce Mitsubishi Electric Benelux Electric Visual Systems A Division of Mitsubishi Electric Europe B.V. Gothaer Str. 8 40880 Ratingen Germany Niiverheidsweg 23A, 3641 RP Mijdrecht Netherlands. Telephone: +49 (2102)-486 9250 Fax: +49 (2102)-486 7320...