Table of Contents
Advertisement
Advertisement
Table of Contents

Related Manuals for Fujitsu ESPRIMO Q5030


Summary of Contents for Fujitsu ESPRIMO Q5030
- Page 1 ESPRIMO Q5030 / Q1500 Operating Manual...
- Page 2 ... any technical problems or other questions which you would like help with? Please contact: ● our Hotline/Help Desk (see the enclosed Help Desk List or look us up on the Internet: http://ts.fujitsu.com/support/helpdesk.html) ● your sales partner ● your sales outlet Further information can be found in the "Safety"...
- Page 4 Published by Fujitsu Technology Solutions GmbH A26361-K1001-Z220-1-7619, Edition 8 2009/07 Produced by XEROX Global Services...
- Page 5 Introduction Important notes Preparation for use ESPRIMO Q5030 / Q1500 Operation Settings in the BIOS Setup Operating Manual Security functions Troubleshooting and tips Technical data Index July 2009 edition...
- Page 6 ESPRIMO is a registered trademark of Fujitsu Technology Solutions GmbH. Microsoft Windows XP, Windows Vista and Windows 7 are registered trademarks of Microsoft Corporation. VESA and DPMS are trademarks of Video Electronics Standards Association. Pentium is a registered trademark of Intel Corporation, USA.
-
Page 7: Table Of Contents
Contents Your ESPRIMO Q..........................1 Notational conventions ......................... 2 Important notes ..........................3 Safety notes............................3 Transporting the device ........................3 Cleaning the device ..........................3 Energy saving, disposal and recycling ....................4 CE marking............................4 FCC Class B Compliance Statement ....................5 Preparation for use.......................... - Page 8 Contents Screen stays blank........................28 No mouse pointer displayed on the screen.................29 Time and/or date is not correct ....................30 Error messages on the screen....................30 Installing new software........................30 Hard disk contents, restoring ......................30 Tips ..............................30 Technical data ...........................31 ESPRIMO Q............................31 Mains adapter .............................32 Index..............................33 A26361-K1001-Z220-1-7619, Edition 8...
-
Page 9: Your Esprimo Q
(e.g. *.PDF, *.HTML, *.DOC, *.CHM, *.TXT, *.HLP) Some of the manuals mentioned can be found on in electronic form on the "Drivers & Utilities" CD/DVD or on the Internet under http://ts.fujitsu.com/support. You can quickly access and view the required information on the screen using the Adobe Reader program, which is also on the CD/DVD. -
Page 10: Notational Conventions
Your ESPRIMO Q... Notational conventions The meanings of the symbols and fonts used in this manual are as follows: This symbol indicates information which is important for your health or for preventing material damage. This symbol denotes information shown on the device; failure to observe this information may pose a risk to health or lead to material damage. -
Page 11: Important Notes
Important notes In this chapter you will find information regarding safety which it is essential to take note of when working with your device. Safety notes Pay attention to the information provided in the "Safety" manual and in the following safety notes. -
Page 12: Energy Saving, Disposal And Recycling
Important notes Energy saving, disposal and recycling Further information can be found on the "Drivers & Utilities" CD/DVD. CE marking CE marking for devices without radio component The shipped version of this device complies with the requirements of the EEC directives 2004/108/EC "Electromagnetic compatibility"... -
Page 13: Fcc Class B Compliance Statement
● Consult the dealer or an experienced radio/TV technician for help. Fujitsu Technology Solutions GmbH is not responsible for any radio or television interference caused by unauthorised modifications of this equipment or the substitution or attachment of connecting cables and equipment other than those specified by Fujitsu Technology Solutions GmbH. The correction of interferences caused by such unauthorised modification, substitution or attachment will be the responsibility of the user. -
Page 14: Preparation For Use
Preparation for use Please observe the safety information in the "Important notes" chapter. Unpacking and checking the delivery It is recommended not to throw away the original packaging material! It may be required for reshipment at some later date. ► Unpack all the individual parts. -
Page 15: Setting Up The Device
Preparation for use Setting up the device When installing your device, please read the recommendations and safety notes in the "Safety" manual. The device should only be set up in the intended orientation, i.e. in a horizontal position. We recommend that you place your device on a surface with good anti-slip qualities. In view of the multitude of different finishes and varnishes used on furniture, it is possible that the rubber or plastic feet of the device will mark the surface they stand on. -
Page 16: Connecting The Device To The Mains Voltage
Preparation for use Connecting the device to the mains voltage Connecting the power adapter The supplied power cable conforms to the requirements of the country in which you purchased your device. Make sure that the power cable is approved for use in the country in which you intend to use it. The mains adapter's power cable should only be connected to a mains socket if the device is connected to the mains adapter. -
Page 17: Switching On For The First Time: Installing The Software
Preparation for use Switching on for the first time: installing the software If the device is integrated into a network, the user and server details as well as the network protocol are required during the software installation. Contact your network administrator if you have any questions about these settings. -
Page 18: Installing The Software
Preparation for use Installing the software ► During installation, follow the instructions on screen. ► Consult the operating system manual if there is anything unclear about the requested input data. You will find further information about the system as well as drivers, additional software and updates on the "Drivers &... -
Page 19: Ports
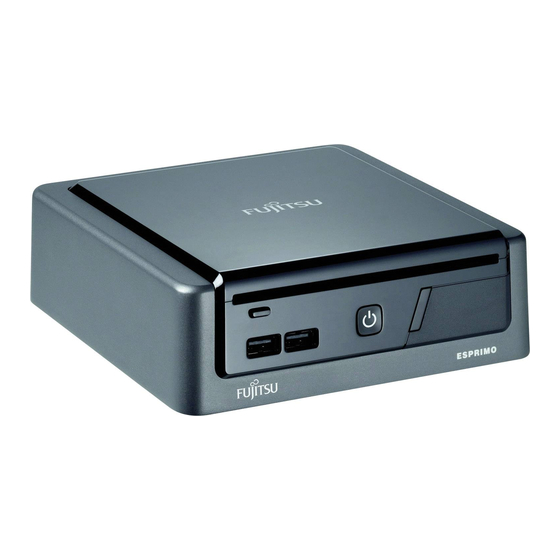
Preparation for use Ports The connections are located on the front and back of the device. The ports available on your device depend on the configuration level you have selected. The standard ports are marked with the symbols shown below (or similar). Monitor port (digital, analogue with Microphone jack, pink adapter) -
Page 20: Connecting External Devices To The Usb Ports
Preparation for use Connecting external devices to the USB ports You can connect a wide range of external devices to the USB ports (e.g. printer, scanner, modem or keyboard). USB devices are hot-pluggable. This means you can connect and disconnect devices while your operating system is running. - Page 21 Preparation for use A26361-K1001-Z220-1-7619, Edition 8...
-
Page 22: Operation
Operation Switch the device on ► If necessary, switch the monitor on (see the operating manual for the monitor). ► Press the ON/OFF switch on the front of the device. The power-on indicator lights blue and the device is started. Switching off the device ►... -
Page 23: Power Indicator
Operation Power indicator The power indicators are on the front of the casing. 1 = Power indicator ● The LED at the ON/OFF switch glows white: The device is switched on. ● The LED at the ON/OFF switch flashes white: The device is switched on, the fixed disk or the optical drive is being accessed. -
Page 24: Optical Drive
Operation Optical drive This product contains a light emitting diode, classified in accordance with IEC 825-1:1993: LASER CLASS 1, and must therefore not be opened. Handling CD/DVDs Observe the following guidelines when handling CD/DVDs: ● Avoid touching the surface of a CD/DVD. Hold CDs/DVDs by their edges! ●... -
Page 25: Inserting A Cd/Dvd
Operation Inserting a CD/DVD The device must be switched on. ► Gently insert the CD/DVD into the drive with printed side facing upwards, until the CD/DVD is automatically drawn in. Removing a CD/DVD The device must be switched on. ► Push the insert/eject button. -
Page 26: Wireless Lan/ Bluetooth Radio Component (Optional)
Depending on the configuration level chosen, your device is already equipped with wireless LAN and Bluetooth. The installation of a wireless LAN module not approved by Fujitsu Technology Solutions GmbH voids the permits issued for this device (see "Technical data" chapter). -
Page 27: Settings In The Bios Setup
Settings in the BIOS Setup In BIOS Setup you can set the system functions and the hardware configuration of the device. The settings can only be changed via the keyboard. When it is supplied, the device is set to factory default settings. You can change these settings in BIOS Setup. -
Page 28: Starting The Bios Setup
Settings in the BIOS Setup Starting the BIOS Setup ► Restart the device (switching On/Off or warm boot). The following display briefly appears on the screen during start-up: <ESC> Diagnostic screen <F2> BIOS Setup <F12> Boot Menu ► When this message appears, press the function key F2 . If a password has been assigned: ►... -
Page 29: Security Functions
Security functions Your device enables you to protect your system and personal data in a number of ways against unauthorised access. By combining these options, you can achieve maximum protection for your system. In this chapter you will learn which security functions your device is equipped with, which advantages these functions offer you and how to configure and use them. -
Page 30: Bios Setup Security Functions
Security functions BIOS setup security functions The Security menu in BIOS Setup offers you various options for protecting your personal data against unauthorised access using passwords, e.g.: ● Setup password: preventing unauthorised calls to BIOS Setup ● System password: preventing unauthorised system access Configuring password protection in the BIOS Setup Setup and system passwords can be configured in the same way. -
Page 31: Changing The Password
Security functions Changing the password ► Call BIOS Setup and select the Advanced BIOS Features menu. When changing the password, proceed exactly as for password assignment. Cancelling passwords To cancel a password (without setting a new password) run the following steps: ►... - Page 32 Security functions A26361-K1001-Z220-1-7619, Edition 8...
-
Page 33: Troubleshooting And Tips
► If you still need assistance resolving the problem, contact the relevant Help Desk for your country (see the Help Desk List or go to http://ts.fujitsu.com/support). Have the ID/serial No. of your system and the DIFS code ready. Troubleshooting... -
Page 34: The Device Cannot Be Switched Off With The On/Off Switch
Troubleshooting and tips The device cannot be switched off with the ON/OFF switch Cause Troubleshooting System crash ► Press the ON/OFF switch for at least 4 seconds, until the device switches off. The operating system is not shut-down properly in the process. -
Page 35: No Mouse Pointer Displayed On The Screen
Troubleshooting and tips Cause Troubleshooting Wrong monitor has been set under ► Restart the device. Windows XP ► Press F8 while the system is booting. Either the Windows Advanced Start Options menu or the menu for selecting the operating system appears. ►... -
Page 36: Time And/Or Date Is Not Correct
► Close unnecessary applications. ► Run the applications in a different order. Other manuals You will find further manuals as PDF files on the "Drivers & Utilities" CD/DVD or on the Internet under http://ts.fujitsu.com/support. A26361-K1001-Z220-1-7619, Edition 8... -
Page 37: Technical Data
5 °C ..35 °C Transport (2K2) –25 °C ..60 °C Condensation in operating must be avoided. The data sheet for this device provides further technical data. You will find the data sheet on the Internet under http://ts.fujitsu.com/support. A26361-K1001-Z220-1-7619, Edition 8... -
Page 38: Mains Adapter
Technical data Mains adapter As mains adapter for your device, use only the LiShin S261113-E533-V15 or the Delta S261113-E533-V55. Electrical data Rated voltage 100 V to 240 V (automatic) Rated frequency 50 Hz to 60 Hz (automatic) Max. rated current: 1.5 A You can readily order an additional mains adapter and an additional power cable. -
Page 39: Index
Index Switching on for the first time 10 transporting 3 Devices Anti-theft protection 21, 22 connecting 11, 13 Audio input 12 ports 12 Audio output 12 Dimensions 29 Disposal 4 BIOS Setup exiting 20 Electrical data 29 password protection 22 Electromagnetic compatibility 4 security functions 22 Environmental conditions 29... - Page 40 Index LAN port 12 Safety notes 3 Line in 12 Saving energy 4 Line out 12 Screen Low voltage directive 4 Port 12 stays blank 26 switching on 10 Security functions 21 Manuals, further 28 BIOS Setup 22 Memory Setup, see BIOS Setup insufficient 28 Signs and symbols 2 not enough 28...
- Page 41 A26361-K1001-Z220-1-7619, Edition 8...