NAPCO GEM-K4RF Installation Instructions Manual
Digital icon keypad with integral rf receiver
Hide thumbs
Also See for GEM-K4RF:
- Installation instructions manual (56 pages) ,
- Operating manual (32 pages) ,
- Programming instructions manual (52 pages)
Table of Contents
Advertisement
Quick Links
Download this manual
See also:
Operating Manual
Digital Icon Keypad with Integral RF Receiver
This Guide includes programming instructions for the
following control panels:
This Guide is to be used in conjunction with the Programming Instruction Manual for the follow-
ing control panels:
Quick Start:
1. Referring to the control panel wiring diagram, connect siren, auxiliary power, PGM
output, remote bus, earth ground, zone and telephone wiring.
Installation Instructions for the appropriate control panel.
2. Connect AC power first and then the battery.
3. Configure the keypad (see page 3).
4. Access the Easy Menu Driven (Dealer Program) Mode:
Press 456789 R
Dealer Code
Press NO (Q) Until "17" appears on the keypad display.
Press YES (P) to Enter Easy Menu Driven Dealer Program Mode.
The Easy Menu Driven Program Mode allows you to complete all basic programming
functions by answering questions which allow the automatic programming of the
control panel.
NOTE:
The programming examples in this manual reflect the GEM-K4RF keypad con-
nected to a GEM-P1632 panel. When used with the GEM-P816 panels, the programming
is identical except for the panel limits such as: Areas = 1; Zones = 16; User Codes = 16;
Zone Doubling = Not available.
© NAPCO 2006
INSTALLATION
INSTRUCTIONS
R
G E M - K 4 R F
•
•
GEM-P816
-
GEM-P1632 -
GEM-P3200 -
GEM-P9600 -
GEM-P816 (v.9A or prior)
GEM-P1632 (v.9A or prior)
WI995 and WI1182 (v.10 or later)
WI897 and WI1148 (v.10 or later)
WI818 and WI1184
WI777 and WI1185
NOTE:
See
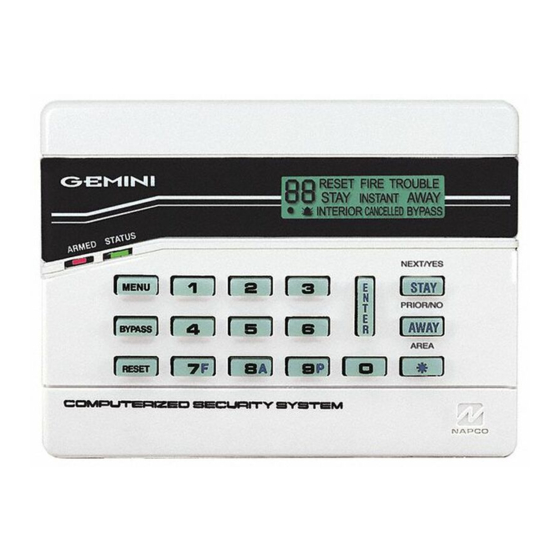
GEM-K4RF Keypad
WI1179B 2/06
1
Advertisement
Table of Contents

Related Manuals for NAPCO GEM-K4RF


Summary of Contents for NAPCO GEM-K4RF
- Page 1 NOTE: The programming examples in this manual reflect the GEM-K4RF keypad con- nected to a GEM-P1632 panel. When used with the GEM-P816 panels, the programming is identical except for the panel limits such as: Areas = 1; Zones = 16; User Codes = 16;...
-
Page 2: Compatible Control Panels
• GEM-P3200 • GEM-P9600 Note: All current panels listed above will accommodate up to 16 points with the GEM-K4RF keypad; however for the GEM-P816/P1632 (v.10) panels, and for the GEM-P3200/P9600 (v.30) panels, up to 32 points will be accom- modated. Note: If the number of allowed points are exceeded, an E-39-00 (receiver capacity) system trouble will occur ("00"... -
Page 3: Installation
Repeat for the other slot. Pull out at the bottom and lift off the two hooks at the top. The GEM-K4RF features a handy pull-up reference label. (This label must be used in UL installations). Before mounting the keypad onto the wall, push the Sliding Label Plate (with label and felt backing affixed and handle facing forward) down the guides at the rear of the keypad until it snaps into place. - Page 4 KEYPAD OPTION JUMPERS Up to 7 GEM-K4RF keypads may be connected to the control panel (Keypads 1–7). Each must be configured for a keypad address. In addition, the keypad may be configured to disable touchpad backlight and entry sounder. Keypads are configured by the proper selection of jumpers. Refer to the label on the keypad circuit board for jumper locations and a summary of settings.
- Page 5 Quick Method (Using the GEM-K1CA keypad) If a receiver is already installed in the panel, Napco Transmitter wireless points can be programmed automatically (“enrolled”). Note: (1) The transmitter point will be enrolled only if the signal strength is 3 or greater. (2) Enroll a sin- gle-point device by merely powering it up.
-
Page 6: Wireless Signal Strength
3. Restore the wireless point (close the loop). When restored, the keypad will beep once regardless of signal strength. Note: With the GEM-K4RF keypad, signal strength is not displayed but is annunciated by beeps as per the above table. For installations that include several transmitters, multiple receivers may be connected to the panel. (Only the highest signal strength will be displayed). - Page 7 EASY PROGRAM MODE OVERVIEW (Using a GEM-K4RF Keypad) ENTERING THE EASY KEYPAD PROGRAM MODE 1 Enter the Dealer Security Code (default = 456789) for a new panel or enter your custom Dealer Program Code if programmed and press 2 Press NO ( ) repeatedly until function "...
- Page 8 Programming the GEM-P816 & GEM-P1632 (v.9A and Earlier) with the GEM-K4RF Refer to the GEM-P9600/3200 Programming Manuals (WI1185 & WI1184) and follow the GEM-K3DGTL Key- pad Easy Programming Mode instructions. The following applies to the GEM-P816/1632: Total Number of Zones in Area 1...
- Page 9 Programming the GEM-P816 & GEM-P1632 (v.9A and Earlier) Entry/Exit Zones in Area 1 (Appears for New Panel Only) Press the button and then directly enter the zone number of any zones CHIME which are to be used as Entry/Exit zones. Valid entries are from 01 to 32. Directly enter each zone number, including leading zeros.
- Page 10 Programming the GEM-P816 & GEM-P1632 (v.9A and Earlier) Central Station Receiver 1 Format (Direct Entry) From the table below, enter the central station's receiver format. Use number buttons through . NOTE: Press for a zero and CHIME for a blank space (•). Press through letters B–E, respectively.
- Page 11 “E” = ; “F” = Quick Method. If a receiver is already installed in the panel, Napco transmitter wireless points can be programmed automatically (“enrolled”) using the following procedure. NOTE: The transmitter point will be enrolled only if the signal strength is 3 or greater.
- Page 12 NOTE: If assigning a key fob to a zone, the “ON/OFF” buttons on the key fob will no longer arm/disarm the system. The key fob is converted to a “panic only” device. ZONE DESCRIPTIONS: GEM-K4RF cannot be used to enter Zone Descriptions. To enter Zone Descriptions you must use the GEM-K1CA Keypad or the Napco Quickloader Software.
-
Page 13: Keypad Programming Overview
DIRECT ADDRESS PROGRAM MODE This is an extension of the Dealer Program Mode. This method of programming is used in conjunction with the Keypad Programming Worksheets contained in the control panel programming guide. Refer to these worksheets to identify the 4- digit location (address) of the feature to be programmed. -
Page 14: Mounting Template
MOUNTING TEMPLATE 2 3/8” 4 3/8” ANTENNA KEYPAD BUS TAMPER (DO NOT CUT OR HOLE WIRES DRILL WALL) - Page 15 NOTES...
-
Page 16: Warranty
NAPCO will, In no event shall NAPCO be liable for an amount in within said period, at its option, repair or replace any excess of NAPCO's original selling price of the product,...