Table of Contents
Advertisement
Quick Links
Advertisement
Table of Contents

Related Manuals for Siemens E49H


Summary of Contents for Siemens E49H
- Page 1 E49H Issued by Gigaset Communications GmbH Schlavenhorst 66, D-46395 Bocholt Gigaset Communications GmbH is a trademark licensee of Siemens AG © Gigaset Communications GmbH 2008 All rights reserved. Subject to availability. Rights of modifications reserved. www.gigaset.com...
-
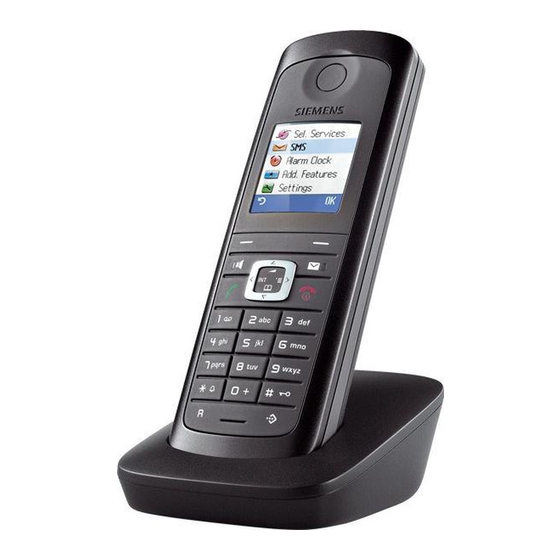
Page 2: Overview
The handset at a glance The handset at a glance 1 Display in idle status 2 Charge status of the batteries = e V U (flat to full) flashes: batteries almost flat e V U flashes: batteries charging ¢ 3 Display keys ( page 15) 4 Message key Access to calls and message lists;... -
Page 3: Table Of Contents
Contents Contents The handset at a glance ....... . . 1 Safety precautions . - Page 4 Contents Handset settings ........27 Quick access to functions .
-
Page 5: Safety Precautions
34). Do not use your phone in environments with a potential explosion hazard (e.g. paint shops). If you give your Gigaset to someone else, make sure you also give them the ƒ user guide. Please remove faulty base stations from use or have them repaired by our Service, as they could interfere with other wireless services. -
Page 6: First Steps
First steps First steps Check the pack contents one Gigaset E49H handset one charging cradle one mains adapter for the charging cradle two batteries one battery cover one belt clip one lock ring one rubber cover for the headset socket... -
Page 7: Setting Up The Charging Cradle
Please note: Never expose the telephone to the influence of heat sources, direct sunlight or other electrical devices. Protect your Gigaset from moisture, dust, corrosive liquids and vapours. Connecting the charging cradle ¤ Connect the flat plug of the mains adapter 1. -
Page 8: Setting Up The Handset For Use
The phone could also malfunction or be damaged as a result of using batteries that are not of the recommended type. * Gigaset Communications GmbH is a trademark licensee of Siemens AG. ¤ Insert the batteries the right way round. - Page 9 First steps ¤ Insert the rubber cover supplied for the headset socket to guarantee the unit is still splashproof. If you need to re-open the battery cover, for instance to replace the batteries, proceed as follows: ¤ Turn the lock ring or belt clip anticlockwise to the end stop (approx.
- Page 10 First steps Registering the handset You must initiate handset registration on the handset and on the base sta- tion. On the handset Please register flashes on the display. Please register ¤ Press on the right side of the control key to display the main menu. ¤...
- Page 11 First steps First battery charge and discharge The correct charge status can only be displayed once the battery is first fully charged and discharged. ¤ Place the handset in the charging cradle for six hours. ¤ Once the battery is fully charged, remove the handset from the charging cradle and do not put it...
- Page 12 First steps Setting the date and time Set the date and time so that the correct date and time can be assigned to incoming calls, and so that the alarm can be used. ¤ If you have not yet set the date Time and time, press the key below on the display screen to open...
-
Page 13: Connecting The Headset
First steps Display in idle status Once the phone is registered and the time set, the idle display is shown as in this example. Displays ¢ ¼ ½ ¼ Eco Mode + activated ( page 25) ¢ ½ Eco Mode activated ( page 25) INT 1 Charge status of the batteries:... -
Page 14: What Would You Like To Do Next
First steps What would you like to do next? Now you have successfully started your Gigaset, you will probably want to adapt it to your personal requirements. Use the following guide to quickly locate the most important subjects. If you are unfamiliar with menu-driven devices such as other Gigaset tele- phones you should first read the section entitled "Using the phone"... -
Page 15: Using The Phone
Using the phone Using the phone Control key In the description below, the side of the control key (up, down, right, left) that you have to press in the different operating situations is marked in black, e.g. v for "press right on the control key". -
Page 16: Display Keys
Using the phone Display keys The functions of the display keys change depending on the particular operating situation. Example: 1 Current display key functions are shown in the bottom display line. 2 Display keys The most important display keys are: Open a context-dependent menu. -
Page 17: Activating/Deactivating The Handset
Using the phone To access a function, i.e. to open the corresponding submenu (next menu level): ¤ Navigate to the function using the control key q. Press the display key §OK§ Submenus The functions in the submenus are displayed as lists. To access a function: ¤... -
Page 18: Illustration In The User Guide
Using the phone Illustration in the user guide The operating steps are shown in abbreviated form. Example The illustration: ¢ ¢ Ð Date/Time means: ¤ In idle status, press on the right side of the control key to display the main menu. î... -
Page 19: Menu Tree
Menu tree Menu tree Instead of scrolling to locate a menu function, you can select a function more quickly by opening the menu and keying in a digit combination (or shortcut). Example: v 5 2 2 for "Set ringer for external calls". With the telephone in idle status, press v (open main menu): î... -
Page 20: Making Calls
Making calls Making calls To deactivate the ringer, press the §Silence§ display key. You can accept the call as long as it is displayed on the screen. Making an external call Handsfree talking External calls are calls using the public tel- In handsfree mode, instead of holding the ephone network. -
Page 21: Making Internal Calls
Making calls Making internal calls Internal calls to other handsets registered to the same base station are free of charge. Calling a specific handset Initiate internal call. Enter the number of the hand- set. Initiate internal call. Select handset. Press the talk key. Calling all handsets ("group call") Initiate internal call. -
Page 22: Using The Directory And Lists
Using the directory and lists Using the directory and lists Storing a number in the directory ¢ New Entry ¤ The options are: Change multiple line input: Directory Number Call-by-call list Enter the number. Last number redial list Name SMS list Enter name. - Page 23 Using the directory and lists Dialling with the directory/call-by-call Delete List Delete all entries in the directory/call- list by-call list. ¢ s / C s (select entry) Copy List Press the talk key. The number Send complete list to a handset ¢...
-
Page 24: Last Number Redial List
Using the directory and lists Copying a displayed number to the Managing entries in the last number directory redial list Numbers displayed in a list, e.g. the calls Press the key briefly. list or the last number redial list, or during Select entry. -
Page 25: Using The Network Mailbox
Set Key 1 Network Mailb. ‰ Select and press = on). §OK§ Enter the number for the net- work mailbox. Press the display key. §Save§ Press and hold (idle status). The setting for fast access applies to all Gigaset E49H handsets. -
Page 26: Eco Dect
The wake-up call sounds for 60 seconds. You are helping to protect the environ- ì is shown in the display. If no key is ment with your Gigaset E49H. pressed, the wake-up call is repeated twice at five minute intervals and then Reduced energy consumption switched off. - Page 27 Using a handset as a room monitor If you accept an incoming call, the room Level monitor is suspended for the duration of Set noise level sensitivity (Low or High). ¤ the call, but the function remains acti- Press to save the settings. §Save§...
-
Page 28: Handset Settings
Handset settings Handset settings Starting a function With the handset in idle status, press the Your handset is preconfigured, but you display key briefly. can change the settings to suit your indi- The function menu is opened. vidual requirements. Changing the display language Quick access to functions You can view the display texts in different The display keys have a function preset by... -
Page 29: Setting The Screen Picture
Handset settings Setting the screen picture Setting the display lighting You can display a screen picture (picture or Depending on whether or not the handset digital clock) when the handset is in idle is in the charging cradle, you can activate status. -
Page 30: Changing The Handsfree/Handset Volume
Handset settings Changing the handsfree/handset You can set different ringers for the fol- lowing functions: volume Ext. Calls: for external calls Calls: for internal calls Internal You can set the loudspeaker volume for All: the same ringer for all functions handsfree talking to five different levels and the handset volume to three different Settings for individual functions... -
Page 31: Activating/Deactivating Advisory Tones
Handset settings Reactivating the ringer – Error tone (descending tone sequence): when you make an Press and hold the star key. incorrect entry Deactivating the ringer for the current call – Menu end tone: when scrolling to the end of a menu Press the display key. -
Page 32: Service (Customer Care)
You can get assistance easily when you have technical questions or questions about how to use your device by using our online support service on the Internet at: www.gigaset.com/customercare This site can be accessed at any time wherever you are. It will give you 24/7 support for all our prod- ucts. -
Page 33: Questions And Answers
The display is blank. taken into consideration. 1. The handset is not switched on. ¥ We, Gigaset Communications GmbH, Press and hold the end call key declare that this device meets the 2. The batteries are flat. essential requirements and other relevant ¥... -
Page 34: Environment
25) saves energy and is an active contribution Our environmental mission statement towards protecting the environment. We, Gigaset Communications GmbH, Disposal carry social responsibility and are actively committed to a better world. Our ideas, Batteries should not be disposed of in gen- technologies and actions serve people, eral household waste. -
Page 35: Appendix
Due to the constant progression in battery icals available on the market, it has not development, the list of recommended been possible to test all substances. batteries in the FAQ section of the Gigaset Customer Care pages is regularly updated: Specifications www.gigaset.com/customercare... -
Page 36: Writing And Editing Text
Appendix Writing and editing text Setting upper/lower case or digits Press the hash key # briefly to switch The following rules apply when writing from "Abc" mode to "123" and from "123" text: to "abc" and from "abc" to "Abc" (upper Control the cursor with u v t s. -
Page 37: Mounting The Charging Cradle To The Wall
Accessories Accessories Ordering Gigaset products You can order Gigaset products from your specialist retailer. Only use original accessories. This will avoid possible health risks and damage to property, and also ensure that all the relevant regulations are complied with. Mounting the charging cradle to the wall 21 mm approx. -
Page 38: Index
Index Index Changing destination number ... . display language ....handset volume ....handsfree volume Accepting a call . - Page 39 Index Idle status (display) ....Idle status, returning to ... ECO DECT ..... Incorrect input (correction) .
- Page 40 Index prompting Snooze mode ........Message key Sound, see Ringer .