Advertisement
Table of Contents
Advertisement
Table of Contents

Related Manuals for Honda EX800


Summary of Contents for Honda EX800
- Page 3 Thank you for purchasing a Honda generator. This manual covers operation and maintenance of the EX800 generator. All information in this publication available at the time of approval for printing. Honda Motor Co., Ltd. reserves the right to make changes at any time without notice and without incurring any obligation.
-
Page 4: Table Of Contents
CONTENS CONTENTS 1. GENERATOR SAFETY 2. COMPONENT IDiNTlFlCATlON 3. PRE-OPERATION CHECK ... 4. STARTING THE ENGINE ... 5. GENERATOR USE ... 6. STOPPING THE ENGINE ... 7. MAINTENANCE .8. TRANSPORTING/STORAGE 9. TROUBLESHOOTING lO.WIRING DIAGRAM 11. SPECIFICATIONS SERVICE ... 12. WARRANTY r ... -
Page 5: Generator Safety
To ensure safe operation Place the generator at least 1 m (3 ft) away from buildings ment when operating Operate the generator on a level surface. If the generator is tilted, Exhaust gas contains Never run the generator in an enclosed area. Be sure to provide adequate ventilation. -
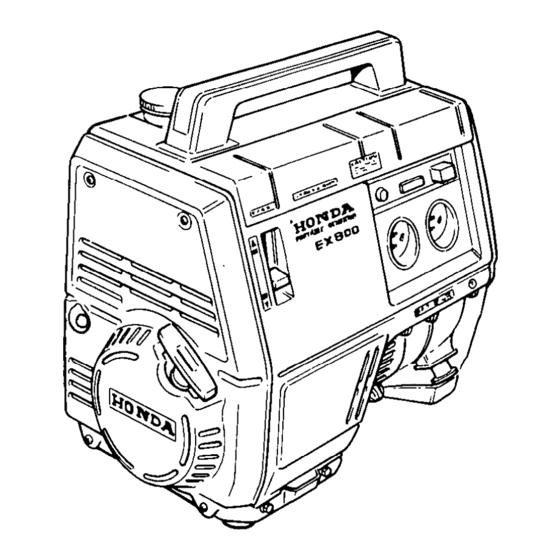
Page 6: Component Idintlflcatlon
2., COMPONENT IDENTIFICAT.ION CIRCUIT BREAKERS TOP COVER L ALERT SWITCH PILOT LAMP FREQUENCY METER C RECEPTACLES GOVERNOR ADJUSTMENT TERMINAL FILLER... - Page 7 CA ,RRYING HANDLE FUEL TANK FUEL GAUGE RIGHT COVER EXHAUST MUFFLER OUTLET COVER...
-
Page 8: Pre-Operation Check
3. IPRE-QPERATBON CAUTION: Be sure to check the generator on a level surface with the engine stopped. 1. Check the engine oil level. CAUTION: Engine oil is a major factor affecting service life. Non-detergent Usfe Honda 4-stroke oil, or an equivalent high detergent, premium quality motor oil certified requirements for Service Classification SE or SF. - Page 9 2. Check the fuel level. Check the fuel gauge, and refill the tank.if the fuel level is low. Use low lead or unleaded automotive gasoline with a pump octane rating of 86 or higher. Never use an oil/gasoline mixture or dirty gakoline. Avoid getting dirt, dust or water in the fuel tank.
-
Page 10: Starting The Engine
4. STARTING THE ENGINE 1. Disconnect any load from the AC receptacles or DC terminals. 2. Move the engine switch to “ON”. 3. Turn the choke.lever to CLOSE. - Page 11 4. Pull the starter rope lightly until resistance is felt, then pull briskly, CAUTION: Do not generator. Return it gently to prevent damage to the housing. NOTE: Make sure the pilot lamp comes on. If not, the filament may be burnt out.
-
Page 12: Generator Use
NOTE: The EX800 generates both AC and DC power. If you use both at the same time, be sure not to exceed the total rated power of 700 W for AC and DC. - Page 13 Oil alert system The oil alert system automatically becomes too low. If this occurs, the oil alert switch will pop out. Add the recommended oil (see page 6), and press the switch in to allow restarting. OIL ALERT stops the engine before the oil level SWITCH...
- Page 14 AC operation the engine and make sure the pilot lamp comes on. If not, the fila- 1. Start ment may be burnt out. 2. Plug in the appliance. CAUTION: Be sure that appliances than 30 minutes, and never exceed the maximum loading will switch...
- Page 15 DC operation The DC terminals may be used for charging 12 volt automotive-type only. Batteries produce explosive To prevent the possibility charging cord first to the battery, cord first at the generator. Disconnect the vehicle’s reconnect grounded possibility of a short circuit contact between a battery terminal CAUTION:...
-
Page 16: Stopping The Engine
6. STOPPING To stop the engine in an emergency, move the engine switch to OFF. In normal use: 1. Tur? ‘off the electrical appliance or disconnect the charging cord from the generator. 2. Move the engine switch to OFF. THE ENGINE... -
Page 17: Maintenance
The purpose of the maintenance schedule and adjustment generator in the best operating condition. Inspect or service as scheduled in the table on the next page. Shut off the engine before performing engine must be run, make sure the area is well ventilated. tains poisonous carbon monoxide CAUTION:... - Page 18 Maintenance Schedule REGULAR SERVICE Perform at every indi- cated month or oper- ating hour interval, whichever occurs Inspection Engine Change Combustion chamber Fuel line inspection (Replace if necessary) Spark arrester NOTE (1) : Service more frequently (2) : These items should owner has.
- Page 19 Changing oil Drain the oil while the engine is still warm to assure rapid and complete draining. 1. Remove the oil filler cap, and drain the oil. 2. Refill with the recommended oil (see page 6) and check the level. OIL CAPACITY: 0.45 Q (0.48 US qt) DRAIN BOLT...
- Page 20 Air cleaner service A dirty air cleaner will restrict air flow to the carburetor. To prevent car- buretor malfunction, service the air cleaner regularly (page 16). Service more frequently when operating the generator in extremely Never use gasoline or low flash point cleaner element.
- Page 21 Spark plug service Recommended spark plug: BPR4HS-10 (NGK) To ensure proper engine operation, the spark plug must be properly gapped and free of deposits. 1. Remove the spark plug cap. 2. Use the wrench supplied in the tool kit to remove the spark plug. 3.
- Page 22 5. Attach the plug washer. Thread the plug in by hand 10 prevent cross- threading. 6. Tighten a new spark plug l/2 turq with the wrench to compress the washer. If you.are reusing a plug, it should only take l/8-1/4 seats.
- Page 23 Spark arrester maintenance If the generator Allow it to cool before proceeding. CAUTION: The spark arrester must be serviced every 100 hours to maintain its efficiency. 1. Remove the four muffler cover bolts and remove the cover. 2. Remove the two 6 mm nuts and the 6 mm bolt. Remove the muffler from the exhaust pioe carefully to avoid damaging the spark arrester screen.
- Page 24 3. Use a brush to remove carbon deposits from the spark arrester screen. 4. Check the exhaust pipe gaskets; replace if damaged. Reinstall the muffler and the cover.
-
Page 25: Transporting/Storage
When transporting keep the generator level to prevent fuel spillage. Fuel vapor or spilled fuel may ignite. Before storing the unit for an extended period: 1. Be sure the storage area is free of excessive humidity and dust. 2. Drain the fuel - a. -
Page 26: Troubleshooting
‘9. TROUBLESHOOTING A. When the engine will not start: 1. Is the engine switch on? 2. Is the oil alert switch pushed in? 3. Is there enough fuel? 4. Are all loads disconnected from the AC receptacles and DC terminals? 5. - Page 27 DRAIN If any fuel is. spilled, and the generator is dry before starting the engine. Fuel vapor or spilled fuel may ignite. B. When the engine starts but stops immediately; 1. Check the oil alert switch. If the switch has popped out, check the engine oil level and fill,with the recommended oil.
- Page 29 BLACK BROWN GREEN. GRAY BLUE LIGHT BLUE LIGHT GREEN ORANGE PINK WHITE YELLOW...
-
Page 30: Specifications
11. SPECIFICATIONS Dimensions Length x Width x Height Dry Weight Engine Engine Type Displacement [Bore x Stroke] Compression Ratio Engine Speed Cooling System Ignition System Oil Capacity .Fuel Tank Capacity Spark Plug Generator Rated Voltage Rated Rated Amperage AC output Maximum Rated Output 1 Maximum... -
Page 31: Warranty Service
Owner Satisfaction Your satisfaction and goodwill Honda warranty details are explained in the Distributor’s Normally, any problems concerning dealer’s service department. been handled to your satisfaction, action: Discuss your problem with a member of dealership management. complaints can be quickly already been reviewed with the Service Manager, contact the dealership or the General Manager. - Page 32 When you write or call, please provide the following information: • Model and serial numbers • Name of the dealer who sold the Honda power equipment to you • Name and address of the dealer who services your equipment •...
- Page 33 MEMO...
- Page 34 MEMO...