Advertisement
Advertisement
Table of Contents

Related Manuals for Honda EM1600X


Summary of Contents for Honda EM1600X
- Page 1 Owner's Manual GENERATOR EM1600X • EM1800X • EM2200X ©1983 Honda Motor Co., Ltd. — All Rights Reserved...
- Page 3 Manual before operating personal injury or equipment damage. and maintenance of the EM1600X, in this publication may be reproduced without a permanent part of the generator and of severe personal injury or loss of of personal injury or equipment damage if Honda dealer.
-
Page 4: Table Of Contents
CONTENTS CONTENTS GENERATOR SAFETY COMPONENT IDENTIFICATION PRE-OPERATION STARTING THE ENGINE ... High altitude operatioty GENERATOR USE ... STOPPING THE ENGINE MAINTENANCE TRANSPORTING/STORAGE TROUBLESHOOTING 10. WIRING DIAGRAM ll.SPEClFlCATlONS 12. WARRANTY SERVICE ... CHECK L ... -
Page 5: Generator Safety
To ensure safe operation - Place the generator at least 1 m (3 ft) away from buildings or other equip- ment during operation. Operate the generator on a level surface. If the generator is tilted, fuel spillage may result. Exhaust gas contains poisonous carbon monoxide. Never run the generator in an enclosed area. -
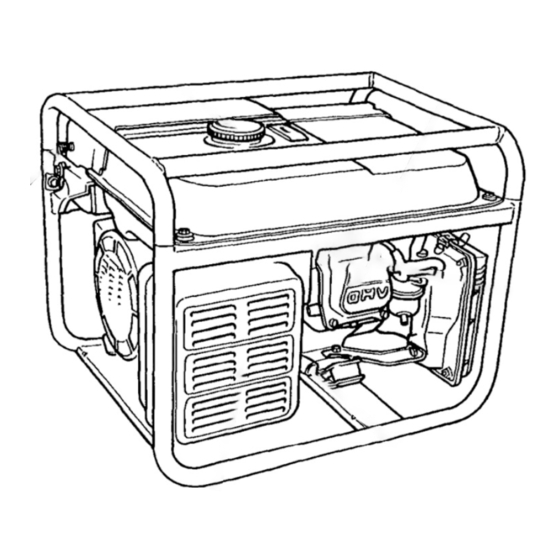
Page 6: Component Identification
2. COMPONENT IDENTIFICATION FUEL GAUGE (Except EM1600XI VOLTAGE METER (Except EM1600X) ENGINE SWITCH AIR CLEANER PILOT LAMP EM1600X) (Except GRIP BREAKER AGE ADJUSTMENT KNOB (Except EM1600XI OIL ALERT LAMP DC TERMINALS OIL ~LLER DC CIA/CUIT BREAKER... - Page 7 FUEL FUEL TANK TANK -SPARK PLUG EXHAUST OUTLET MUFFLER...
-
Page 8: Pre-Operation Check
3. PRE-OPERATION CAUTION: Be sure to check the generator on a level surface with the engine stopped. 1. Check the engine oil level. CAUTION: Engine oil is a major,factor service life. Non-detergent or vegetable oils are not recommended. Use Honda 4-stroke oil, or an equivalent motor oil certified requirements... - Page 9 2. Check the fuel level Check the fuel gauge (EM1800X if the fuel level is low. Use low lead or unleaded automotive gasoline with a pump octane rating of 86 or higher. Never use an oil/gasoline or water in the fuel tank. Clean the fuel filler screen regularly.
-
Page 10: Starting The Engine
4. STARTING (1) Disconnect any load from the terminals and make sure that the circuit breaker is in the OFF position. (2) Turn on the fuel valve. (3) Turn on the engine switch. THE ENGINE AC CIRCUIT BREAKER DC TERMINALS... - Page 11 (4) Move the choke lever to the CLOSED position. (5) Pull the starter rope lightly resistance is felt, then pull briskly. CAUTION: Do not allow the starter grip to snap back. Return it slowly hand. NOTE: Make sure the pilot lamp comes on.
-
Page 12: High Altitude Operatioty
Oil Alert System Before the oil level in the crankcase can fall below a safe limit, the Oil Alert System will automatically when the recoil starter grip is pulled. To restart, add enough recommended engine oil to bring the oil level to the upper level mark on the dipstick (See page 6), and restart the engine. -
Page 13: Generator Use
EM2200X) for AC and DC combined. Most appliance motors require more than their rated wattage for start-up. 5. GENERATOR maximum poyver (1.6 KVA for the EM1600X; 1800X and 2200X generate both AC and DC power. 1.5 KVA for the EMl800X GROUND... - Page 14 AC applications 1. Start the engine and make sure the pilot lamp comes on. If not, check the filament. 2. Switch on the AC Circuit Breaker. NOTE: Although voltage adjustment ments may be made by turning generator at the specified voltage (12OV). 3.
- Page 15 DC application The DC terminals may be used for charging 12 volt automotive-type only. Batteries cigarettes away. To prevent battery, connect charging cables first to the battery, then to the generator, and disconnect cables at the generator first. CAUTION: Do not attempt to start an automobile connected to the battery.
-
Page 16: Stopping The Engine
6. STOPPING THE ENGINE Turn off the AC circuit breaker and disconnect any charging leads at the DC terminals. Turn the engine switch to the OFF position. (3) Turn the fuel valve to the OFF position. -
Page 17: Maintenance
The purpose of the maintenance generator in the best operating condition. Inspect or service as scheduled in the table on the next page. Shut off the engine before performing engine must be run, make sure the area is well ventilated, tains poisonous carbon monoxide gas. - Page 18 Maintenance Schedule Air cleaner (Replace if necessary) NOTE (1) : Service more frequently (2) : These items should owner has the proper Shop Manual. when used in dusty areas. be serviced by an authorized tools and is mechanically Honda dealer, unless the proficient, See the Honda...
- Page 19 Changing oil Drain the oil while the engine is still warm to assure rapid and complete draining. 1. Remove the drain plug and filler cap, and drain the oil. Retighten the plug securely. 2. Refill with the recommended oil (see page 6) and check the level. 01 L CAPACITY: 0.6 II (0.63 USqt) OIL DRAIN...
- Page 20 Air cleaner service A dirty air cleaner will restrict air flow to the carburetor, buretor malfunction, service the air cleaner regularly (page 16)). Service more frequently when operating the generator in extremely dusty areas. Never use gasoline or low flash point solvents for cleaning the air cleaner element.
- Page 21 Fuel filter service The filter prevents dirt or water which may be in the fuel tank from entering the carburetor. If the engine has not been run for a long time, the filter should be cleaned. 1. Turn the fuel valve OFF. Remove the filter cup. 2.
- Page 22 Spark plug service Recommended spark plug: To ensure proper engine operation, and free of deposits. 1. Remove the spark plug cap. 2. Clean any dirt from around the spark plug base. 3. Use the wrench supplied in the tool kit to remove the spark plug. PLUG WRENCH SPARK...
- Page 23 6. Attach the plug washer and thread the plug in by hand to prevent cross threading. 7. After a new spark plug has been seated by hand, it should be tightened turn with a wrench to compress its washer. If a used plug is being reinstalled, after being seated, CAUTION: The spark plug must be securely tightened.
- Page 24 Spark arrester maintenance If the generator has been running, Allow it to cool before proceeding. CAUTION: The spark arrester must be serviced every 100 hours to maintain its efficiency. 1. Loosen the five 6 mm bolts to remove the muffler protedtor. 2.
- Page 25 3. Use a brush to remove carbon deposits from the spark arrester screen. NOTE: Inspect the spark arrester screen for holes or tears. Replace if necessary. gasket 4. Check the exhaust pipe and replace if damaged. Reinstall muffler and the protector.
-
Page 26: Transporting/Storage
8. TRANSPORTING/STORAGE When transporting keep the generator level to prevent fuel spillage. Fuel vapor or spilled fuel may ignite. Before storing the unit for an extended period: 1. Be sure the storage area is free of excessive humidity 2. Drain the fuel - a. -
Page 27: Troubleshooting
When the engine will not start: Is there fuel in the tank? in the engine? R!!!re is no spil- led fuel around the spark plug. Spilled fuel may ignite. the carburetor? 9. TROUBLESHOOTING (The oil alert lamp goes on when pulling the starter grip) Replace the Still Nospark... - Page 28 No electricity at the AC receptacles: Check the electrical appliance or equip- ment for any defects No electricity at the DC terminals: breaker on? NO DEFECTS DEFECTS Turn the AC circuit breaker on. Take the generator to an authorized Honda dealer. - Replace the elect- rical appliance equipment.
-
Page 31: Ll.speclflcatlons
3600 rpm Forced air cooled Transistor Magnet Ignition 0.611 (0.63 USqtI 11 .OQ (2.9 USgal) BPGES, BPRGES (NGK), W20EP-U, W20EPR-U (ND) 120v 60Hz EM1600X: 11.7 A EM1800X: 12.5 A EM2200X: 16.7 A EM1600X: 1.4 kVA (14OOW) EM1800X: 1.5 kVA (15OOW) EM2200X: 2.0 kVA (2OOOW) -
Page 32: Warranty Service
12. WARRANTY Owner Satisfaction Your satisfaction and goodwill Honda warranty details are explained Normally, any problems dealer’s service department. been handled to your satisfaction, action: Discuss your problem with a member of dealership complaints can be quickly already been reviewed the dealership or the General Manager. - Page 33 MEMO...
- Page 36 POM53284 KINKOS 75.2002.08 P/N 31ZB1010 Printed on PRINTED IN U.S.A. 00X31-ZB1-0100 Recycled Paper...