Table of Contents
Advertisement
Advertisement
Table of Contents

Related Manuals for First Alert A-550


Summary of Contents for First Alert A-550
- Page 1 Indoor/Outdoor Analog Wireless Camera with Receiver Model A-550 USER'S MANUAL...
- Page 2 ©2010 Lehigh Consumer Products, LLC All rights reserved. Distributed by Lehigh Consumer Products, LLC, Macungie, PA 18062. Due to continuing product development, the product inside the packaging may look slightly different than the one on the package. Lehigh Consumer Products, LLC is a subsidiary of Jarden Corporation (NYSE: JAH). To obtain warranty service, contact the Consumer Affairs Division at 1-800-323-9005, Monday through Friday, 7:30 a.m.
-
Page 3: Table Of Contents
Table of Contents Safety ..........................1 Safety Precautions ........................... 1 FCC Compliance ..........................1 Getting to Know Your A-550 System ................2 Check Package Contents........................2 Features............................3 Setting Up Your A-550 System ..................4 Safety and Installation Tips ......................4 Device Operating Range........................ -
Page 4: Safety
Safety AFETY RECAUTIONS Do not drop, puncture, or disassemble the camera or receiver. Never tug on the power adapter. Use the plug to remove it from the wall. Do not expose the camera or receiver to high temperatures. Doing so may ... -
Page 5: Getting To Know Your A-550 System
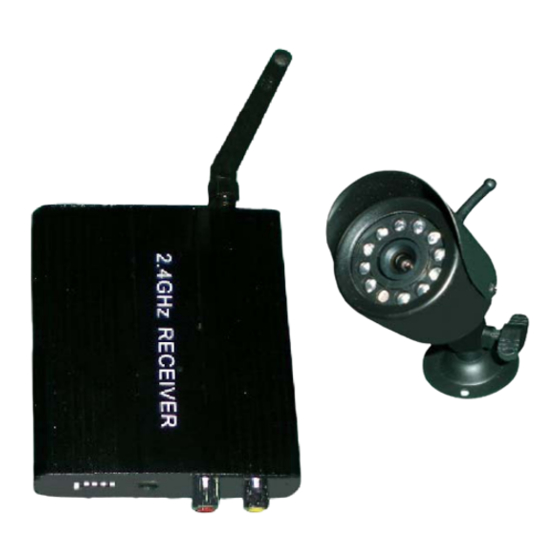
Congratulations on purchasing your First Alert Security Camera product. First Alert has been helping families and businesses stay safe for over 50 years. By having a First Alert Security Camera, you’re taking the first step in protecting your home or business from damage or theft. -
Page 6: Features
Getting to Know Your A-550 System Model A-550 User's Manual EATURES 380 TV lines for clear image resolution Infrared night vision Wireless 2.4 GHz transmission between camera and receiver up to 330 ft in open field conditions Record video direct to your VCR or DVR ... -
Page 7: Setting Up Your A-550 System
Setting Up Your A-550 System AFETY AND NSTALLATION Do not attempt to open the camera. There are no user serviceable parts inside. Refer servicing to qualified service personnel. When installing the camera, follow manufacturer’s advice when using power tools, ... -
Page 8: Installing The Camera
Setting Up Your A-550 System Model A-550 User's Manual NSTALLING THE AMERA Select the position for the camera and secure the camera bracket. Screws and anchors are supplied. Use an appropriate screw type for the mounting surface Loosen the T-bolt. -
Page 9: Setting The Camera's Channel
AMERA HANNEL The A-550 wireless camera has four selectable channels to avoid any interference from any other wireless devices. Follow the steps below to set or change the frequency channel of the camera. If you are adding another camera to an existing system, make sure its channel is different from the channel of the existing camera. -
Page 10: Connecting The Receiver To A Dvr/Vcr And Tv
Setting Up Your A-550 System Model A-550 User's Manual DVR/VCR ONNECTING THE ECEIVER TO A Note: The receiver also can be connected directly into the television inputs. Connect one end of the AV cable (supplied) to the Receiver. Connect other end of AV cable to INPUT on DVR/VCR. -
Page 11: Viewing The Cameras On Your Dvr/Vcr/Tv
Setting Up Your A-550 System Model A-550 User's Manual ETTING THE ECEIVER HANNEL The wireless receiver is capable of receiving up to four separate channels. The front of the wireless receiver has four LEDs corresponding to the four channels. When lit, the LED indicates which channel is currently being displayed. -
Page 12: Troubleshooting
Setting Up Your A-550 System Model A-550 User's Manual ROUBLESHOOTING Problem Solution Make sure the cameras and receiver are plugged in. No picture. Make sure the TV/ VCR/ DVR is tuned to the correct input channel. The camera's infrared LEDs shine invisible light that reflects off surfaces such as glass causing white light. -
Page 13: Technical Information
Technical Information ECEIVER Transmission Channels Transmission Range 330 ft Power Supply DC 12V AMERA Image Device ¼” CMOS Video System NTSC Resolution 380 TV lines Min. Illumination 0 LUX (IR ON) Lens 6 mm LEDs Effective Pixels NTSC: 512 (H) x 492 (V) Signal/Noise Ratio >... -
Page 14: Warranty
IMITED ARRANTY BRK Brands, Inc., (“BRK”) the maker of First Alert® brand products warrants that for a period of one year from the date of purchase (the “Warranty Period”), this product will be free from defects in material and workmanship. BRK, at its sole option, will repair or replace this product or any component of the product found to be defective during the Warranty Period. -
Page 15: Obtaining Service
Technical Information Model A-550 User's Manual other software that may be or may become resident on the users system as a result of installing the software provided. This warranty is in lieu of other warranties, expressed or implied, and BRK neither assumes nor authorizes any person to assume for it any other obligation or liability in connection with the sale or service of the product.