Table of Contents
Advertisement
Quick Links
USER'S GUIDE P-touch E300
Read this User's Guide before you start using your P-touch.
Keep this User's Guide in a handy place for future reference.
Visit us at http://solutions.brother.com/ where you can
get product support, and answers to frequently asked
questions (FAQs).
INTRODUCTION
GETTING STARTED
EDITING A LABEL
LABEL PRINTING
USING THE FILE MEMORY
RESETTING & MAINTAINING
YOUR P-TOUCH
TROUBLESHOOTING
APPENDIX
INDEX
Advertisement
Table of Contents

Related Manuals for Brother P-touch E300


Summary of Contents for Brother P-touch E300
- Page 1 Read this User’s Guide before you start using your P-touch. INTRODUCTION Keep this User’s Guide in a handy place for future reference. GETTING STARTED Visit us at http://solutions.brother.com/ where you can get product support, and answers to frequently asked EDITING A LABEL questions (FAQs).
- Page 2 The contents of this manual and the specifications of this product are subject to change without notice. If a new version of the E300 firmware is released, this manual may not reflect the updated features. Therefore, you may find the new firmware and the contents in this manual are different.
-
Page 3: Table Of Contents
Contents Safety Precautions ........................3 General Precautions......................10 Symbols Used in this Guide ....................11 How to use the P-touch .......................12 GETTING STARTED ..................13 Unpacking Your P-touch .....................13 General Description......................14 LCD Display & Keyboard.....................15 LCD Display........................15 Key Names and Functions.....................16 Power Supply ........................18 AC Adapter ........................18 Using the Rechargeable Li-ion Battery ................18 Battery ..........................21... - Page 4 INTRODUCTION Entering Symbols........................ 34 Entering Symbols Using the Symbol Function .............. 34 Using Symbol History....................35 Entering Accented Characters .................... 36 Setting Character Attributes....................36 Setting Character Attributes by Label ................36 Setting Auto Fit Style ....................37 Setting Frames ........................37 Setting Cut Options......................
-
Page 5: Safety Precautions
Safety Precautions To prevent injury and damage, important notes are explained using various symbols. The symbols and their meanings are as follows: Indicates an imminently hazardous situation which, if the product is DANGER handled without following the warnings and instructions, will result in death or serious injuries. - Page 6 INTRODUCTION DANGER Rechargeable Li-ion Battery Carefully observe the following precautions for the rechargeable Li-ion battery (hereafter referred to as “rechargeable battery”), If these precautions are not followed, overheating, leaking, or cracks in the battery may result in an electrical short, explosion, smoke, fire, electric shock, injury to yourself or others, or damage to the product or other property.
- Page 7 DANGER Rechargeable Li-ion Battery Liquid (electrolyte) leaking from the DO NOT disassemble, modify, or labelling system or rechargeable battery attempt to repair the rechargeable may indicate that the rechargeable battery. battery is damaged. If the rechargeable DO NOT dispose of the rechargeable battery leaks, immediately discontinue battery in fire or intentionally overheat.
- Page 8 DO NOT use the P-touch with a foreign object in it. If water, a metallic substance, or any other foreign object enters the P-touch, disconnect the AC adapter and remove the batteries, and contact Brother customer service. Alkaline batteries/Ni-MH rechargeable batteries Follow these guidelines to avoid liquid leakage, heat, rupture of the battery and cause personal injury.
- Page 9 DO NOT place heavy objects on, or damage to the labelling system or damage, or modify the adapter cord or other property. Brother does not plug. Do not forcibly bend or pull the assume, any responsibility for any adapter cord.
- Page 10 INTRODUCTION CAUTION Alkaline batteries/Ni-MH rechargeable batteries Follow these guidelines to avoid liquid leakage, overheating or rupture of the battery. DO NOT use a battery other than the Before using Ni-MH rechargeable one specified for use with your labelling batteries, carefully read the instructions system.
- Page 11 CAUTION P-touch Follow these guidelines to avoid minor personal injury and damage to the P-touch. Store the P-touch on a flat, stable DO NOT use the P-touch in places with surface such as a desk or in a drawer. moisture or high humidity, such as DO NOT leave the P-touch or any tape bathrooms.
-
Page 12: General Precautions
Li-ion rechargeable battery, charge it at least every six months. • If you notice anything unusual about the rechargeable Li-ion battery the first time it is used, for example overheating or rust, DO NOT continue to use the battery. Contact Brother customer service. -
Page 13: Symbols Used In This Guide
• The length of the printed label may differ from the displayed label length. • You can also use Heat Shrink Tube in this model. Check the Brother website (http://www.brother.com/) for further information. You may not be able to use some print frame, or font settings when using Heat Shrink Tube. -
Page 14: How To Use The P-Touch
INTRODUCTION How to use the P-touch Create a label with the P-touch GETTING STARTED • Prepare the P-touch. P. 13 CREATING A LABEL • Entering and Editing text. P. 33 In addition to entering text, the P-touch • Entering Symbols. P. -
Page 15: Getting Started
GETTING STARTED Unpacking Your P-touch Check that the package contains the following before using your P-touch. E300 P-touch AC adapter The plug may differ by countries. Li-ion Battery Strap Tape Cassette User’s Guide Unpacking Your P-touch... -
Page 16: General Description
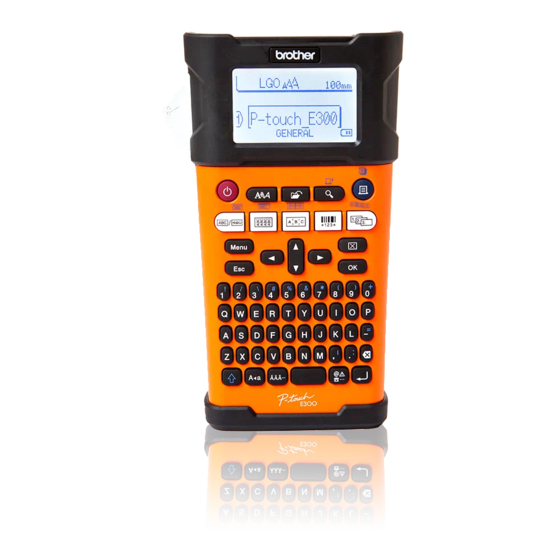
GETTING STARTED General Description Tape cassette compartment Tape exit slot Cover latch Tape cutter LCD display Tape cutter lever Keyboard Print head Release lever When shipped from the factory, the LCD display is covered with a protective sheet to prevent damage. -
Page 17: Lcd Display & Keyboard
LCD Display & Keyboard LCD Display 6. Cursor Characters are entered to the left of the 13 14 cursor. Indicates the current data input position. 7. Labelling Application Type Indicates current labelling application type. 8. Return mark Indicates the end of a line of text. 9. -
Page 18: Key Names And Functions
GETTING STARTED Key Names and Functions The default language is “English”. 1. Power 6. Labelling Application Type Turns the P-touch on and off. • Selects the labelling application type. • The feature that is displayed above the 2. Style button is enabled when used in Enables character and label attributes for combination with the Shift key. - Page 19 13. OK 17. Caps Selects the displayed option. Turns Caps mode on and off. 14. Letter 18. Accent • Use these keys to type letters or Use this to select and enter an accented numbers. character. • Uppercase letters and symbols can be 19.
-
Page 20: Power Supply
GETTING STARTED Power Supply AC Adapter Use the AD-E001 (AC adapter) for this labelling system. The AD-18 or AD-24ES cannot be used. Connect the AC adapter directly to the P-touch. Insert the plug on the AC adapter cord into the connector marked DC IN 12 V on the P-touch. - Page 21 Insert the rechargeable Li-ion battery into the battery compartment. Confirm that the hooks on the edge of the rear cover are inserted correctly, and then reattach the cover. Removing the Rechargeable Li-ion Battery Remove the battery cover and the rechargeable Li-ion battery, and then reattach the battery cover.
- Page 22 GETTING STARTED Rechargeable Li-ion Battery Characteristics Understanding the properties of the rechargeable Li-ion battery will allow you to optimise its usage. • Using or storing the rechargeable Li-ion battery in a location exposed to high or low temperatures may accelerate its deterioration. In particular, using a rechargeable Li-ion battery with a high charge (90% or more) in a location exposed to high temperatures will considerably accelerate battery deterioration.
-
Page 23: Battery
Users of Ni-MH rechargeable batteries Always replace all six batteries at the same time with fully charged ones. Visit us at http://solutions.brother.com/ for the latest information about recommended batteries. Attach the rear cover by inserting the three hooks at the bottom into the slots on the labelling system, then pushing down firmly until it snaps into place. -
Page 24: Inserting A Tape Cassette
Inserting a Tape Cassette Tape cassettes of 3.5 mm, 6 mm, 9 mm, 12 mm or 18 mm width can be used in your P-touch. Use Brother tape cassettes with the mark. If the new tape cassette has a cardboard stopper, be sure to remove the stopper before inserting the cassette. -
Page 25: Turning Power On/Off
• Do not pull the label coming out of the tape exit slot. Doing so will cause the ink ribbon to be discharged with the tape. • Store tape cassettes in a cool dark location, away from direct sunlight and high temperature, high humidity, or dusty locations. -
Page 26: Lcd Display
GETTING STARTED LCD Display LCD Contrast You can change the contrast setting of the LCD display to one of five levels (+2, +1, 0, -1, -2) to make the screen easier to read. The default setting is “0”. Press the Menu key to display the setup menu, select “Adjustment” using the key, and then press the OK or Enter key. -
Page 27: Setting Language And Unit
Setting Language and Unit Language Press the Menu key to display the Setup menu, select “Language” using the key, and then press the OK or Enter key. Select a language for menu commands and messages shown on the LCD display by using the key. -
Page 28: Editing A Label
EDITING A LABEL Selecting a Labelling Application Type You can select six different types of labelling applications by pressing a label application key. The label application type you selected is shown in the LCD display. Keys Type Usage GENERAL Prints general purpose labels. (See page 26.) Shift+1 FACEPLATE Prints faceplate labels. -
Page 29: Cable Wrap
CABLE WRAP Labels printed with this mode can be wrapped around a cable or wire. This mode is also used to print on Heat Shrink Tube. ° In Flexible ID, the text is rotated 90 counterclockwise and printed, you can also specify the Size, Text and Repeat (ON/OFF). Flexible ID •... -
Page 30: Patch Panel
EDITING A LABEL PATCH PANEL Labels printed with this mode can be used to identify various types of panels. In this mode, you can specify Block Length, # of Blocks, Separator, Orientation, Reverse (ON/OFF) and Multipliers (ON/OFF). • Block Length: 15mm, 5 - 300mm •... -
Page 31: Setting Bar Code Parameters And Entering Bar Code Data
Setting Bar Code Parameters and Entering Bar Code Data Press the Bar Code key. The Bar Code Setup screen is displayed. Up to five bar codes can be entered on a label. Select an attribute using the key, and then set a value for that attribute using key. -
Page 32: Entering A Serialize Label
EDITING A LABEL Entering a Serialize Label Numerically serialized labels can be printed. You can set the increment and count for the series. In serialize mode, you can create a series of labels by incrementing one numeric character in the pattern. In advanced serialize mode, you can choose simultaneous or advanced. -
Page 33: Advanced Serialize
Advanced serialize Simultaneous Enter text. Example: Create a label “B020”, “C030”, “D040” from “A010” by using this function. Press the Shift key and then press the Serialize key. Select “Simultaneous” by using the key and press the OK key. Select the first character(s) that you want to increase by using the key and press the OK or Enter key twice. - Page 34 EDITING A LABEL Advanced Enter text. Example: Create a label “1A-A02”, “1A-A03”, “1A-A04”, “1A-B01”, “1A-B02”, “1A-B03”, “1A-B04” from “1A-A01” by using this function. Press the Shift key and then press the Serialize key. Select “Advanced” by using the key and press the OK key. Select the first character(s) that you want to increase by using key and press the OK or Enter key twice.
-
Page 35: Entering And Editing Text
• Press the Escape key to return to the previous step. • Serialize mode can be also applied to bar code. A bar code is counted as a character. • Any symbols or other non-alphanumeric characters in the auto-numbering sequence are ignored. •... -
Page 36: Inserting Text
EDITING A LABEL Inserting Text • To insert additional text into an existing line of text, move the cursor to the character to the right of the position where you want to start inserting text and then enter the additional text. The new text is inserted to the left of the cursor. -
Page 37: Using Symbol History
Select a symbol category (Punctuation, Mathematics, etc.) using the key or by pressing the Symbol key repeatedly, and then press the OK or Enter key. Select a symbol using key and then press the OK or Enter key. The selected symbol is inserted into the line of text. When selecting symbols: •... -
Page 38: Entering Accented Characters
EDITING A LABEL Entering Accented Characters The P-touch can display and print a set of accented characters such as other language specific characters. Selectable “Accented Characters” are listed in the Appendix. (See page 51.) Enter the character you wish to change to an accented character. Caps mode can be used with the Accent function. -
Page 39: Setting Auto Fit Style
Setting Auto Fit Style When “Size” is set to “Auto” and “Length” is set to a specific length, you can select the way of reducing the text size to fit within the label length. When “Text Size” is selected, the total text size is modified to fit within the label. When “Text Width”... -
Page 40: Setting Cut Options
EDITING A LABEL Setting Cut Options The tape cutting options allow you to specify how the tape is fed and cut when printing labels. In particular, the “Chain” option greatly reduce the amount of wasted tape by using smaller margins and eliminating blank sections cut between labels. Depends on labelling application type, the setting value is fixed or limited. -
Page 41: Selecting How Tape Is Fed And Cut
• When using Heat Shrink Tube, set labelling application type to “Cable Wrap” and select “Heat-shrink Tube”. In this case, cut option if fixed to “No Cut”. After printing, remove the Heat shrink Tube cassette from the labelling system and use scissors to cut the tape. •... -
Page 42: Label Printing
LABEL PRINTING Label Preview You can preview the current page and check the layout before printing. Press the Preview key. An image of the label is displayed on the screen. The length of the label is shown in the lower-right corner of the screen. Press the key to scroll the preview to the left or right. -
Page 43: Printing Multiple Copies
Printing Multiple Copies Using this function you can print up to 50 copies of the same label. Make sure that the appropriate tape cassette is inserted and ready for printing. Press the Shift key and then press the Print key to display the Copies screen. Then select the number of copies to be printed using the key, or type the number using the number keys. -
Page 44: Using The File Memory
USING THE FILE MEMORY You can store up to 50 of your most frequently used labels in the file memory. Each label is stored as a file, allowing you to quickly and easily recall your label when needed again. When the file memory is full, each time you save a file you will need to overwrite one of your stored files. -
Page 45: Printing A Stored Label File
Printing a Stored Label File Press the File key to display the File screen. Select “Print” using the key. Press the OK or Enter key. The file number of a stored label is displayed. The label text is also displayed to identify the label. Select a file number using the key, and then press the Print, OK or Enter key. -
Page 46: Resetting & Maintaining Your P-Touch
RESETTING & MAINTAINING YOUR P-TOUCH Resetting the P-touch You can reset the internal memory of your P-touch when you want to clear all saved label files, or in the event the P-touch is not operating correctly. Resetting the data to factory settings Turn off the labelling system. -
Page 47: Maintenance
Maintenance Your P-touch should be cleaned on a regular basis to maintain its performance and life span. Always remove the batteries and disconnect the AC adapter before cleaning the P-touch. Cleaning the Unit Wipe any dust and marks from the main unit using a soft, dry cloth. Use a slightly dampened cloth on difficult to remove marks. -
Page 48: Troubleshooting
All files stored in the internal memory are deleted if the batteries previously are now are weak or the AC adapter was disconnected. empty. A tape jam which Please contact Brother customer service. cannot be cleared keeps occuring. What to do when... -
Page 49: Error Messages
Error Messages When an error message appears on the display, follow the directions provided below. Message Cause/Remedy Wrong Type An incompatible AC adapter is connected. Of Adapter Use an appropriate AC adapter. Connected! Low Battery! The installed batteries are getting weak. Replace Battery! The installed batteries are about to run out. - Page 50 System Error XX Please contact Brother customer service. Select Other The tape length set using the tape length setting is shorter than the total Cut Option! length of the left and right margins applied for the “Large Margin” cutting option.
-
Page 51: Appendix
C / 20-80% humidity (without condensation) ° temperature / humidity Maximum wet bulb temperature: 27 *1 Actual character size may be smaller than maximum print height. *2 Not included. *3 Visit us at http://solutions.brother.com/ for the latest information about the recommended batteries. Specifications... -
Page 52: Symbols
APPENDIX Symbols Category Symbols Punctuation Datacom Audio/Visual Electrical Arrows Safety Prohibited Brackets Mathematics Greek Super/ subscript Bullets Currency Misc. The symbols shown in the table may look slightly different on the labelling system LCD and when printed. Symbols... -
Page 53: Accented Characters
Accented Characters Character Accented Characters Character Accented Characters Character Attribute Attribute Value Result Value Result (Letter (Atlanta) Gothic) (Helsinki) (Adams) Font (Brussels) (Sofia) (Los Angeles) Accented Characters... - Page 54 APPENDIX Attribute Value Result Value Result When Auto is selected, the text is automatically Auto adjusted to print in the 42 pt largest size available for each tape width. 36 pt 12 pt Size 24 pt 9 pt 18 pt 6 pt x 2/3 Width...
-
Page 55: Frames
Frames Attribute Value Result Value Result Frame The length of the label can be set within the range 25 - 300 mm. When Auto Length is selected, the length of the label is automatically adjusted based on the amount of text entered. Bar Codes Bar Code Settings Table Attribute... -
Page 56: Special Character List
APPENDIX Special Character List CODE39 CODABAR Special Character Special Character (SPACE) CODE128, GS1-128 (UCC / EAN-128) Special Character Special Character Special Character (SPACE) FNC3 FNC2 FNC4 FNC1 Bar Codes... -
Page 57: Index
INDEX AC adapter Tape cassettes ............ 18 ..........22 Accented Characters Tape length ........51 ........... 15 Auto power-off time Text ........23 Entering and editing ......33 Lines ............33 Battery ............21 Width .............. 36 Caps mode ............ 15 Contrast ............ - Page 60 Printed in China LAC025001...